
How to Use AutoTune to Find the Best Backup Settings for Your Server
Are your backups failing or timing out, and you’re not sure which archive engine or database setting your server needs? AutoTune, a tool in Duplicator, our backup and migration plugin, runs real test backups on your server and keeps the fastest configuration that completes.
In this guide, we’ll show you how to use AutoTune to find the best backup settings for your server.
Before you get started, make sure no backup is building or transferring. AutoTune doesn’t start while another backup is running. Your WordPress user also needs permission to change Duplicator settings and to create backups.
What AutoTune Does
AutoTune runs a series of real, full-site test backups. The first test uses the fastest configuration your server supports. When a test backup fails, AutoTune looks at the reason, changes only the setting related to that failure and runs the next test. When a test backup completes, the session ends and that configuration stays active for your future backups.
AutoTune manages six backup settings. The table below shows the name each setting has in AutoTune, where to find it in Duplicator Pro > Settings > Backups, and the value AutoTune starts with:
| AutoTune setting | On the Settings page | Starting value |
|---|---|---|
| Archive Engine | Archive section | The fastest engine your server supports: Shell Zip, then ZipArchive, then DupArchive |
| Compression | Archive Compression in the Archive section | On, when the engine supports it |
| ZipArchive Chunk Size | Buffer Size under ZipArchive Options | 128 MB |
| Database Dump | Database section | Mysqldump, then PHP Code |
| Query Limit | Query Size under PHP Code Options | 1M |
| Server Load Reduction | Server Throttle in the Processing section | Off |
Opening AutoTune
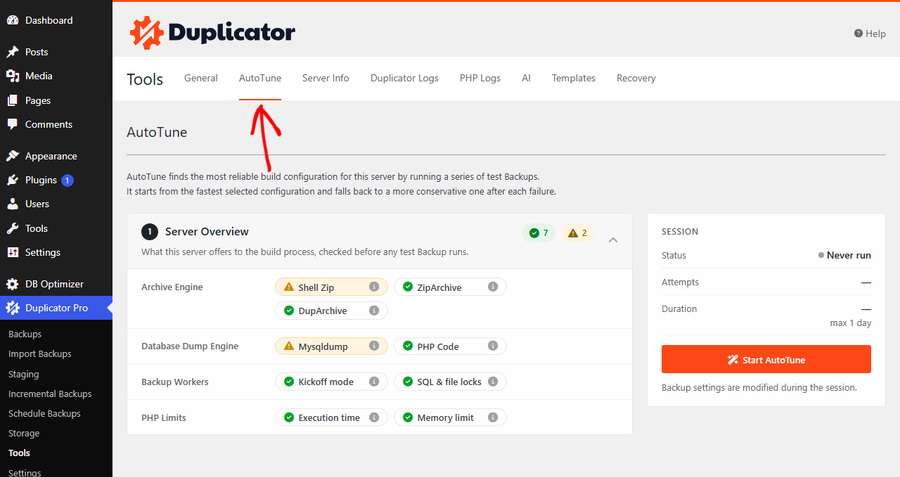
To open AutoTune, navigate to Duplicator Pro > Tools and click the AutoTune tab.
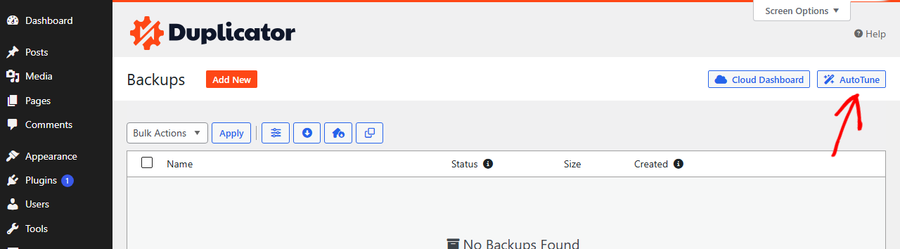
AutoTune is also one click away on the Backups page. Click the AutoTune button at the top right of the page.
Until AutoTune runs for the first time, our plugin also displays an Optimize Backup Settings with AutoTune notice on its pages. Click the AutoTune link in the notice to open the page. Dismissing the notice hides it permanently.
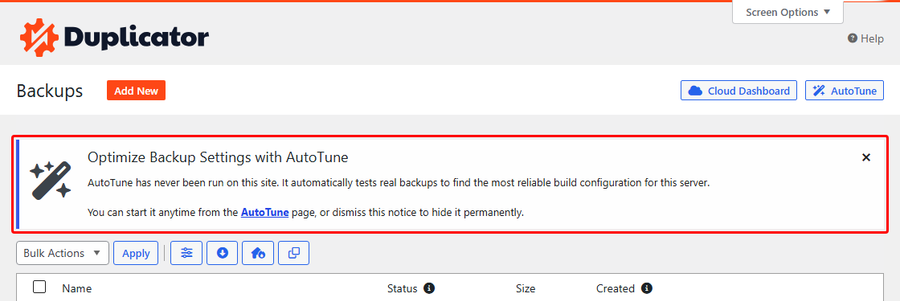
When a backup fails for a reason that a settings change is able to fix, its error notice also includes a Recommended: line with a link to run AutoTune.
Reviewing the Server Overview
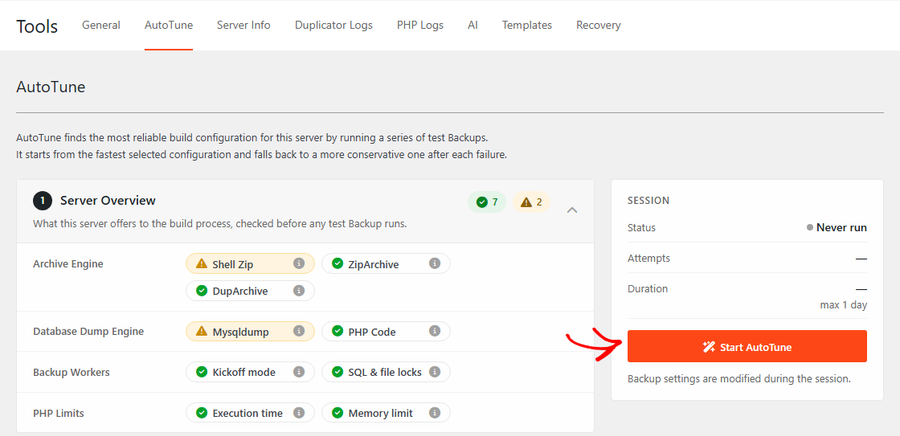
The Server Overview section shows what your server offers to the backup process. Our plugin runs these checks again each time the AutoTune page opens, so the overview always reflects your current server.
Each item appears as a chip with a status icon:
- Green check: the item is ready.
- Yellow warning: a suggestion. AutoTune still runs, but enabling the item widens the configurations it tests.
The counters next to the section title add up the chips by status. The chips are grouped in four rows:
- Archive Engine: Shell Zip, ZipArchive and DupArchive. An available engine also shows a warning when compression or encryption isn’t supported with it.
- Database Dump Engine: Mysqldump and PHP Code.
- Backup Workers: the Kickoff mode chip shows whether your server starts the backup workers on its own (server-side) or needs your browser to start them (client-side). It also covers the AJAX endpoint and password-protected access settings. The locks chip shows whether the SQL and file process locks work on your server.
- PHP Limits: Execution time and Memory limit.
DupArchive and PHP Code are AutoTune’s fallbacks. If either one is missing, or no process lock works on your server, its chip turns red and AutoTune doesn’t start.
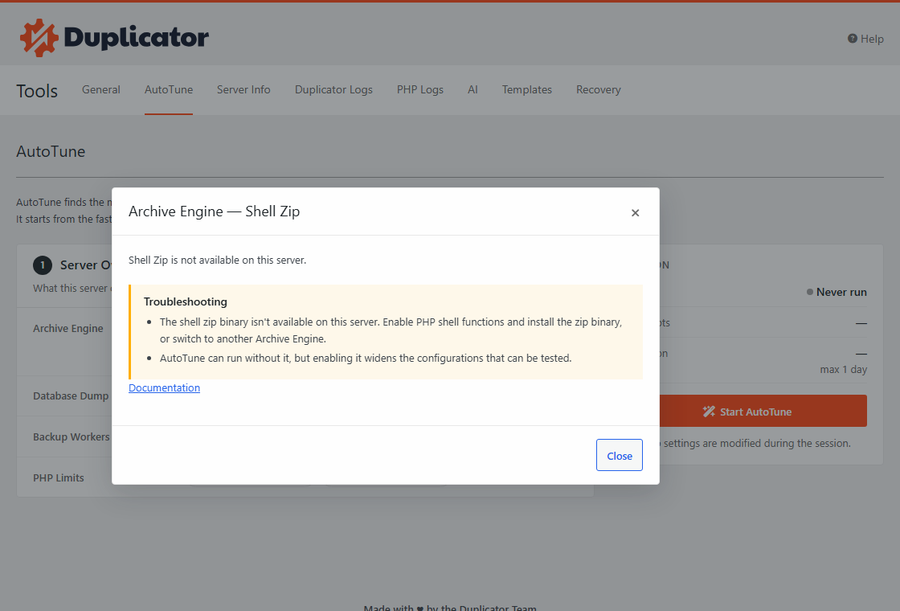
Click any chip to see its details. The dialog explains the current state, lists troubleshooting steps and links to documentation or to the related settings page.
Starting an AutoTune Session
To start a session, click the Start AutoTune button in the Session panel.
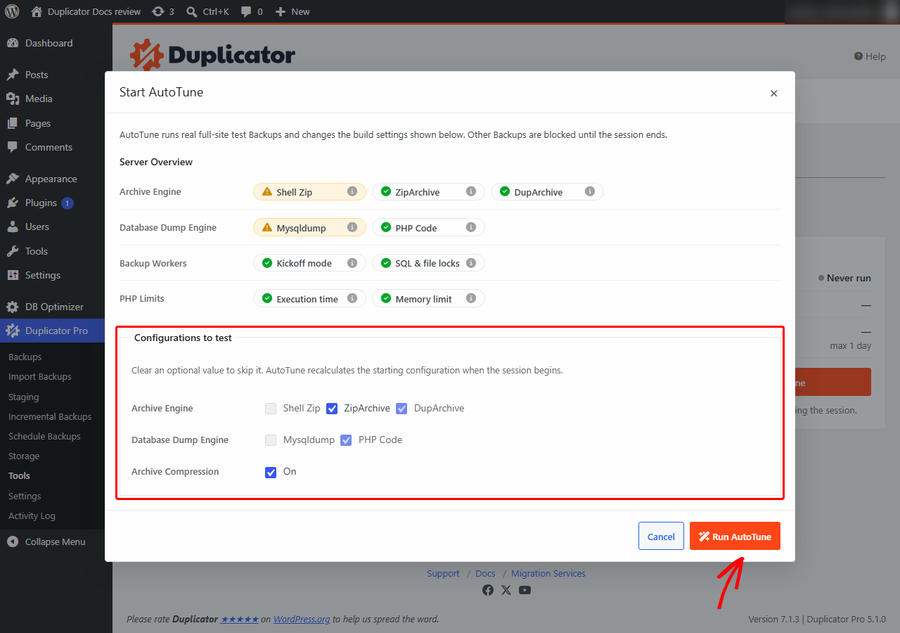
The Start AutoTune dialog opens. It reminds you that AutoTune runs real full-site test backups, changes your backup settings and blocks other backups until the session ends.
Choosing the Configurations to Test
Under Configurations to test, every option your server supports is checked. Clear a checkbox to skip that option during the session. For example, clear Shell Zip to keep AutoTune from testing it.
Some checkboxes are locked:
- DupArchive and PHP Code are the fallback values, so AutoTune always tests them.
- Options your server doesn’t support are grayed out.
To test only without compression, clear the On checkbox next to Archive Compression. AutoTune remembers your choices for the next session.
Once you’re ready, click Run AutoTune.
What Happens During the Session
While the session runs, AutoTune takes over the backup process:
- Active backup schedules are paused and turn back on automatically when the session ends.
- Incremental backups wait for the session to end.
- The running test backup can’t be deleted or cancelled from the Backups page. To stop it, abort the session.
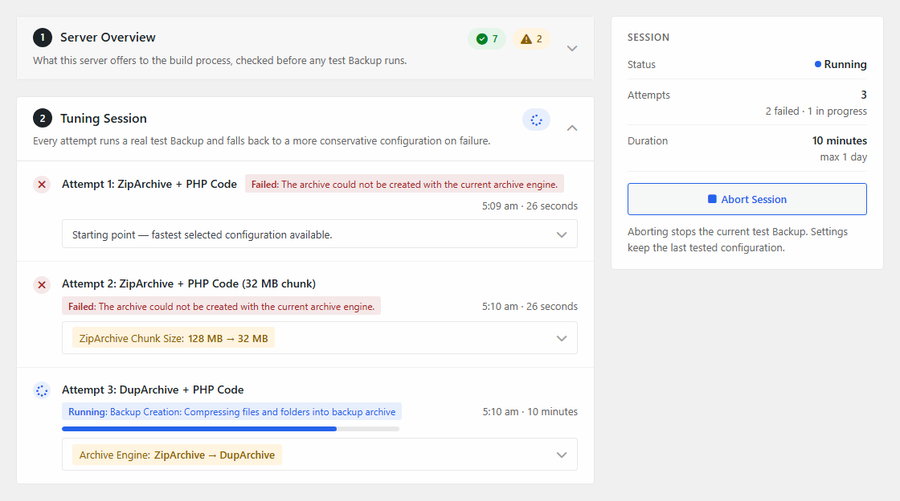
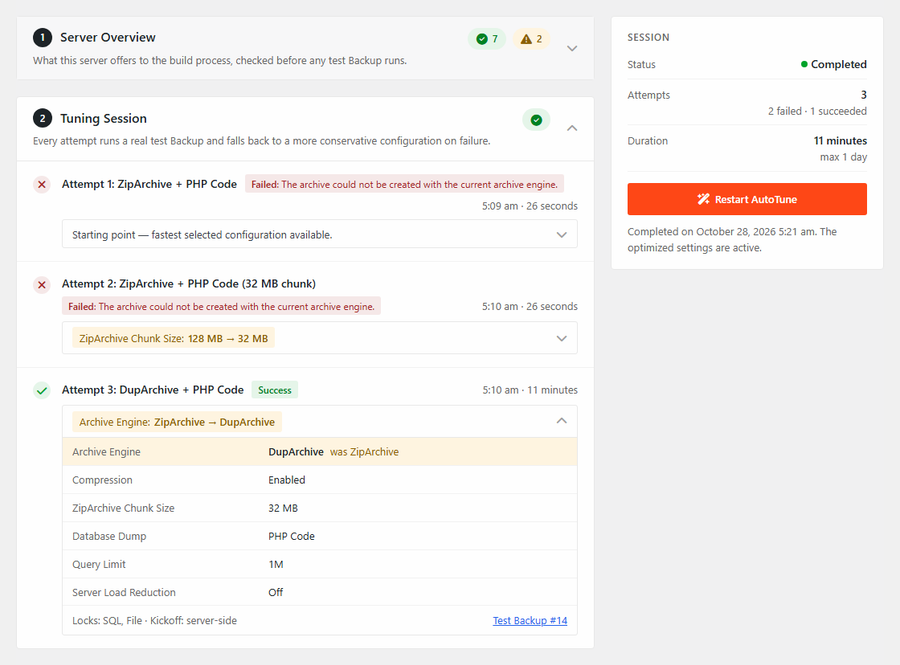
The Tuning Session section lists each attempt with the configuration tested, its status, start time and duration. A progress bar follows the running test backup. Below each attempt title, a highlighted label shows what changed compared to the previous attempt, such as ZipArchive Chunk Size: 128 MB → 32 MB. Click that label to see every setting of the attempt and a link to its test backup.
The Session panel shows the status, the number of attempts and how long the session has been running.
How AutoTune Picks the Next Configuration
After a failed test backup, AutoTune changes only the setting related to the failure:
- Archive failures: AutoTune moves to the next archive engine, from Shell Zip to ZipArchive and then to DupArchive. When ZipArchive fails on a timeout, AutoTune first tries again with a 32 MB chunk size.
- Database failures: AutoTune switches from Mysqldump to PHP Code. When the database export is interrupted, it first lowers the query limit to 128K.
- Last try: when nothing else is left to test, AutoTune runs one more test with Server Load Reduction set to Low.
AutoTune never tests the same configuration twice and skips any option you cleared in the start dialog.
Some failures aren’t related to backup settings, for example a full disk, wrong folder permissions or a backup that stalls because the server doesn’t run its background workers. In these cases, AutoTune stops right away and explains what to fix.
Keeping the Page Open
AutoTune runs in the background. When your server uses the server-side kickoff mode, close the page at any time and the session keeps going. When the Kickoff mode chip shows the client-side mode, your browser starts each backup step, so keep the AutoTune page open until the session ends.
A session stops automatically after one day.
Aborting a Session
To stop a session, click Abort Session in the Session panel and confirm. AutoTune cancels the running test backup, which takes a few minutes to finish. Your backup settings keep the last tested configuration.
Understanding the Results
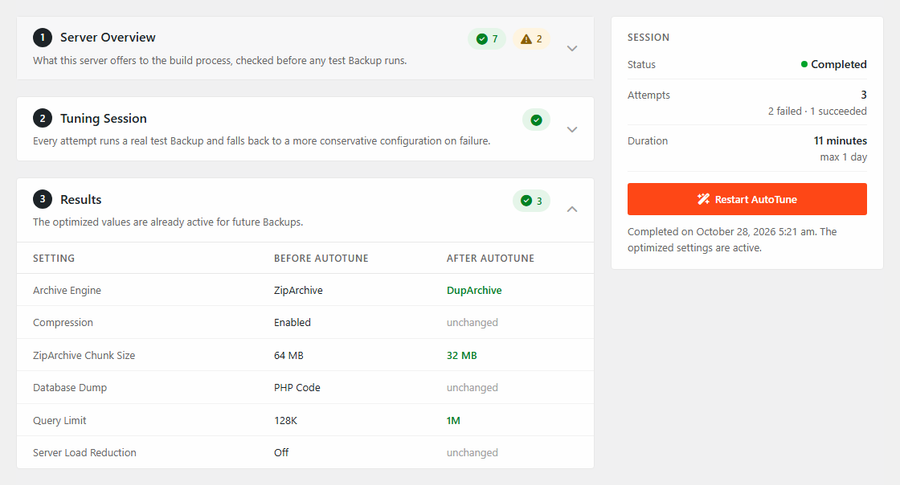
When a test backup completes, the status changes to Completed. The Results section compares your settings Before AutoTune and After AutoTune and highlights each value that changed. The new settings are already active, so your next backups use them.
To review every attempt, open the Tuning Session section. The successful attempt shows its full configuration and a link to its test backup.
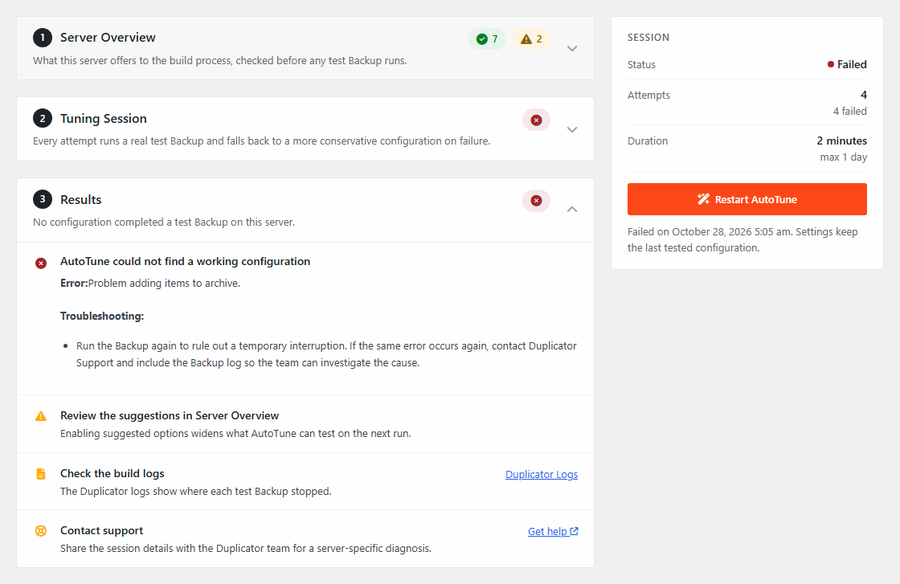
If no configuration works, the status changes to Failed and the Results section shows AutoTune could not find a working configuration, with the error from the last test backup and troubleshooting steps. Some errors also include a suggested server configuration with a Copy button and a link to our documentation. Below the error, AutoTune suggests three next steps:
- Review the suggestions in the Server Overview. Enabling a suggested option widens what AutoTune tests on the next run.
- Click Duplicator Logs to see where each test backup stopped.
- Click Get help to contact our support team.
A session also ends with one of these statuses:
- Aborted: you stopped the session.
- Timed out: the session reached its one-day limit.
- Error: AutoTune couldn’t continue, for example because its test backup was deleted or another backup started.
As with Failed, your settings keep the last tested configuration. To run AutoTune again, click Restart AutoTune.
Finding the Test Backups
Each test backup is a full backup of your site, created with your default template and saved to your default storage. In the Backups list, a magic wand icon marks the backups created by an AutoTune session.
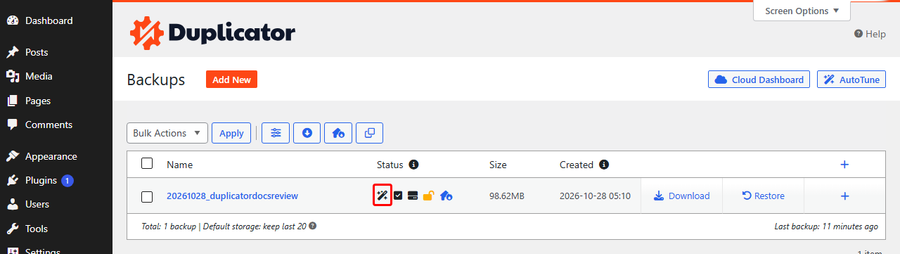
The successful test backup stays in your list like any other backup. Failed test backups are removed automatically by our plugin’s regular cleanup. AutoTune events also appear in the Activity Log with the AutoTune label.
If your default template encrypts the archive, AutoTune skips any archive engine that can’t encrypt on your server.
FAQs
Below, we’ve addressed some of the most common questions regarding this feature.
That’s it! You now know how to use AutoTune to find backup settings that work on your server and how to read its results.