
How to Migrate a Large WordPress Site (The Easy Way in 2026)
 Joella Dunn
Joella Dunn
Joella Dunn
 John Turner
John Turner
John Turner
TL;DR: In a hurry? Here’s how to do it step by step:
- Install Duplicator Pro for large-site support
- Switch to multi-threaded SQL mode and DupArchive
- Set server throttle if resources are limited
- Create your backup, excluding unnecessary files
- Drag and drop the archive into the new site
Migrating a large WordPress site can feel like a daunting task. We’ve all heard the horror stories about server timeouts, database errors, and incomplete file transfers.
Fortunately, you can avoid all of these challenges. With the right tools, you’ll get rid of potential PHP timeout issues and successfully move your site.
In this guide, I’ll walk you through a seamless migration for your large WordPress site. Let’s look at the steps to ensure everything transitions smoothly!
Here are the key takeaways:
- Use Duplicator Pro’s DupArchive format to avoid PHP timeout issues when migrating sites up to 400GB
- Enable multi-threaded SQL mode and PHP Code settings to chunk your database over multiple requests
- Set server throttle to Medium or High if you have limited server resources
- Duplicator’s drag-and-drop import functionality eliminates the need for manual FTP transfers and complex installations
- Exclude unnecessary files during the backup to reduce migration size and clean up your site in the process
Quick Summary: How to Migrate a Large WordPress Site
Table of Contents
- Why Migrate Your WordPress Site?
- What Could Go Wrong When Migrating a Large Website?
- Check Your Hosting Limits Before You Migrate
- Clean Up and Optimize Your Database Before You Begin
- How to Migrate a Large WordPress Site
- Manual Migration for Very Large Sites (Command-Line Method)
- Frequently Asked Questions (FAQs)
Why Migrate Your WordPress Site?
As your site grows, your original WordPress hosting plan may not be able to support it. In this case, it’s time to upgrade your plan or migrate to a new hosting provider.
Here are some more reasons to migrate your site:
- Moving to a new domain name for a rebrand
- Moving to a localhost staging site for safe testing
- Moving to a new Content Management System (CMS)
- Moving from HTTP to HTTPS
What Could Go Wrong When Migrating a Large Website?
If you own a small website, it’s fairly easy to migrate to a new server, domain, or host. However, larger sites like e-commerce stores can face unique challenges.
During the migration process, you’ll have to package your website’s files and MySQL database into a zip file. This makes it easy to transfer to another server, but compiling all of the data on a large site can be difficult.
Usually, budget web hosting servers configure PHP scripts to time out quickly. If you only have 30 seconds to create a large zip file and dump your WordPress database, it’ll time out.
For a large site, timeouts can prevent you from backing up your current site before migrating it to another server.
However, there are ways to avoid this problem. Using the right tools, you’ll successfully back up your large website and migrate it to a new location!
Check Your Hosting Limits Before You Migrate
Before you start, it’s worth checking a few numbers with your host. This tells you how much room you’re working with, and whether you’ll hit limits partway through.
- PHP max execution time: This is the setting that causes the timeouts I mentioned above. Ask your host what it’s currently set to.
- Available disk space: During the migration, you’ll briefly need room for both your original site and the backup archive at the same time. If your site is 50GB, plan for at least double that in free space, not just 50GB.
- Upload file size limits: Some hosts cap how large a single file upload can be. If your backup file is bigger than that limit, you’ll need to increase it or split the transfer.
- Memory limit (PHP memory_limit): Large database exports can hit memory limits on shared hosting. Ask your host if this can be raised temporarily during the migration.
Most hosts will bump these limits for you if you ask, especially if you explain you’re doing a one-time migration.
Clean Up and Optimize Your Database Before You Begin
A bloated database makes everything about a large-site migration slower, and more likely to time out. A few minutes of cleanup before the migration can pay off later.
- Delete old post revisions: WordPress keeps every revision of every post by default. On a site that’s been around for years, this can add up to thousands of extra database rows.
- Empty spam and trashed comments: These sit in your database until you clear them manually.
- Remove expired transients: Transients are temporary cached data that plugins store in your database. Old, expired ones just take up space.
- Run a database optimization tool: A plugin like DB Optimizer can handle all of the above in a couple of clicks.
A smaller database means a faster backup, a faster import, and less chance of hitting a timeout on either end.
How to Migrate a Large WordPress Site
Migrating a large WordPress site can be a daunting task. But even as a beginner, you can easily move your website and avoid any timeout issues from your server.
Here’s how to migrate a large WordPress site:
- Step 1: Install Duplicator Pro, a migration plugin built for large site migrations
- Step 2: Adjust backup settings to handle multi-gigabyte websites
- Step 3: Create a backup that bypasses PHP timeout limits
- Step 4: Import your site to the new location using drag-and-drop functionality
Step 1: Install a Migration Plugin with Large Site Support
Most website owners install a WordPress migration plugin to easily transfer their site files and database to another location. Not all of these tools are built for large WordPress site migrations.
Duplicator Pro is a migration and backup plugin that makes it easy to migrate a large website. In fact, it’s capable of migrating sites as big as 400GB.
Unlike other options, this plugin can back up your site in a DupArchive. This is a custom file format built for large sites.
Using chunked systems, Duplicator creates your site backup in multiple parts. Since this doesn’t compile a large zip file all at once, it’ll bypass the server timeout problem.
Recent updates added automatic resume if a backup build gets interrupted, so a dropped connection or a brief server hiccup doesn’t force you to start the whole backup over.
Duplicator also supports multi-threaded SQL mode, which will chunk your database script over multiple requests.
Here are some more features that make Duplicator the best migration plugin:
- Drag-and-drop import functionality for quick migrations
- Automatic backups
- Cloud storage integrations to Duplicator Cloud, Dropbox, Google Drive, Amazon S3, and more
- Doesn’t require WordPress to be installed
- Supports WordPress Multisite
- One-click restores
- Disaster recovery to restore your site after errors or hacks
- No extra add-ons to access premium features
- Dedicated customer support
- Free WP Media Cleanup included in Elite plan
To get started with Duplicator, choose a subscription for the premium version. Although there is a free version, upgrading will give you advanced options like a multi-threaded PHP dump and the DupArchive file format.
Download Duplicator Pro. In your WordPress dashboard, install and activate it.
You’ll also need to activate your license key in Duplicator Pro » Settings » General.
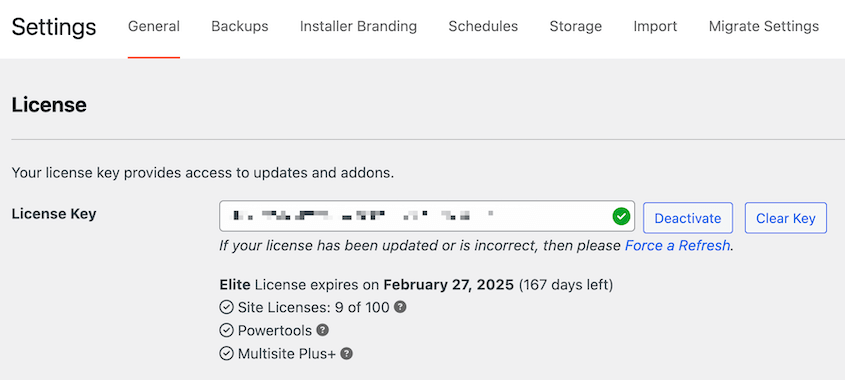
Paste your license key. After you click Activate, you’ll be able to start using Duplicator!
Step 2: Update the Backup Settings to Handle Larger Files
Although the default settings are effective for most websites, you’ll need more support for a large migration.
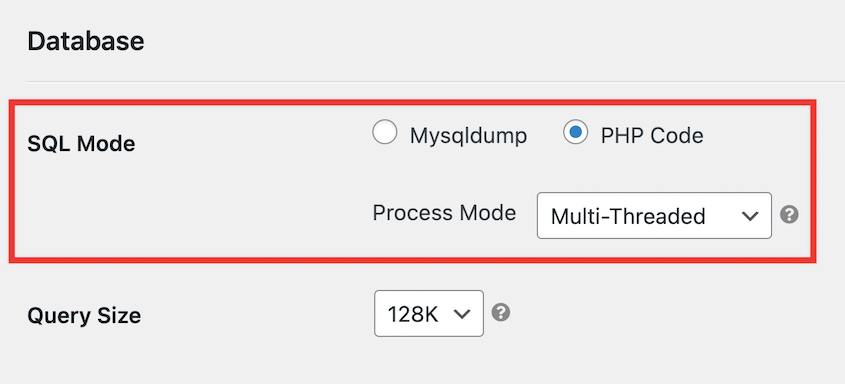
First, update your backup settings. Head over to Duplicator Pro » Settings » Backups. Find the Database section.
As I mentioned earlier, large WordPress site migrations can benefit from a multi-threaded SQL mode. So, set the SQL Mode to PHP Code and the Process Mode to Multi-Threaded.
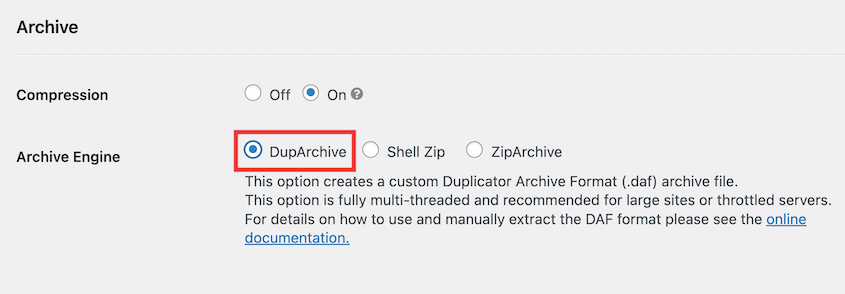
You’ll also need to adjust the Archive settings. Under Archive Engine, choose DupArchive. This is the custom file format designed for large sites.
If you have limited server resources, I recommend enabling the server throttle. Set the Server Throttle to Medium or High based on your web host’s level of resources.
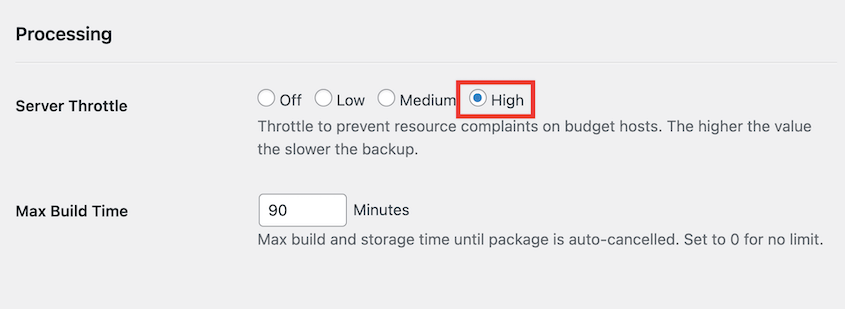
After this, save the new settings.
Step 3: Create a Backup of Your Large Website
Next, you can create a backup of your website. This will bundle all of your WordPress files, plugins, themes, database, and other content.
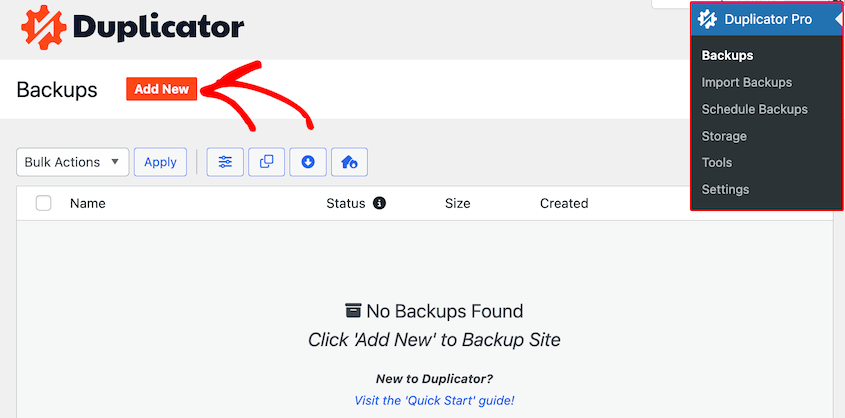
To do this, go to Duplicator Pro » Backups » Add New.
At the top of the page, name the backup with dynamic tags. Feel free to change the storage location.
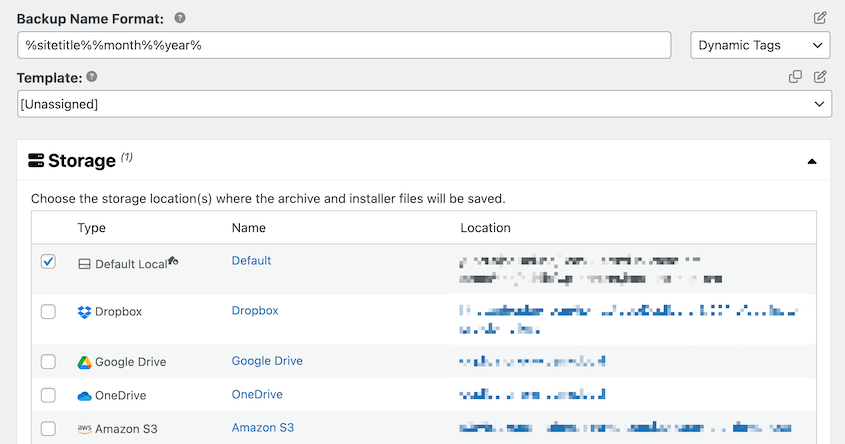
You’ll see that the backup file is in a DAF format instead of ZIP. This is the custom DupArchive for large websites.
If you want to exclude certain data from the migration, add filters before continuing with the build.
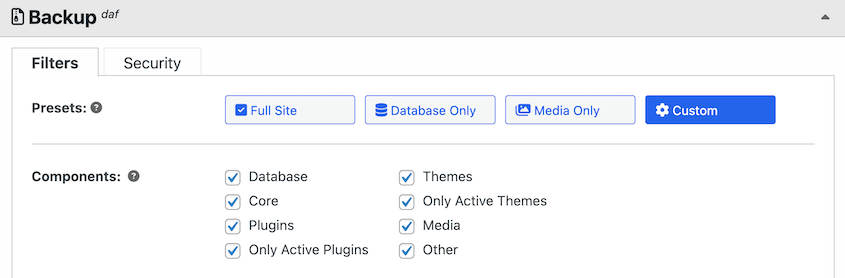
This can help you clean up your site during the migration. You could only include active themes, plugins, or other important files to set up your new website without unnecessary data.
After you click on Next, Duplicator will scan your site.
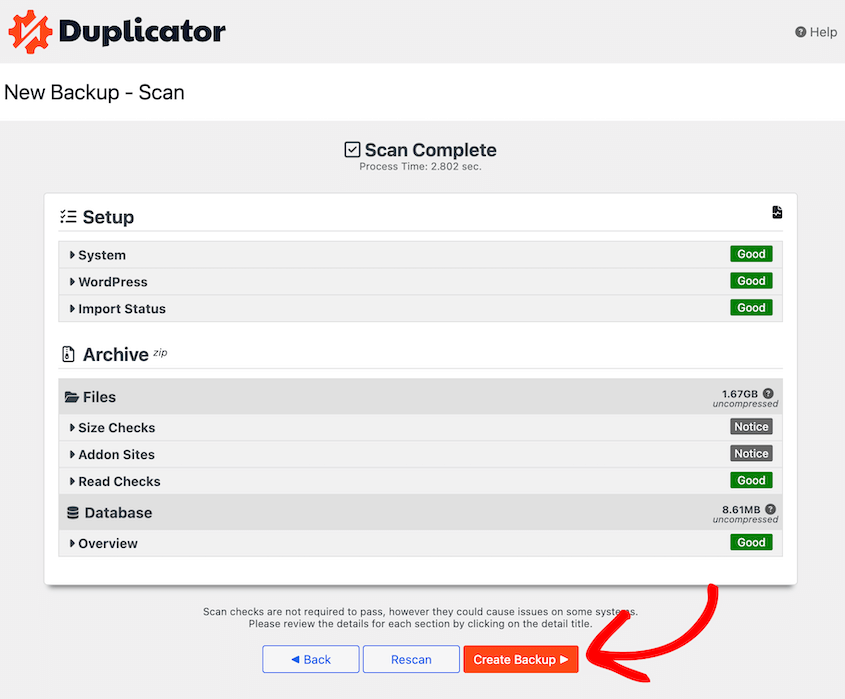
Hit Create Backup. This will automatically start compiling your large site into a single file.
Step 4: Import Your Website into the New Location
Once you build a backup, you’ll see it on the Backups page. To migrate it to another location, click on Download » Archive.
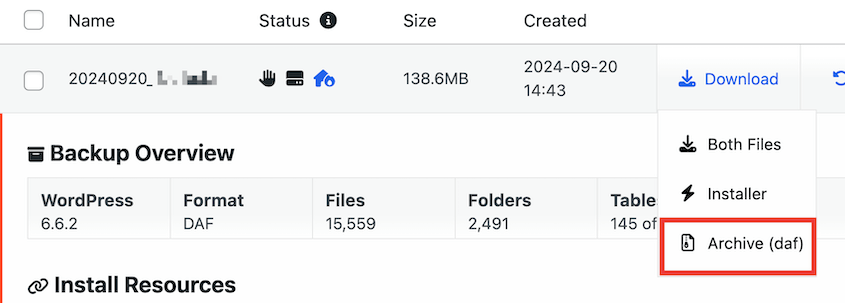
You’ll need to find your WordPress login information from your new web host. On the second site, install and activate Duplicator Pro.
After you activate your license key, navigate to Duplicator Pro » Import Backups.
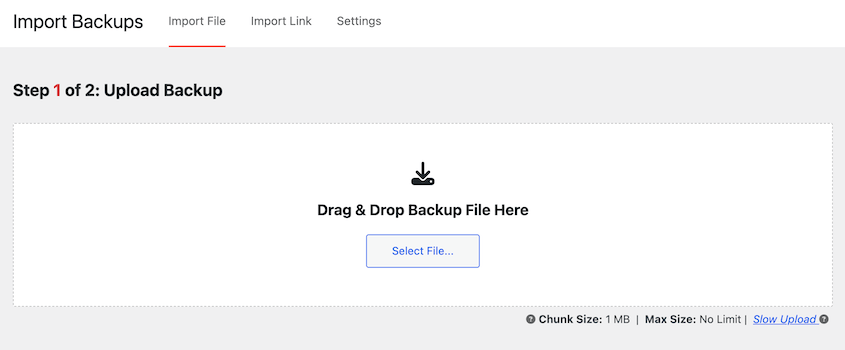
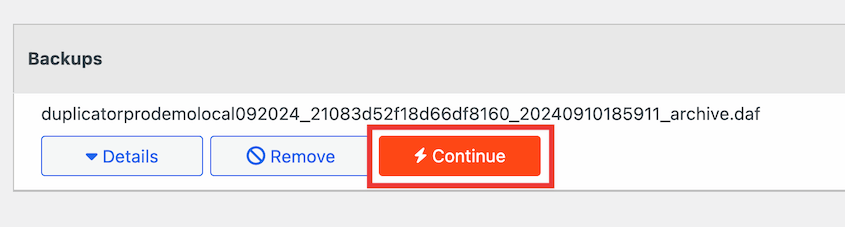
Drop the DupArchive file into the import box. After it uploads, click Continue.
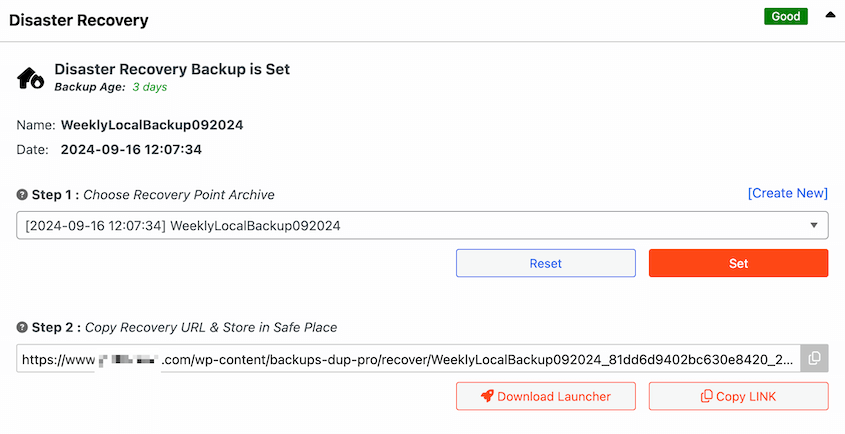
Since you’re working with a new WordPress installation, you likely won’t need to set a recovery point. However, you can create a backup of the new site to restore it later if needed.
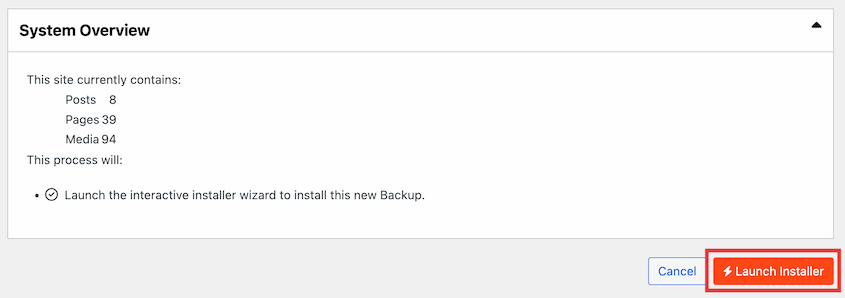
Scroll down the page to see an overview of the current site. Then, launch the installer.
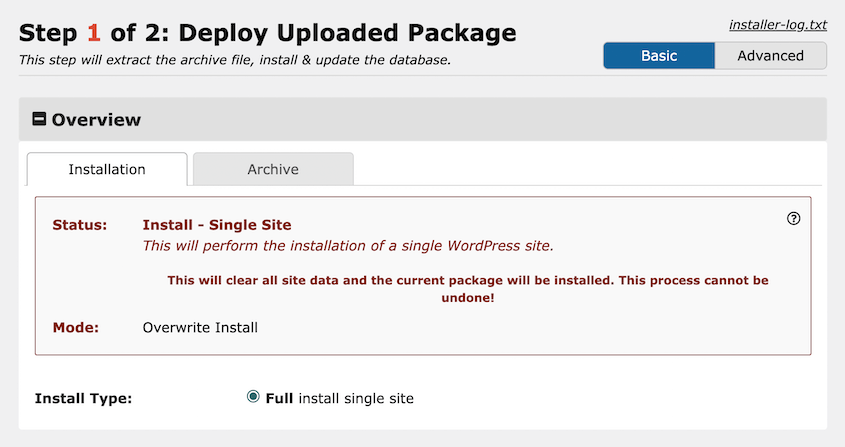
Now you’ll see options to deploy your uploaded backup. The Install Type should be a Full install single site.
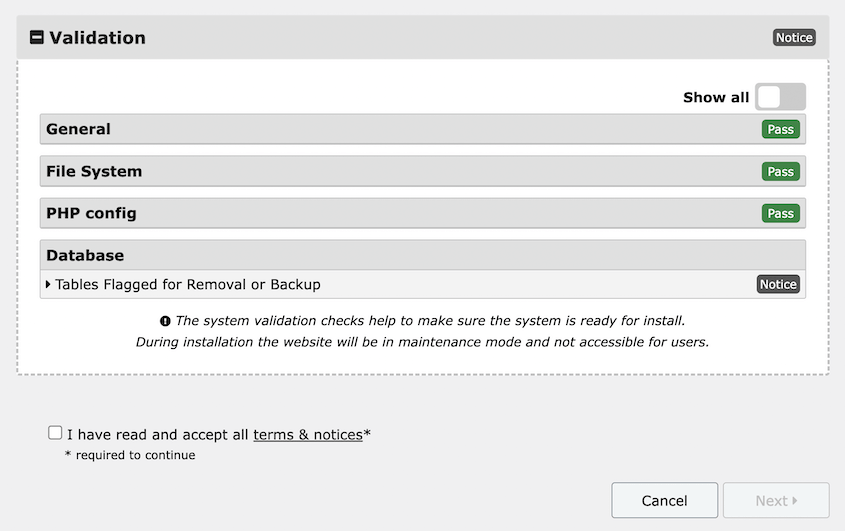
Under Validation, Duplicator will review the import for any problems. Be sure to review any of these notices. To continue, accept the terms and notices and hit Next.
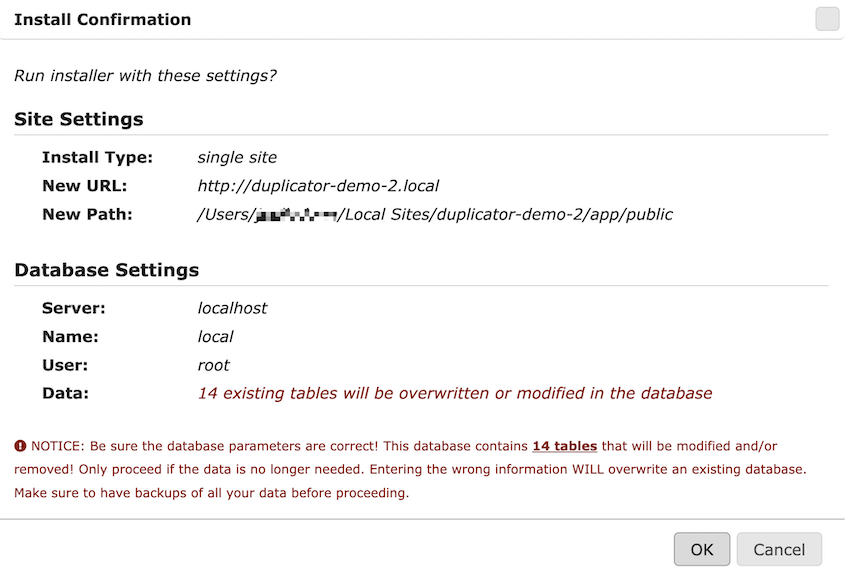
A pop-up will ask you to confirm the installation. Once you click on OK, the import will run.
If the migration is successful, you’ll see an Admin Login button. Before clicking on this, check the box next to Auto delete installer files.
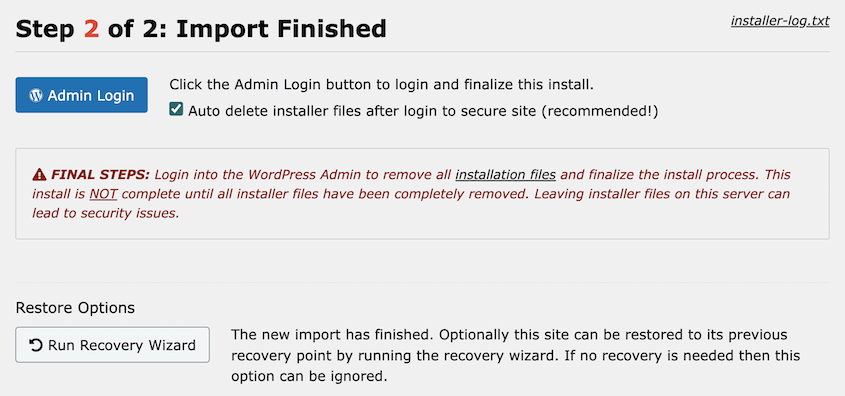
You can now log back into your wp-admin page!
Manual Migration for Very Large Sites (Command-Line Method)
Everything above covers the plugin route, and for most sites, that’s genuinely the easier path. But if you’re dealing with an especially massive site (we’re talking 20GB or more) or you’re comfortable on the command line, there’s a manual option worth knowing about.
This method needs SSH access to both your old and new hosting accounts and WP-CLI installed on the new server. Not every host offers SSH (especially budget shared hosting), so check with your host first.
If you don’t have SSH access or WP-CLI, stick with the plugin method above.
Export Your Database with mysqldump
Skip phpMyAdmin for this. It’s built for smaller exports and will likely time out or run out of memory on a large database.
Instead, connect to your old server over SSH and run:
mysqldump -u db_user -p --single-transaction --quick db_name | gzip > database_backup.sql.gz--single-transaction is especially useful for InnoDB tables because it helps avoid locking the live database during the export.
--quick streams the data instead of loading it all into memory first, which is what prevents the crash you’re trying to avoid. Piping through gzip compresses the file so it transfers faster.
Once that finishes, move the compressed file to your new server, then import it into the empty database you created there:
gunzip < database_backup.sql.gz | mysql -u new_db_user -p new_db_nameTransfer Your Files with rsync
Don’t download your files to your own computer and re-upload them. That doubles your transfer time for no reason.
Instead, sync directly from server to server. From your new server, run:
rsync -avP -e "ssh -p 22" user@oldserver:/path/to/wp-content/ /path/to/new/wp-content/Replace 22 with your host’s actual SSH port if it’s different (some hosts use a non-default one).
Sync the whole wp-content folder, not just uploads. Your database still references specific themes and plugins, so if you only copy the media library, your new site will be missing the actual theme and plugin files it needs to work.
Update Your Domain in the Database
Update your wp-config.php file on the new site with your new database credentials. Then, if your new site has a different URL from your old one, you still need to update every reference to the old domain inside the database you just imported.
Don’t do this with a plain SQL find-and-replace. WordPress stores some data in a serialized format that encodes string lengths, and a blind text substitution breaks it.
Use WP-CLI instead, which handles this safely:
wp search-replace 'https://oldsite.com' 'https://newsite.com' --all-tablesFrequently Asked Questions (FAQs)
How do I transfer a large WordPress site?
You can transfer a large WordPress site by creating a DupArchive backup with Duplicator Pro. This will avoid any PHP timeout issues with your current server. Then, drag and drop this backup into the new location. Alternatively, upload the backup files to the new server and launch the installer.
How can I move a large WordPress site for free?
You can do a free migration of a large site by using an FTP client to manually download all the files in your root directory, or public_html folder. After this, upload this as a zip file to your new site.
Note: Usually, your hosting service provides your FTP login credentials in your control panel.
Next, create a new database on the new server.
You’ll need to download your original database. Although you could export your database as a SQL file in phpMyAdmin, it’s easier to build a database-only backup with Duplicator Lite.
Take the upload files generated by Duplicator and add them to your new root folder. Lastly, open http://yoursite.com/installer.php in a browser window and go through the steps shown in the Duplicator installer wizard.
This two-part installation can be effective for websites with a large media library. However, keep in mind that you may still experience problems performing a database dump.
For the best results, consider creating a DupArchive with Duplicator Pro.
What is the best WordPress migration plugin?
Duplicator Pro is the best WordPress migration plugin for any type of website. This tool supports drag-and-drop migrations so you can move your WordPress site without any downtime. Plus, you can use Duplicator to regularly back up your website.
Alternatives: UpdraftPlus, All-in-One WP Migration, and Migrate Guru are capable of performing migration services. However, Duplicator’s custom DupArchive file format makes it easy to migrate large sites and Multisite networks.
How much does it cost to migrate a WordPress site?
The cost of migrating a WordPress site will depend on how and why you’re moving your website. To quickly move to a new WordPress host or server, you can purchase a WordPress migration tool like Duplicator Pro for as little as $69.30 per year.
However, you’ll also have to consider the cost of setting up the new hosting account. Many WordPress hosting providers support free migrations, but you’ll have to purchase a hosting plan first.
If you’re moving to a new domain name, you’ll have to buy a new domain. These usually cost between $9 to $14.99 yearly.
To see more hidden costs in WordPress migrations, check out my comprehensive guide!
What is the fastest way to migrate a WordPress site?
The fastest way to migrate a WordPress site is to create a backup of the original site with Duplicator Pro. Then, install Duplicator on the second site and go to the Import page. Finally, drag and drop the backup file to migrate your data to the new location.
How do I export an entire WordPress site?
To export an entire WordPress site, you can use a backup and migration plugin like Duplicator Pro. This tool allows you to compile all your data into a single zip file. Once you create a copy of your site, you can download it as a backup or move it to another host, domain, or server.
Move Your Large Site Without the Stress
By following the steps outlined in this guide, you’ve moved your large website without timeouts or other errors!
Remember, the key to a hassle-free migration lies in careful planning, using the right tools, and understanding how to address potential errors. With this knowledge, you’re in control of your website’s future.
Are you ready to move large sites without any stress? Try out Duplicator Pro for custom large file formats that make migrations easy, no matter your site’s size!
While you’re here, I think you’ll like these other resources:
- How to Back Up a Large WordPress Site
- How Ergo Creative Migrates Large Websites in Under 20 Minutes
- Your Site Migration Is Going to Fail (Unless You Avoid These Mistakes)
- The Complete Guide to SEO Website Migration
- 5 Best WordPress Migration Services for Simple Transfers
- How to Convert WordPress Multisite to a Single Site