Imagine spending hours on a new feature, only to have it break your live site.
A staging site prevents this by letting you experiment and troubleshoot in a risk-free environment. Once you’re happy with the changes, you can easily push them to your live site without any issues.
Setting up a WordPress staging site may seem intimidating, but it’s an important part of keeping your website running smoothly. It’s where you can safely test changes before making them public.
In this tutorial, I’ll show you how to create a WordPress staging site!
Table of Contents
Quick Summary: How to Create a WordPress Staging Site
I’ll show you how to get a WordPress staging site up and running. Along the way, you’ll get detailed steps and recommended tools for the process.
But for now, here’s a brief overview to get you started.
1. Build a staging area.
There are a few ways to create a staging site, but I’d recommend setting one up on your live server. Many web hosts do this for you. However, you might have to add a new subdomain and create a new database for the staging site.
2. Back up your live website.
Duplicator is the best tool for building staging sites. With Duplicator, start by backing up your entire WordPress site. It’ll give you two files to download: the archive and the installer.
3. Import the backup into the staging site.
If there are any files in your staging site’s root directory, delete them. Then, upload Duplicator’s backup files.
4. Finish the installation.
You can launch Duplicator’s installer wizard by pasting this URL into a new browser window: “https://subdomain.example.com/installer.php“. Enter the new database details and allow Duplicator to finish the installation.
What Is a WordPress Staging Site?
A WordPress staging site is a copy, or clone, of your live website. This staging site is exactly the same as your website, except it cannot be viewed publicly by your visitors. If you make changes to the staging website, it won’t affect your live blog or small business site.
What Is the Benefit of Having a WordPress Staging Site?
Staging sites are used to test changes in a safe environment. You can perform updates, tweak coding, or do a complete redesign without breaking your website. When you’re ready, you can make these changes live.
Whether you’re a blogger or an ecommerce website owner, you can benefit from creating a staging site. It allows you to modify your website without any risks.
Ultimately, staging sites can act as a safety net for your WordPress website. If you decide to make a significant change to your live site, it may accidentally break its functionality. Then, you’ll need to go through the process of restoring your website from a backup.
On the other hand, a staging site won’t affect your live site at all.
You can adjust your files, design, or other elements until everything looks and feels perfect. Since your staging site will be private, any changes won’t impact your SEO.
When to Use a WordPress Staging Site
Here’s when you might want to use a WordPress staging site.
- Installing New Themes and Plugins
New themes and plugins could conflict with other installed software. A staging site will help you see how any new software will affect your site.
- Updating WordPress Core, Themes, and Plugins
Although it may save time in your workflow, you shouldn’t update your live WordPress site. This may publish visible errors to your audience. When you want to avoid high bounce rates or downtime, it’s important to have a staging site.
Sometimes, you may see unexpected errors or bugs on your website that harm user experience. If you want to safely troubleshoot them without causing more problems, use a staging site.
- Implementing Code-Based Changes
A staging environment can be a test site to play with code, try out new features, and adjust your site safely.
- Before Creating a WordPress Site
You can set up a new staging site before you ever create a website. You’ll be able to fully design your WordPress website and then make it live when you have a hosting plan.
How to Create a WordPress Staging Site
Now that you know the benefits of staging sites, you’ll probably want to build your own. To ease your concerns, we’ll explain how to create a staging site, step-by-step!
Method 1. Create a WordPress Staging Site With a Plugin
If your web host doesn’t have a one-click staging site feature, you can easily build your own staging site. This involves cloning your original site and uploading it to a new subdomain on your server. Don’t worry, it’s not as hard as it sounds.
Step 1: Build the Staging Area
You can set up a staging site right on your hosting server. This avoids any potential errors when you migrate changes between a staging server and your live server.
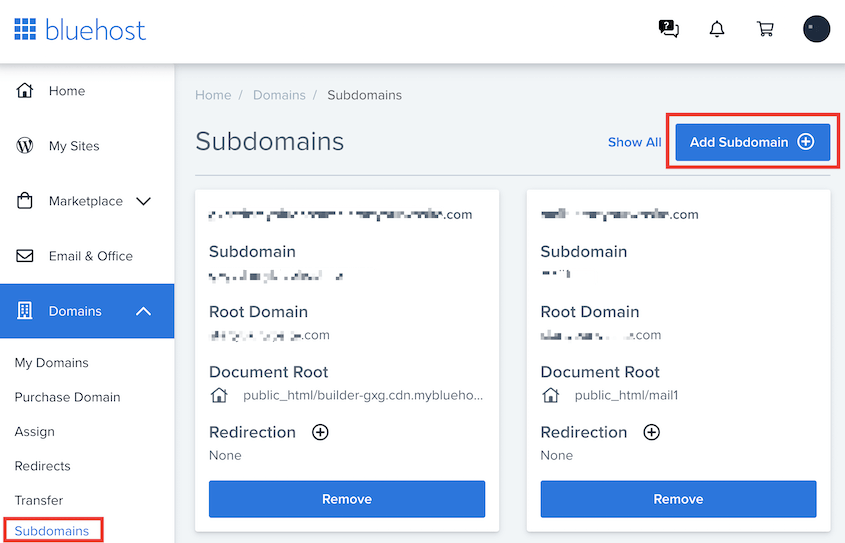
To get started, open the dashboard for your WordPress hosting account. For this tutorial, I’ll be using Bluehost. Find the Domains » Subdomains » Add Subdomain.
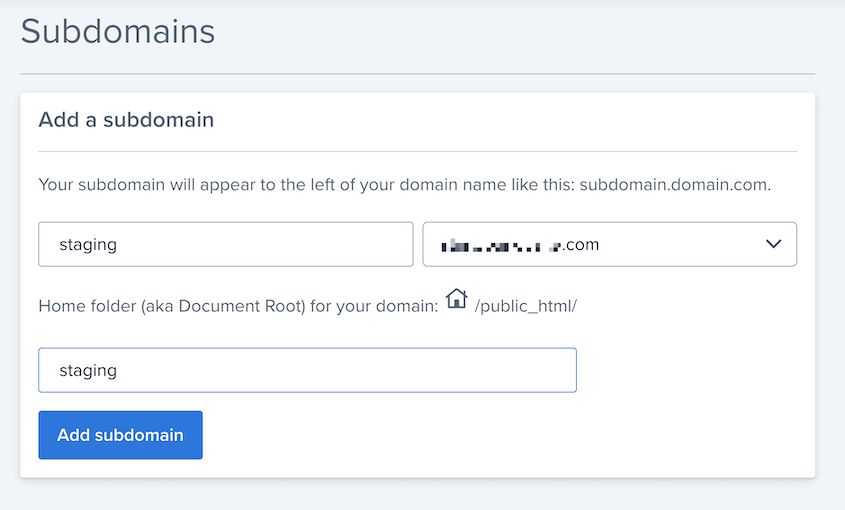
You can then name your subdomain Staging and hit Add Subdomain.
You could also create a local WordPress staging site with services like Local by Flywheel, MAMP, WAMP, or XAMPP.
Step 2: Install Duplicator
Now you’ll need to clone your live website and move it to the staging site.
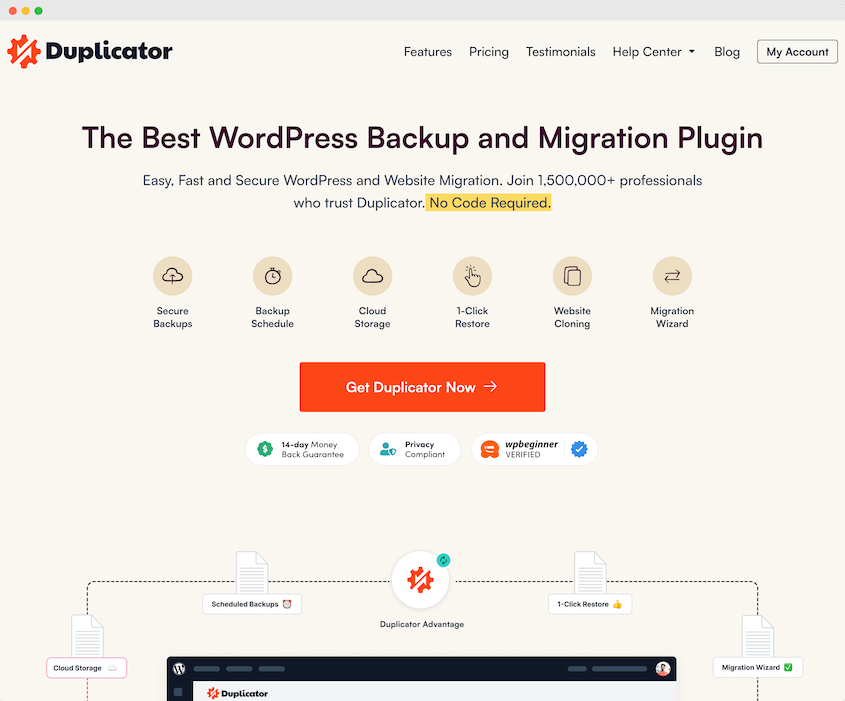
To do this, we’d recommend installing Duplicator Pro. This plugin creates copies of your website in seconds, so it’s useful for cloning, migrations, and backups.
See how Rock Lobster Webdesign improves its design efficiency by setting up staging sites with Duplicator!
To start using Duplicator, select a subscription that meets your needs. Although there is a free version, Duplicator Pro‘s drag-and-drop migrations make it easy to push content to and from your staging site.
Download the plugin and copy your unique license key. Next, open the WordPress dashboard for your live website and install Duplicator Pro as a new plugin.
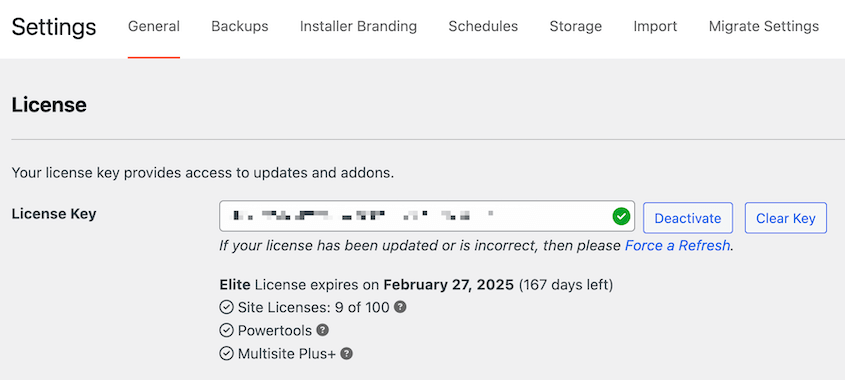
Finally, you’ll need to activate your license key. Head over to Duplicator Pro » Settings. Here, paste your license key.
Then, hit Activate. Now you’ll be able to create a copy of your website and easily move it to your staging site!
Step 3: Create a Backup
With Duplicator, you can easily compile your live website’s content, WordPress files, plugins, themes, and database tables into a single backup file. Then, you’ll be able to move all this data to a staging site.
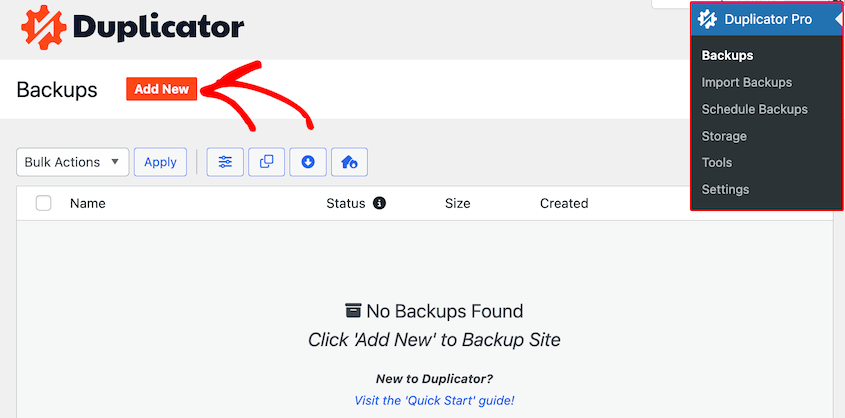
In Duplicator, go to Backups » Add New.
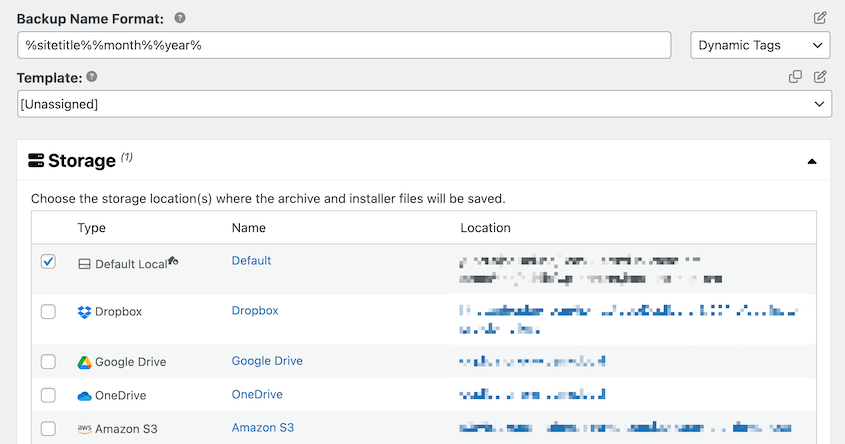
Name your backup so you can easily find it later. Then, click on Next.
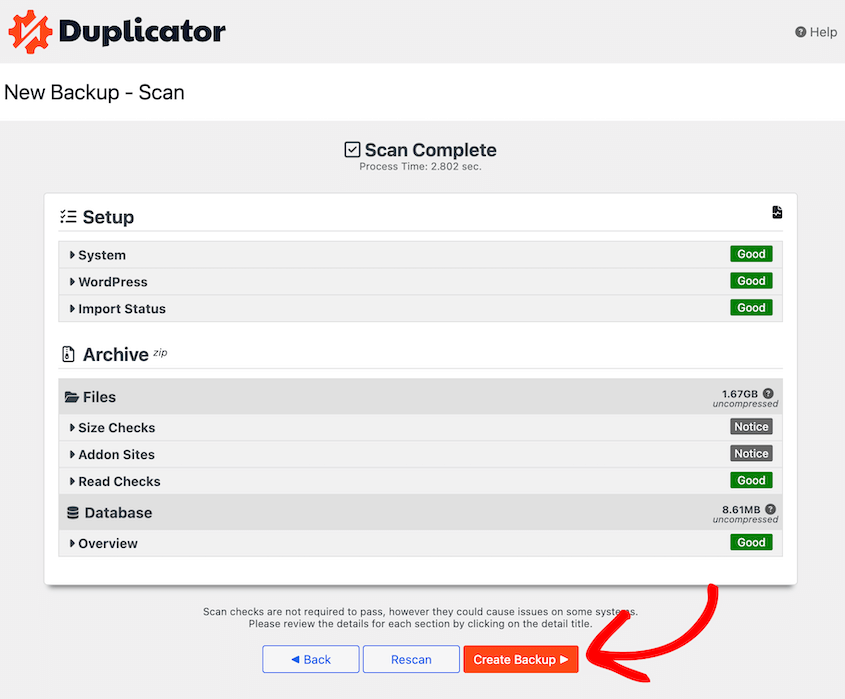
Before Duplicator builds your backup, it will scan your live website. It’s important to review any notices to see if they’ll affect the build.
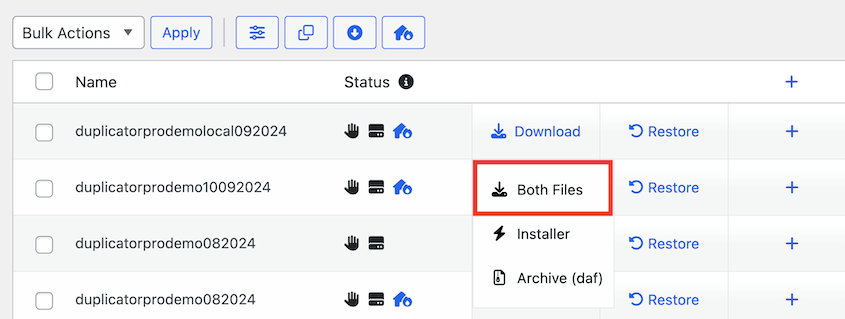
To continue, select Create Backup. Once finished, find the Backups page again. Here, click Download » Both Files next to the backup you just created.
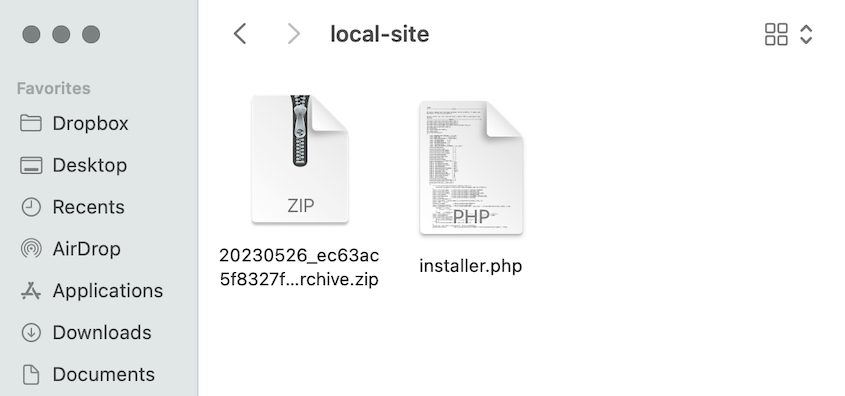
This will download both an archive and installer file to your computer.
The archive file will contain the files and database for your website. The installer is a PHP file that will deploy the archive file when you add it to your staging site.
Step 4: Import Your Backup Into the Staging Site
Once you’ve downloaded a clone of your website, it’s time to upload it to the staging site.
To upload files to a WordPress website, you’ll need either a File Transfer Protocol (FTP) client or cPanel. Either of these options will allow you to connect to your web host’s server and edit your site files.
Usually, your hosting company will recommend a specific file manager for this process.
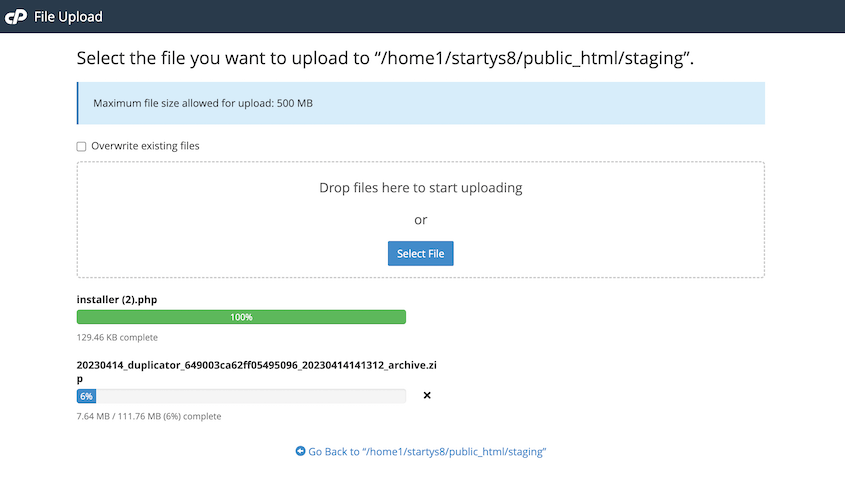
In this tutorial, I’ll be using cPanel. Once you log in, open the root directory for the subdomain you created. Completely delete any files in this folder and upload your backup files.
You’ve just cloned your website to the staging area!
Step 5: Create a New Database
Before you can start editing your staging site, it’ll need a new database. The process for creating one will depend on your hosting provider.
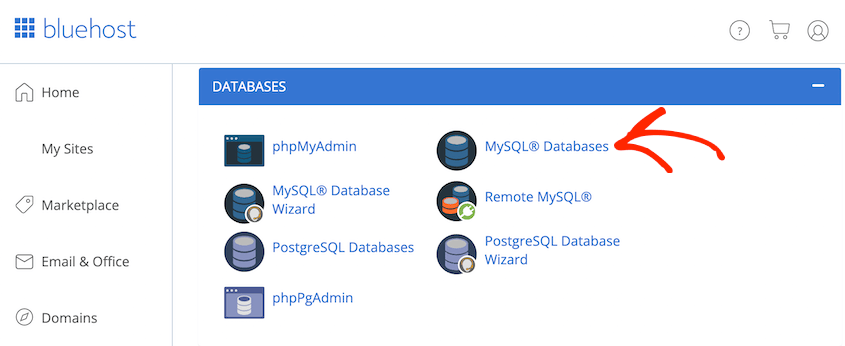
For Bluehost users, open your control panel and find the MySQL Databases button.
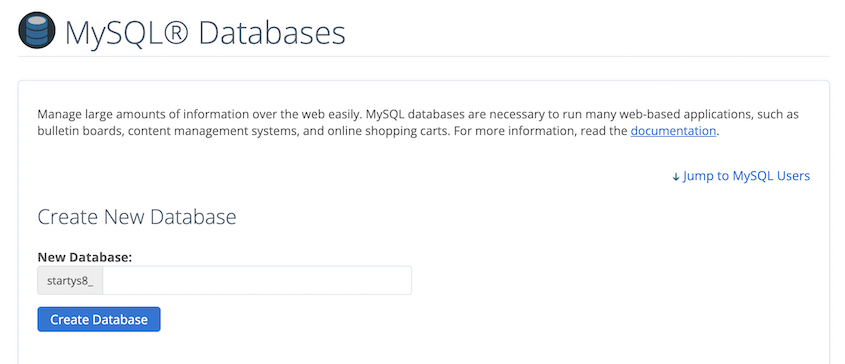
Then, you can name your new staging site’s database and hit Create Database.
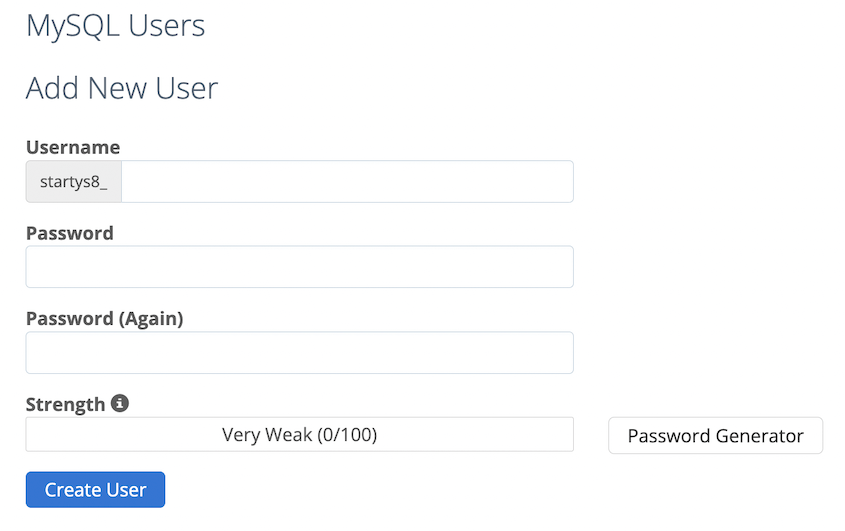
Find the MySQL Users section. Enter a username and password for the new user.
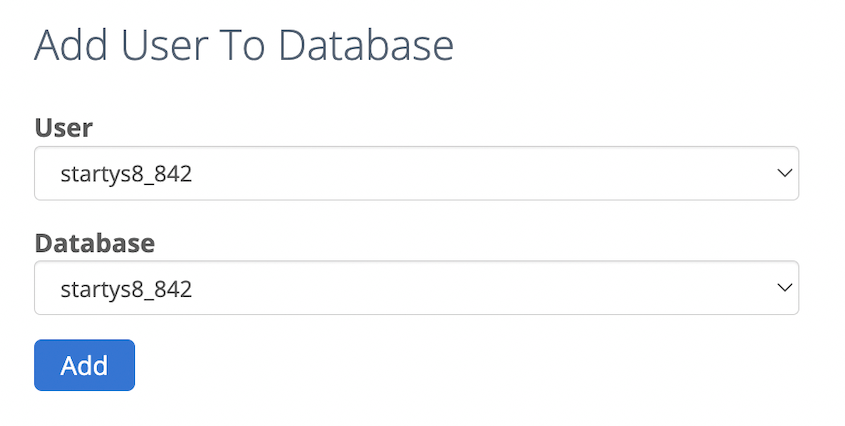
Next, scroll down until you see Add User to Database. In this section, select both the new database and user in the dropdown menus.
Before continuing to the next step, you can assign all privileges to the new user. This will allow the user to fully control the database.
Step 6: Run the Duplicator Installer
It’s time to install the backup of your original site into the WordPress staging environment. To do this, open a new browser window and paste this URL:
https://subdomain.example.com/installer.php
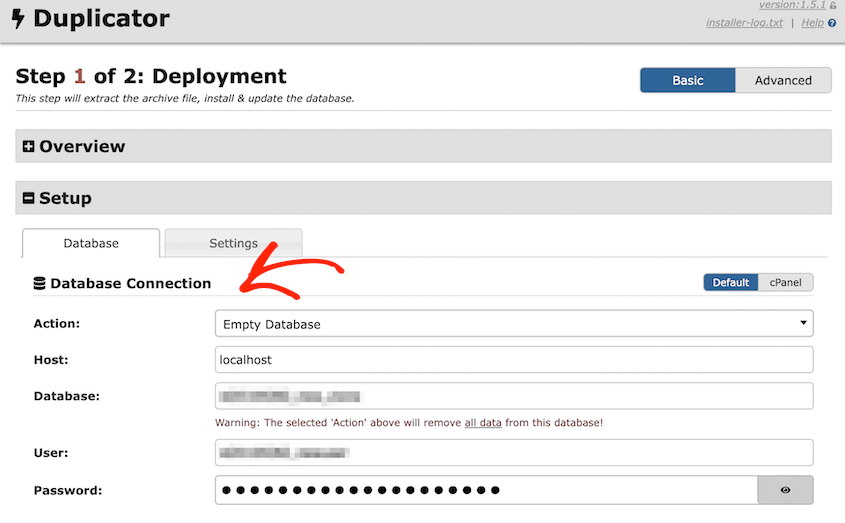
This will automatically open the Duplicator installer wizard. Under Setup, enter the details for your new database.
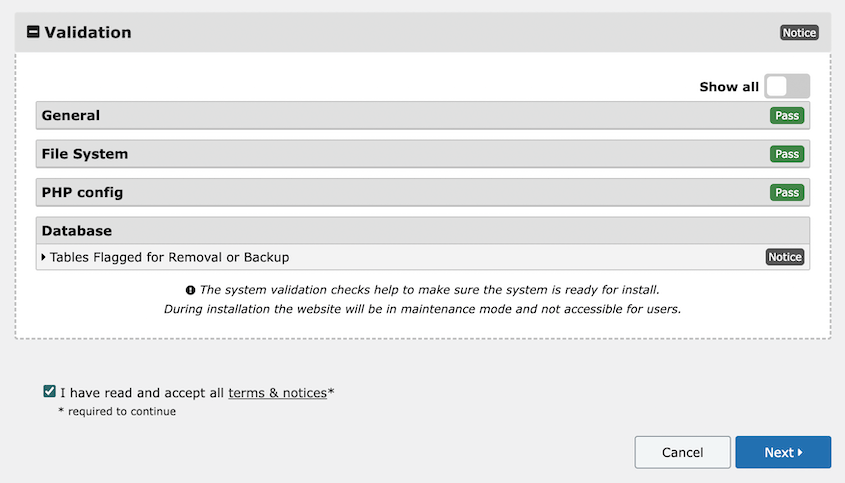
Next, hit the Validate button. Be sure to review any notices before accepting the terms and conditions.
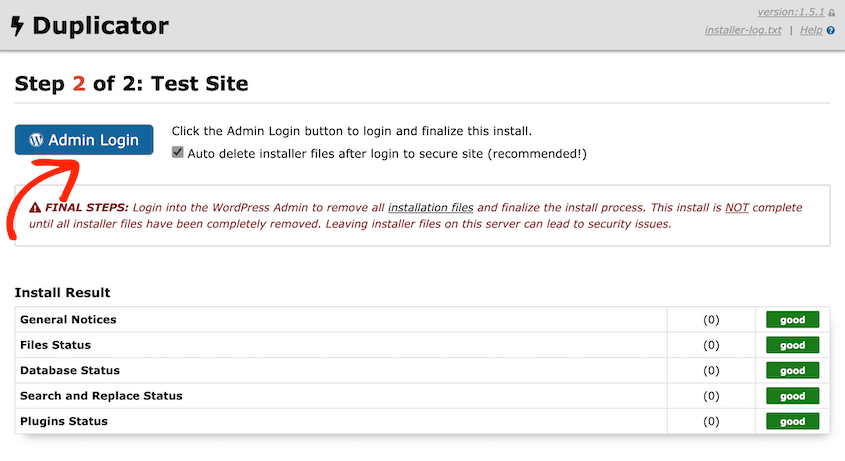
Once the installation is complete, you’ll be able to log into your staging site.
Click on Admin Login to start editing the cloned version of your production site!
Step 7: Add Password Protection
To make sure no one else can access your staging site, consider adding password protection. This will hide the development area from search engines and the public eye.
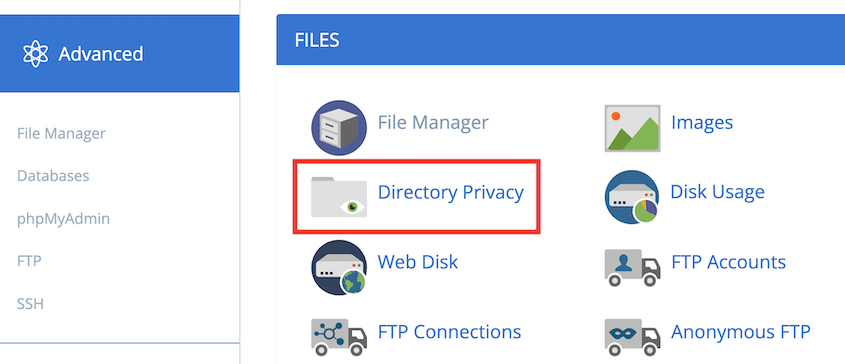
To do this with Bluehost, navigate to Advanced » Directory Privacy in your control panel.
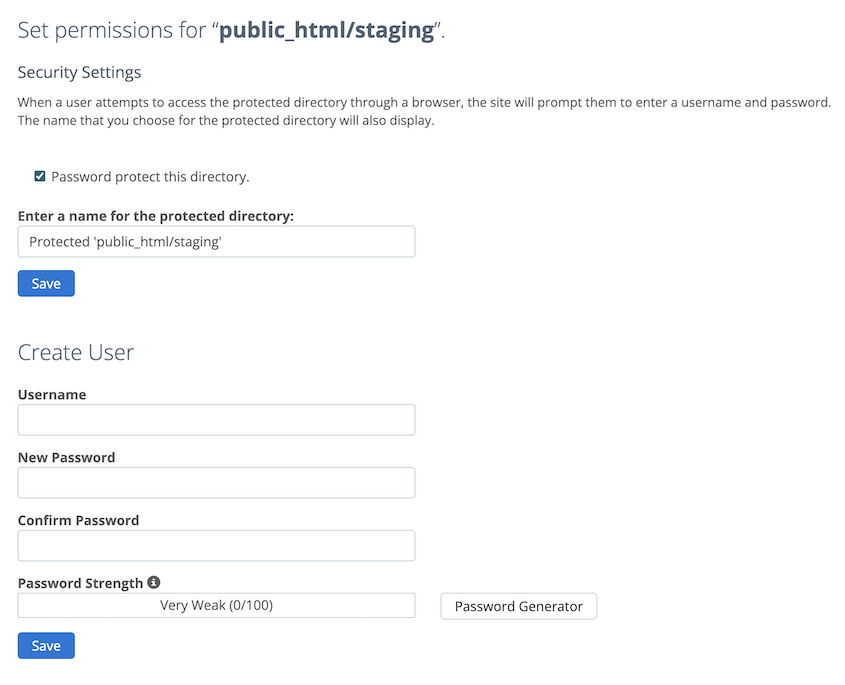
Now you’ll need to find the folder for the subdomain. Then, check the box next to Password protect this directory.
Add a name for the protected directory. Lastly, choose a username and password so that you can access the site.
After you save these changes, you’ll be the only one who can edit your staging site!
Method 2. Create a Staging Site With Your Web Host
Some WordPress hosting providers allow you to create staging sites with one click. This is a simple way to clone your website and host it on the same server.
I’ll show you how to build staging sites with Bluehost, SiteGround, and WP Engine. If you have a different web host, you’ll need to check whether it offers a built-in staging feature.
Creating a Staging Site With Bluehost
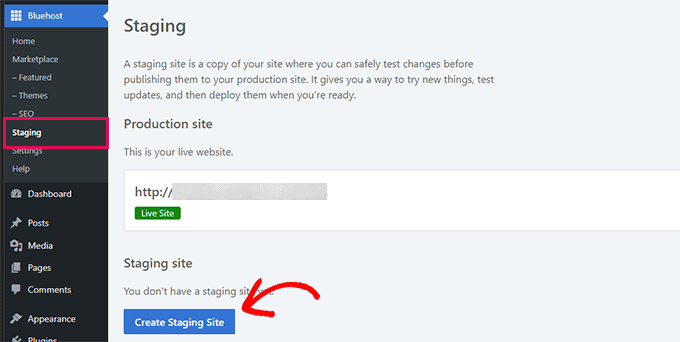
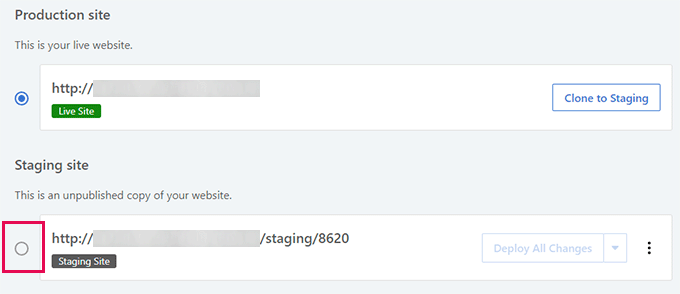
Every Bluehost hosting plan supports one-click staging. All you’ll need to do is log into your WordPress dashboard and find the Bluehost Staging page.
Then, click on the Create Staging Site button. Bluehost will automatically build your staging site!
Whenever you need to, you can switch from your production site to the staging area.
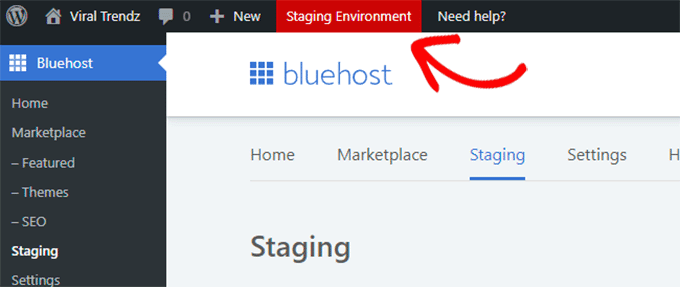
You’ll see a cloned copy of your entire website. At the top of the page, there will be a red bar marking it as the Staging Environment.
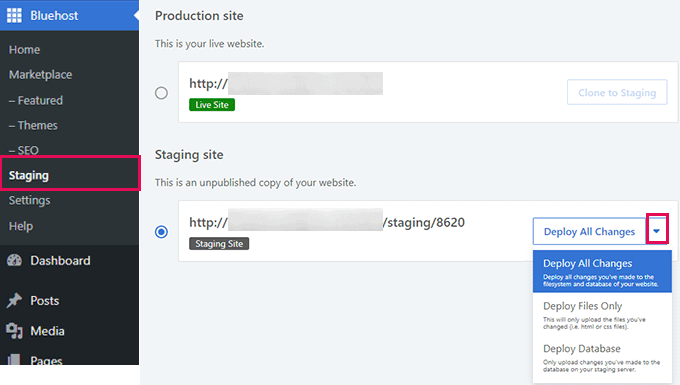
Continue to make any changes without worrying about them affecting your live site. When you’re ready to deploy them, head over to Bluehost » Staging and hit Deploy All Changes.
Creating a Staging Site With SiteGround
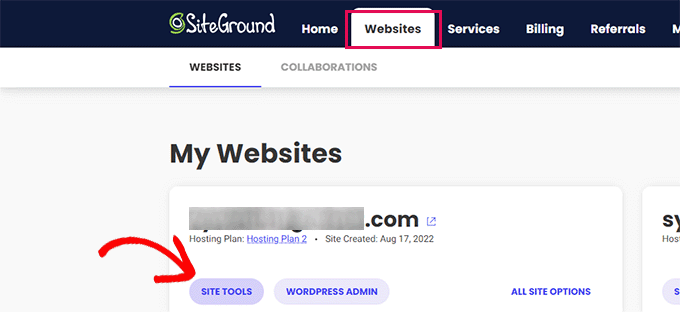
If you’re a SiteGround user, start by logging into your hosting control panel. Click on the Websites tab and hit Site Tools.
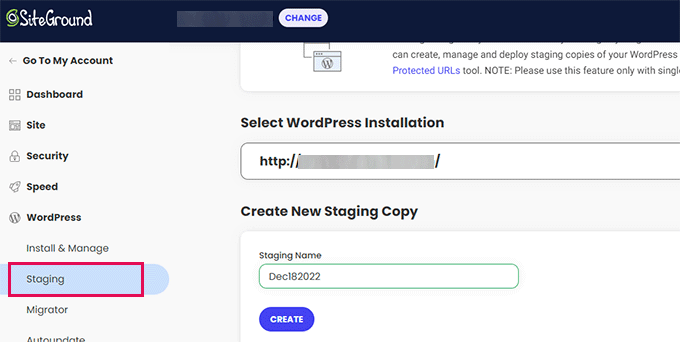
Next, navigate to WordPress » Staging. Select your website and create a staging site name. Finally, click on Create.
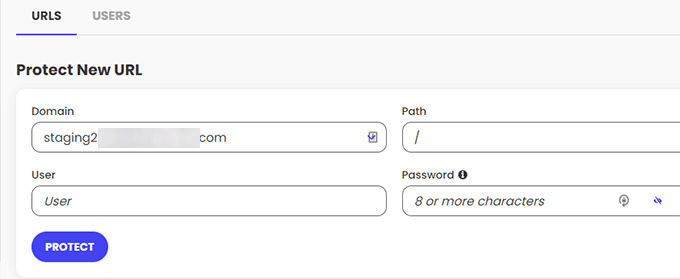
To prevent unauthorized users from accessing your staging content, you can add password protection. In your SiteGround account, click Go to protected URLs. Then, add a username and password for the staging site.
Now you can log into your new staging site.
To push any staging changes to your live website, go back to this page in your control panel. Click on the three-dot icon and hit Full Deploy.
Creating a Staging Site With WP Engine
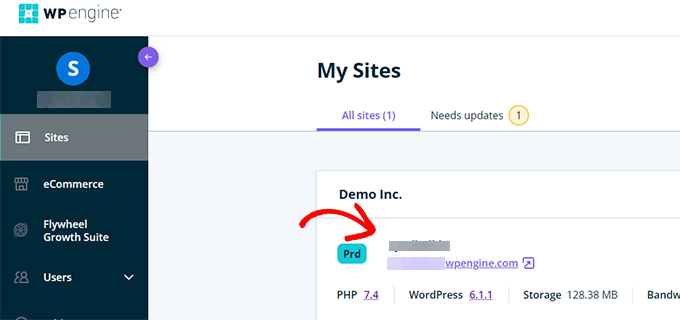
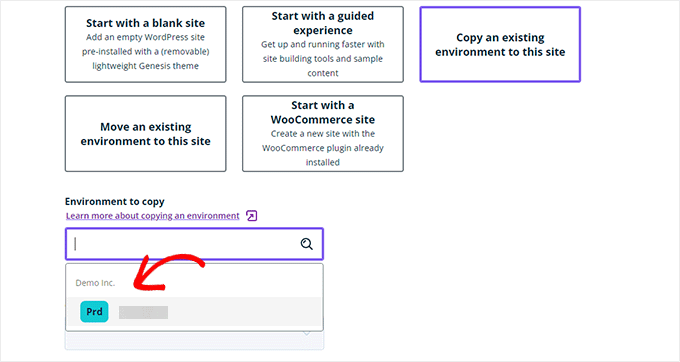
WP Engine is another WordPress host that includes one-click staging in all of its plans. To get started, select your site in the WP Engine control panel.
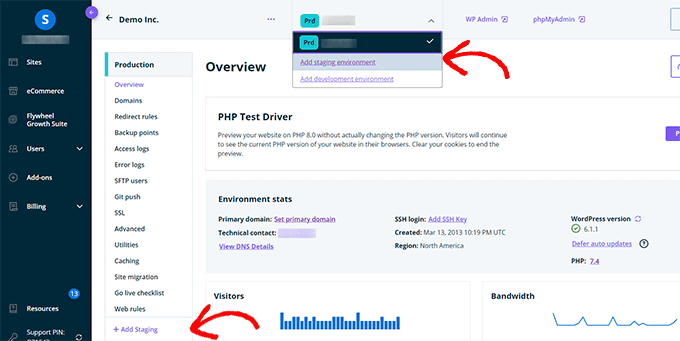
Then, click on Add Staging.
From the list of options, choose to Copy an existing environment to this site. Next, select the production site that you want to clone.
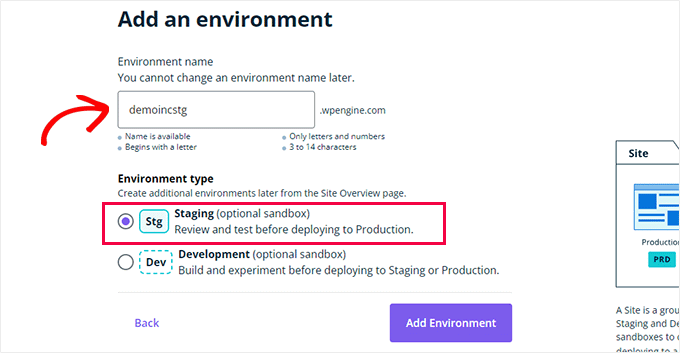
Name the staging site. Make sure the Environment type is Staging.
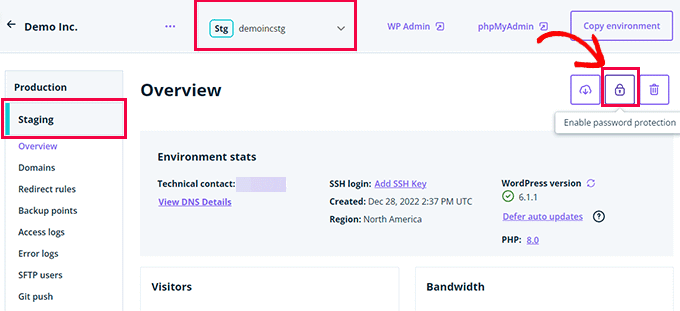
Once your staging site is created, you can add password protection. Simply go to Staging and click on the padlock icon.
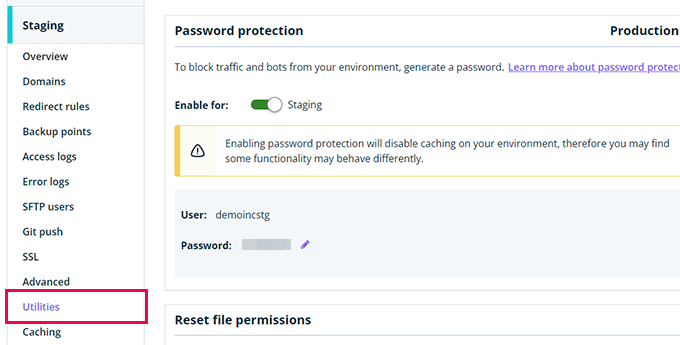
Find the Utilities tab and copy the username and password for your staging dashboard.
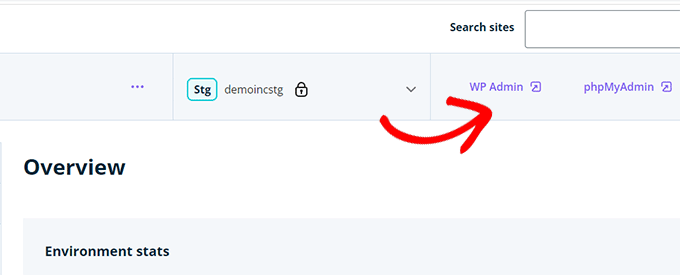
To start editing the staging site, hit WP Admin.
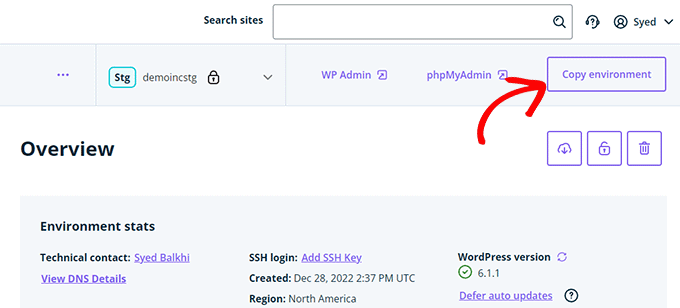
Once you’re ready to push your changes live, click Copy environment.
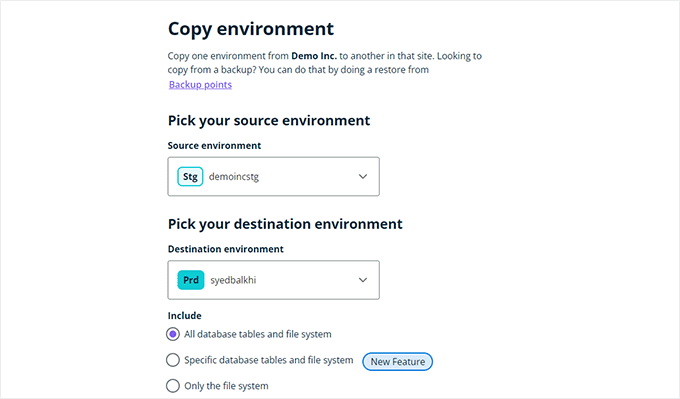
Finally, choose the staging site as the Source environment. The Destination environment should be your live site.
Frequently Asked Questions (FAQs)
How do I test my WordPress site before going live?
Before going live, it’s a good idea to test your WordPress site in a staging environment. Using a staging site, you can implement code, install software, or make updates safely. Then, you can simply push your staging site to a live server when you’re ready.
What is the difference between a production site and a staging site?
A production website is the live site that is displayed to your online visitors. A staging site is a testing environment where you can perform changes without affecting your live site.
How long does it take to create a staging site?
The length of time it takes to create a staging site depends on the method you choose. Some managed WordPress hosting companies provide built-in staging features to immediately create new staging sites with one click. Alternatively, it’ll take a few minutes to install a plugin like Duplicator and clone your website to the staging area.
How do I move my website from staging to production?
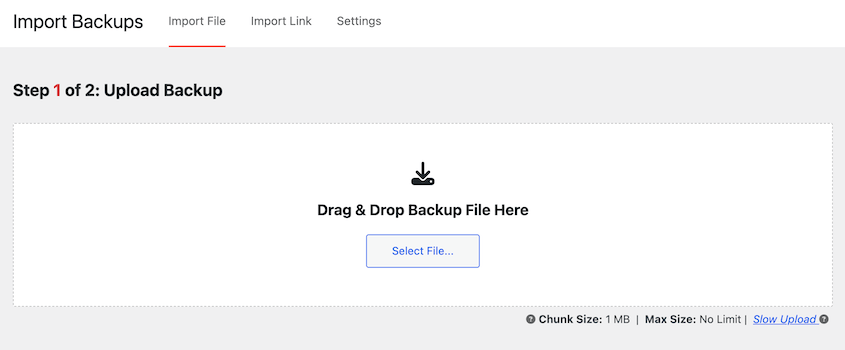
You can move your website from staging to production by creating a backup of the staging site with Duplicator Pro. Then, install Duplicator on your production site and drag and drop the backup’s archive file into the import box.
To import the backup, hit Continue.
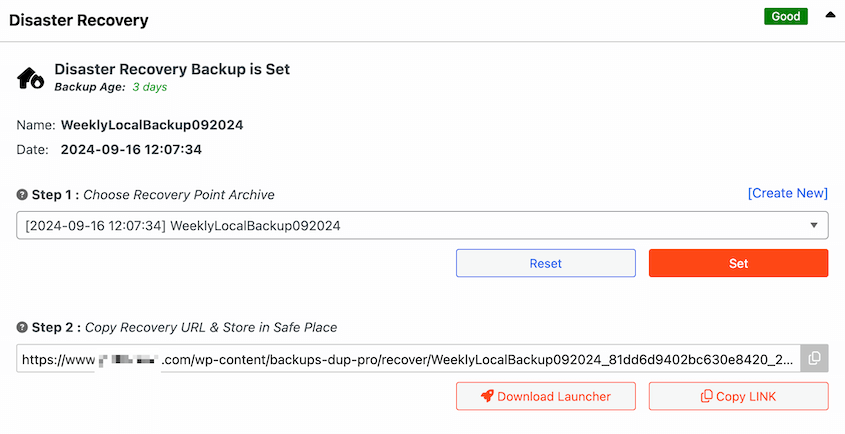
As a security precaution, consider setting a disaster recovery point. Essentially, you can choose a previous backup of your production site to recover if anything goes wrong.
Select a backup and hit Set. After this, copy the URL or download the launcher for quick and easy recovery.
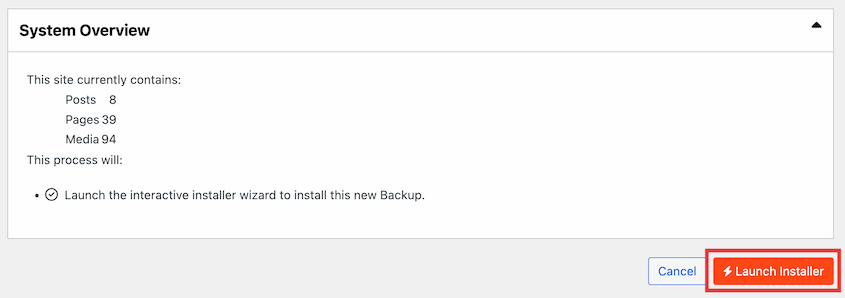
Next, scroll down to the bottom of the page. Click on Launch Installer.
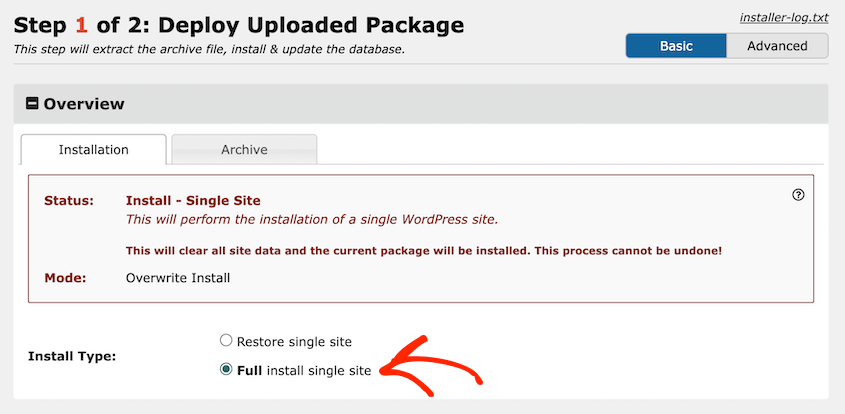
In the Duplicator installer, select Full install single site to overwrite the production site.
You’ll also need to review any notices to see if they will impact the installation. After this, accept the terms and notices and click on Next.
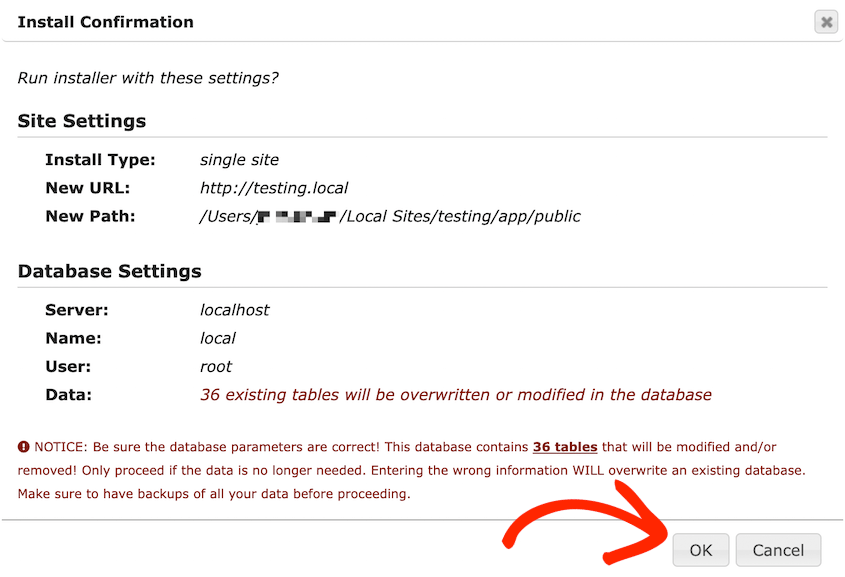
Finally, use the pop-up to confirm that you want to proceed with the installation.
This will automatically push changes on your staging site to your live site!
How do I create a staging site for free on WordPress?
To create a WordPress staging site for free, install the Duplicator Lite plugin. With this free tool, you can build a complete backup of your live site. Next, set up your staging environment using LocalWP, MAMP, WAMP, or XAMPP (all free tools).
Create a new database for your staging site. Then, pull up your staging site’s files and upload the archive and installer files you downloaded earlier.
Finally, launch the Duplicator installer wizard.
For more details, check out these local WordPress installation tutorials:
Alternatives: The WP Staging plugin is another free tool for building WordPress staging sites. If you want extended features like one-click staging or password protection for your local development site, WP Stagecoach is a popular premium staging site plugin.
Conclusion
That’s it! You’ve created your WordPress staging site.
While you’re here, you may also like these extra WordPress tutorials:
Are you ready to set up your staging site? Try out Duplicator Pro to migrate your live website to a staging site without any downtime!
Joella is a writer with years of experience in WordPress. At Duplicator, she specializes in site maintenance — from basic backups to large-scale migrations. Her ultimate goal is to make sure your WordPress website is safe and ready for growth.


