I’ll admit it – I’ve had a love-hate relationship with WordPress multisite networks over the years. They’re brilliant when you need to spin up multiple sites quickly, but sometimes they become more of a headache than a help.
Maybe you’ve hit that point too. Your flagship site is bursting at the seams while other sub-sites barely see any traffic.
Or you’re tired of playing middleman every time a site admin needs a new plugin installed. Perhaps you’re wincing at hosting bills that keep climbing as your network grows.
Here’s what I’ve learned: converting to a single site isn’t nearly as scary as it sounds.
Whether you’re a developer who loves diving into database tables, or someone who prefers one-click solutions, there’s a method that will work for you.
In this tutorial, I’ll show you how to convert WordPress multisite to a single site.
Table of Contents
What Is the Difference Between a Multisite and a Single WordPress Site?
A WordPress multisite allows you to manage multiple sites from a single WordPress installation. It’s like a city where each website acts as a building, all sharing the same foundation and utilities (like themes and plugins).
On the other hand, a single WordPress website is more like a standalone house. It has unique themes, plugins, and users. It’s completely independent.
Both setups have their perks. With a multisite, you can create as many sub-sites as you want. These will share data, making it easy to perform updates and other maintenance tasks.
BBC America is one of my favorite examples of a multisite network. There are sub-sites for different shows, but they’re all on the BBC network.
However, a single WordPress site stands on its own. It doesn’t need any extra sub-sites, so all its content is under one domain.
I know how confusing multisites can be for beginners. If you need extra information, I compiled this full guide on WordPress multisite!
When You Might Need to Convert WordPress Multisite to a Single Site
At this point, you’ve created a WordPress multisite network. But, you’re considering turning it back into a single site.
Here are some scenarios where this is a good option.
Moving a Client Site to an Independent Server
Whether you’re a freelancer or run an agency, you might develop clients’ sites on a multisite network. In this case, you can migrate the site onto your server and make all the changes you need to.
Once it’s ready to go live, the client usually wants the site back on its own independent server. You’ll need to transition the multisite sub-site into a single WordPress installation.
You could’ve also been providing ongoing maintenance and support for clients on your network. If they no longer need your services, the sub-site doesn’t need to be on your multisite anymore.
The Server Costs Are Getting Too High
Running a multisite might have seemed like a cost-effective solution at first. But as the network grows and more sub-sites are added, you’ll need more server resources to keep everything running smoothly.
Migrating to a single site can potentially help cut down on these costs. Each sub-site can be on a shared hosting plan, reducing costs.
A Sub-Site Has Grown
One sub-site on the network could become much larger than the other sites. You might want to set it up with its own web server and domain name.
On a single installation, the site can have better search visibility. It can continue to grow without worrying about taking up too many resources.
Need More Admin Control
In a multisite, all the WordPress plugins and themes will be installed and activated by the network administrator. The sub-site admins can only use new tools if the higher-level admin provides them.
By migrating to a single site, you’ll have full control over the site. It’s easy to install plugins and themes. You can even test out new code if you want to.
Plus, not all plugins and themes are compatible with multisite. A single site allows you to access all the tools in the WordPress.org repository. The options are endless!
The Difficulties of Converting a Multisite to a Single Site
Moving a single site to a better host or server is a fairly straightforward process. When you want to convert a multisite to a single site, it can get complicated.
This is because a WordPress multisite and a single site store data differently.
Just like a single site, a multisite stores separate upload files, posts, taxonomies, and other data for each sub-site. However, some data is stored once for the entire network.
When a new user is added, they have an account on the entire network, not just a sub-site. If you plan on migrating a sub-site out of the network, you’ll have to move its users separately.
As I mentioned earlier, themes and plugins are stored once for the network. This doesn’t matter how many sites are using them.
Although this simplifies updates, migrations become more difficult. Some data in the database is shared, so you can’t just export one sub-site’s database and call it a day.
How to Convert WordPress Multisite to Single Site
Converting a WordPress multisite to a single site can be challenging, but not impossible. Anyone can do it with the right tools!
Method 1. Use a Multisite Migration Plugin
The easiest way to turn your multisite into a single WordPress installation is to use a migration plugin. A tool like Duplicator Pro can seamlessly transition your sub-sites into standalone WordPress sites.
With Duplicator, you’ll completely remove any complicated migration tasks. It allows you to simply drag and drop each sub-site onto its own server!
Not every migration plugin can handle WordPress multisite. Duplicator Pro was built to help you import sites into and out of your network whenever you need to.
Step 1: Install Duplicator Pro
To get started, choose a subscription for Duplicator Pro. There is a free version available, but I’d recommend upgrading. You’ll get access to extra helpful features like multisite support and drag-and-drop migrations.
See how CodeVidia uses Duplicator to migrate multisite networks to and from development environments without losing data!
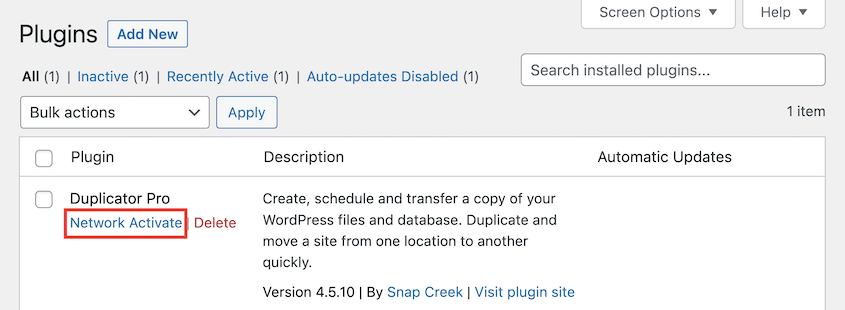
Then, open your multisite admin dashboard. Install Duplicator and hit Network Activate.
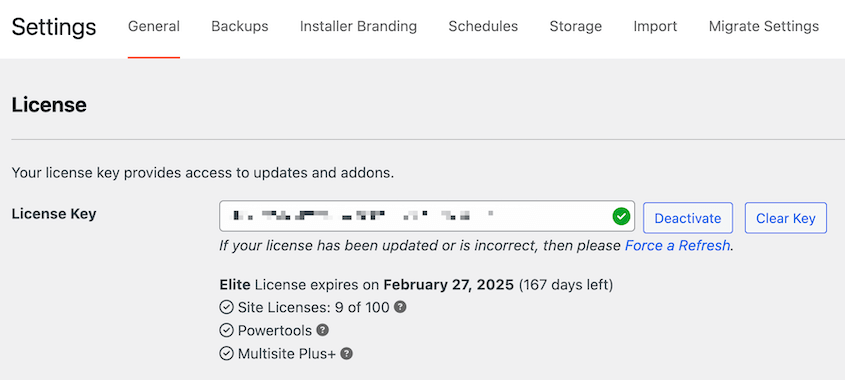
Finally, open the plugin settings and find General. Enter your premium license key and activate it.
Now you’re ready to export sub-sites out of your network!
Step 2: Back Up Your Sub-Sites
With Duplicator, you can turn your multisite into a standalone site. During this process, you’ll back up all your sub-sites individually. Then, you’ll overwrite the multisite with one of the single site backups.
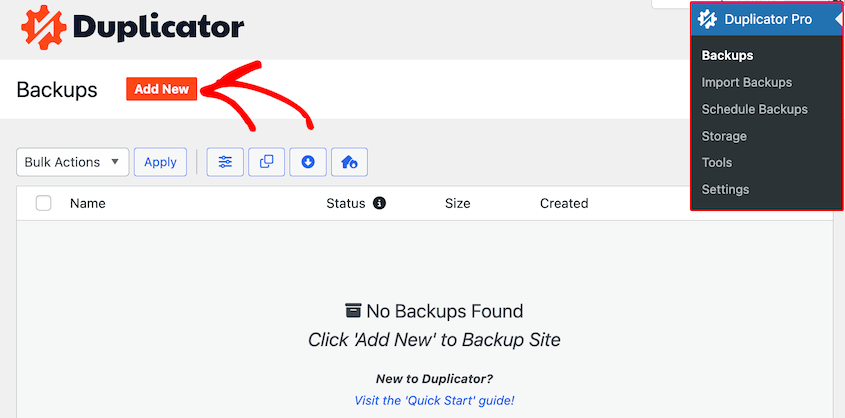
First, go to Duplicator Pro » Backups » Add New.
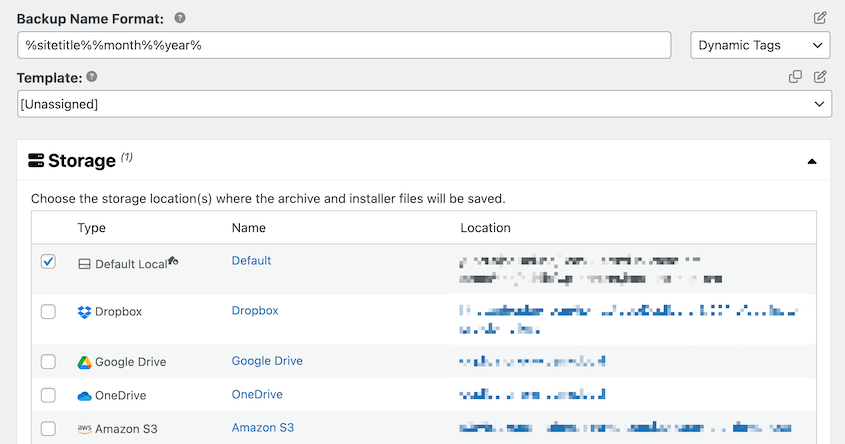
Name the backup with dynamic tags. Although Duplicator supports many different cloud storage locations, choose Local.
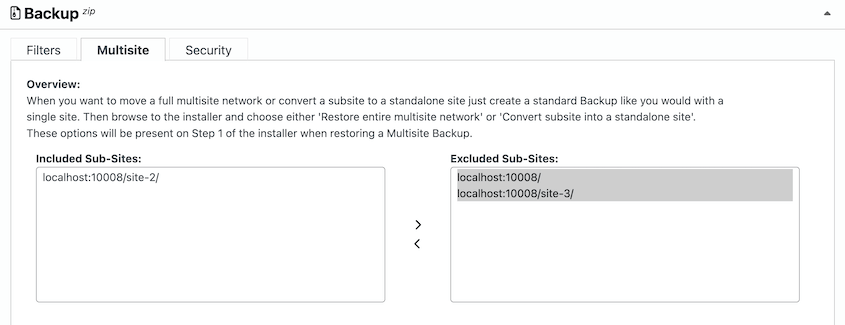
In the Backup section, click on the Multisite tab. You’ll see a list of all your sub-sites in the Included Sub-Sites box. Move all the sites into the Excluded box except the one you want to use as your main site.
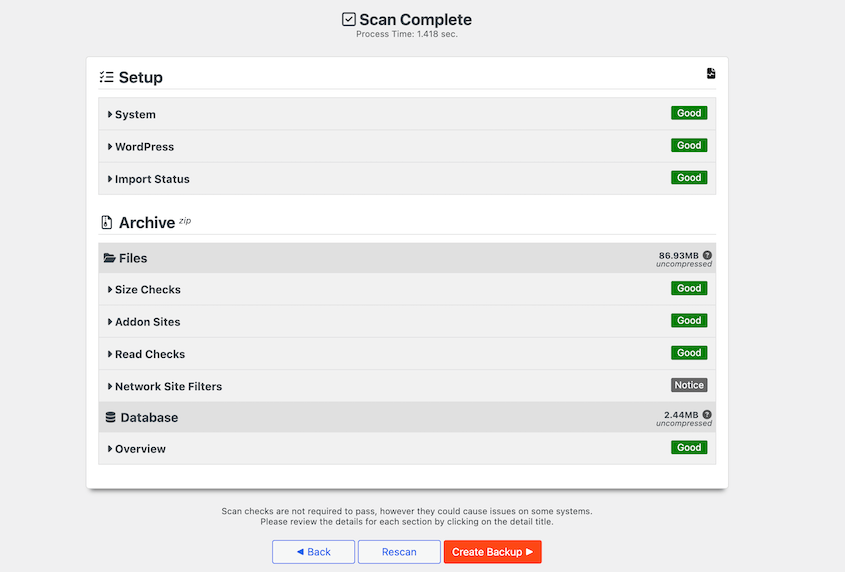
Click Next. Duplicator will then scan your multisite. Review any notices and hit Create Backup.
After this, you’ll get a full backup of the sub-site.
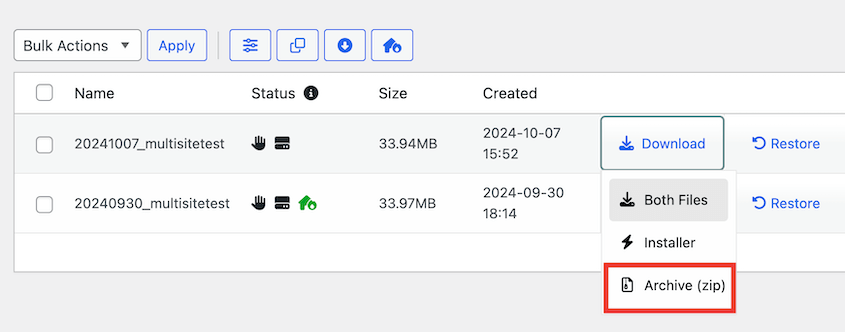
Be sure to download the backup archive file.
Repeat this step until you have backups of all your sub-sites.
Step 3: Overwrite Your Multisite
You’re ready to convert your multisite to a standalone site!
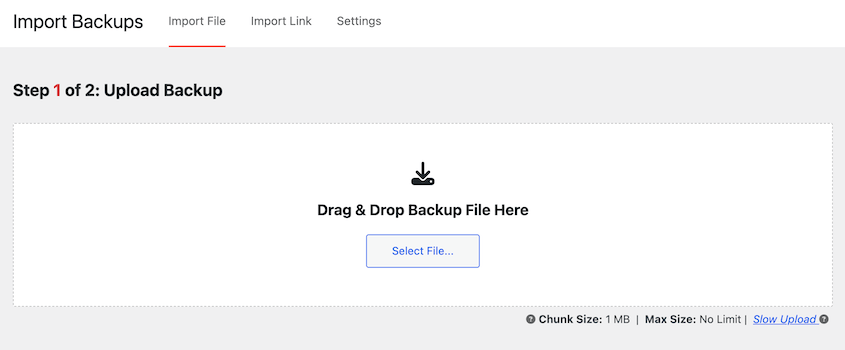
To do this, find the backup of your main sub-site. Then, go to Duplicator’s Import Backups page on your multisite dashboard.
Drag and drop your backup archive file into the upload box. Once it uploads, hit Continue.
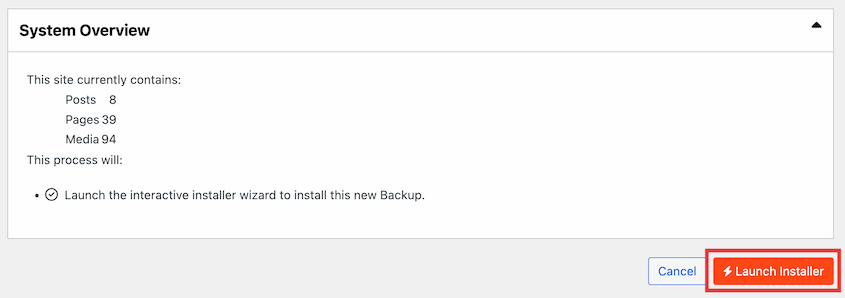
Next, launch the installer.
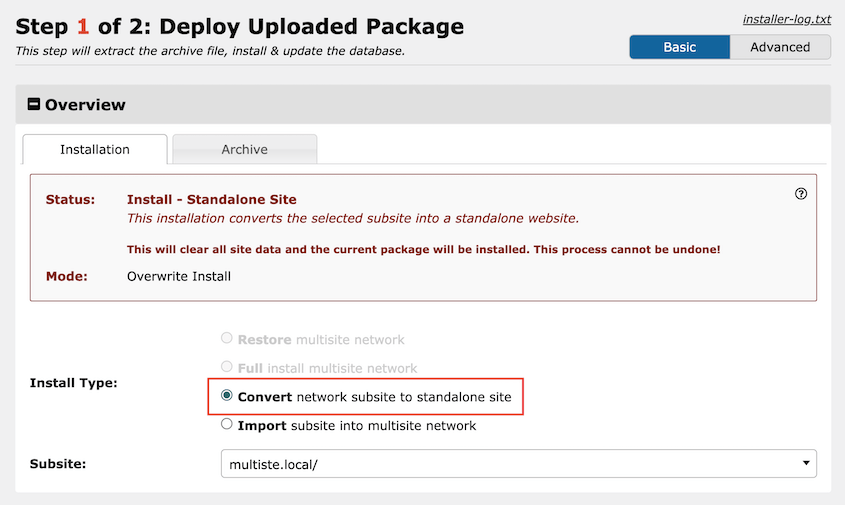
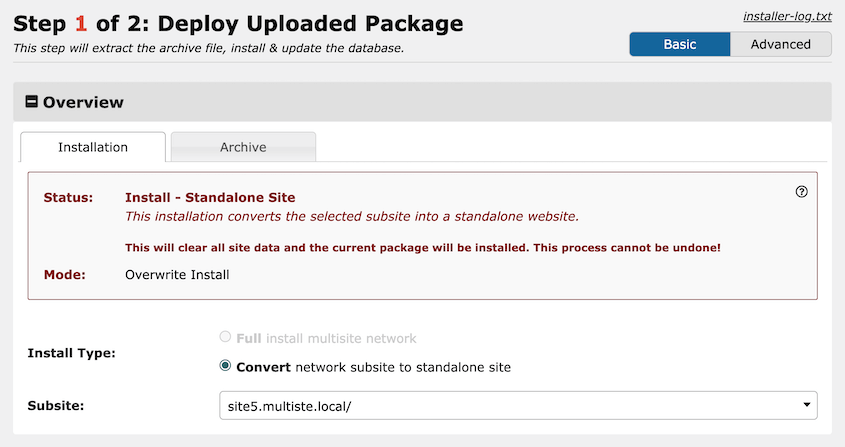
In the installation wizard, make sure the Install Type is Convert network subsite to standalone site.
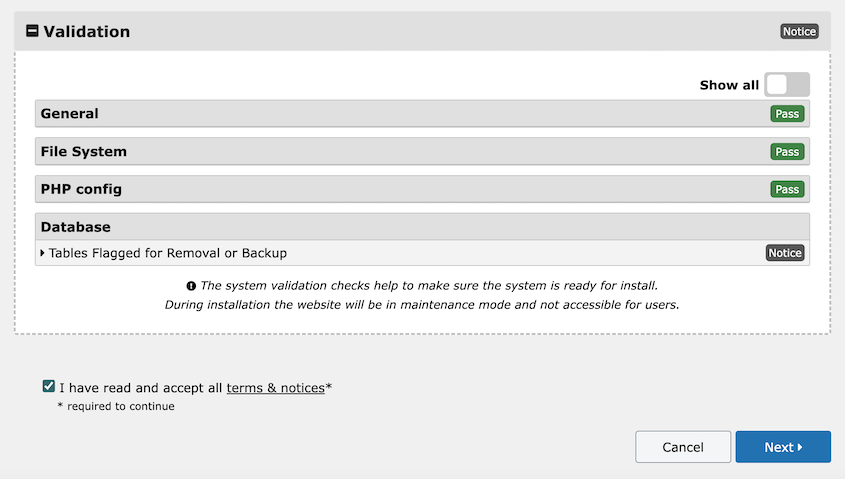
At the bottom of the page, click Validate. Then, accept the terms and notices and continue to the next step.
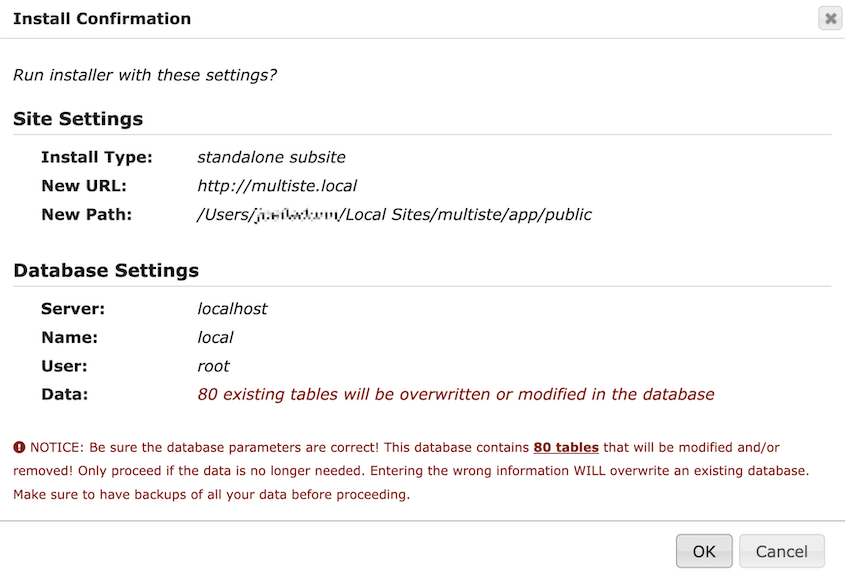
In the pop-up window, confirm the installation.
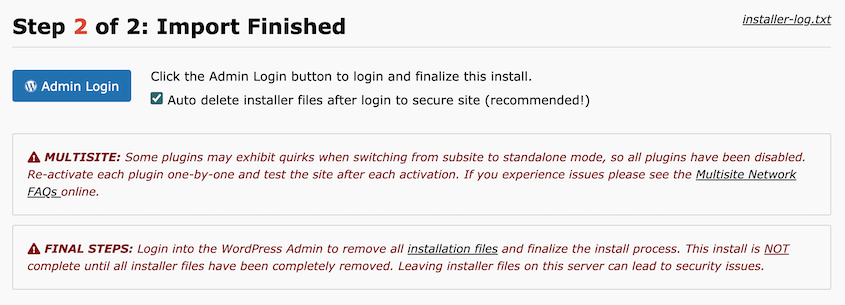
After this, Duplicator will automatically convert your multisite into a standalone site. You can log in using the Admin Login button.
When you open your WordPress dashboard, you’ll also need to activate your plugins again.
Duplicator should automatically delete its installation files so your site is cleaned up and ready to use.
Step 4 (Optional): Move Your Sub-Sites to Standalone Servers
At this point, your multisite is fully converted into a single site. If you don’t need any of your sub-sites, you’re finished!
However, you may need to set up these sub-sites on their own servers. This prevents you from losing any data from your multisite.
First, find a WordPress hosting provider for your new sub-sites. Then, fully set up a new standalone site by purchasing a domain name and installing WordPress.
Go ahead and install Duplicator Pro as well. On the new single site dashboard, go to Duplicator Pro » Import Backups.
Upload one of your sub-site backup archive files. Once you launch the installer, choose Convert network subsite to standalone site.
Complete the rest of the installation. Continue to set up each of your sub-sites on new individual servers.
There is a built-in WordPress tool that can export most of your sub-site’s data to a standalone server.
However, it’s not a comprehensive migration plugin. So, you’ll still have to manually move plugin and theme files, as well as admin settings.
Step 1: Create Single WordPress Installations For Each Sub-Site
As a first step, you’ll need to install WordPress on a new standalone server. Do this for every sub-site, so you have new single site installs for each one.
To help you out, here’s my guide on how to create a WordPress site from scratch!
Step 2: Upload the Plugin and Theme Files to the Single Server
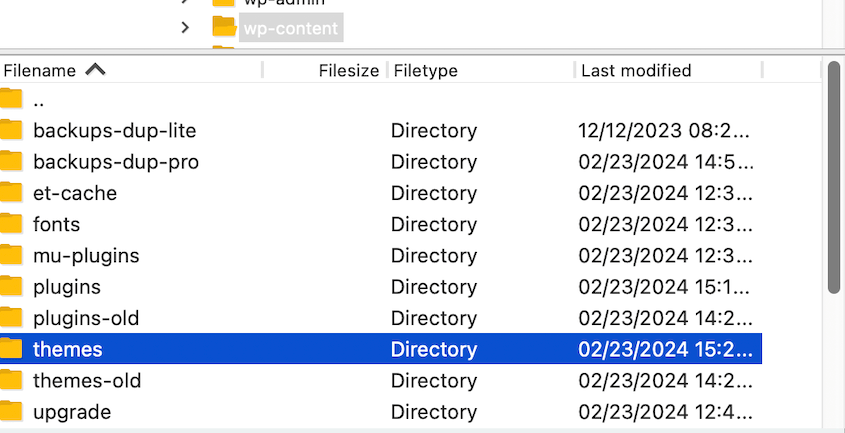
Then, go back to your current multisite. In a file manager like cPanel or an FTP client like FileZilla, open your wp-content folder.
Download both the theme and plugins folders. Once you have these files, compress them.
Now, open the new single site in FileZilla or cPanel. Upload both of these folders to the new wp-content folder. Rename the old plugins and themes folders.
After this, open your new single site dashboard. Activate your old sub-site’s theme.
Step 3: Move All the Sub-Sites Using the WordPress Exporter
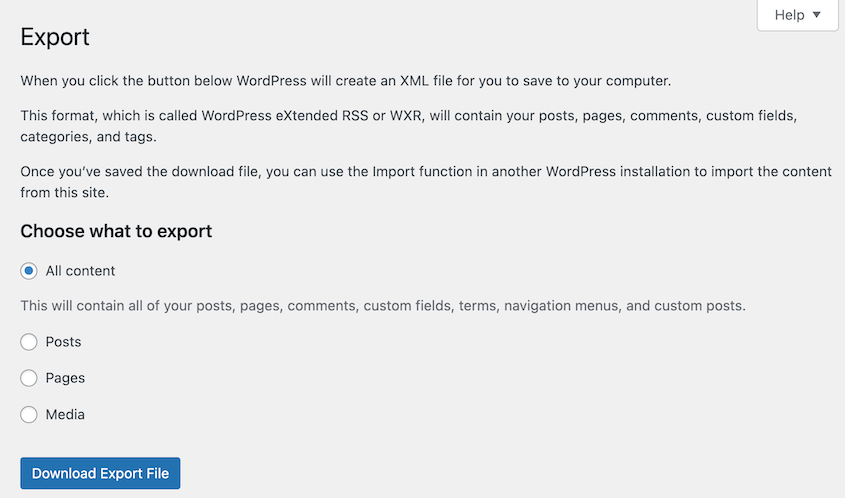
Go back to your old multisite network and open the dashboard for the sub-site you want to move. Navigate to Tools » Export.
Choose All content and hit Download Export File.
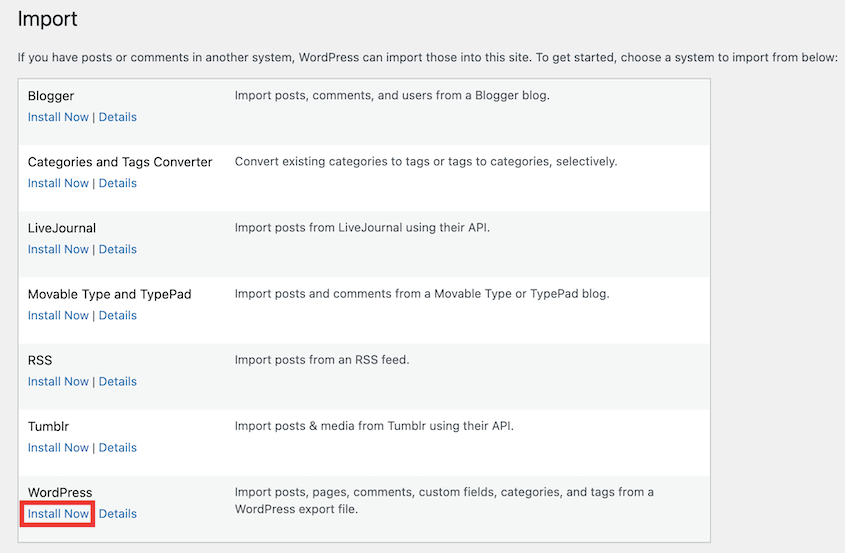
On the new single site, find Tools » Import. Install the WordPress importer.
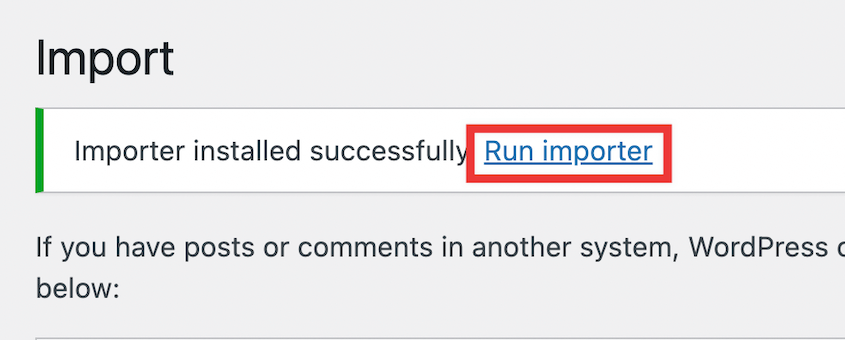
Then, click on Run Importer.
Now, upload the XML file that you downloaded earlier.
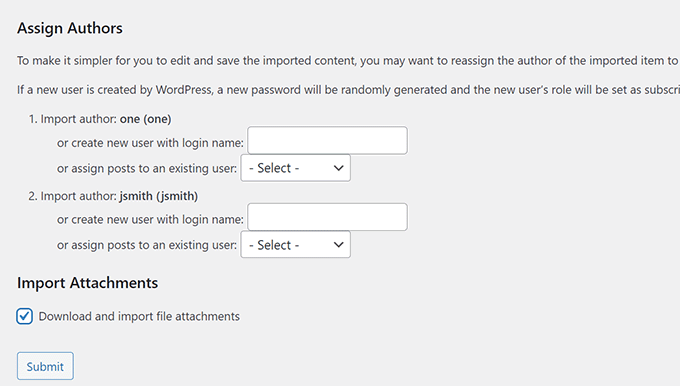
Next, you can import the original author user roles or create new ones. You can also download and import file attachments.
This will successfully import your posts, pages, and users. If you want to import widgets as well, you might need to install the Widget Importer & Exporter plugin.
Since the WordPress importer is fairly limited, you’ll also have to manually change all your admin settings.
Step 4: Set Up Redirects
When you first set up your multisite, you might have used custom domains. If so, you don’t have to create permanent redirects.
However, many people create sub-sites on subdomains or subdirectories. In this case, you’ll need to redirect the old URL to the new one.
Before you get started, make sure both the old multisite and new single site are using the same permalink structure.
Then, install All in One SEO on your old multisite. This WordPress SEO plugin has a redirection add-on with one-click full-site redirects.
Be sure to sign up for AIOSEO Pro or Elite for the redirection add-on. Then, install and activate it on your multisite network.
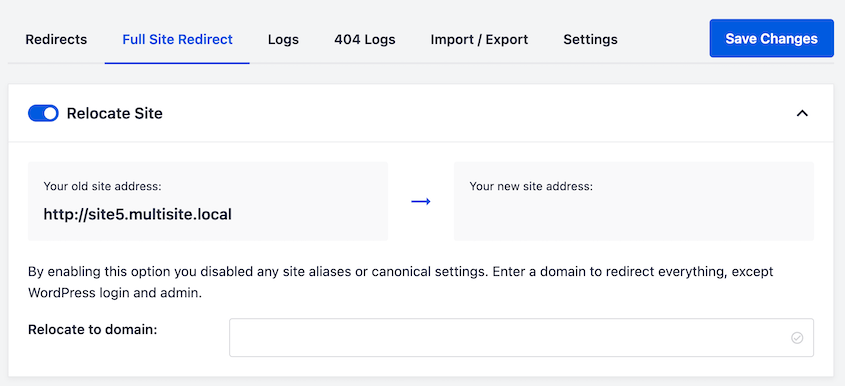
Open the original sub-site’s dashboard. Go to AIOSEO » Redirects » Full Site Redirect.
Turn on the Relocate Site option. In the box next to Relocate to domain, paste your new site’s URL.
Save your changes. This redirects all the content under this domain except the WordPress login and admin pages.
Method 3. Manually Converting a Sub-Site to a Single Site
Pretty much any WordPress task can be handled manually. If you have some technical experience, this might be a good option.
However, I’d recommend trying safer methods. Manually converting a sub-site to a single site leaves a lot of room for error, so you might end up breaking your site.
If you choose this method, be sure to create a full backup of your multisite beforehand. You’ll need to quickly restore a functional copy if you experience any issues.
Step 1: Move the Plugins, Themes, and Uploads
Just like the other methods on this list, start by setting up a new WordPress single site installation. Then download the plugins and themes folders from your multisite and upload them to your new wp-content directory.
If you’re not using the WordPress importer, you’ll also need to move your media files manually. On a file manager, go to wp-content » uploads » sites.
Find your sub-site and download its uploads folder. Next, add this to your new wp-content folder.
Step 2: Export the Sub-Site’s Database Tables
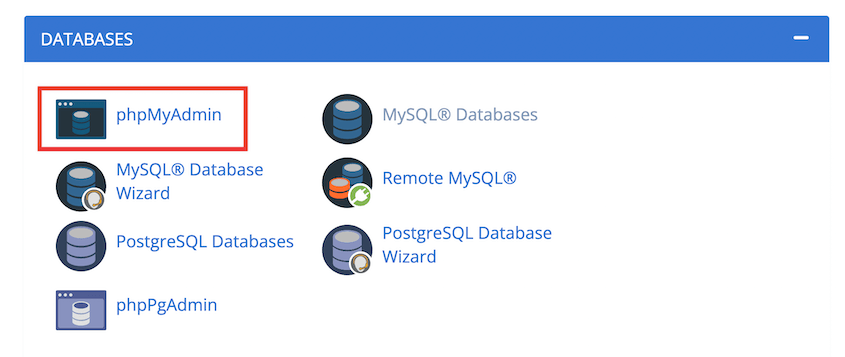
To export your sub-site’s database tables, open phpMyAdmin.
In a multisite, there are extra sets of database tables for each sub-site. Find the set for the sub-site you want to download.
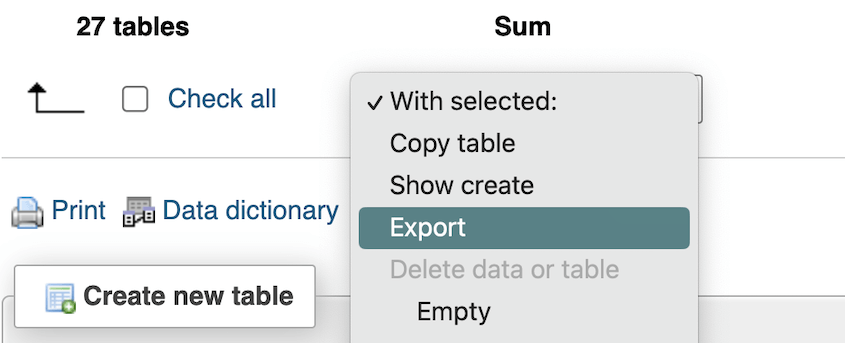
Select them and scroll to the bottom of the page. Click on the With Selected dropdown and choose Export.
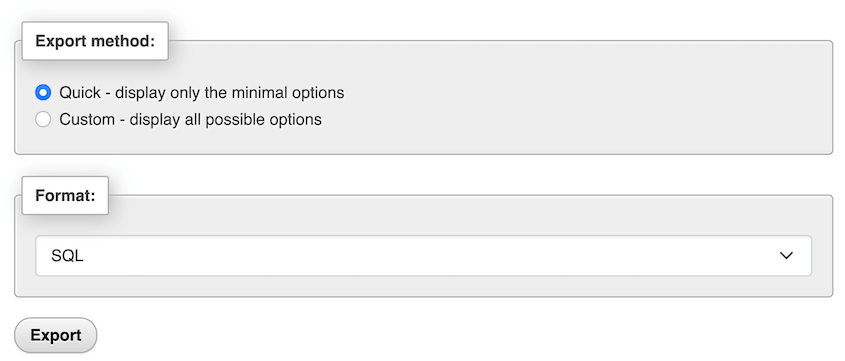
Select the Quick export method and the SQL format. Then, hit Export.
Step 3: Edit the Database SQL File
Next, copy the downloaded SQL file. Open it in your favorite code editor.
Here’s what you’ll need to update:
These database tables still refer to the old site’s domain. Go through them and add your new URL.
Secondly, WordPress multisite tables reference the sub-site’s ID. For example, the prefixes are wp_XX_.
Single sites use the wp_ prefix. So, update all the tables with this new prefix.
Step 4: Migrate Sub-Site Database Tables to the Single Site
Before you import the original sub-site tables into the single site, you’ll need to drop the existing tables. To do this, select all of the tables except wp_users and wp_usermeta. Select Drop in the With selected menu.
Then, click on the Import tab. Upload the SQL file that you updated. Hit Go to import the database.
Step 5: Delete the Sub-Site From Your Multisite
After you’re finished with the migration, I’d recommend clearing your browser cache. Then, log into the new single site and make sure everything is working correctly.
You may want to give yourself some time to troubleshoot issues and fully test your new site for errors. Once you’re confident the new site is good to go, delete the old sub-site.
Repeat this process for any sub-sites you want to convert to single sites.
Method 4. Manually Converting a Multisite to a Single Site
Alternatively, you might want to completely turn your main site into a single site. This completely gets rid of your network.
We’d recommend this option only if you have a few sub-sites. You’ll have to move or delete all of them, which can be a lengthy process if you have a large network.
Step 1: Delete or Migrate All of the Sub-Sites
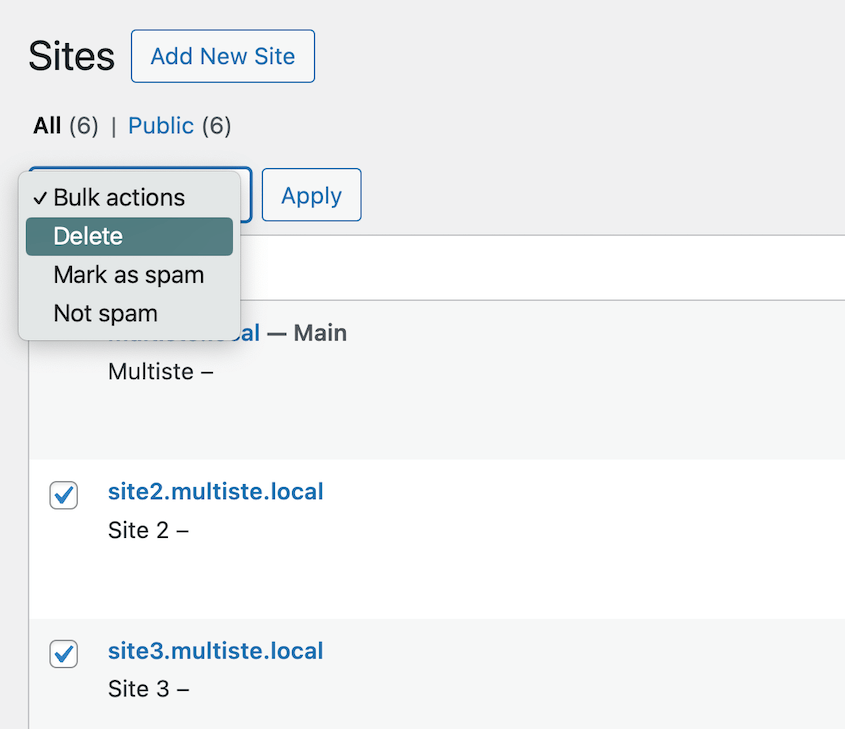
To turn your multisite into a single site, it’s time to remove your sub-sites. Go to the Network Admin » Sites page and delete all of them.
You could also move each site out of the network and onto its own server. Be sure to follow the steps we included in the previous methods.
Step 2: Delete Extra Themes, Plugins, and Users
Next, find your Plugins page and delete any tools you don’t plan on using. You should also remove any extra themes that won’t be used on the base site.
Maybe one of your sub-sites was a membership website. In this case, you won’t want records of all of these extra users. So, go through your users and remove any that shouldn’t have access anymore.
Step 3: Deactivate WordPress Multisite
When you activated WordPress multisite, you added code to your wp-config.php file. To convert it to a single site, you’ll have to make some adjustments.
In your wp-config.php file, find and remove this code:
define( 'MULTISITE', true );
define( 'SUBDOMAIN_INSTALL', false );
$base = '/wordpress/';
define( 'DOMAIN_CURRENT_SITE', 'localhost' );
define( 'PATH_CURRENT_SITE', '/wordpress/' );
define( 'SITE_ID_CURRENT_SITE', 1 );
define( 'BLOG_ID_CURRENT_SITE', 1 );
Then, locate this line:
define('WP_ALLOW_MULTISITE', true);
Replace “true” with “false”.
You might’ve had to also edit the .htaccess file to set up the multisite. If so, open this file and replace the multisite code with this:
RewriteEngine On
RewriteBase /wordpress/
RewriteRule ^index.php$ - [L]

# uploaded files
RewriteRule ^([_0-9a-zA-Z-]+/)?files/(.+) wp-includes/ms-files.php?file=$2 [L]

# add a trailing slash to /wp-admin
RewriteRule ^([_0-9a-zA-Z-]+/)?wp-admin$ $1wp-admin/ [R=301,L]
RewriteCond %{REQUEST_FILENAME} -f [OR]
RewriteCond %{REQUEST_FILENAME} -d
RewriteRule ^ - [L]
RewriteRule ^([_0-9a-zA-Z-]+/)?(wp-(content|admin|includes).*) $2 [L]
RewriteRule ^([_0-9a-zA-Z-]+/)?(.*.php)$ $2 [L]
RewriteRule . index.php [L]
Save both of these files and close them.
Finally, you’ll have to drop a few database tables that were added to activate multisite. Log into phpMyAdmin and select all of these tables:
- wp_blogs
- wp_blog_versions
- wp_registration_log
- wp_signups
- wp_site
- wp_sitemeta
Use the With selected dropdown to drop these tables. This will convert your multisite installation into a single site!
Common Mistakes to Avoid
One frequent issue is not properly backing up your multisite before the transition. Backups are crucial to avoid permanent data loss.
Rely on dependable backup solutions suited for multisite configurations (like Duplicator). Double-check the backup completeness before starting the transition.
Another common mistake is ignoring plugin compatibility.
Some plugins that work seamlessly in a multisite setup may behave differently once converted. Check for compatibility beforehand to prevent functionality glitches after the move.
FAQs About Converting a WordPress Multisite to a Single Site
How do I change my WordPress site from multisite to single?
To change your WordPress site from a multisite to a single site, install a migration plugin like Duplicator Pro. Back up the sub-site you want to use as your main site. Then, import it back into the site, overwriting it with the single site backup.
How do I turn off multisite?
To switch off multisite, you have to edit your WordPress code files and remove the multisite lines from your wp-config.php file. After you’ve done this, you will need to remove the .htaccess rules related to WordPress multisite. Be sure to back up your site before making these changes to safeguard against any potential issues.
When is it not best to use WordPress multisite?
If you’re managing websites that need different plugins and themes, it’s not best to use a WordPress multisite network. Plus, when a sub-site gets too big and demands more specific server resources, transitioning into a standalone site might be the best move.
How do I restore a single site in WordPress multisite?
Restore a single site in a WordPress multisite by backing up the sub-site first. Create a single sub-site backup with Duplicator, then restore it with one click when needed. This process ensures efficient recovery without affecting the entire multisite network.
Conclusion
By now, you’ve turned your multisite into a single site! You’re free to install new plugins, redesign your theme, and grow your site as much as you want.
While you’re here, I think you may like these extra WordPress guides:
Do you want to quickly convert your multisite to a single WordPress install? Download Duplicator Pro to overwrite the site with a sub-site backup, instantly turning it into a single site!
Joella is a writer with years of experience in WordPress. At Duplicator, she specializes in site maintenance — from basic backups to large-scale migrations. Her ultimate goal is to make sure your WordPress website is safe and ready for growth.


