The database is what keeps all your WordPress content organized and accessible.
When you build a website, your WordPress host will set one up for you. But, you might eventually have to create a new database.
You might need a new database if you’re setting up a brand-new website or migrating your site to a new host. You could also need a staging environment or separate databases for multiple WordPress installations.
Don’t worry if this sounds technical. In this post, I’ll teach you everything you need to know!
Here are the key takeaways:
- A WordPress database stores all your site’s content in MySQL tables, including posts, pages, comments, user data, and settings
- You’ll need to create a new database when launching a new site, migrating hosts, setting up staging environments, or managing multiple WordPress installations
- Always back up your existing site before creating a new database to protect your data
- You can create a WordPress database using either phpMyAdmin (more technical) or cPanel’s MySQL Database Wizard (more user-friendly)
- After creating your database, update your wp-config.php file with the new database credentials and implement security measures like strong passwords and regular backups
Table of Contents
What Is a Database in WordPress?
Think of a WordPress database as a digital filing cabinet for your website. It’s where all the important stuff gets stored and organized.
But instead of folders and papers, information is stored in WordPress database tables and rows. Here’s what’s in your database:
- Your posts and pages
- Comments left by readers
- User information and profiles
- Settings for your themes and plugins
- Categories and tags
- Links and metadata
WordPress uses a special type of database called MySQL. Don’t let the technical name scare you — MySQL is just a system that’s good at managing all this information quickly and efficiently.
When someone visits your site, WordPress pulls the necessary info from this database and displays it as a beautifully formatted web page. It happens in the blink of an eye, and your visitors never see the behind-the-scenes action.
Why Create a WordPress Database?
Creating a database isn’t something you’ll do often. But there are a few scenarios when you might need to. Let’s break them down!
Setting Up a New WordPress Site
The most common reason to create a new database is when you’re launching a brand-new website. Every WordPress website needs its own database to function. It’s like giving your new digital home a foundation.
Migrating to a New Host
Switching hosting providers? You’ll likely need to create a fresh database on your new server. This ensures all your content has a place to live in this new location.
Creating a Staging Environment
Web developers often use staging environments for testing. These require a separate database to avoid messing with the live site’s data.
Managing Multiple WordPress Installations
If you’re running several WordPress sites on one server, each needs its own database. This keeps everything organized and prevents one site’s data from interfering with another.
Recovering from Errors
Your site may experience a significant problem. To fix it, you could create a new database and import your backed-up data into it.
However, this is not the easiest way to restore your site. See our guide on rolling your site back from a disaster!
Learning and Experimentation
Maybe you’re just curious about how WordPress works under the hood. Creating a database is a great way to learn about WordPress’s inner workings.
What to Do Before Creating a WordPress Database
First things first: if you’re working with an existing WordPress site, back it up. This includes your current database and all your files. It’s like taking a snapshot of your site, just in case.
It’s always better to be safe than sorry. If anything goes wrong, you can restore your site to its previous state.
There are several ways to back up your WordPress site, but I’d recommend using a plugin like Duplicator. It not only backs up your site but gives you easy ways to restore it if necessary.
You’ll need access to your hosting account to create a database. This usually means logging into your hosting control panel (like cPanel) or database management tool (like phpMyAdmin).
Make sure you have these login details handy:
- Your hosting account username and password
- Your database management tool credentials (if different from your hosting account)
If you’re not sure where to find this information, check your welcome email from your hosting provider or contact their support team.
Different hosts may have specific requirements or limitations for databases. It’s a good idea to check:
- How many databases you’re allowed to create
- Any naming conventions for databases or users
- Any specific instructions your host provides for creating databases
A quick look at your hosting provider’s knowledge base or a chat with their support can save you headaches later.
How to Create a WordPress Database (2 Methods)
Now that we’re all set, let’s create your WordPress database!
There are several ways to do this. So, the best method for you will depend on your hosting setup and comfort level with different tools.
- Method 1: phpMyAdmin: A powerful database management interface that gives you direct control over database creation, user setup, and privilege management
- Method 2: cPanel MySQL Database Wizard: A streamlined, beginner-friendly tool that walks you through creating a database and user
Method 1. Creating a WordPress Database with phpMyAdmin
Picture phpMyAdmin as the control room for your databases. It’s a powerful tool that might look a bit intimidating at first, but don’t worry – we’ll navigate it together.
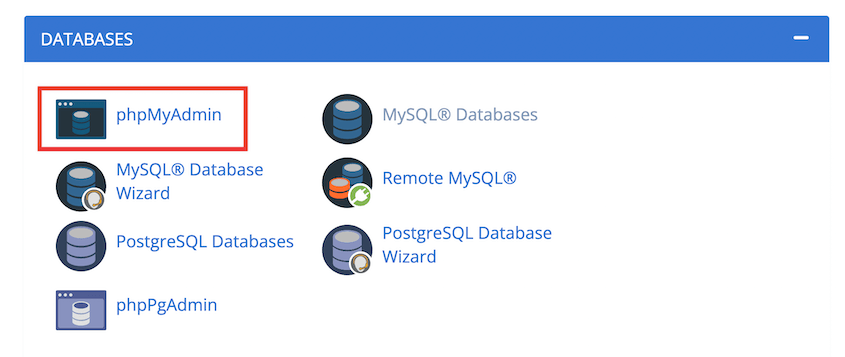
First, you’ll need to access phpMyAdmin. Usually, you can find it in your hosting control panel. Look for an icon labeled phpMyAdmin, usually tucked under a section called Databases.
Click on the Databases tab. You should see a field for creating a new database.
Type in a name for your new database. Choose something memorable but avoid spaces or special characters.
Remember, some hosts might add a prefix to your database name, so don’t be surprised if you see that.
After you’ve typed in your chosen name, hit the Create button. Just like that, you’ve created your WordPress database! But we’re not done yet.
Now we need to set up a user for this database.
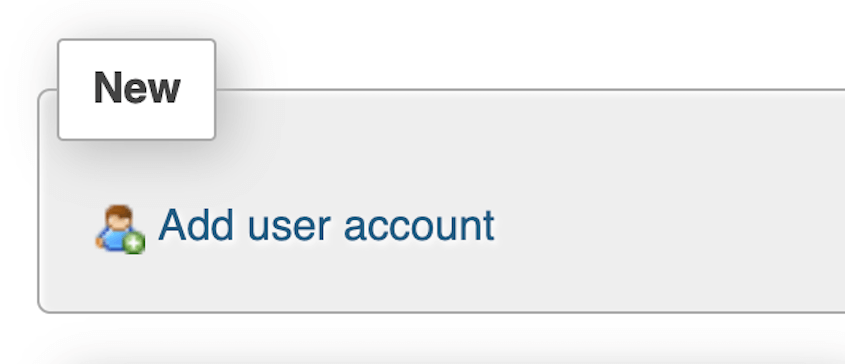
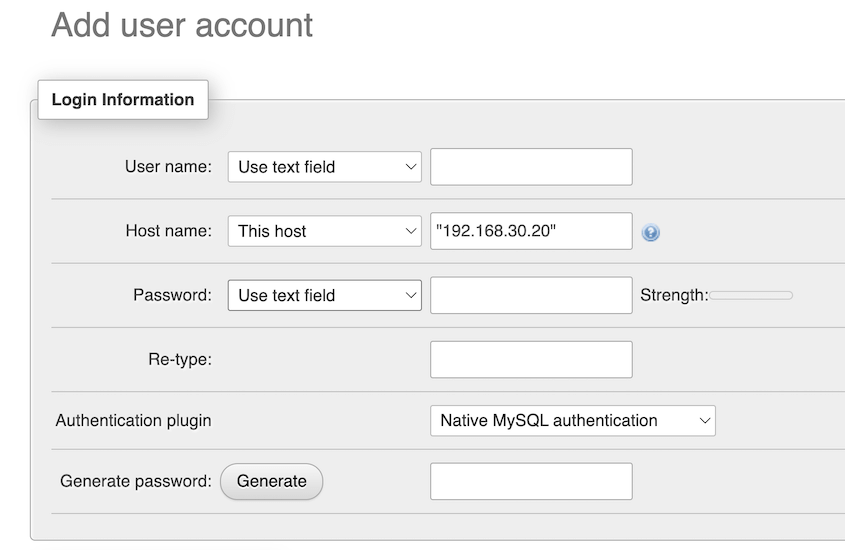
Click on the User accounts tab. At the bottom, hit Add user account.
Create a username (again, avoid spaces and special characters) and a strong password.
Pro tip: use a password generator for this. It’s crucial to use a strong, unique password here to keep your site secure.
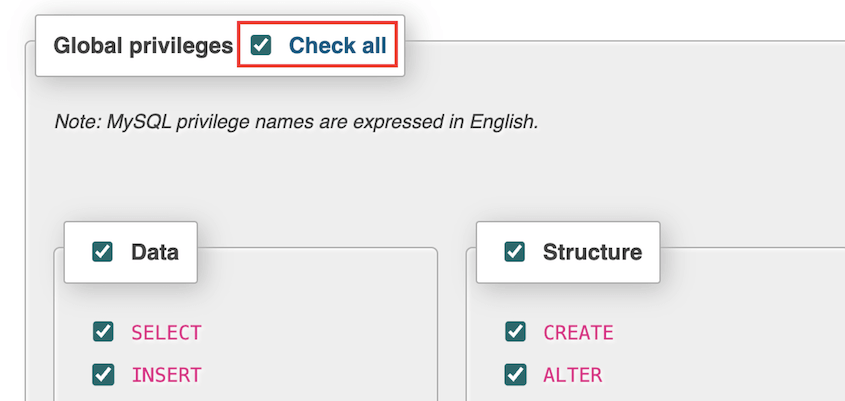
Finally, you’ll need to give this new user permission to access and modify your new database. Check all global privileges and hit Create user.
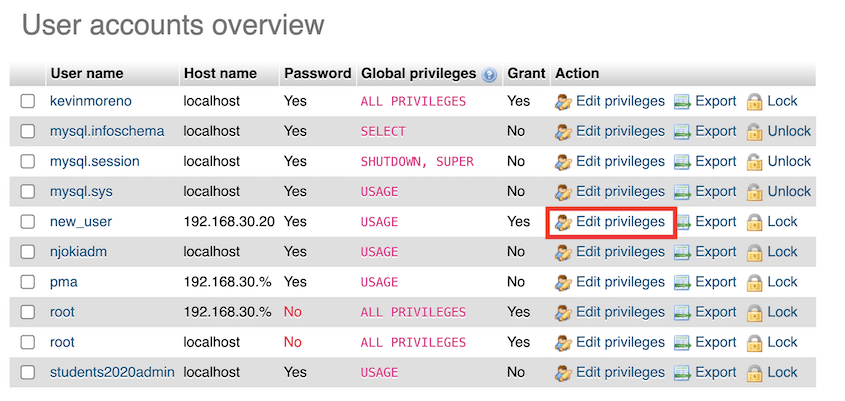
Click on Users again. Find the new user and select Edit privileges.
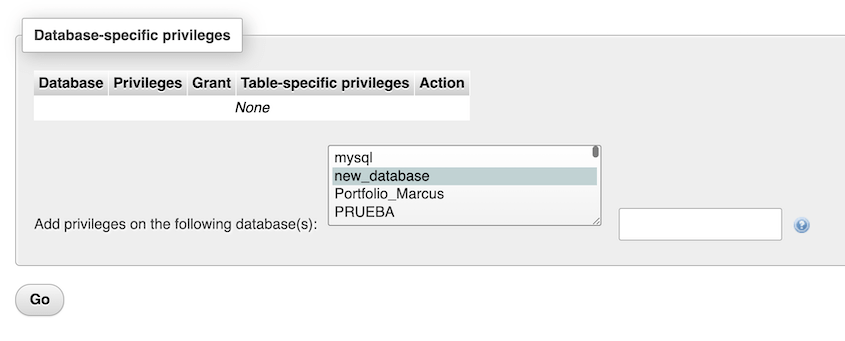
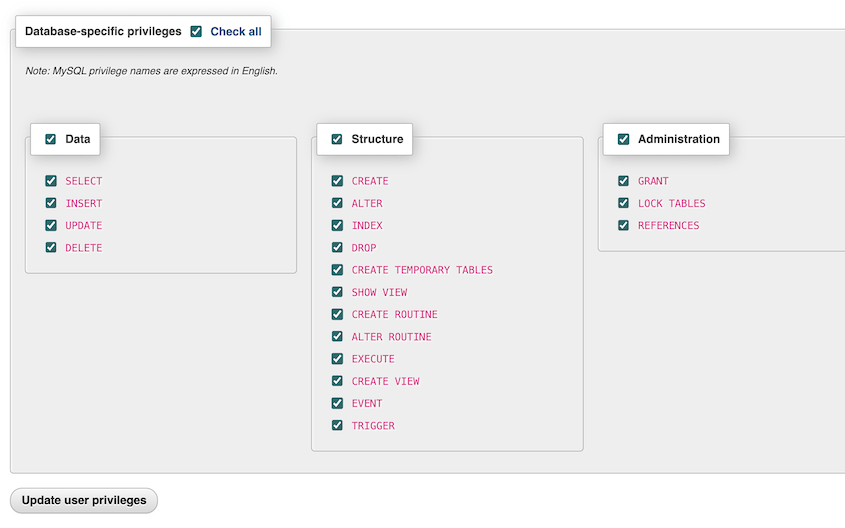
Click on the Database option. Under Database-specific privileges, find Add privileges to the following database. Choose the database name you created earlier and hit Go.
Check all of the privileges again and click Update user privileges.
And there you have it! You’ve successfully created a WordPress database and a user to access it.
Method 2. Creating a WordPress Database with cPanel
If phpMyAdmin felt a bit too technical, don’t worry. Many hosting providers offer a more user-friendly option: cPanel. This allows you to access the WordPress database and create a new one without as many steps.
First, you’ll need to log into your cPanel account. Your hosting provider should have given you the login details.
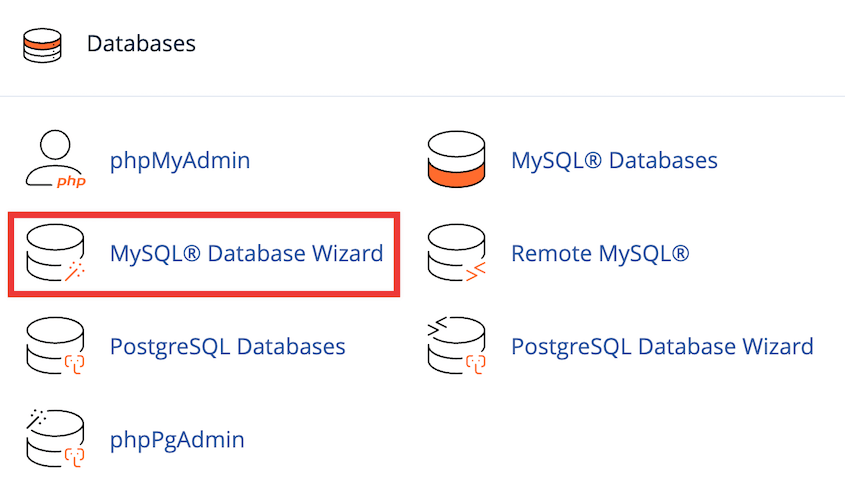
Click on MySQL Database Wizard.
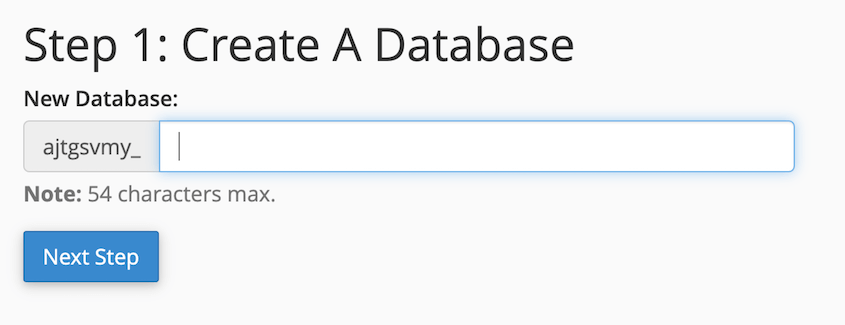
In the field provided, type in a name for your new database. Remember, keep it simple and avoid spaces.
Click Create Database, and voila! You’ve just created your WordPress database.
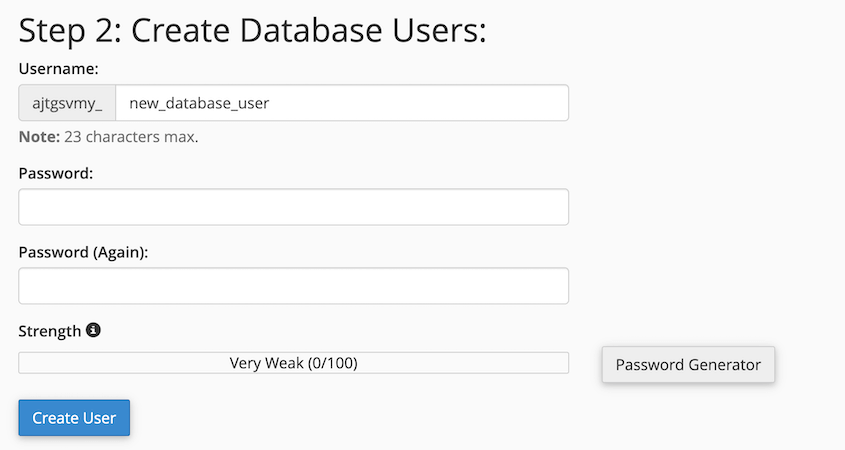
Scroll down a bit more, and you’ll see a section called Add New User. This is where we’ll create the user who can access your new database.
Choose a username and a password. I’d suggest using the password generator that cPanel provides. It’ll create a super-strong password that’ll keep your database secure.
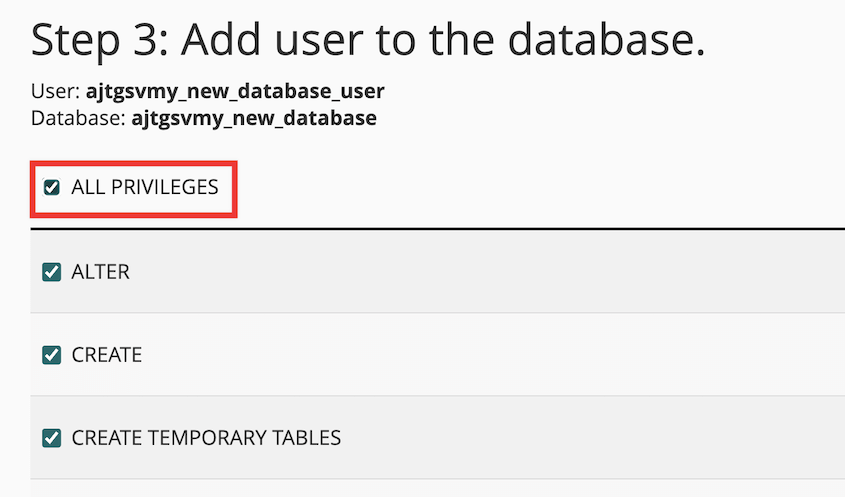
After you’ve created the user, you need to connect it to your new database. Look for a section called Add User to Database. Select your new user and your new database from the dropdown menus, then click Add.
You’ll see a page with a bunch of checkboxes for different permissions. For a WordPress database, select ALL PRIVILEGES. This gives your user full access to manage the database.
And there you have it! You’ve created a WordPress database and a user to go with it, all through the user-friendly interface of cPanel.
What to Do After Creating a WordPress Database
You’ve successfully created your WordPress database. But our journey isn’t over yet. Think of it like building a house – we’ve laid the foundation, but now we need to connect everything and make sure it’s secure.
First things first: updating your wp-config.php file. This file tells your WordPress site how to connect to your new database.
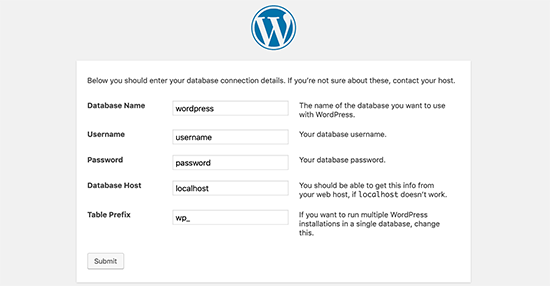
If you’re installing WordPress for the first time, you’ll be asked for your database details during the famous “5-minute install.” Just plug in the database name, username, and password you created earlier, and you’re good to go.
But what if you’re migrating a site or setting up WordPress manually? In that case, you’ll need to edit the wp-config.php file yourself.
Find the wp-config.php file in your root directory. Open it in a text editor and look for these lines:
define( 'DB_NAME', 'database_name_here' );

define( 'DB_USER', 'username_here' );

define( 'DB_PASSWORD', 'password_here' );
Replace ‘database_name_here’, ‘username_here’, and ‘password_here’ with the details you created earlier. Save the file, and you’re all set!
Now, let’s talk security. Your database is like the vault of your website, so we need to make sure it’s locked up tight.
Here are a few steps to secure your new database:
- Use a strong, unique password for your database user.
- Limit database user privileges if possible.
- Keep your WordPress installation, themes, and plugins up to date.
- Use a security plugin. Many offer features to protect your database from common attacks.
- Create backups regularly. They’re a lifesaver if something goes wrong.
Remember, creating and securing your database is a crucial step in your WordPress journey. It might seem technical, but you’re building valuable skills that will serve you well as you manage your site.
Frequently Asked Questions (FAQs)
Is a WordPress database free?
Yes, the database itself is typically included with your hosting plan. However, some advanced managed database services might have additional costs.
How do I get a WordPress database?
You can create a WordPress database using your hosting control panel, phpMyAdmin, or command line tools. Most hosting providers offer user-friendly methods to set up databases.
How do I set up a MySQL database for WordPress?
Setting up a MySQL database for WordPress involves creating the database, creating a user, and granting that user privileges on the database. Your hosting provider usually offers tools to simplify this process.
What is the best database type for WordPress?
MySQL is the standard database type for WordPress. However, MariaDB, a fork of MySQL, is also widely used and fully compatible with WordPress.
How do I create a database for WordPress in localhost?
For local development, you can use tools like XAMPP or MAMP, which include database management interfaces. These tools make it easy to create and manage databases on your local machine for testing and development.
Conclusion
Creating a database might seem like a small step, but it’s a crucial foundation for your website. You’ve not only learned how to create a MySQL database but also how to do it securely and efficiently on different platforms.
While you’re here, I think you’ll like these extra WordPress guides:
Don’t forget that tools like Duplicator make WordPress database management a breeze. Try out Duplicator Pro to easily back up, clone, or migrate your database!
Joella is a writer with years of experience in WordPress. At Duplicator, she specializes in site maintenance — from basic backups to large-scale migrations. Her ultimate goal is to make sure your WordPress website is safe and ready for growth.


