
![[New] Introducing Duplicator 5.0: AI Backups, AutoTune, and Extra Free Features](https://duplicator.com/wp-content/uploads/2026/09/Duplicator-5-0-Announcement.jpg)
How to Create a WooCommerce Staging Site (And What to Test Before Going Live)
 Joella Dunn
Joella Dunn
Joella Dunn
 John Turner
John Turner
John Turner
Somewhere in the back of your mind is the same question every store owner eventually asks: what happens if I install an update and something breaks?
On a blog, a broken plugin is annoying. On a WooCommerce store, it’s a broken checkout. Every minute your checkout doesn’t work is a sale you’re not getting back.
That’s what a staging site solves. It’s an exact copy of your store running on a separate URL, completely isolated from your live site.
You make your changes there first. If something breaks, nothing happened. If everything works, you know it’s safe to apply on live.
In this post, I’ll walk you through how to create a WooCommerce staging site. I use this process every time I need to test a significant change on a store, and it’s the fastest way I’ve found to go from live site to working staging environment without touching a single config file.
Here are the key takeaways:
- Duplicator can create a complete WooCommerce staging site directly from a backup inside your WordPress dashboard.
- Staging is built from a backup, so you need to create one before you can set up a staging site.
- The most important WooCommerce staging rule: never push your staging database back to your live site. Your live store kept taking orders while you were on staging, and those orders aren’t in the staging copy. Apply changes manually to live instead.
- Duplicator automatically blocks search engines from indexing your staging site and disables outgoing email.
Table of Contents
- Why You Need a Staging Site for Your WooCommerce Store
- How to Create a WooCommerce Staging Site
- What to Test on Your WooCommerce Staging Site
- Important: Never Push Your Staging Database Back to Your Live Store
- Common WooCommerce Staging Problems
- Frequently Asked Questions (FAQs)
- Your WooCommerce Store Is Worth Protecting
Why You Need a Staging Site for Your WooCommerce Store
A WooCommerce store isn’t like a standard WordPress site. It’s live infrastructure, and it runs constantly.
While you’re reading this, your store is processing orders, authenticating customer accounts, and communicating with payment gateways.
There’s no natural downtime window to sneak in a quick test. Any change you make goes live the moment you make it.
That’s a problem because WooCommerce stores are more fragile than they look. Here’s what could happen:
- A plugin conflict can silently break the add-to-cart button without throwing a single error.
- A WooCommerce core update can clash with a plugin you’ve had installed for years.
- A payment gateway setting change can prevent orders from completing while the checkout page looks completely normal to the customer.
You won’t know any of this happened until a customer tells you, or until you check your orders and notice the gap.
Staging removes that risk. You’re not guessing whether a change is safe. You’re testing it on an identical copy of your store and confirming it works before your customers ever see it.
This matters most in two situations:
- If you’re a store owner running a promotion, the worst possible moment for a plugin conflict is during a sale when traffic is high and orders are coming in fast.
- If you’re a developer managing a client store, breaking a live store while testing is not something you can walk back easily.
Staging is how you make sure these problems never happen.
How to Create a WooCommerce Staging Site
Duplicator Pro is a WordPress backup and migration plugin that includes one-click staging. It handles the entire setup automatically: no phpMyAdmin, no file transfers, no manual URL replacement or database configuration.
Here’s what you’ll do:
- Step 1: Create a full backup of your WooCommerce site. Staging is built from this backup, so a fresh one ensures your staging environment matches your live store as closely as possible.
- Step 2: Set up your staging site in Duplicator Pro. This is where you configure the environment and run the installer. Duplicator handles search engine blocking, email suppression, and database isolation automatically.
- Step 3: Log in and verify the staging site. You’ll confirm the staging environment is working correctly and switch your payment gateway to test mode before running any test orders.
Step 1: Create a Full Backup of Your WooCommerce Site
Staging is built from a backup, so this is where you start. The backup captures your store exactly as it is right now, and that snapshot becomes your staging environment.
I’ll walk you through this process with Duplicator Pro, a popular backup plugin. You can use the free version to import your site into an off-site staging area, but the Pro version has one-click staging. I’ll show you how it makes testing easier!
A quick note before you begin: don’t use an old backup for this. The closer the backup is to your current live site, the more accurately staging will reflect it. Create a fresh one now.
First, get Duplicator Pro and install it in your WooCommerce site. Make sure to upgrade to the Pro or Elite plan for one-click staging.
Go to Duplicator Pro » Backups and click Add New.
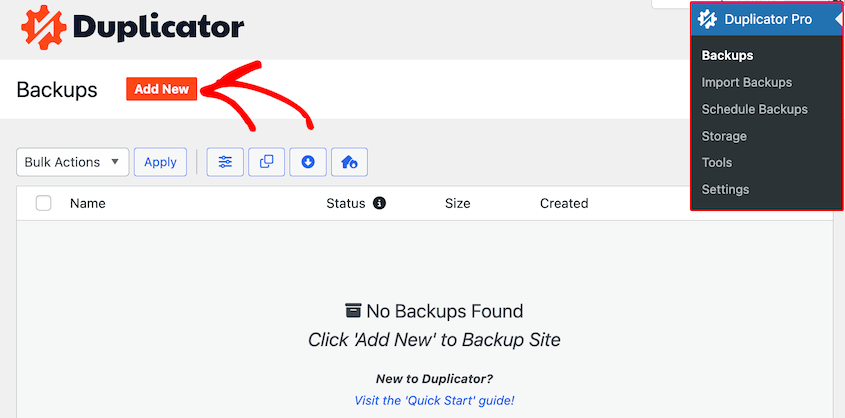
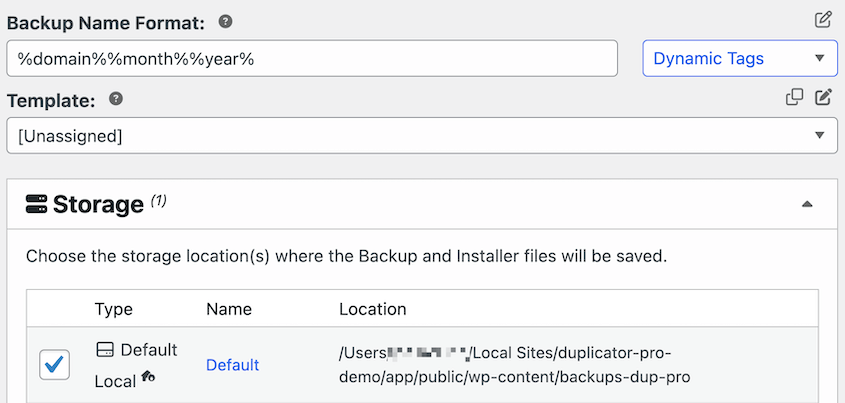
Give the backup a name with custom dynamic tags. Choose the Local storage location.
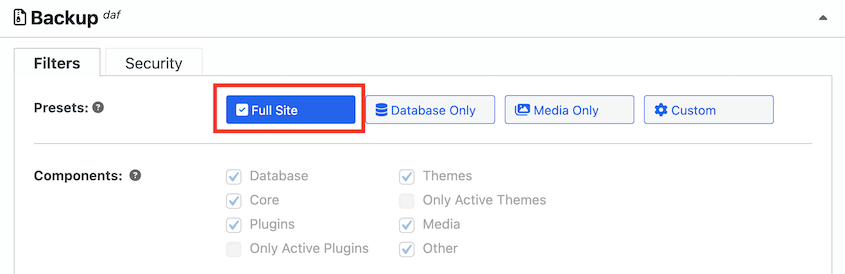
In the Backup settings, select the Full Site backup preset. This tells Duplicator to copy all the data on your site to the staging area.
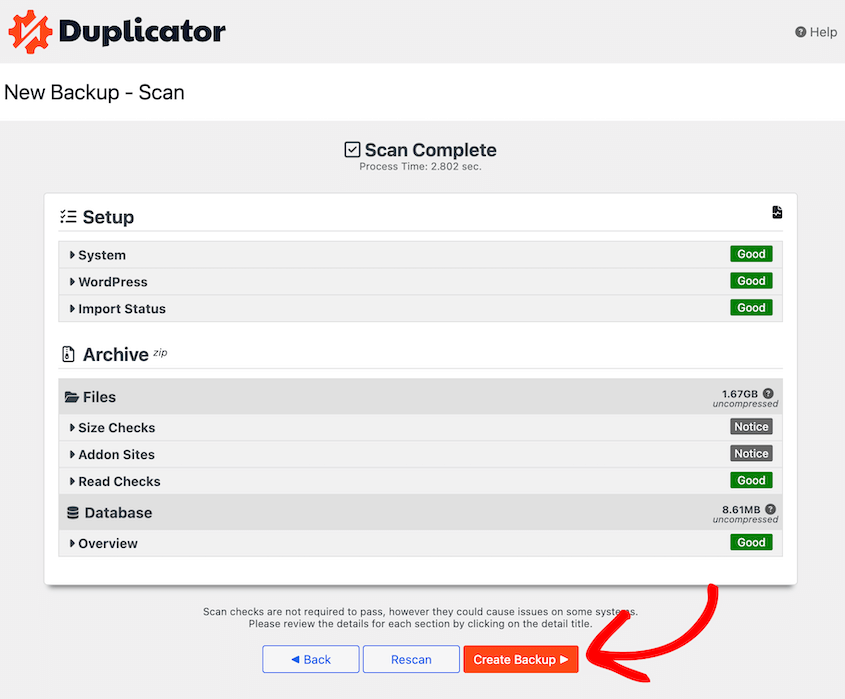
Click Next. Duplicator will scan your site and build the backup.
Wait for the build to complete. When it’s done, you’ll see a new backup listed in your Backups screen with its name, file size, and a Download button. That backup is your staging source.
Step 2: Set Up Your Staging Site in Duplicator Pro
With the backup ready, the actual staging setup takes only a few minutes.
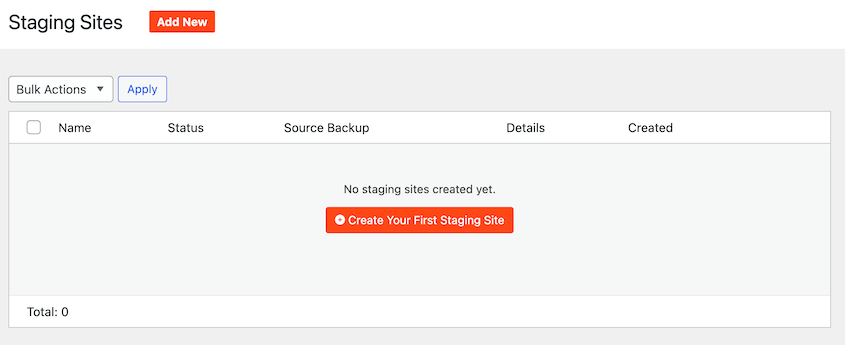
Find Duplicator Pro » Staging. If this is your first staging site, you’ll see an empty screen with a Create Your First Staging Site button. Click it.
You’ll be prompted to select a source backup. Choose the one you just created. Then give the staging site a name you’ll recognize later.
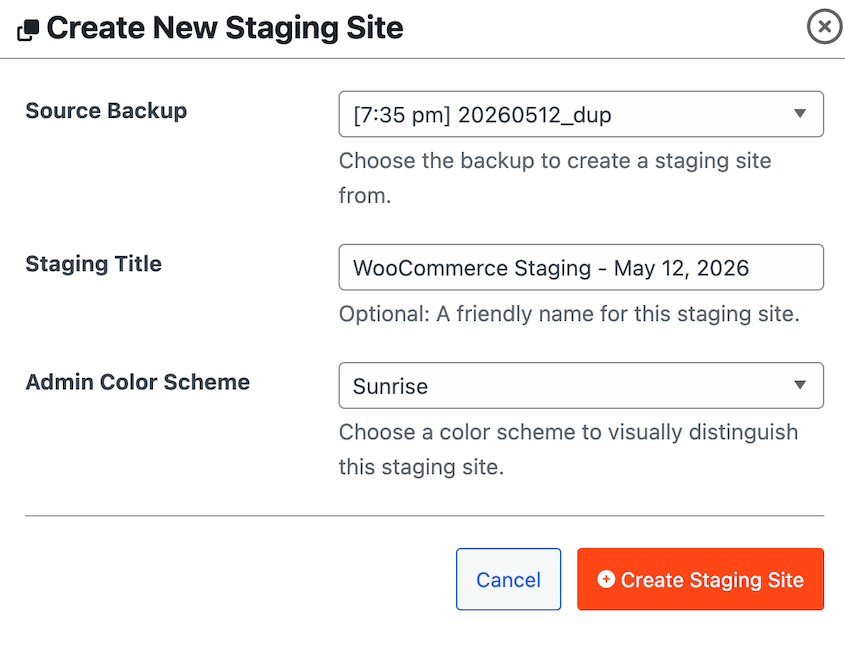
I usually go with something like “WooCommerce Staging — May 2026” so it’s easy to identify.
Next, pick an admin color scheme that looks different from your live site. Duplicator applies a colored admin bar to the staging environment so you always know at a glance which site you’re editing.
It sounds like a small thing, but it prevents a lot of “Wait, am I on live right now?” moments.
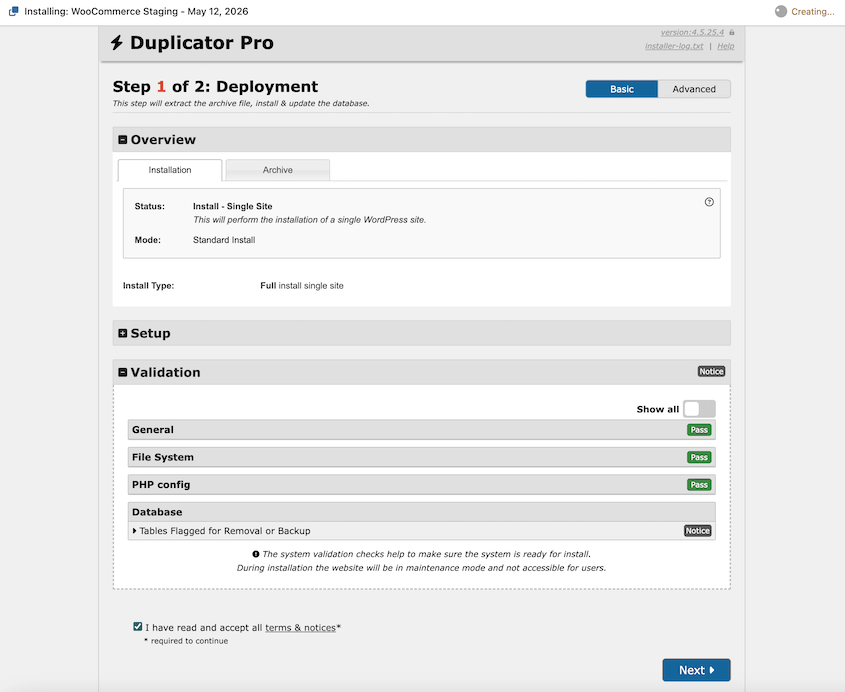
Click Create Staging Site to launch the Duplicator installer.
The database credentials are pre-filled. Just accept the terms and notices and continue.
In the pop-up, hit OK.
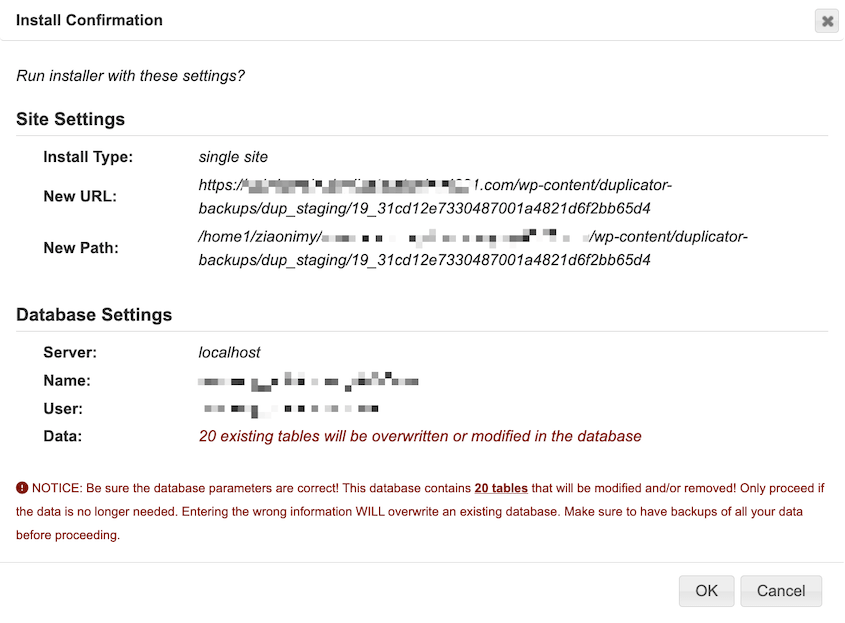
Duplicator sets up your staging site with protective settings automatically:
- Search engines are blocked from indexing the staging site via noindex, so Google won’t pick it up as a duplicate of your store
- Outgoing email is disabled, so no test actions send real notifications to customers
- A unique database prefix isolates the staging database from your live site’s data
That last one about email is especially important for WooCommerce. If email weren’t disabled, a test order you place on staging would fire a real order confirmation to a real customer’s inbox.
Step 3: Log In and Verify the Staging Site
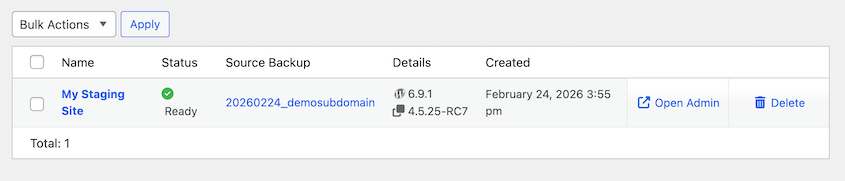
Once Duplicator installs your staging site, sign in with the Admin Login button.
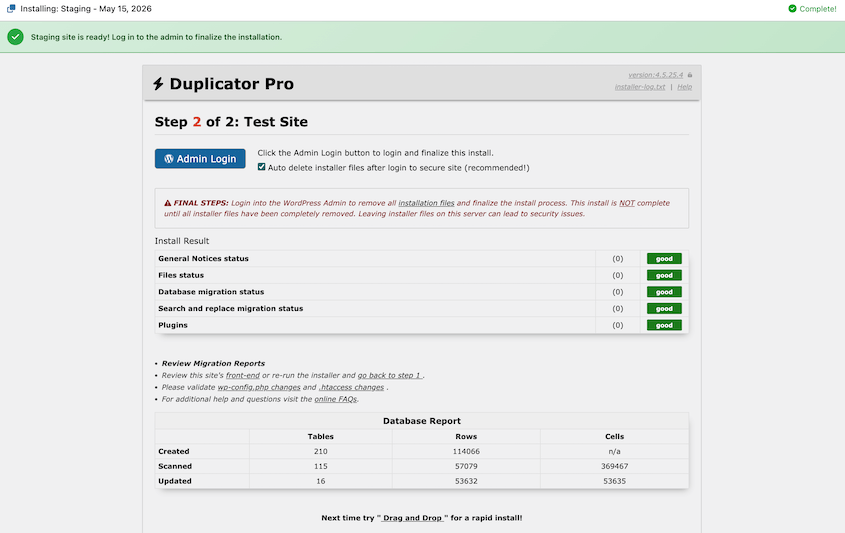
You can also access it anytime on your live site’s Staging page. Just hit Open Admin.
The first thing to check is the colored admin bar at the top of the screen. If it’s there, you’re on staging.
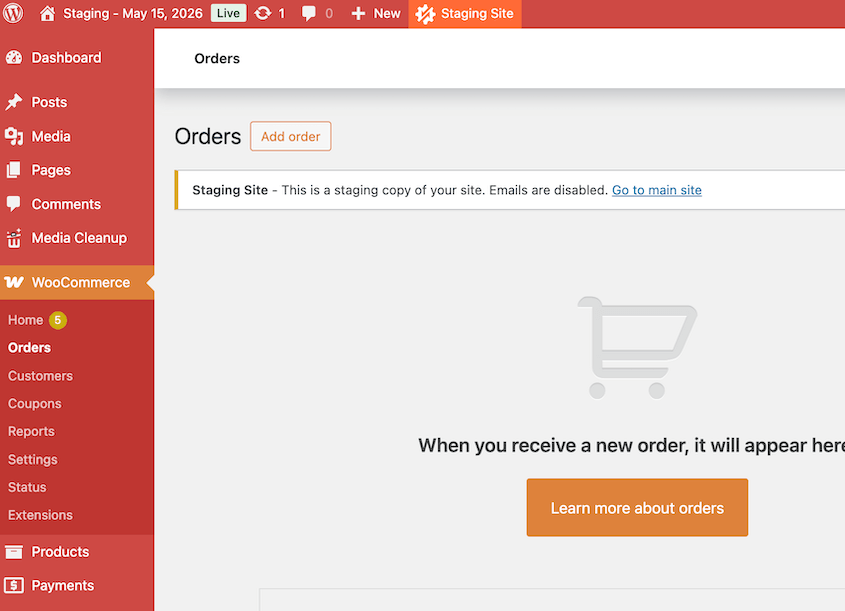
From the admin, visit your store’s front end: the homepage, a product page, and the cart. Confirm they all load correctly before you do anything else.
Then go to WooCommerce » Settings » Payments, open your payment gateway, and switch it to test or sandbox mode.
Duplicator disables email automatically, but it doesn’t touch your payment gateway settings. If you skip this step and run a test checkout, you’ll process a real charge on a real payment method.
Once the colored admin bar is visible, the front end loads correctly, and your payment gateway is in test mode, your staging site is ready to use.
Feel free to update plugins, edit code, or make any other changes without affecting your live site. However, you’ll immediately see how it could impact your site, since it’s an exact replica of your data.
What to Test on Your WooCommerce Staging Site
Having a staging site only helps if you test the right things before pushing any change to your live store. Here’s what to verify every time:
- Confirm your payment gateway is in test mode before placing any orders.
- Run a full test order. Add a product to the cart, go through checkout using a test card number, and confirm the order appears in WooCommerce » Orders with the correct status.
- Install new plugins, apply updates, or activate features you’ve been waiting to try.
- Run through the checkout flow again after making your change. Confirm the cart, checkout page, and order confirmation all still work after the change is in place.
- For developers: open wp-content/debug.log and check for any PHP warnings or notices that appeared after your change. A warning that doesn’t break anything on staging can still cause problems under real traffic on live.
Important: Never Push Your Staging Database Back to Your Live Store
When you’re done testing, you might want to sync staging back to live. For a standard WordPress blog, pushing the full database is fine. For a WooCommerce store, it’s not.
Your live store kept taking orders the entire time you were working on staging. Those orders exist only on your live site. They’re not in the staging database because the staging database is a snapshot from before you started.
If you push the staging database to live, you overwrite every order placed since you created that backup. There’s no undo. Those orders are gone.
The safe approach is to manually apply your tested changes directly on your live site. Install the same plugin, change the same setting, make the same code edit. Do it by hand. Never sync the databases.
Common WooCommerce Staging Problems
Most staging issues follow a familiar pattern. Here’s what to check when something isn’t working.
The Staging Site Looks Different From Your Live Store
If images are missing, the layout is broken, or CSS isn’t loading correctly, the most likely cause is a cache layer that got captured in the backup.
Your theme may also be using absolute URLs that still point to your live site instead of the staging URL.
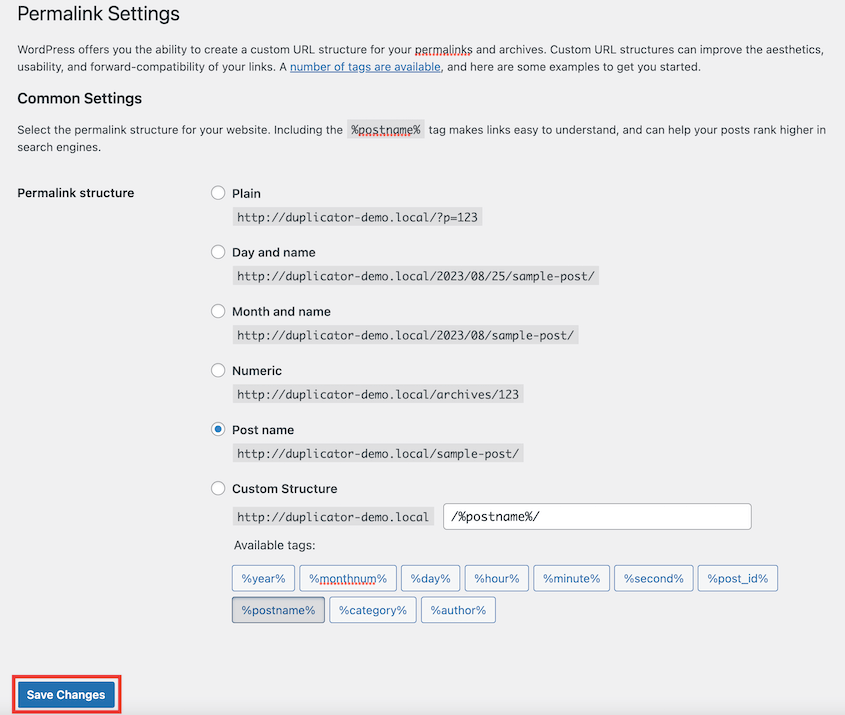
Clear any caching plugins on staging first, then go to Settings » Permalinks and click Save Changes without changing anything. That forces a permalink flush and resolves most layout issues without any manual editing.
WooCommerce Is Showing a License Error on Staging
Most premium WooCommerce extensions tie their license to a specific domain. When Duplicator creates your staging site at a new URL, those extensions could see an unrecognized domain and throw a license error.
Check the support documentation for each affected extension. Most allow one staging site activation. Some issue a separate staging license key. It takes a few minutes to sort out, but it’s a one-time fix per extension.
Test Emails Are Reaching Real Customers
If a customer replies to a test order confirmation, email suppression isn’t active on your staging site.
Duplicator should automatically disable emails on your staging site. If it’s not, contact the support team.
Frequently Asked Questions (FAQs)
Do I need a separate hosting account for a WooCommerce staging site?
No. Duplicator Pro can create a new staging site within your existing hosting account using an obfuscated subdirectory URL. You don’t need a second host, a second server, or any additional infrastructure. Everything runs under your current hosting plan.
Will my live store stay online while I set up staging?
Yes. The staging build runs entirely in the background inside your WordPress dashboard. Your live store keeps processing orders normally the whole time. There’s no downtime, no maintenance mode, and no interruption to your customers.
Can customers find my staging site?
Duplicator automatically applies noindex to the staging environment so search engines don’t index it, and the staging URL is obfuscated so it’s not easily guessable from your main domain. That said, always keep your payment gateway in test mode on staging. If someone does find it, no real charges will process.
What happens to orders placed on my live site while I’m working on staging?
They exist only on the live site, not in the staging database. This is why you should never push the staging database back to production — your live orders won’t be in it. When testing is done, apply your changes manually to the live site instead of syncing.
How often should I update my staging site to match live?
Before every new round of testing. Don’t reuse an old staging site for a new round of changes. Delete it from Duplicator Pro » Staging, create a fresh backup of your live store, and build a new staging environment from that backup. A staging site that’s two months out of date doesn’t tell you much about what will happen on your current live store.
Your WooCommerce Store Is Worth Protecting
You now have a working staging environment that mirrors your live store. Every product, every setting, every active plugin is there.
You can install, update, break, and fix things as many times as you need to, and none of it touches a real customer or a real order.
When you’re done with a staging site, delete it. Go to Duplicator Pro » Staging and remove it.
Old staging sites sit on your hosting storage, and forgotten ones can be left with an accessible URL or email accidentally re-enabled. Deleting takes ten seconds and removes any risk entirely.
Your WooCommerce store processes real orders and real customer data every day. A staging site is the simplest way to make sure a change you’re testing never becomes a problem your customers experience.
Over 1.5 million WordPress professionals use Duplicator Pro to back up, migrate, and protect their sites. If you’re not on Pro yet, it’s the tool that makes this whole process work.
If this tutorial helped, these guides are worth bookmarking too.
- How to Update WooCommerce (Without Breaking Your Online Store)
- Proven WooCommerce SEO Strategies to Skyrocket Your Store’s Rankings
- The Ultimate Guide to WooCommerce Backups
- How to Migrate a WooCommerce Site
- 26 Best WooCommerce Plugins to Improve Your Online Store
- Best WooCommerce SEO Plugins to Dominate Your Store’s Niche in Searches