Docker is revolutionizing the way developers work.
It packages up your entire WordPress site into a neat, portable container. This means you can move your site between different environments effortlessly without compatibility headaches.
In this tutorial, I’ll show you how to install and set up WordPress using Docker.
I’ll break down each step clearly, so you can follow along even if you’re new to the world of containers. Get ready to experience WordPress development in a whole new light!
Here are the key takeaways:
- Docker eliminates compatibility issues by packaging WordPress and all dependencies into portable containers that run consistently across any system
- Setup takes just minutes instead of hours compared to traditional LAMP stack installations
- You’ll need Docker Desktop installed on your Mac, Windows, or Linux machine to get started
- Docker Compose manages everything; it handles both WordPress and MySQL containers with a single configuration file
- Your development site runs locally at http://localhost:8080 after running just a few simple commands
- Resource usage is minimal; Docker containers are lighter than virtual machines, letting you run multiple test environments simultaneously
Table of Contents
What Is Docker?
Docker is an open-source containerization platform that lets you create isolated environments for your applications. These environments (called containers) are consistent and portable, ensuring that your WordPress site runs smoothly wherever it’s deployed.
Imagine you have a fleet of ships (your applications) that need to transport goods (your code) to different countries (web servers or environments). Each country has its own rules and regulations, which can make shipping a logistical nightmare.
Docker acts like those standard shipping containers you see on cargo ships. It packages your application and all its dependencies into a self-contained unit.
This container can then be easily shipped and run on any system that supports Docker, regardless of the underlying operating system.
Why Use WordPress in Docker?
Docker makes local WordPress development significantly smoother and more efficient.
Normally, you’d have to install a LAMP stack (Linux, Apache, MySQL, PHP). You’ll be stuck with this web development environment unless you want to install a completely different one.
With Docker, your site runs the same way even if you have to move it to a different operating system. Docker containers are portable and you won’t have to worry about compatibility issues.
You can create new containers for new development sites very quickly. Docker streamlines the process, letting you get your WordPress site up and running in minutes.
Docker containers use fewer resources compared to traditional virtual machines. You can build multiple testing environments on your computer without slowing it down.
However, you’ll need to be comfortable with using the command line to read and execute commands.
How to Install WordPress on Docker
Ready to experience Docker firsthand? Here’s the WordPress installation process on Docker:
- Step 1: Install Docker: Download Docker Desktop for your operating system and verify it’s running properly
- Step 2: Create Containers with Docker Compose: Set up a docker-compose.yml file that configures both WordPress and MySQL containers
- Step 3: Finish Creating Your WordPress Site: Access your new site at localhost:8080 and complete the standard WordPress setup wizard
Step 1: Install Docker
Before we can dive into the world of containers, you need to install Docker on your system. You’ll be installing Docker Engine, which is used to build and run Docker containers.
The good news is, Docker is available for all major operating systems. I’ll show you how to set it up on macOS, Windows, and Linux.
Installing Docker on macOS
If you’re using a Mac, make sure it meets the following requirements:
- 4GB of RAM
- Updated macOS version
- Rosetta 2 (for Macs with Apple silicon)
Then, download Docker Desktop for Mac. There are different versions based on your computer, so make sure you use the right one.
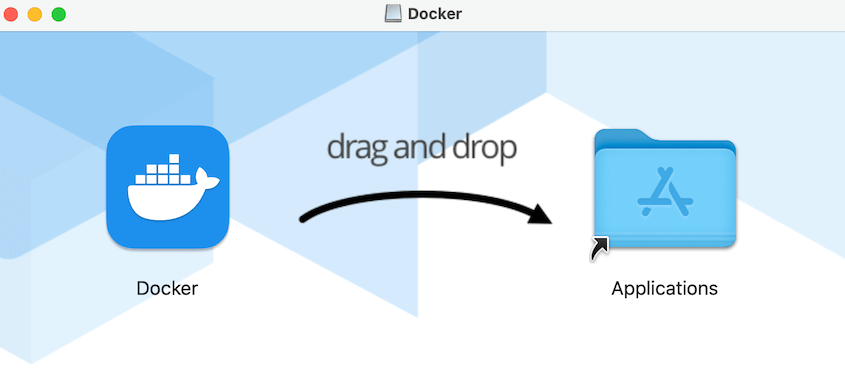
Double-click on the Docker.dmg file once it downloads. Drag and drop the Docker icon into your Applications folder.
Open Docker Desktop from your Applications folder. Follow any prompts to authorize the installation. You’ll know it’s running when you see the Docker icon in your menu bar.
Installing Docker on Windows
For Windows users, make sure your computer meets the following requirements:
- 64-bit processor
- 4GB of RAM
- Enabled hardware virtualization in BIOS/UEFI
After this, visit the official Docker Desktop for Windows download page. Download the correct version for your computer.
Open the downloaded .exe file and follow the on-screen instructions. Docker Desktop will automatically be installed at C:\Program Files\Docker\Docker.
You’ll either use WSL 2 or Hyper-V. Select the right one based on the backend you chose. If your computer only supports one, there will be only one option available.
After installation, you’ll have to close Docker and restart your computer. Afterward, you’ll see the Docker icon in your system tray.
Installing Docker on Linux
Docker can be installed on all Linux installations. All you’ll need to do is open a terminal and run this command:
curl -L get.docker.com | bash
To make sure it was installed properly, run this command:
sudo docker run hello-world
You’ll get a success message.
If you have CentOS, Debian, or Fedora, don’t use these steps. Docker has different installation guides for other Linux distributions.
Step 2: Create Containers with Docker Compose
Docker Compose allows you to manage multi-container applications. In our case, we’ll use it to set up a new container for WordPress.
First, open the command line for your operating system. Use this command to run Docker Compose and make sure it’s working:
docker compose version
Enter this command to create a new directory called wordpress-local:
mkdir wordpress-local && cd wordpress-local
Next, open your favorite text editor. Create a new file and name it .env. Add this code:
# MySQL
MYSQL_ROOT_PASSWORD=change_root_password
MYSQL_DATABASE=wordpress
MYSQL_USER=wp_user
MYSQL_PASSWORD=change_wp_password

# Ports
WORDPRESS_PORT=8080
PHPMYADMIN_PORT=8081
Replace the placeholder passwords with your own secure values. Using a .env file keeps sensitive information out of your compose file and makes it easier to change ports or credentials later.
Then, create a docker-compose.yml file. Save it to the new project directory.
Paste this code into the YAML file to install the WordPress content management system:
services:
  db:
    image: mysql:8.0
    restart: unless-stopped
    command: --default-authentication-plugin=mysql_native_password
    environment:
      MYSQL_ROOT_PASSWORD: ${MYSQL_ROOT_PASSWORD}
      MYSQL_DATABASE: ${MYSQL_DATABASE}
      MYSQL_USER: ${MYSQL_USER}
      MYSQL_PASSWORD: ${MYSQL_PASSWORD}
    volumes:
      - db_data:/var/lib/mysql

  wordpress:
    image: wordpress:6.5-php8.2-apache
    depends_on:
      - db
    restart: unless-stopped
    ports:
      - "${WORDPRESS_PORT}:80"
    environment:
      WORDPRESS_DB_HOST: db:3306
      WORDPRESS_DB_NAME: ${MYSQL_DATABASE}
      WORDPRESS_DB_USER: ${MYSQL_USER}
      WORDPRESS_DB_PASSWORD: ${MYSQL_PASSWORD}
    volumes:
      - wp_content:/var/www/html/wp-content

  phpmyadmin:
    image: phpmyadmin/phpmyadmin:latest
    depends_on:
      - db
    restart: unless-stopped
    ports:
      - "${PHPMYADMIN_PORT}:80"
    environment:
      PMA_HOST: db
      PMA_USER: root
      PMA_PASSWORD: ${MYSQL_ROOT_PASSWORD}
      UPLOAD_LIMIT: 256M

volumes:
  db_data:
  wp_content:
Now that you have the Docker Compose file, use this command to start the containers:
docker compose up -d
This command will download the necessary Docker images from Docker Hub, which is a public registry. It will give you key folders like wp-content and wp-admin.
Congratulations! You’ve successfully set up a WordPress container. Now, let’s move on to the final steps.
Step 3: Finish Creating Your WordPress Site
Your WordPress Docker containers are up and running! Now it’s time to finish the WordPress setup.
Open your favorite web browser and navigate to http://localhost:8080 or http://host-ip:8080
If you’re running Docker on a remote server, you’ll need to use the server’s IP address to access the site. For example, if your server’s IP address is 192.168.1.100, you would search for http://192.168.1.100:8080.
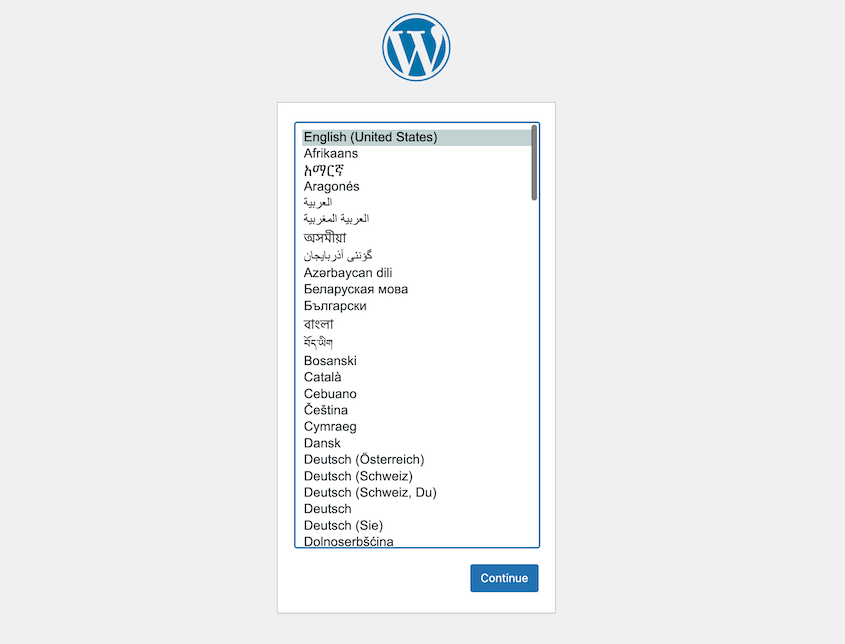
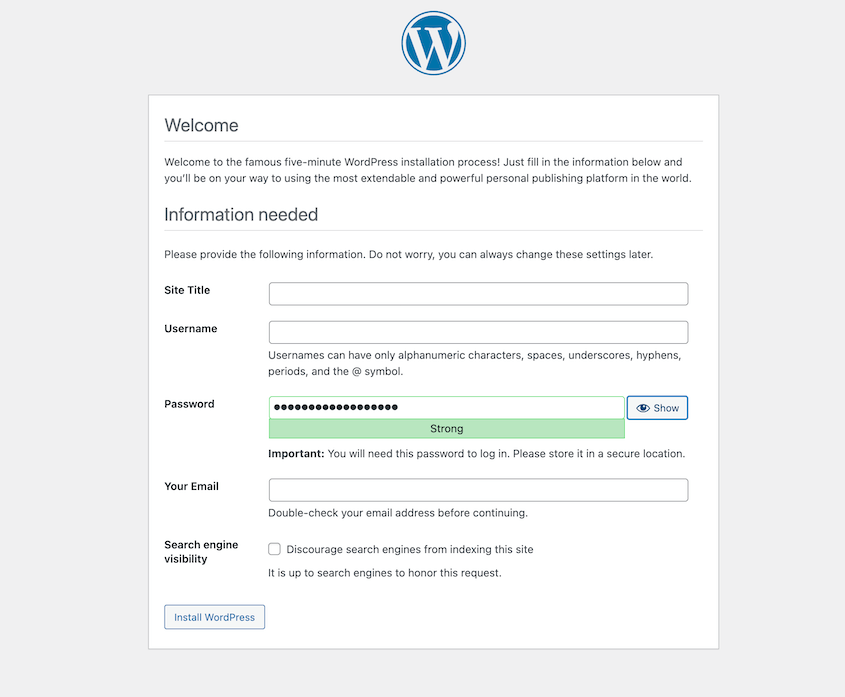
Follow the on-screen prompts to configure your WordPress website. You’ll need to choose your preferred language for the WordPress dashboard and interface.
Enter a title for your site, administrator username, and password. Be sure to choose a strong password for security.
Enter your email address. WordPress will use this address to send important notifications. You can also decide whether you want your site to be visible to search engines.
Lastly, hit Install WordPress. Use your new login credentials to access your WordPress dashboard.
phpMyAdmin is already defined in your docker-compose.yml. You can open it at http://localhost:8081 (or whatever PHPMYADMIN_PORT you set in .env).
Congratulations! You’re now running WordPress on Docker.
FAQs About Installing WordPress on Docker
How do I Dockerize an existing WordPress site?
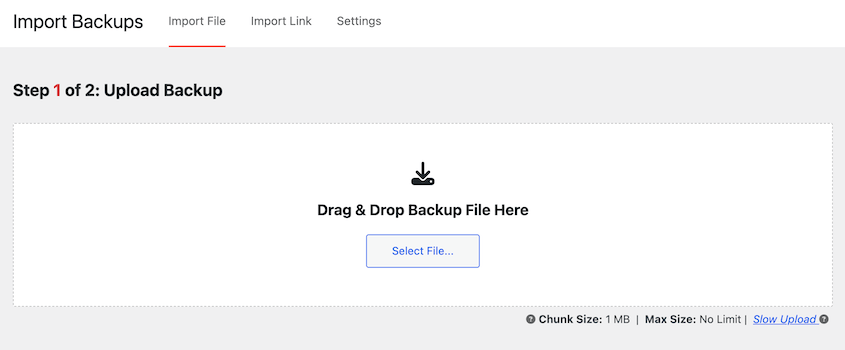
To Dockerize an existing WordPress site, install WordPress in Docker. Then, install a migration plugin like Duplicator Pro. Create a backup of the existing site and import it into the new site with the Import Backups page.
Duplicator will replace the new WordPress Docker site with your existing data. You can now manage your WordPress site in Docker.
What is the difference between Docker and WordPress VM?
When you use a VM for WordPress, you’re essentially creating a whole new computer inside your existing one. This virtual computer runs its own operating system (like Windows or Linux) completely separate from your main system.
Docker takes a different approach. Instead of creating an entire virtual machine, it packages your application (WordPress, in this case) and all its dependencies into a self-contained unit called a container. This container shares the resources of your host operating system, making it much more lightweight and efficient than a VM.
For most WordPress users, Docker offers a more streamlined and developer-friendly approach. However, VMs might be preferable if you need absolute isolation or want complete control over the operating system.
How do I update my WordPress version in Docker?
Updating WordPress in Docker is simpler than you might think! First, pull the latest WordPress image from Docker Hub:
docker-compose pull wordpress
Next, recreate your WordPress container to apply the update:
docker-compose up -d --build wordpress
This command will rebuild the WordPress container using the latest image and restart it.
How do I access my WordPress files with Docker?
To access your WordPress files with Docker, use the docker exec command in your project folder:
docker compose exec wordpress <some command>
Docker-Powered WordPress Development Starts Here
By now, you’ve installed a local WordPress site on Docker!
But the real fun isn’t in the initial setup, it’s in what comes next. You’ve unlocked the ability to spin up identical development environments in seconds, test plugin conflicts without fear, and experiment with different PHP or WordPress versions.
This is the kind of flexibility that used to require expensive server setups or complex virtual machine configurations.
Whether you’re building client sites, testing new features, or learning WordPress development from scratch, you now have a professional-grade workflow that scales with your needs.
Everything you’ve learned here applies to containerizing other applications too, opening doors to modern development practices that top agencies use every day.
Ready to take your WordPress deployments to the next level? Duplicator Pro streamlines the process of migrating, cloning, and backing up your WordPress sites!
While you’re here, you may like these extra WordPress guides:
Joella is a writer with years of experience in WordPress. At Duplicator, she specializes in site maintenance — from basic backups to large-scale migrations. Her ultimate goal is to make sure your WordPress website is safe and ready for growth.


