Are you not sure how to install WordPress?
Whether you’re setting up your blog, a business website, or a personal portfolio, WordPress can help you create a great website. But, it can be tricky to understand how it works and how to install it.
In this tutorial, I’ll show you how to install WordPress! I’ve included a few different methods, so you can choose one that meets your skill level.
An Introduction to WordPress
WordPress is an open-source Content Management System (CMS) that powers millions of websites worldwide. Its user-friendly interface and extensive library of themes and plugins make it a popular choice for both beginners and experienced developers.
If you want to start a blog, an online store, or a professional website, WordPress can be a great option. But, before you can start building your dream website, you first need to know how to install WordPress.
How to Install WordPress
I remember when I first installed WordPress, feeling overwhelmed by the technicality of it all. Don’t worry, I’ll guide you through the installation process!
Method 1. Install WordPress Using Your Web Host
As a beginner, one easy way to install WordPress is with your web hosting provider. These companies provide server space and resources for your new website.
When you sign up, you’ll choose a hosting plan that meets your needs. Then, pick a unique domain name, which is the URL for your WordPress website.
With a WordPress hosting provider, you’ll usually be able to install WordPress in just one click. You won’t have to go through a complicated setup process.
However, every web host installs WordPress differently. So, let’s walk through some of the most popular options. Feel free to skip to your web host and follow those specific steps!
Installing WordPress with Bluehost
In our opinion, Bluehost is the best WordPress hosting provider. It’s affordable and user-friendly, so you can easily get your new site up and running.
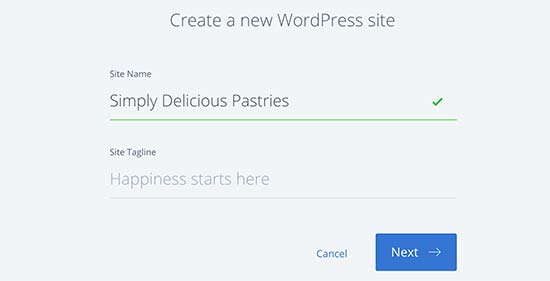
If you choose Bluehost, give your site a name and tagline.
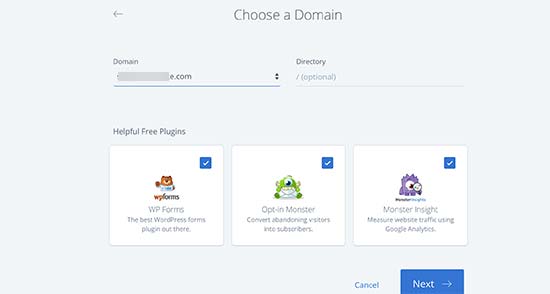
As we mentioned earlier, you’ll also need a domain name. You can also install some free WordPress plugins like MonsterInsights or WPForms.
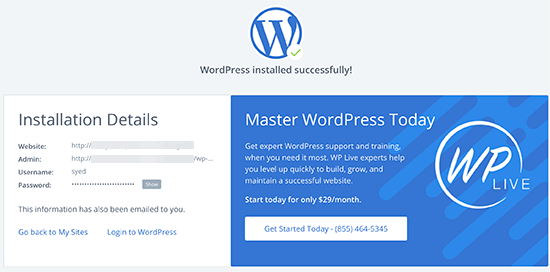
After this, Bluehost automatically installs WordPress. You’ll immediately get your login information.
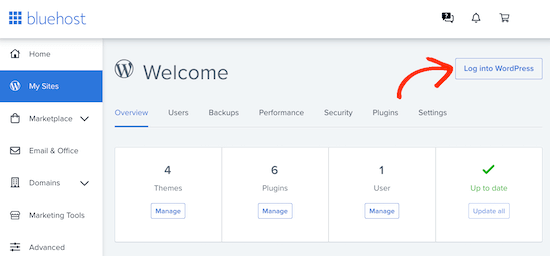
To access your WordPress dashboard, go to My Sites » Manage Site » Log into WordPress.
This takes you to your dashboard, which you can use to edit your new site!
Installing WordPress with HostGator
HostGator is another popular hosting provider. It’s on our list of the best web hosts!
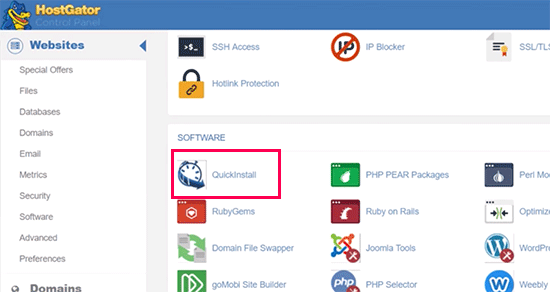
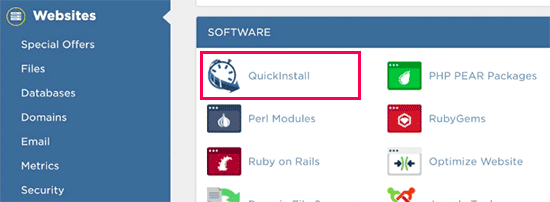
To install WordPress with HostGator, sign into your hosting account. Under Software, click on QuickInstall.
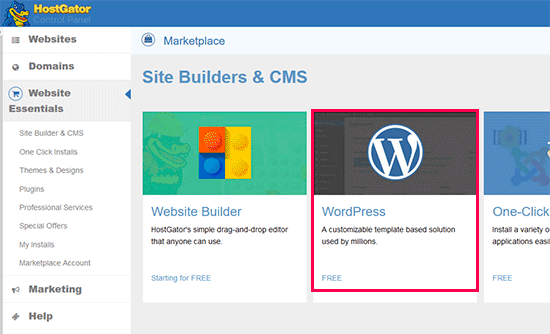
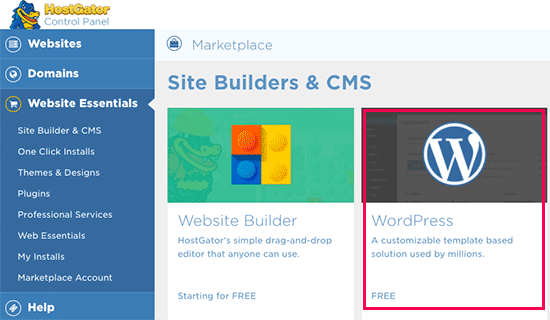
You’ll see a few different Content Management Systems (CMS) to choose from. Select WordPress.
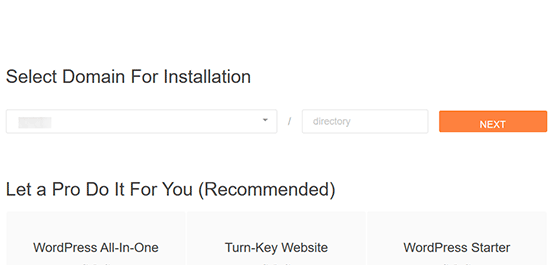
Then, select the domain name that you created when you signed up. In most cases, you can leave the directory field blank. This will install WordPress on your root domain (ex: Duplicator.com).
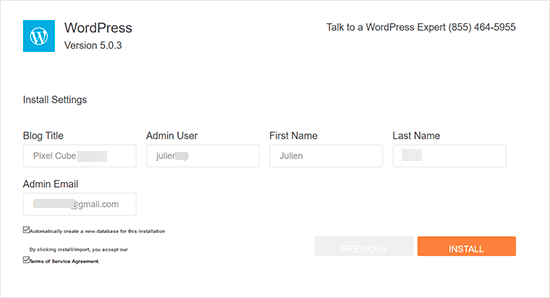
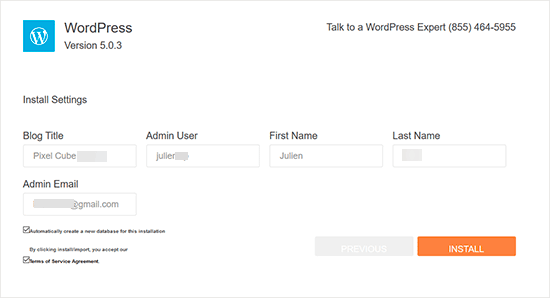
Now, fill out the new site’s name. You’ll also need to set up an admin user.
After this, click on Install.
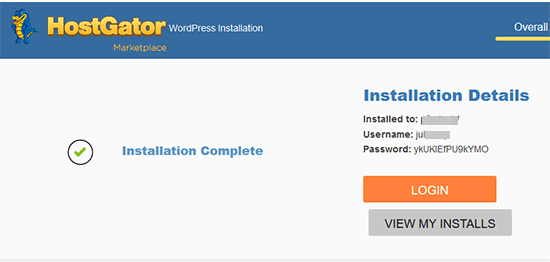
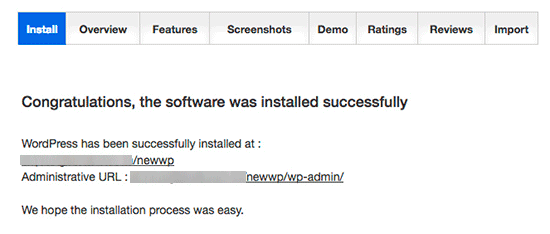
This starts the new WordPress installation! When it’s finished, you can use your new username and password to log in.
Installing WordPress with SiteGround
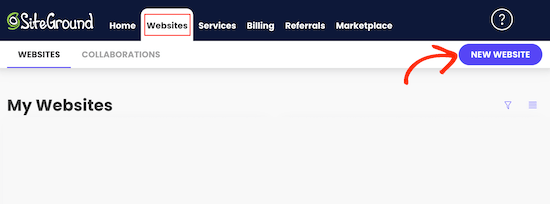
SiteGround is a web host with great support and speed. If you choose this hosting service, find Websites » New Website in your control panel.
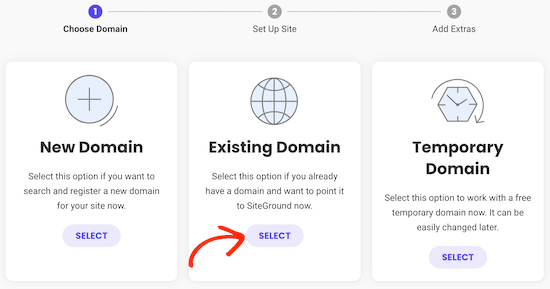
If you already purchased a domain name, select Existing Domain. However, you can also register a new one or a temporary domain. Just so you know, I’ll be using an existing domain.
Enter your domain name and hit Continue.
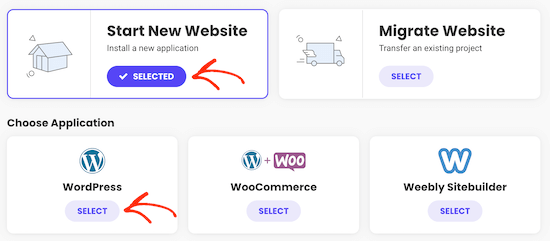
On this page, click on Start New Website. Below this, select WordPress.
At this point, add your email address and password that you want to use for logins.
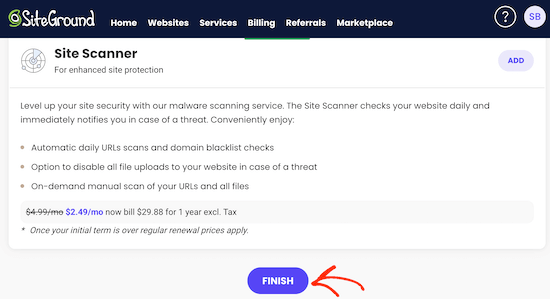
SiteGround will then offer you a few extra add-on features, but you don’t have to use them. To install WordPress, scroll to the bottom and hit Finish.
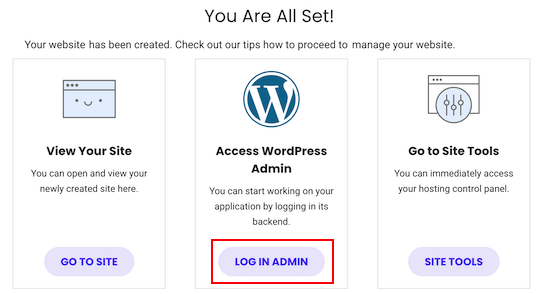
Like the other options on this list, SiteGround will set up WordPress for you. Then, you can log into your new admin dashboard.
Installing WordPress with WP Engine
If you prefer managed WordPress hosting, you might like WP Engine. Essentially, it will take care of technical tasks like speed optimization, security, updates, and backups.
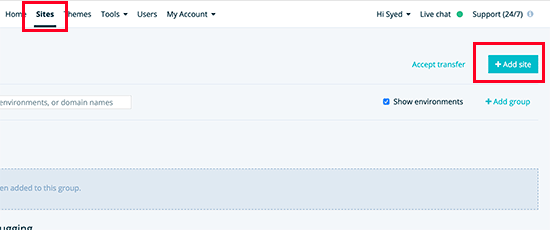
To install WordPress with WP Engine, click on Sites » Add site.
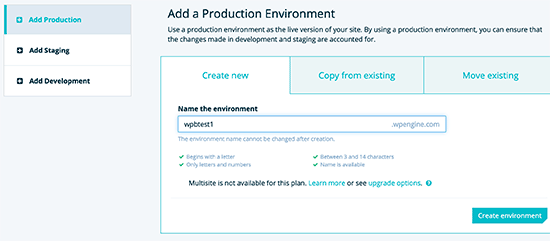
Select the Add Production tab. Give it a name and hit Create environment.
This is all you need to install WordPress! Since WP Engine is a managed host, the steps are much simpler.
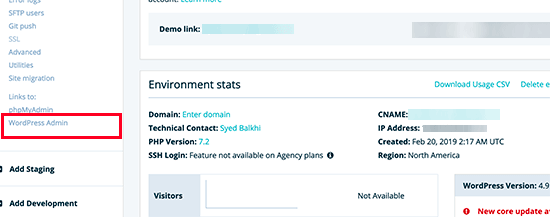
Your new login credentials will be on the WordPress Admin page.
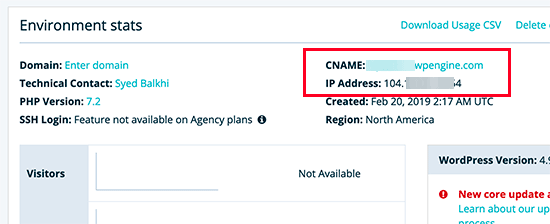
However, your new domain name isn’t pointing to the site yet. To do this, find the IP address and CNAME under the new Environment stats.
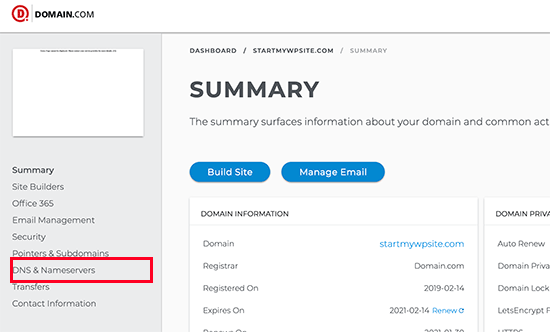
Then, you’ll need to use a domain registrar like Domain.com. Log in and navigate to DNS & Nameservers.
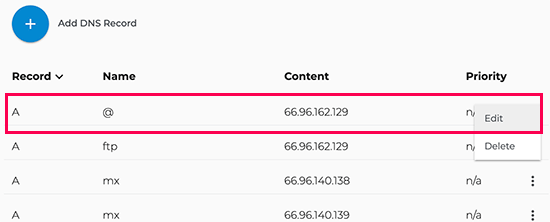
Beside the the A record with the @ name, click Edit.
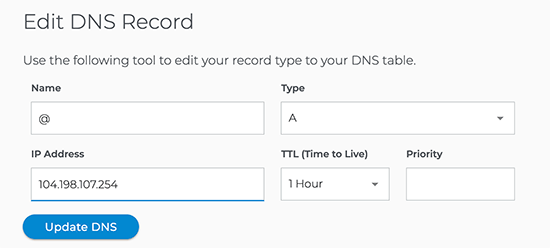
Add the IP address from WP Engine and update the DNS record.
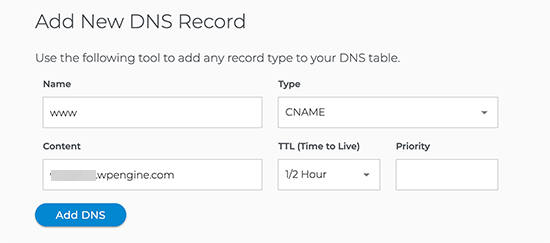
Then, try to find a CNAME record named www. If so, open and edit it. However, you can create a new DNS record if you don’t have one already.
For the Content field, add the CNAME subdomain from WP Engine.
Now you’ve pointed your domain name to the WP Engine site!
Method 2. Install WordPress Using cPanel
Many web hosts include cPanel in their services. This software allows you to complete different management tasks for your website and server.
CPanel often has auto-installer scripts for WordPress. However, each hosting company might prefer a different auto-installer script.
Here are some popular auto-installer scripts in cPanel:
- Softaculous
- QuickInstall
- Fantastico
Let’s install WordPress with all of these options!
Installing WordPress with Softaculous
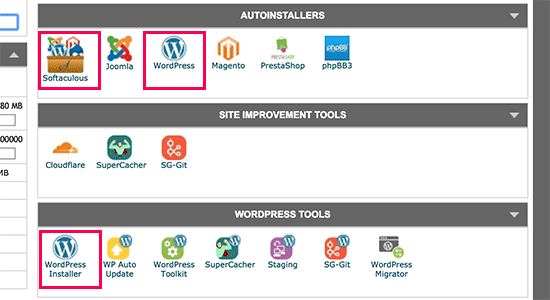
If you have a web host like SiteGround or InMotion Hosting, your control panel will include Softaculous. This auto-installer script can install WordPress for you.
In cPanel, go to the AutoInstallers section and click on Softaculous. You can also use the WordPress Installer option.
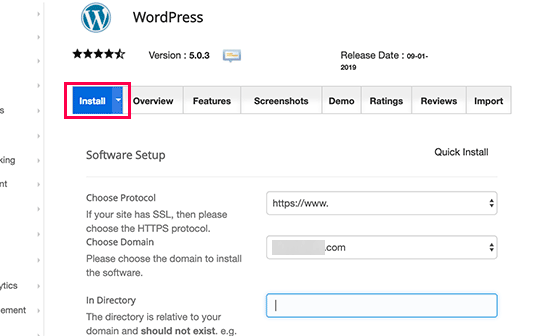
This opens Softaculous. Be sure to open the Install tab.
For the Protocol, choose http:// or http://www. However, your site might have SSL and HTTPS. If so, use https:// or https://www.
You’ll probably want to install WordPress in your domain’s root directory (example.com), so leave the In Directory field blank.
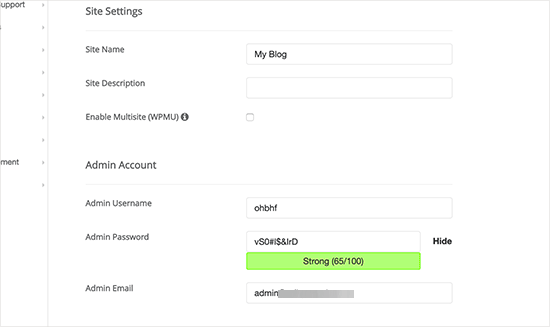
Now you can scroll to the Site Settings. Here, add a site name and description. You’ll also need an admin username, password, and email address.
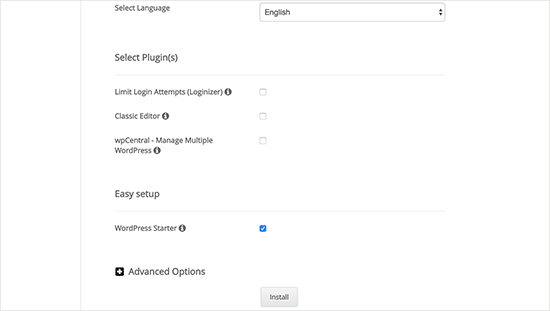
At the bottom of the page, you’ll see extra optional settings. After reviewing these, hit Install.
Softaculous will then take a few minutes to install WordPress. Once the progress bar is at 100%, feel free to access your admin area.
Installing WordPress with QuickInstall
Other hosts like HostGator opt for QuickInstall, another auto-installer. I’ll show you screenshots from HostGator’s dashboard, but this process will be similar for any host that uses QuickInstall.
Under the Software section of your cPanel dashboard, find QuickInstall.
Then, click on the WordPress option.
Similar to other auto-installers, leave the directory field blank if you want to install WordPress on your root domain. Click Next.
Fill out the main details for your site and administrator.
After you hit Install, QuickInstall will install WordPress for your site. Use your login details to access the new site.
Installing WordPress with Fantastico
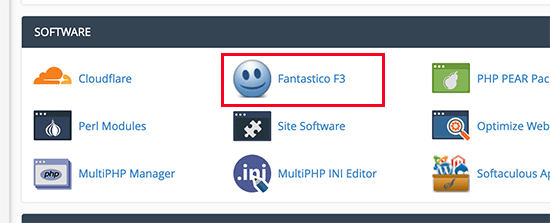
Fantastico is another popular auto-installer script for WordPress. If your host uses it, you can find Fantastico in the Software section of cPanel.
I’ll be using Fantastico F3 in this tutorial. Even if you have a different version, the installation steps will be very similar.
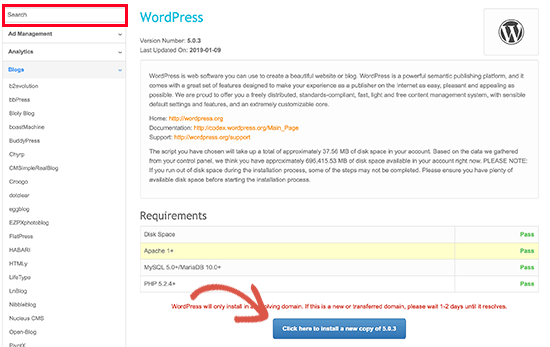
With Fantastico, you can install many different web applications. So, you’ll need to search for Blogs. Then, find WordPress and install it.
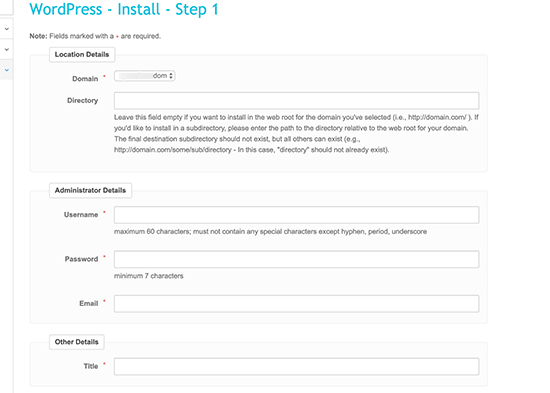
Choose your domain name. Add user information for an administrator user role.
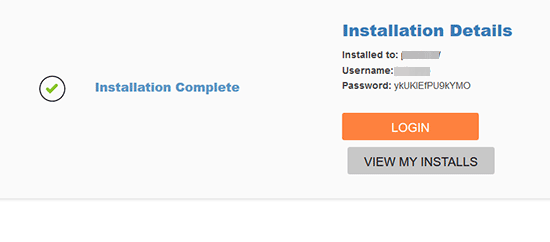
Now Fantastico will install WordPress on your domain (or the directory you specified).
Method 3. Install WordPress Locally
You can also install WordPress on your local computer. Using a local development environment, you can build and customize a WordPress site without having to set up a live server.
Local installations allow you to easily experiment with WordPress without any consequences. You can test code, try out new plugins, design custom themes, and much more.
If you already have a WordPress site set up, you won’t want to perform dangerous changes on the live server. In this case, you can migrate a copy of your site to a localhost.
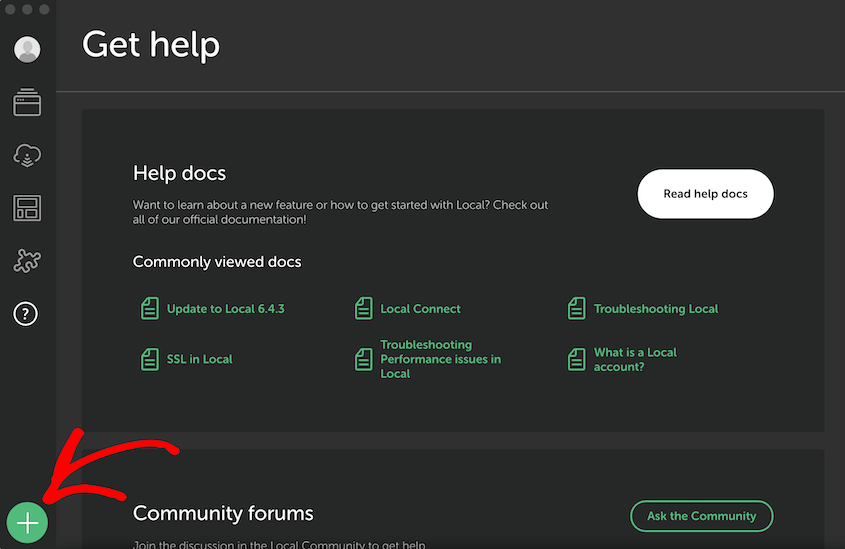
Alternatively, set up a local WordPress installation from scratch. LocalWP offers one of the easiest ways to set up new local sites. Start by creating a new site.
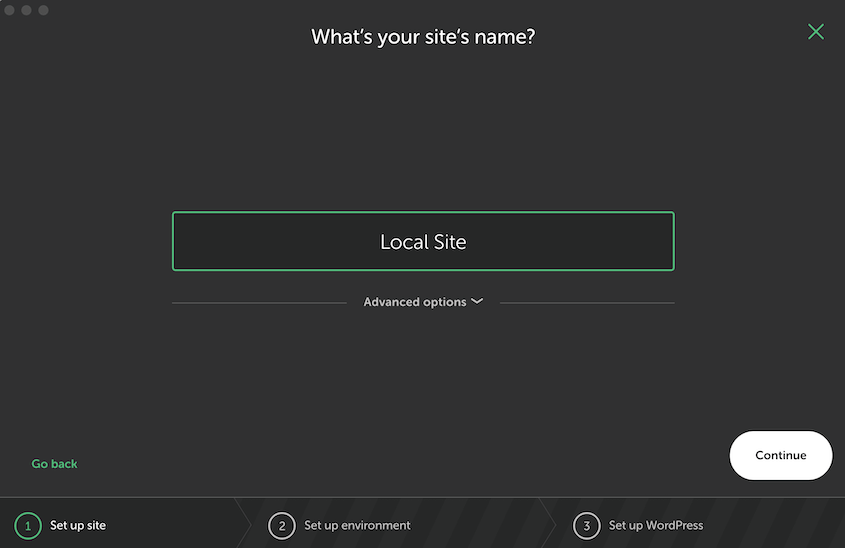
Give the local site a name and continue to the next step.
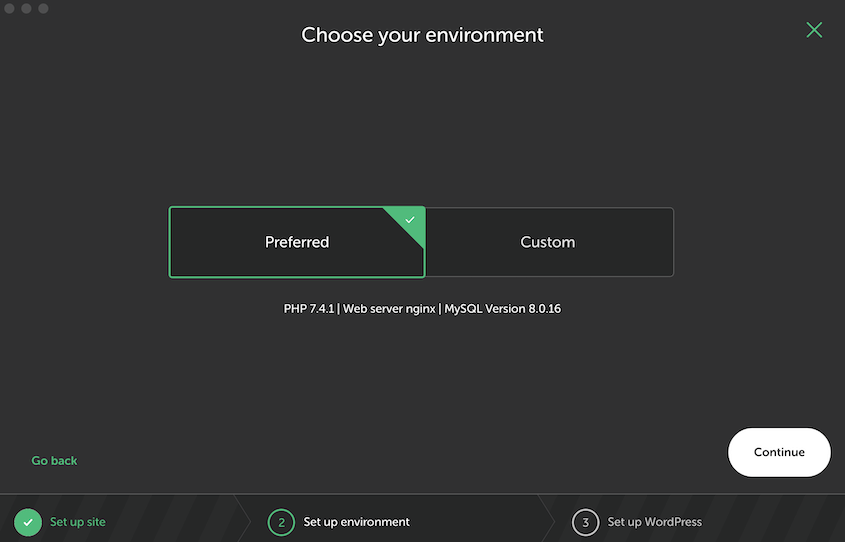
LocalWP has preferred settings for local sites. However, you can also customize the PHP version, web server, and MySQL version.
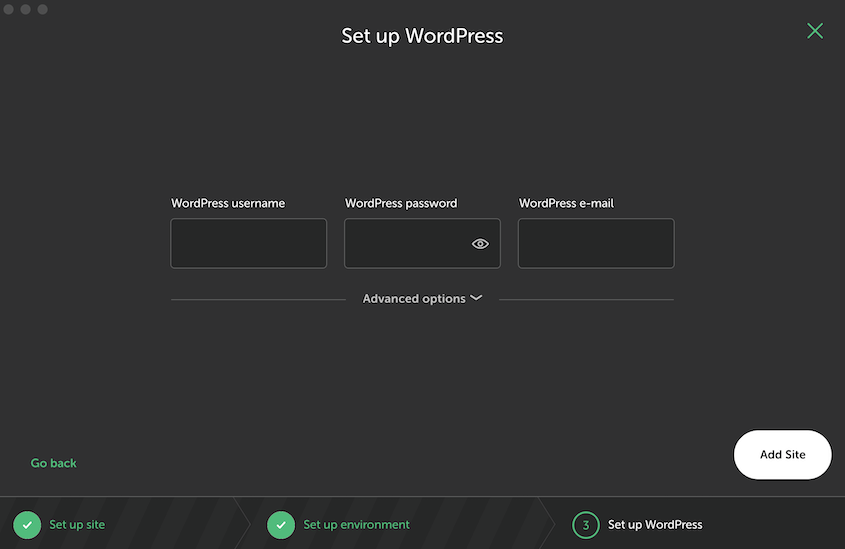
Lastly, enter your local site’s username, password, and e-mail address.
LocalWP will automatically start building your local WordPress site. You can open it at any time by clicking the WP Admin button and logging in.
There are many different local development environments, so these steps can vary. Here are some useful guides for popular local software:
Method 4. Install WordPress Multisite
Did you know that you can manage multiple sites under one WordPress installation? This is called a WordPress multisite network.
A multisite allows you to set up many sub-sites, which are either on subdomains or subdirectories in your network. Having a multisite installation can help you more easily update plugins and themes for your entire network. Plus, you can keep branding consistent and collaborate with your team effortlessly.
Multisite installations can be a little more complicated than single sites. To get started, check out my full guide on WordPress multisite. You’ll find installation instructions there!
Method 5. Manually Install WordPress
You can also install WordPress manually. However, you’ll need to be ready to edit WordPress files and databases. Since this setup process is complicated, I wouldn’t recommend it for beginners.
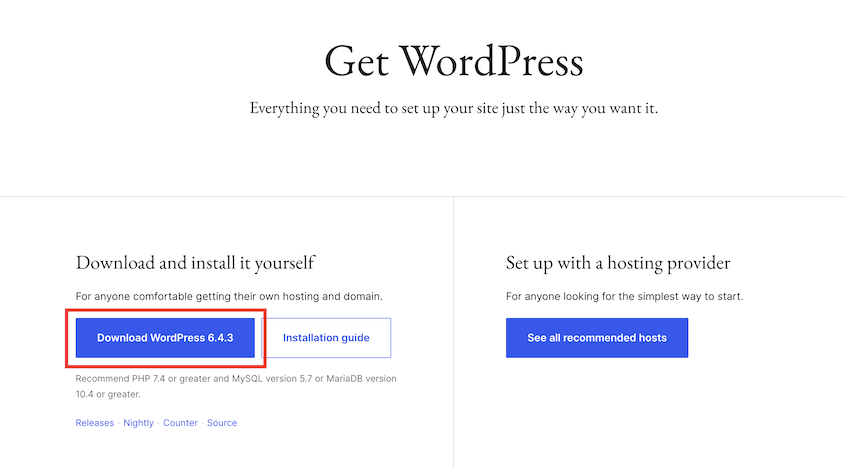
First, go to the WordPress.org website and download the latest version of WordPress.
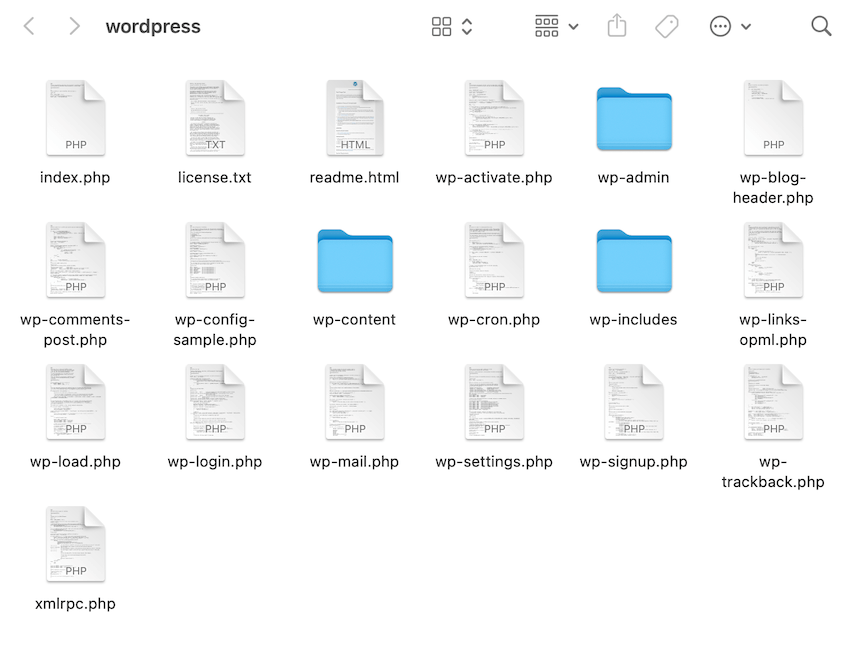
This will download as a zip file. Unzip the file and open the new wordpress folder. Here, you’ll see core WordPress files.
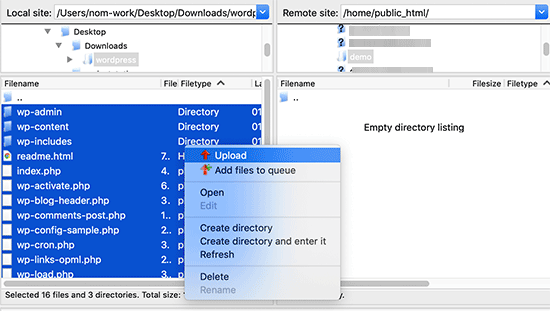
After this, use an FTP client to connect to your hosting server. Upload all the WordPress files to your website’s root directory (public_html).
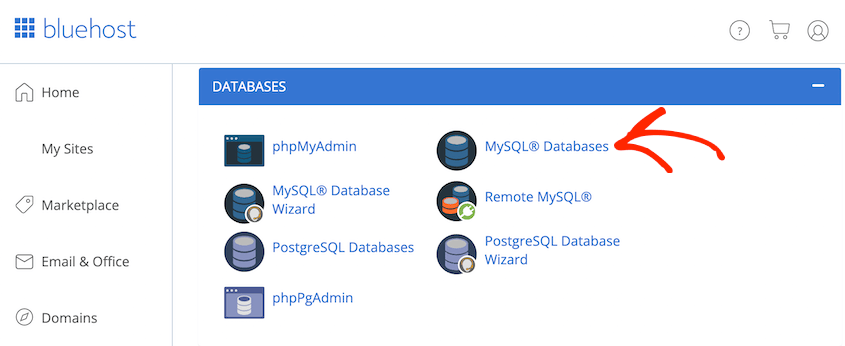
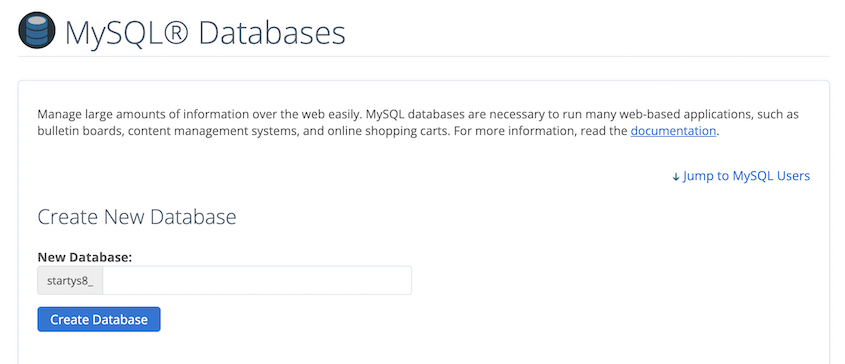
Now you’ll need to create a database for the new site. In cPanel, click on MySQL Databases.
Name the database and hit Create Database.
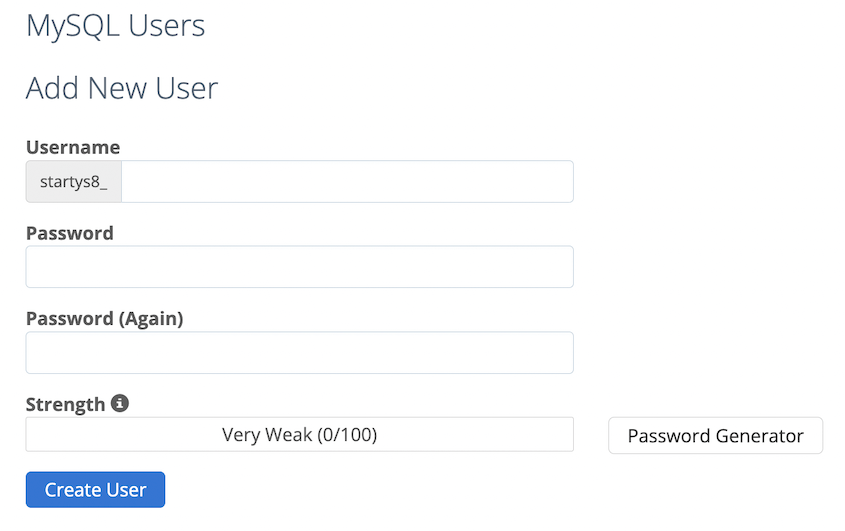
Next, add a new user.
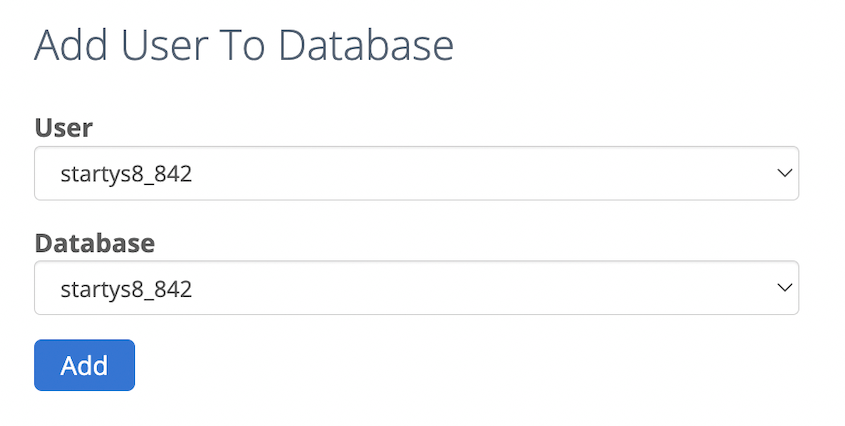
Once you have a new user and a new database, assign the user to the database. Give the user all privileges.
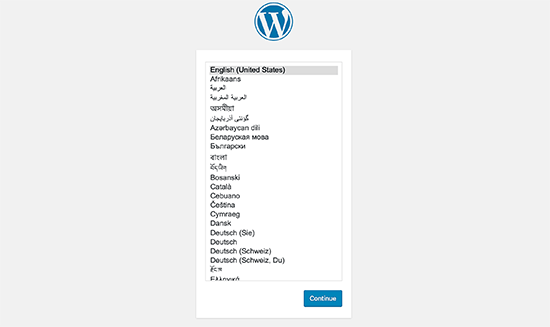
Then, open your new site’s URL. Choose a language for your site.
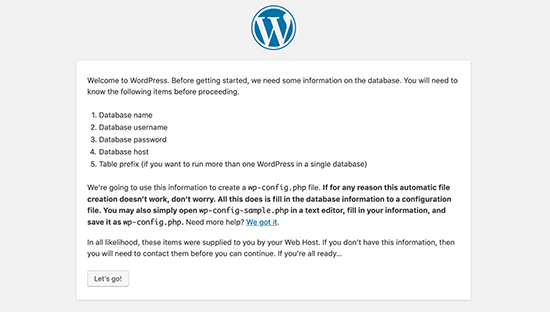
On the next page, hit Let’s go.
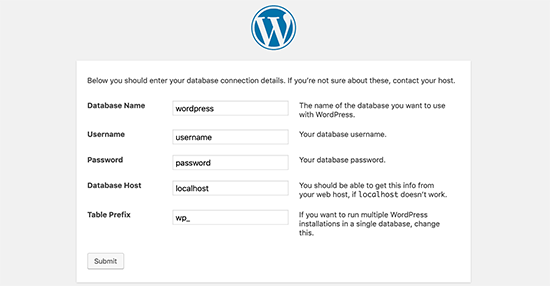
You can now add your new database name, database user, password, database host, and table prefix.
After submitting these details, click on Run the installation.
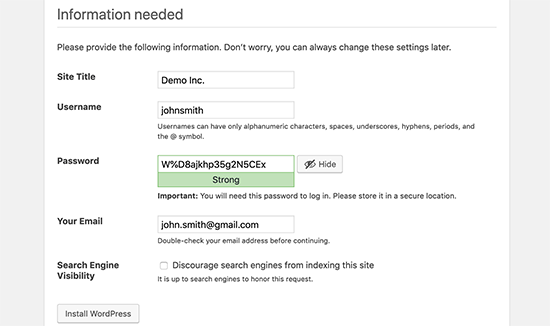
WordPress will need some extra details before installing. Add a site title.
Then, enter a new admin username, password, and email. We’d recommend using a strong password.
You can also make your site invisible to search engines if you need to.
Hit the Install WordPress button. Now you can log into your new website!
Speed Up WordPress Installations with Duplicator
If you’re starting your first blog or online business, your goal might be to build one good website. If so, you’ll only have to deal with one WordPress installation.
However, developers and agency owners commonly have to set up new WordPress sites for their clients. In this case, you won’t want to waste precious time installing WordPress again and again.
Duplicator is a backup and migration plugin that helps you avoid this problem. With this tool, you can set up pre-configured WordPress installations. This makes the development process fast and easy.
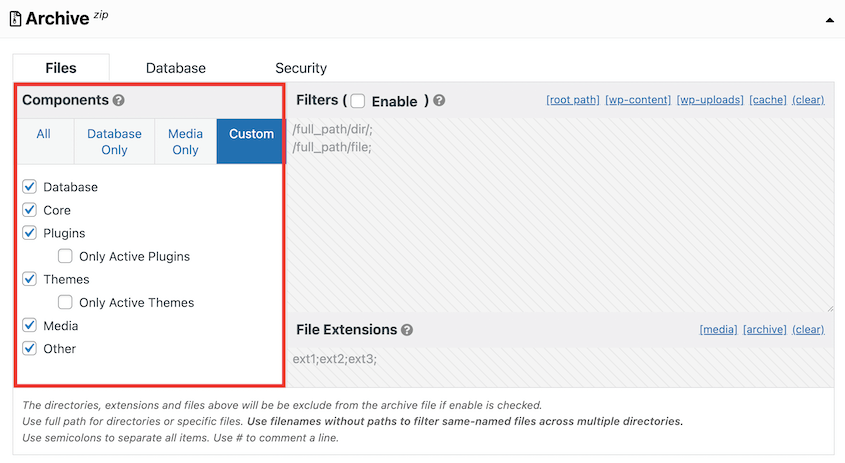
All you’ll need to do is create a backup of a website you want to copy. Using the checkboxes, only include the data you want to use in your pre-configured install.
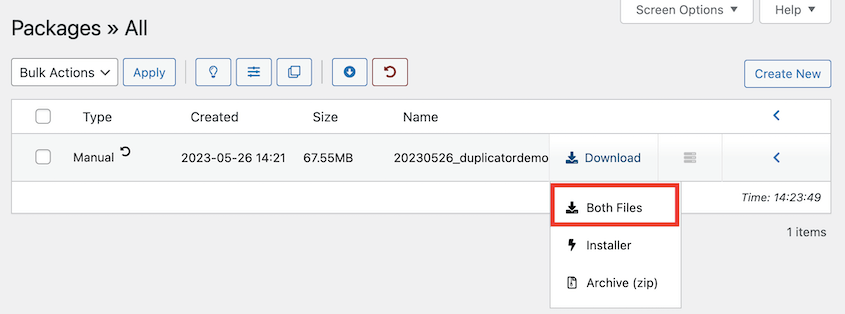
Then, download this backup. You should have two files: an archive and an installer PHP file.
Now, you can use Duplicator to completely avoid installing WordPress. But first, you’ll still have to create a new database for the new site.
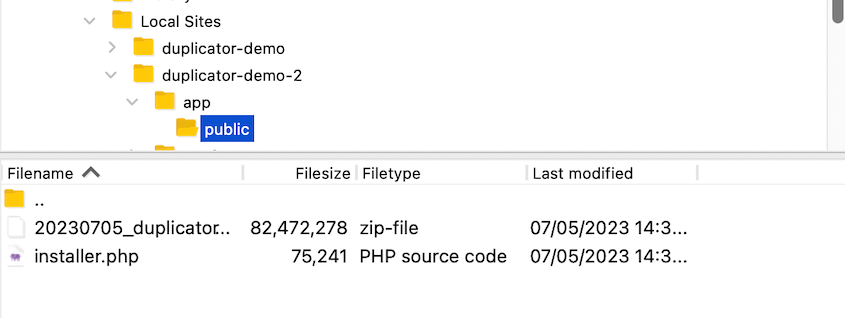
After this, connect to the new site’s server with an FTP client or cPanel. Upload your backup files to an empty directory.
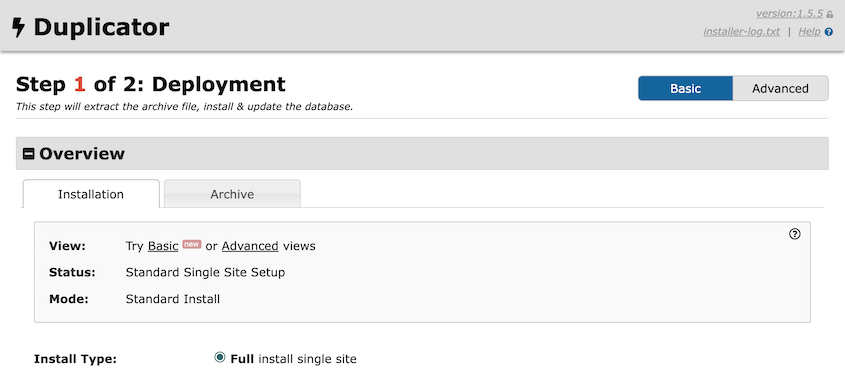
To launch Duplicator’s installer, search for this URL in a browser window: https://your-domain/installer.php
You can follow the step-by-step instructions in the installer. This will automatically install WordPress on the new location!
FAQs about Installing WordPress
How do I install WordPress on my local computer?
To install WordPress on your local computer, set up a local server using software like MAMP (for Mac) or WAMP (for Windows). Once the local server is running, download WordPress from the official site and upload it to the local site. Alternatively, LocalWP installs WordPress for you.
How do I install WordPress for free?
You can set up a local server using free software like XAMPP, WAMP, or MAMP. Then, install WordPress on it. This method allows you to use WordPress for free, however, keep in mind that your website will be only visible to you.
Do you need to install WordPress to use it?
Yes, to use WordPress, it has to be installed either on your local machine or a web server. Without installing it, you won’t be able to use the software.
What is the easiest way to install WordPress?
The easiest way to install WordPress is the one-click installation feature offered by most web hosting providers. This method saves time and reduces the chance of errors.
Can you use WordPress without a domain?
Yes, you can use WordPress without having a domain. For example, you can install it locally on your computer for testing or development purposes. Alternatively, you can use a temporary URL provided by web hosts.
Conclusion
I hope you now have WordPress installed! But, if you encounter any issues along the way, drop a comment below.
While you’re here, I think you’ll like these WordPress tutorials:
Are you struggling with long, complicated WordPress installations? Download Duplicator Pro to create pre-configured WordPress installs and instantly get new sites online!
Joella is a writer with years of experience in WordPress. At Duplicator, she specializes in site maintenance — from basic backups to large-scale migrations. Her ultimate goal is to make sure your WordPress website is safe and ready for growth.


