Have you ever wished you could undo a change you made to one of your WordPress posts or pages?
Maybe you deleted a paragraph by mistake or your latest update didn’t quite hit the mark. This is where WordPress revision history comes to the rescue.
WordPress revision history is a built-in feature that tracks every change you make to your content. It saves multiple versions of your posts and pages as you edit them, allowing you to revisit and restore earlier drafts.
This incredibly useful tool ensures that you never lose your hard work.
In this post, I’ll show you what WordPress revision history is and how to use it in your daily workflow.
Here are the key takeaways:
- WordPress automatically saves every version of your posts and pages as you edit them, creating a complete revision history
- You can easily restore any previous version by accessing the Revisions section in your post editor
- Limit revisions to prevent database bloat by adding a simple code snippet to your wp-config.php file
- Delete old revisions using plugins like WP-Optimize or Advanced Database Cleaner to improve site performance
- Consider using Duplicator Pro for comprehensive site backups and version control beyond individual posts
Table of Contents
What Is WordPress Revision History?
WordPress revision history is an automatic version control system for your posts and pages. Each time you save a draft or update your content, WordPress creates a new revision. These revisions are essentially snapshots that include all the changes made, complete with timestamps and author information.
The beauty of this feature is that it operates quietly in the background. As you work on your content, WordPress keeps a detailed log of every edit you make.
This means that if something goes wrong (like an accidental deletion or a formatting error) you can easily revert to a previous version.
Whether you’re a blogger, a content creator, or a website administrator, it’s important to learn about WordPress post revisions. This can vastly improve your workflow and content quality.
How to Use WordPress Revision History
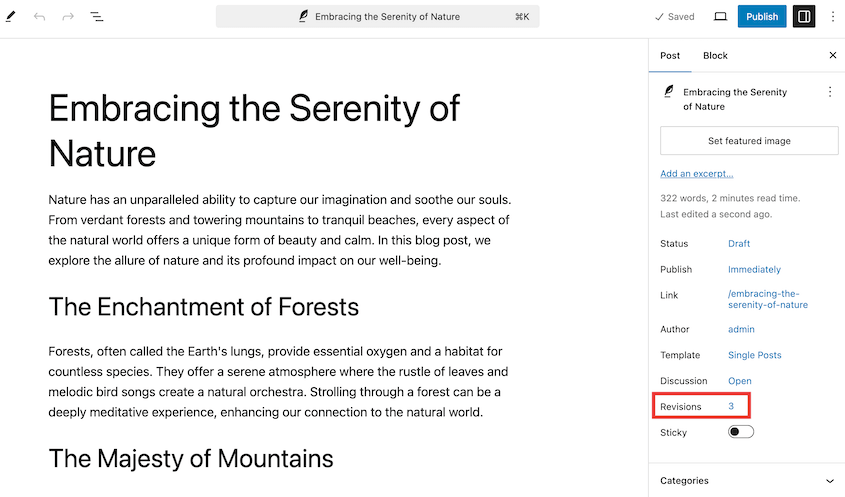
To view your post’s revision history, head to the post or page editor in WordPress. On the right-hand side or at the bottom of the editor, you’ll see a Revisions section. Click on the number.
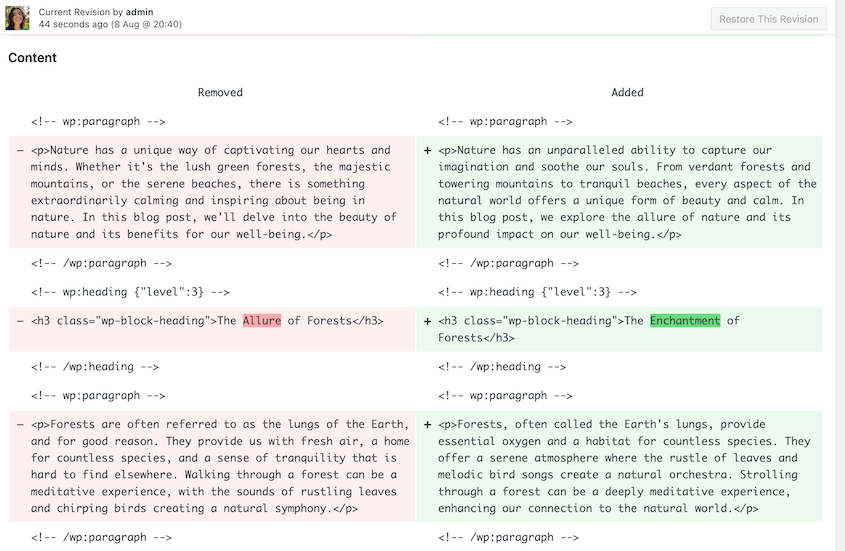
You’ll see a comparison screen that highlights the differences between versions. Additions are marked in green, while deletions appear in red.
You can compare revisions side by side, making it easy to spot changes.
If you accidentally delete content or make unwanted changes, you can quickly revert to a previous version. This saves you from rewriting or re-formatting sections from scratch.
Multiple authors and editors can work on the same post. Revisions track who made which changes and when, improving transparency and collaboration.
Sometimes, your initial draft may need refining. Revision history allows you to experiment with different versions and revert to a better one if needed.
It’s like having an undo button for your entire editing process.
How to Restore Posts and Pages with WordPress Revision History
The revision history feature in WordPress is invaluable for making sure your content evolves smoothly. But what happens when you need to revert to an earlier version?
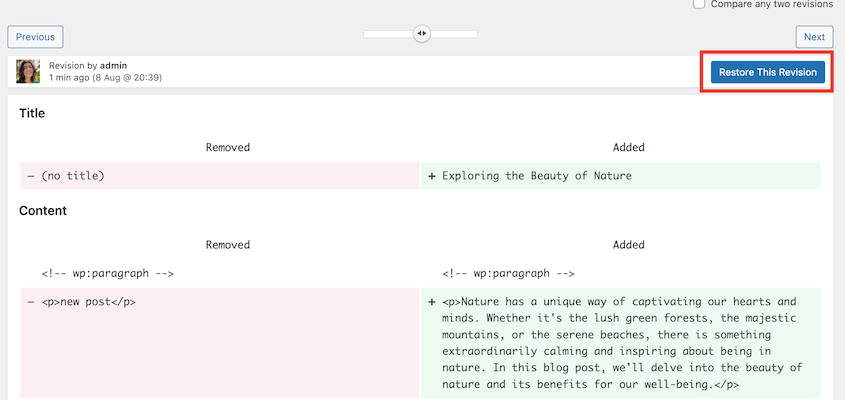
On the revision comparison screen, a slider at the top lets you move between different revisions. Slide it to find the version you want to restore.
Once you find the correct version, click the Restore This Revision button at the top right of the screen.
WordPress will revert the content to the selected revision. It will take you back to the block editor, where you can continue editing the post.
This process works for both posts and pages, giving you control over all your content.
How to Limit Post Revisions in WordPress
While WordPress revision history is a powerful tool, it can sometimes lead to database bloat if not managed properly.
Every version of a post or page is stored in your database, and over time, this can slow down your site. Keeping fewer revisions reduces the size of your database, which can improve overall site performance.
By limiting revisions, you ensure that server resources are not wasted on storing excessive amounts of data. You’ll also have a leaner database that’s easier to manage, back up, and restore.
The simplest way to limit WordPress revisions is by adding a line of code to your wp-config.php file.
Use an FTP client or your web host’s file manager to locate the wp-config.php file in the root directory of your WordPress installation. Download and open this file using a text editor (like Notepad or any code editor).
Insert the following line of code above the line that says /* That's all, stop editing! Happy blogging. */:
define('WP_POST_REVISIONS', 5);
In this example, WordPress will save only the most recent five revisions of each post or page. You can adjust this number according to your needs.
Save the changes and upload the modified wp-config.php file back to your server.
By limiting the number of revisions, you can keep your WordPress site running smoothly without sacrificing the ability to revert to previous versions when needed.
How to Delete Old Post Revisions in WordPress
Over time, as you create and edit content, your WordPress site can accumulate a large number of post revisions. Deleting old revisions can help improve your site’s performance.
If you are comfortable working directly with your database, you can manually delete WordPress revisions using phpMyAdmin. Choose the database for your WordPress site from the list on the left.
Navigate to the SQL tab and copy-paste the following query:
DELETE FROM wp_posts WHERE post_type = 'revision';
Click Go to run the query. This will delete all post revisions from your database.
Make sure to back up your database before executing the query, as this action cannot be undone.
If you prefer a more user-friendly approach, several plugins can help you manage and delete revisions. You won’t have to touch any code.
WP-Optimize cleans up your database, compresses images, and caches your site for better performance. It includes the option to delete your post revisions.
On the Database page, you’ll see an option to Clean all post revisions. Next to it, hit the Run optimization button.
Another plugin you can use is Advanced Database Cleaner. It helps remove database clutter like spam comments, unused tables, and post revisions.
How to Disable WordPress Post Revisions
There may be scenarios where disabling WordPress revision history altogether makes sense. You might want to do this on sites that rarely change or where performance optimization is critical.
To disable WordPress revisions, download and open your wp-config.php file. Insert the following line of code:
define('WP_POST_REVISIONS', false);
Save the changes and upload the file back to your server.
While disabling revisions can save space and improve performance, it comes with some trade-offs:
- Without revisions, you can’t access previous versions of your posts and pages. Any accidental deletion or error will require manual correction.
- Revisions allow you to experiment with your content over multiple drafts. Disabling them limits this flexibility.
- If multiple authors or editors contribute to your site, you’ll have a harder time tracking changes and managing collaborative edits.
Weigh these pros and cons carefully to decide if disabling revisions is the right choice for your site. For many users, limiting rather than completely disabling revisions provides the best balance between functionality and performance.
Pros and Cons of WordPress Revision History
Like every feature, WordPress revision history has its advantages and disadvantages. Understanding these can help you make an informed decision about how to use this feature effectively on your site.
Pros of WordPress Revision History
This feature provides revisions to undo changes when needed. If you make a mistake or delete important content accidentally, you can quickly revert to an earlier version without losing your work.
For sites with multiple authors and editors, revisions make tracking changes easier. Everyone can see who made what changes and when, facilitating better collaboration and accountability.
- Effective Content Management
Revisions allow you to experiment with different drafts and ideas. This flexibility helps you refine your content over time, ensuring the final version is as polished as possible.
Cons of WordPress Revision History
Over time, saved revisions can take up significant space in your database. This can slow down your site, especially if you have a large number of posts and pages with many revisions.
Having too many revisions can clutter your editing interface and make it difficult to manage your content. You might not be able to easily find a specific revision.
For very large sites with extensive content, the sheer number of saved revisions can negatively impact server performance. Frequent database queries for revisions can lead to slower response times.
How to Better Manage WordPress Revisions
Managing WordPress revisions effectively ensures your site remains efficient, organized, and high-performing. Let’s explore some tools and practices that can help you keep your revisions under control.
Use WordPress Revision History Plugins
One powerful tool for revision history is Duplicator, a plugin that goes beyond simple backups. It can also help you create and restore versions of your website.
Duplicator allows you to create full site backups, including all content, themes, plugins, and settings. This is useful not just for recovery but also for maintaining different versions of your site.
You can use Duplicator to save snapshots of your site at different stages. Your backups can be a revision history log for your entire site, not just individual posts or pages.
With Duplicator, restoring your site to a previous state is straightforward. In your backup log, find the right version. Then, hit Restore.
You can completely disable WordPress revisions if you’d like. You might find it easier to manage different versions of your complete website, rather than specific posts/pages.
Alternative: If you’re looking to keep track of revisions, the Simple History plugin is an excellent choice. It’s one of the best WordPress revision history plugins because it keeps a log of changes made to your site, including post/page edits, plugin updates, and more.
Set a Revision Limit
While it’s possible to disable WordPress revisions, it’s often better to limit them instead. This way, you maintain some history without overloading your database. You’ll keep the most recent versions without excessive database growth.
Do Regular Cleanups
Periodically clean up old revisions using plugins or manual methods. This helps maintain optimal database size and performance.
Use Optimization Plugins
Plugins like WP-Optimize or Advanced Database Cleaner can automate revision management and other database optimization tasks. They’ll keep your site running smoothly while you focus on writing new content.
Solve Issues With WordPress Revisions
If you’re experiencing issues with WordPress revisions not showing, it could be due to plugin conflicts or server misconfigurations. To fix WordPress revisions, try deactivating plugins, checking your wp-config.php file, or consulting with your WordPress hosting provider.
FAQs About WordPress Revision History
How do I find revision history in WordPress?
To find revision history in WordPress, go to the post or page you want to check. In the post editor, look for the Revisions section in the right-hand sidebar or at the bottom of the page.
Can I restore a previous version of my WordPress site?
Yes, you can use the built-in revision feature to restore previous versions of posts or pages. For entire site backups and restoration, use a plugin like Duplicator Pro. It can restore previous backups with just one click.
How many revisions does WordPress keep?
By default, WordPress keeps an unlimited number of revisions. You can set a specific number of revisions by adding a line of code in your wp-config.php file.
How do I turn off revision history in WordPress?
Add the code snippet define('WP_POST_REVISIONS', false); to your wp-config.php file. This will disable revisions completely.
Conclusion
WordPress revision history is a powerful feature that provides a safety net for your content. It can help you improve content recovery and streamline collaboration.
While you’re here, I think you’ll like these extra WordPress guides:
For comprehensive site version control and easy backups, try Duplicator Pro. It’s a game-changer for managing your WordPress site efficiently!
Joella is a writer with years of experience in WordPress. At Duplicator, she specializes in site maintenance — from basic backups to large-scale migrations. Her ultimate goal is to make sure your WordPress website is safe and ready for growth.


