Website migrations are exciting, but you might wonder how to move everything without destroying years of SEO work.
301 redirect maps will change everything about how you approach migrations.
Think of it as a change-of-address form for your website. Just like forwarding your mail when you move houses, a redirect map will help you inform browsers and search engines where each of your old pages has moved.
With a proper redirect map, you can move your site with confidence, knowing that every link will work and every bit of search engine authority will transfer to your new home.
Here are the key takeaways:
- A 301 redirect map is a spreadsheet that matches old URLs to new URLs, preserving SEO value during website migrations
- Without redirects, you lose all backlinks, search rankings, and user experience suffers from 404 errors
- Redirect maps are essential for domain changes, redesigns, HTTPS switches, content audits, and platform migrations
- Create one by crawling your old site, mapping URLs in a spreadsheet, and implementing through plugins like AIOSEO
- Test thoroughly before and after the migration to ensure all redirects work properly and return 301 status codes
Table of Contents
What Is a 301 Redirect Map?
A 301 redirect map is just a spreadsheet with at least two columns: your old URLs and your new URLs. This URL redirect mapping process is essential for maintaining your site’s SEO value during any migration.
301 refers to the HTTP status code that tells browsers and search engines this is a permanent move. When someone clicks an old link or Google tries to crawl an old page, the 301 redirect automatically sends them to the new location.
A 301 redirect moves visitors to the correct location, but it also passes along what SEO experts call “link equity.” All the authority and ranking power that your old page earned from backlinks and search engine trust gets transferred to the new page.
Without redirects, those old URLs become dead ends that return 404 errors. Google stops showing those pages in search results.
The backlinks you worked so hard to earn become worthless. Years of SEO effort vanish overnight.
Who Could Use a 301 Redirect Map?
You need a redirect map anytime you’re changing your site’s URLs. Here are the most common scenarios:
- Moving to a new domain (yoursite.com to yournewsite.com)
- Website redesigns that change your URL structure (/blog/post-title to /articles/post-title)
- Switching from HTTP to HTTPS
- Content audits where you’re deleting old pages but want to redirect visitors to relevant content
- E-commerce site restructures that change product category URLs or individual product pages
- Platform migrations (WordPress to Shopify, Wix to WordPress, etc.)
Basically, if your URLs are changing, you need redirects. To help manage redirects, many SEO experts create maps to keep track of them all. This is especially important when dealing with a large number of pages that need to be redirected.
Why Create a 301 Redirect Map?
A redirect map protects three critical parts of your site migration:
Every page that shows up on Google’s first page represents months or years of work. When you migrate without redirects, you’re starting from scratch.
A proper redirect map preserves SEO value by telling search engines, “This page didn’t disappear—it just moved.”
- Maintain User Experience (UX)
Put yourself in your visitor’s shoes. They bookmark your best blog post, then visit six months after your migration. They click the link and hit a 404 error.
Users don’t care about your technical challenges. They want the content they were looking for. When they can’t find it, they leave.
Redirects turn potential frustration into a smooth experience. Each URL redirect ensures visitors find exactly what they’re looking for without confusion.
- Organization and Error Prevention
The redirect map is your safety net against human error.
It forces you to account for every single URL. It catches edge cases you’d never think of—like that outdated landing page that still gets occasional traffic.
How to Create a 301 Redirect Map
Here are the key steps to create a 301 redirect map before your website migration:
- Compile old URLs: Use sitemaps and crawling tools like Screaming Frog to find all existing pages
- Compile new URLs: Crawl your staging site or create a new URL structure based on your migration plan
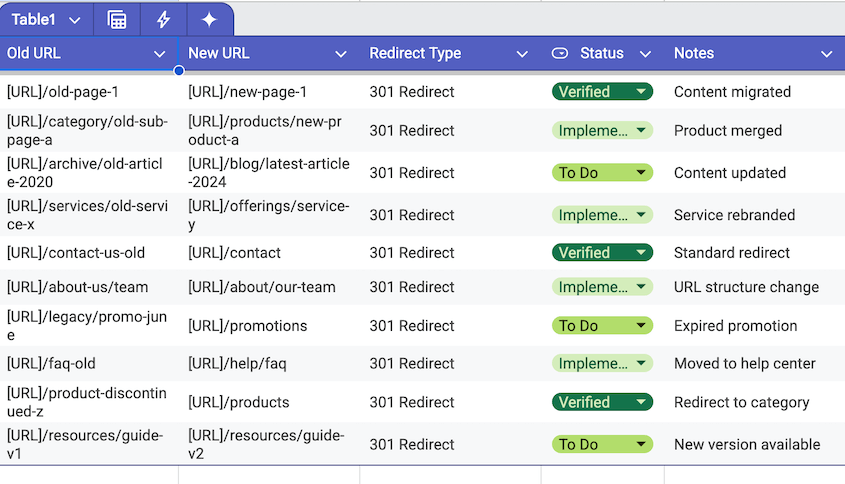
- Build the map: Create a spreadsheet with Source URL, Destination URL, Notes, and Status columns
- Map URLs: Match each old URL to its new equivalent, working in batches of 50-100
- Handle unmatched URLs: Redirect to relevant pages, category pages, or the homepage as a last resort
Compile a List of Your Old URLs
Before you can map old URLs to new ones, you need a complete inventory of what you’re working with.
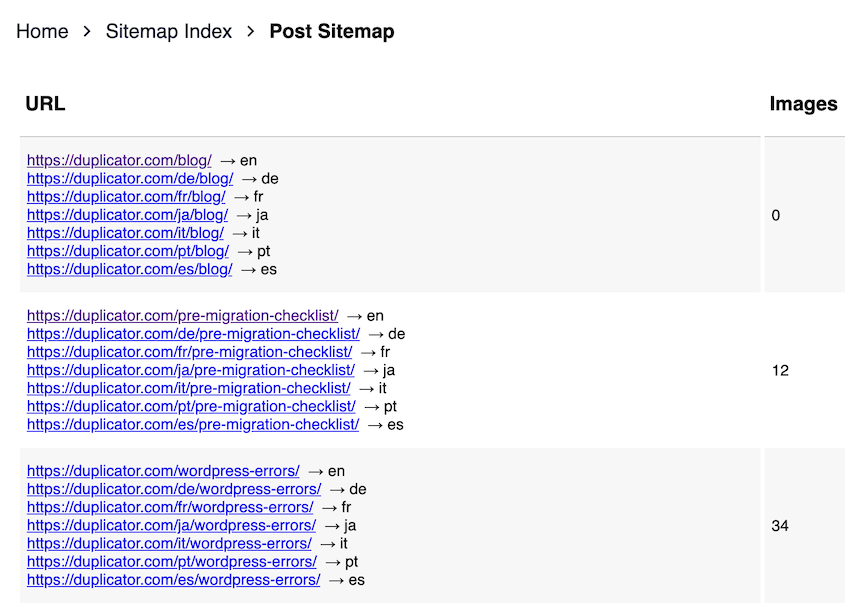
Start with your sitemap. Most websites have an XML sitemap at yoursite.com/sitemap.xml. This gives you a baseline list of your most important pages.
But don’t stop there—sitemaps don’t always capture everything.
For a more comprehensive list, use a crawling tool like Screaming Frog SEO Spider (free for up to 500 URLs). Point it at your current site and let it crawl every page it can find.
This approach will save time compared to manually discovering URLs one by one.
Don’t forget about:
- Old blog posts that might not be in your main navigation
- Landing pages from previous campaigns
- Product pages that might be hidden deep in your site structure
- PDF downloads or other file types that get direct traffic
Compile a List of Your New URLs
If you’re doing a simple domain change (keeping the same URL structure), this step is easy. Just do a search-and-replace on your old URL list: change “oldsite.com” to “newsite.com” and you’re done.
For more complex migrations, you’ll need to crawl your new site the same way you crawled the old one.
Most developers set up the new site on a staging domain before going live. Crawl that staging site to get your complete list of new URLs.
Build the Map in a Spreadsheet
Open Google Sheets or Excel and create a simple spreadsheet with these columns:
- Source URL (your old URLs)
- Destination URL (your new URLs)
- Notes (optional, but helpful for complex cases)
- Status (optional, for tracking progress)
Keep it simple, and remember you can use AI tools to help you. I used Gemini to create this 301 redirect map in under a minute.
Map the Old URLs to the New URLs
This is where the real work happens. You’ll go through each old URL and decide where it should redirect.
For straightforward cases, this is obvious. Your old “About Us” page maps to your new “About Us” page. Your contact form stays a contact form.
But you’ll run into trickier situations. Maybe you had five different product category pages that you’ve consolidated into two. Or you’ve restructured your blog and changed the URL format entirely.
Take your time here. Every decision you make affects both SEO and user experience.
I recommend working in batches (maybe 50-100 URLs at a time) so you don’t burn out or start making careless mistakes.
Double-check your work as you go. One typo in a destination URL means a redirect that leads nowhere.
Handle URLs Without a Direct Match
Not every old URL will have a perfect new equivalent. Maybe you deleted outdated content, or you combined multiple old pages into one comprehensive new page.
Here’s some solutions, from best to worst:
- Redirect to the most relevant new page. If you had a blog post about “WordPress Security Tips” and now you have a comprehensive guide called “Complete WordPress Security Guide,” that’s a natural match.
- Redirect to a parent category page. If you can’t find a specific match, redirect to the broader category that contains similar content.
- Redirect to the homepage. This should be your last resort. While it prevents 404 errors, it’s essentially a “soft 404” that provides little value to users or search engines.
Whatever you do, don’t leave old URLs without redirects. A redirect to a somewhat relevant page is always better than a dead link.
How to Implement 301 Redirects
Creating the map is only half the battle. Now you need to actually implement those redirects on your website.
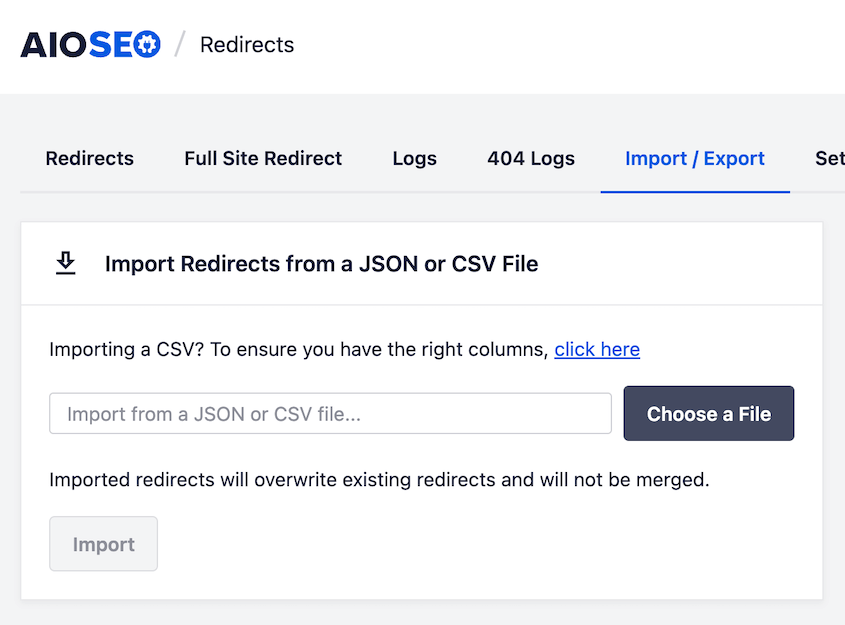
For WordPress users, I strongly recommend using a plugin rather than trying to edit server files manually. All in One SEO (AIOSEO) is my go-to choice because it lets you import your entire redirect map from a CSV or JSON file.
Instead of creating hundreds of redirects one by one, you can upload your entire spreadsheet at once. Save your redirect map as a CSV file, upload it to AIOSEO, and you’re done.
The plugin handles all the technical implementation behind the scenes. There’s no risk of breaking your site with a misplaced character in a configuration file.
If you’re not using WordPress, or if you prefer more technical control, you can implement redirects through your server configuration:
- Apache servers use the .htaccess file
- Nginx servers require changes to the server config file
But unless you’re comfortable editing server files and understand the syntax, stick with a plugin. The risk of breaking your site isn’t worth the minor performance benefits of server-level redirects.
301 Redirect Best Practices
- Avoid redirect chains. Don’t redirect A to B to C. Each additional hop slows down the user experience and dilutes SEO value. Always redirect directly to the final destination.
- Update internal links on your new site. Once your migration is complete, update your internal links to point directly to the new URLs rather than relying on redirects. This reduces server load and improves page speed.
- Aim for one-to-one mapping where possible. The strongest SEO benefit comes from redirecting one old page to one specific new page with similar content.
- Keep your redirect map for future reference. You might need to modify redirects later, or you might want to reference your mapping for future migrations.
- Test everything before going live. A broken redirect is worse than no redirect at all because it creates an infinite loop that crashes browsers.
How to Test 301 Redirects
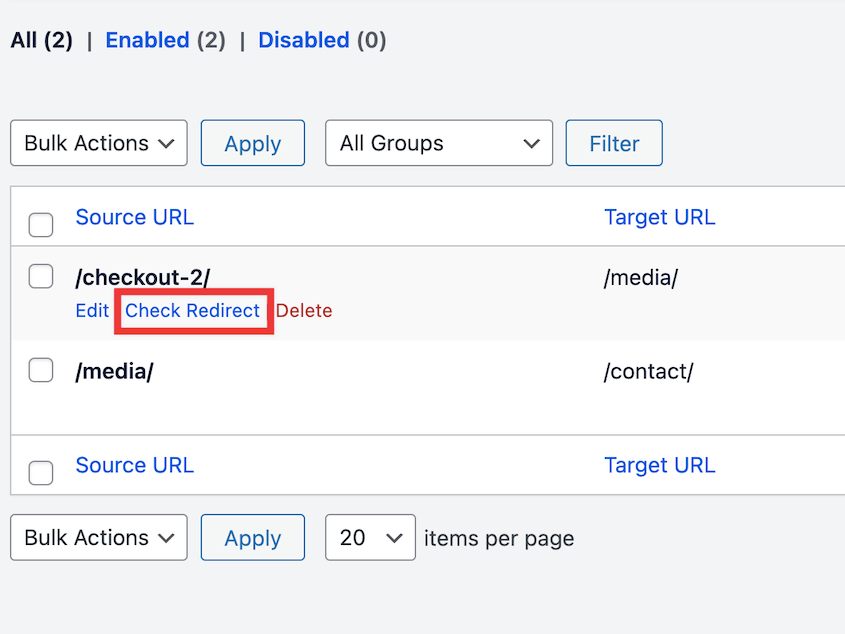
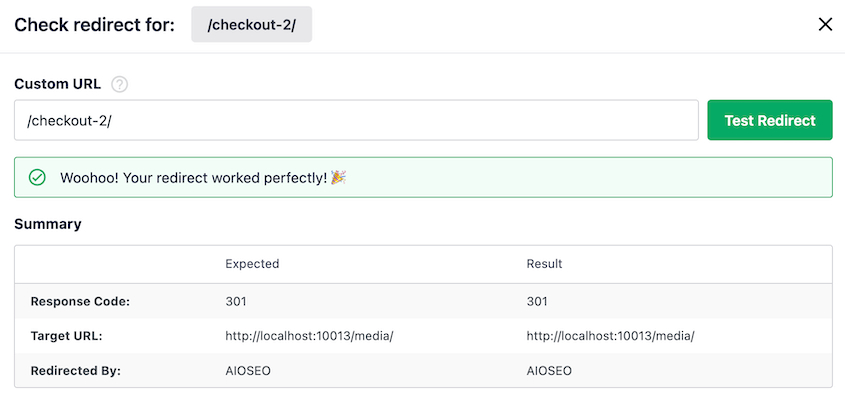
Once you set up 301 redirects, it’s time to test them. If you used AIOSEO’s redirection add-on, you’ll have Check Redirect buttons under each URL.
AIOSEO will tell you the link’s status code. If it’s set up properly, it’ll be a 301 redirect.
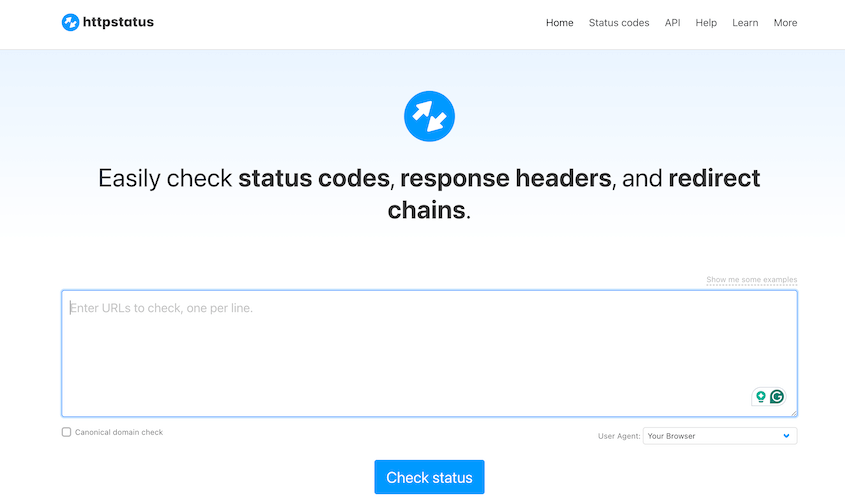
You can also use a bulk status code checker tool. Tools like HTTP Status Code Checker can test hundreds of URLs at once and show you which ones return 301 redirects versus 404 errors.
After implementing your redirects, run another Screaming Frog crawl on your list of old URLs. Each one should show a 301 status code pointing to the correct new URL.
Do manual spot-checks of your most important pages. Open a browser and manually visit 10-20 of your most important old URLs. Make sure they redirect quickly and land on the right pages.
After your migration goes live, watch for new 404 errors in Google Search Console. A spike in 404s usually means you missed some URLs in your redirect map.
Frequently Asked Questions (FAQs)
Does Google penalize 301 redirects?
No. Google actually recommends using 301 redirects when you move content permanently. They pass nearly all ranking power to the new URL, though you might see a temporary dip that recovers within a few weeks.
Can a 301 redirect be reversed?
Yes, you can remove or change 301 redirects at any time. However, it might take weeks for Google to notice the change and adjust accordingly.
What’s the alternative to a 301 redirect?
A 302 redirect signals a temporary move instead of a permanent one. Use 302s for maintenance pages or A/B tests, but stick with 301s for migrations since they pass maximum SEO value.
Will having hundreds of 301 redirects slow down my website?
Individual redirects add minimal load time—just a few milliseconds. However, redirect chains (A → B → C) do slow things down significantly, so keep your redirects direct.
Your Blueprint for a Successful Migration
I’ve seen too many business owners skip redirect maps and regret it later. Their organic traffic disappears, and their users hit dead ends and leave frustrated.
With a comprehensive redirect map, you maintain control over your migration. Every bit of SEO authority transfers to your new site, and your users find what they’re looking for.
The redirect map is only one piece of a successful migration, though. Before you can implement any redirects, you need to actually move your website files and database safely.
That’s where Duplicator Pro becomes essential. It handles the complex process of moving everything to your new hosting environment or domain. Think of it as the foundation that makes everything else possible—you can’t redirect to pages that don’t exist yet.
Start your next migration with confidence. Create your redirect map, use Duplicator Pro to move your site safely, and watch your SEO rankings follow you to your new home.
While you’re here, I think you’ll like these other hand-picked resources:
Joella is a writer with years of experience in WordPress. At Duplicator, she specializes in site maintenance — from basic backups to large-scale migrations. Her ultimate goal is to make sure your WordPress website is safe and ready for growth.


