There’s nothing worse than migrating a WordPress site and having visitors hit a broken page.
I’ve seen it happen countless times. A developer moves a site to a new server, updates the DNS, and suddenly discovers a critical error that everyone can see.
Here’s a trick I use on every migration: edit your hosts file first. This lets you preview your migrated site on the new server while the rest of the world still sees your original, working site.
You can test everything, fix any problems, and only update your public DNS when you’re 100% confident.
In this guide, I’ll walk you through what the hosts file is, why editing it prevents downtime, and exactly how to do it on Windows, macOS, and Linux.
You’ll learn how to:
- Edit the hosts file on any operating system
- Preview your migrated site before updating DNS
- Test your changes and verify they’re working
- Undo the hosts file entry when your migration is complete
Quick Summary: How to Edit Your Hosts File
To edit your hosts file, you need administrator privileges and must add a line mapping your domain to an IP address. On Windows, open Notepad as administrator and edit C:\Windows\System32\drivers\etc\hosts. On macOS, use sudo nano /private/etc/hosts in Terminal. For Linux, use sudo nano /etc/hosts. Add a line like 192.168.1.1 your-website.com www.your-website.com, save the file, flush your DNS cache, and test with ping to verify the change worked.
Table of Contents
What is the Hosts File?
The hosts file is a plain text file on your computer that maps domain names to IP addresses.
When you type a domain name into your browser, your computer normally asks public DNS servers for the corresponding IP address. The DNS server responds with something like “192.168.1.1” and your browser connects to that server.
But your computer checks the hosts file first, before it asks any DNS servers.
The hosts file is stored locally on your machine. If it contains an entry for a domain, your computer uses that IP address instead of asking DNS servers. This means you can override what your local computer thinks a website’s IP address is, while everyone else in the world still gets the normal DNS response.
Only your computer sees the hosts file entries. The rest of the internet continues using the public DNS records.
Why Edit Your Hosts File?
The main reason WordPress users edit their hosts file is to test a site migration before updating the public DNS.
Here’s the typical scenario: You’ve moved your site to a new hosting provider with a new IP address. Your site files are now on the new server, but your domain’s DNS records still point to the old server.
If you update your DNS records right away, everyone visiting your site will see the new server. But what if there’s a problem? What if some images are broken, or a plugin isn’t working correctly on the new host?
By modifying the hosts file first, you can point your domain to the new server’s IP address on your computer only. This lets you browse the migrated site as if the DNS change has already happened, while the rest of the world still sees the original site on the old server.
You can test everything thoroughly. Click through pages, test contact forms, and check that all your plugins work. If you find issues, you can fix them privately while your live site remains unaffected.
Once you’re confident everything works perfectly, then you update the public DNS records.
How Do You Edit the Hosts File?
Before we dive into the operating system specifics, there are two key things to know.
First, you need administrator privileges to edit and save changes to the hosts file. This is the most common stumbling block I see people hit. The file is protected because it can affect how your computer connects to websites.
Second, hosts file entries follow a simple format: the IP address, followed by a space, then the domain name.
Here’s what a typical entry looks like:
192.168.1.1 your-website.com www.your-website.com
The IP address 192.168.1.1 would be your new server’s IP address. The domain names that follow are what you want to redirect to that IP. I always include both the www and non-www versions of the domain to cover all bases.
Now let’s look at how to actually edit the hosts file on each operating system.
- Windows: Run Notepad as administrator, open C:\Windows\System32\drivers\etc\hosts, change the file filter to “All Files,” and add your entry
- macOS: Use sudo nano /private/etc/hosts in Terminal, add your entry, save with Control + O, exit with Control + X
- Linux: Use sudo nano /etc/hosts in Terminal, add your entry, and save
- Entry format: IP_ADDRESS domain.com www.domain.com
How to Edit Hosts File in Windows
The hosts file on Windows is located at C:\Windows\System32\drivers\etc\hosts.
Here’s how to edit it:
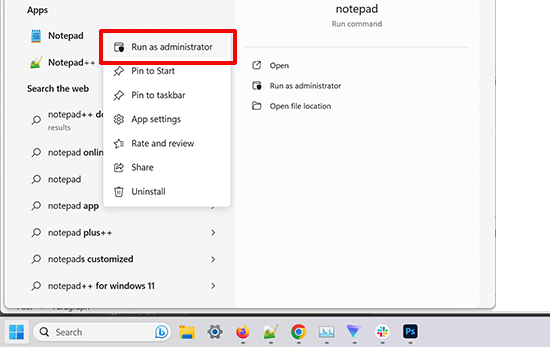
Click the Start button and search for Notepad. Right-click on Notepad and select Run as administrator.
In Notepad, go to File » Open. Navigate to C:\Windows\System32\drivers\etc\.
Change the file type dropdown from Text Documents to All Files so you can see the hosts file.
Select the hosts file and open it with a text editor.
Scroll to the bottom of the file and add your new line:
192.168.1.1 your-website.com www.your-website.com
Save the file with Ctrl + S.
The key step people often miss is changing the file filter to All Files. Without this, the hosts file might not show up in the file browser.
How to Edit Hosts File on macOS
The hosts file on macOS is located at /private/etc/hosts.
The easiest way to edit it is through Terminal. You can open this with Command + Space and searching for Terminal in Spotlight.
Use this command: sudo nano /private/etc/hosts. Enter your password. (The cursor won’t move as you type. This is normal for security.)
Use the arrow keys to navigate to the bottom of the file. Add your new line: 192.168.1.1 your-website.com
The sudo command gives you administrator privileges, and nano is a simple text editor that runs in Terminal.
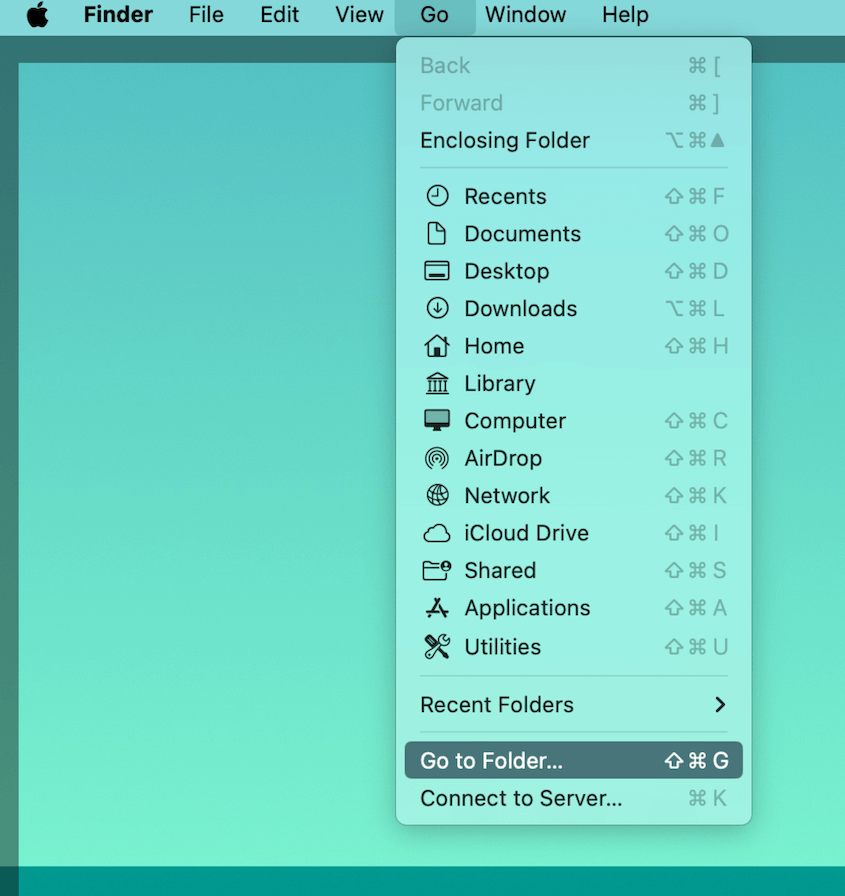
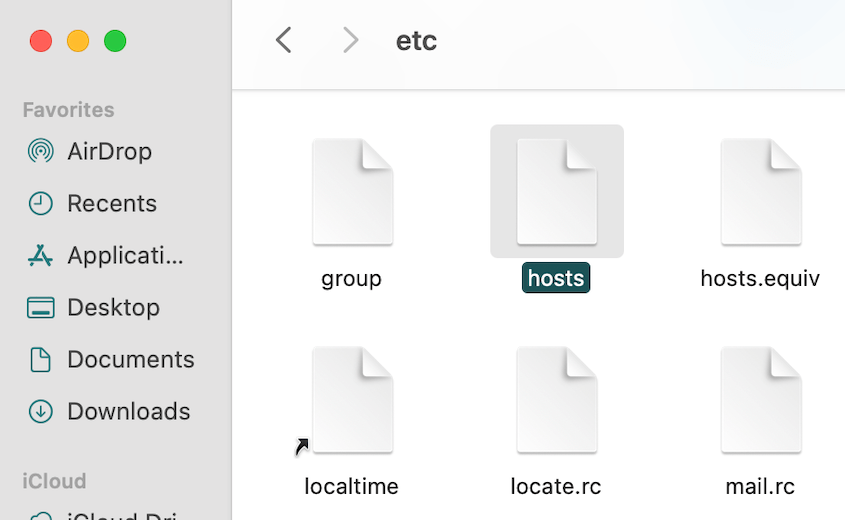
You can also do this with a more graphical interface if you prefer. Open Finder and go to the top-left corner of your Mac. Select Go and then Go to Folder.
Search for /etc and locate your hosts file. Open it in your favorite text editor.
Enter the command above and save the file.
How to Edit Hosts File on Linux
The process on Linux is nearly identical to macOS. You can open Terminal with the application launcher menu or by pressing Ctrl + Alt + T.
Open the hosts file in a text editor. Add this command: sudo nano /etc/hosts
Enter your password when prompted. However, you won’t have to do this if you log in as root.
At the bottom of the file, add your new line:
192.168.1.1 your-website.com www.your-website.com
Press Control + X, Y, and Enter.
The steps are the same as macOS, just with a slightly different file path.
How Do You Verify That Your Hosts File Was Changed?
After editing your hosts file, you need to flush your DNS cache before the changes take effect.
Your computer caches DNS lookups to speed up browsing. Even after modifying your hosts file, your computer might still use the old cached IP address for a while.
Here’s how to flush the DNS cache on each operating system:
Windows:
Open Command Prompt as administrator and run:
ipconfig /flushdns
macOS:
Open Terminal and run:
sudo dscacheutil -flushcache; sudo killall -HUP mDNSResponder
Linux:
The command varies by distribution, but this works on most systems:
sudo systemctl restart systemd-resolved
After flushing your DNS cache, verify the change worked by using the ping command:
ping your-website.com
Look at the IP address that ping returns. It should match the IP address you added to your hosts file, not your old server’s IP. If it matches, your hosts file edit is working correctly.
If you still see the old IP address, double-check that you saved the hosts file properly and try flushing your DNS cache again.
How to Revert Changes to Your Hosts File
Once your migration is complete and you’ve updated your public DNS records, you should remove the entries from your hosts file.
This step is important. If you leave the hosts file entries in place, your computer will continue using them even after your public DNS records are updated. This can cause confusion later if you need to troubleshoot or if your server IP changes.
To revert the changes:
1. Open the hosts file again using the same method you used to edit it (with administrator privileges).
2. Find the line you added for your domain.
3. You have two options:
- Delete the line entirely (simplest approach)
- Comment it out by adding a # at the beginning of the line (if you might need it again)
Commenting out looks like this:
# 192.168.1.1 your-website.com www.your-website.com
I prefer commenting out because it keeps a record of what I did, and I can easily reactivate it later if needed.
After making the change, save the file and flush your DNS cache again using the commands from the previous section.
Frequently Asked Questions (FAQs)
What do I do after editing a hosts file?
Test your site thoroughly by clearing your browser cache and clicking through all pages, forms, and functionality. Once you’ve confirmed everything works perfectly on the new server, update your domain’s official DNS records at your registrar to point to the new IP address.
How do I change host records?
The hosts file is a local file on your computer, while host records are public DNS settings managed at your domain registrar. To change public DNS records, log into your registrar’s control panel and look for DNS management or DNS zone editor.
How do I open the hosts file as an administrator?
On Windows, right-click your text editor and select Run as administrator before opening the file. On macOS and Linux, use the sudo command in Terminal (like sudo nano /etc/hosts) and enter your password when prompted.
Where is the known hosts file?
The known_hosts file is used by SSH connections for server security and is located in your .ssh directory. For domain redirection, use the hosts file paths covered in this article: C:\Windows\System32\drivers\etc\hosts on Windows or /etc/hosts on macOS/Linux.
Avoid Migration Downtime By Editing Your Hosts File
The hosts file method gives you the confidence to migrate WordPress sites with zero downtime.
Instead of crossing your fingers and hoping everything works when you update DNS, you can test everything privately first. You’ll catch broken links, plugin conflicts, and server configuration issues before anyone else sees them.
The hosts file technique pairs perfectly with a migration tool like Duplicator Pro. Duplicator Pro handles the complex part—packaging your entire site and moving it to the new server with all your content, themes, plugins, and database intact.
Ready to make your next WordPress migration worry-free? Try out Duplicator Pro and take the guesswork out of moving your sites.
While you’re here, I think you’ll like these hand-picked WordPress resources:
Joella is a writer with years of experience in WordPress. At Duplicator, she specializes in site maintenance — from basic backups to large-scale migrations. Her ultimate goal is to make sure your WordPress website is safe and ready for growth.


