
How to Check a WordPress Site for Malware: Detection and Removal
 Joella Dunn
Joella Dunn
Joella Dunn
 John Turner
John Turner
John Turner
Your site failed a Google Safe Browsing check. Or a client forwarded you a screenshot showing that their site may be hacked.
Either way, you’re staring at a WordPress dashboard wondering where to start looking for malware.
I run the same checklist every time this happens, whether it’s my own site or one I’m managing for a client.
It’s not complicated. It just has to be thorough, because malware doesn’t always announce itself with a warning label.
In this post, I’ll show you how to check your site for malware, step by step, plus what to do once you find some.
If you’d rather skip straight to comparing malware removal plugins, we’ve got a separate post for that. Here, we’re focused on the process: what to look for, where to look, and how to know when you’ve actually found something versus just something that looks suspicious.
Here are the key takeaways:
- Two ways to fix a malware infection: restore a backup taken before the malware got in (fast, wipes it out in one step), or remove infected files and database entries manually if no clean backup exists (slower, requires more care).
- Backing up an infected site is expected, not a mistake: that backup protects you from your own cleanup errors.
- Malware often lives in your database, not your files: rogue admin accounts, injected links in post content, and altered siteurl values routinely slip past file-based scanners.
- Your Activity Log timestamp decides everything: it tells you how far back the infection goes, which determines whether a clean backup actually exists to restore.
- Cleaning up the malware isn’t the last step: if you don’t patch whatever let it in (an outdated plugin, a weak password), the same infection gets back in the same way.
Table of Contents
- Why Check Your Site for Malware?
- What You Need Before You Start
- How to Check Your WordPress Site for Malware
- Step 1: Look for the Visible Warning Signs
- Step 2: Back Up Your Site Before You Touch Anything
- Step 3: Check Google Search Console and Browser Warnings
- Step 4: Scan Your Files for Unfamiliar or Recently Modified Code
- Step 5: Check Your Database for Injected Content and Rogue Users
- Step 6: Run a Malware Scan for a Second Opinion
- Step 7: Review Your Activity Log to Trace What Changed and When
- How to Remove Malware Once You've Found It
- Troubleshooting Common Errors
- Frequently Asked Questions (FAQs)
- Catching Malware Early Beats Cleaning It Up Later
Why Check Your Site for Malware?
Malware on a WordPress site rarely stays contained to one file or one page. It spreads.
A single infected plugin file can inject spam links across every page on your site, create hidden admin accounts, or quietly redirect a portion of your visitors to a scam page while everything looks normal to you.
Left alone, that has real consequences.
Google can flag your entire site with a “This site may be hacked” warning in search results, which tanks your click-through rate even if most of your pages are untouched.
Your hosting provider can suspend your account if the infection starts sending spam or attacking other sites. If you run an online store, a database-level infection can expose customer data without a single visible symptom.
I’ve seen site owners put this off for weeks because nothing looked obviously wrong.
That’s usually the problem. The infections that do the most damage are the ones built to stay quiet.
Checking regularly (not just when something looks off) is what catches an infection while it’s still small enough to fix in an afternoon instead of a week.
What You Need Before You Start
You don’t need to be a developer to work through this checklist, but you do need a few things in place first.
- Access to wp-admin. You’ll be checking users, plugins, and content directly in the dashboard.
- FTP/SFTP or file manager access. Most hosts provide this through cPanel or a similar control panel. You’ll need it to look at file modification dates and inspect code.
- Database access. phpMyAdmin or your host’s equivalent. This one’s optional for the early steps, but you’ll want it once you get to checking for injected content.
- A recent backup, or the ability to take one right now. This isn’t optional.
Here’s why that last one matters more than it sounds like it should.
Once you start poking around infected files, it’s easy to delete something that turns out to be load-bearing or misread a legitimate plugin file as malicious. A backup means any mistake you make along the way costs you a restore, not a rebuild.
If you don’t already have a recent backup, that’s your first step. Everything else in this post assumes you’ve got one.
How to Check Your WordPress Site for Malware
Here’s what I always do to check a WordPress site for dangerous malware:
- Look for the visible warning signs: the symptoms that usually tip people off before anything else does, so you know within minutes whether you’re dealing with an infection or something else entirely.
- Back up your site before you touch anything: this makes every step after this one reversible, so a wrong guess later costs you a restore, not a rebuild.
- Check Google Search Console and browser warnings: confirm whether Google or Chrome has already flagged you, since that flag is what’s actually costing you traffic right now.
- Scan your files for unfamiliar or recently modified code: the manual check most people skip, and usually where the real infection turns up.
- Check your database for injected content and rogue users: where the infections most scanners miss actually hide, because there’s often no file for a scanner to flag.
- Run a malware scan for a second opinion: a cross-check, not a substitute for the steps before it, useful for catching what a manual read-through missed.
- Review your Activity Log to trace what changed and when: pinpoint the exact moment things went wrong, since that timestamp is what tells you later whether a clean backup even exists.
Step 1: Look for the Visible Warning Signs
Most infections show themselves before you go looking for them. You just have to know what you’re looking for.
Check for:
- Visitors getting redirected to spammy or unfamiliar sites when they land on your pages
- Pop-ups or ads showing up that you never added
- A “deceptive site ahead” or “this site may harm your computer” warning in Chrome or another browser
- A sudden drop in search rankings or traffic with no explanation
- Spammy or nonsensical text showing up in your search snippets, even though your actual pages look fine
- The site is running noticeably slower or throwing 500 errors without any recent changes on your end
- An email from your host about a suspension or a security concern
Any one of these on its own could be something else entirely. But if you’re seeing two or three of these at once, that could be a major sign of malware on your site.
Step 2: Back Up Your Site Before You Touch Anything
Before you open a single file or run a single scan, take a backup.
Everything you do from here on (deleting a file, editing the database, or running a cleanup tool) needs a way back if it goes wrong. A backup is that way back.
This one trips people up, so let’s address it directly: if your site is infected, doesn’t backing it up just save a copy of the malware?
Yes, it does. That’s fine.
This backup protects you from your own cleanup mistakes, not to give you a clean version of the site.
If you delete the wrong file or break something while investigating, you restore this backup, and you’re back to exactly where you started, malware and all, instead of a broken site on top of an infected one.
The backup you’d actually restore from to remove the malware is a separate, older one, taken before the infection happened. We’ll get to that later. For now, this backup is just your undo button for any cleanup mishaps.
To create it, I recommend using Duplicator. This is my favorite backup plugin because it offers true disaster recovery that restores your site even if WordPress is completely broken.
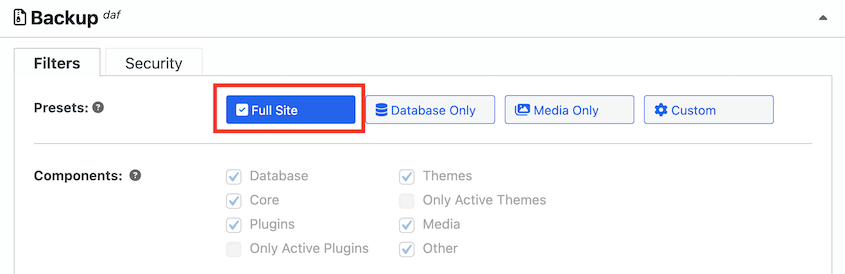
Create a new backup. Choose the Full Site backup preset.
Duplicator can send backups straight to cloud storage: Duplicator Cloud, Google Drive, Dropbox, or Amazon S3, among others.

This matters more than it might seem. If your server is compromised badly enough, a backup sitting in the same place as the infection isn’t much of a safety net.
You’ll know it worked when the backup shows up on the Backups screen, with both an archive file and an installer file listed.
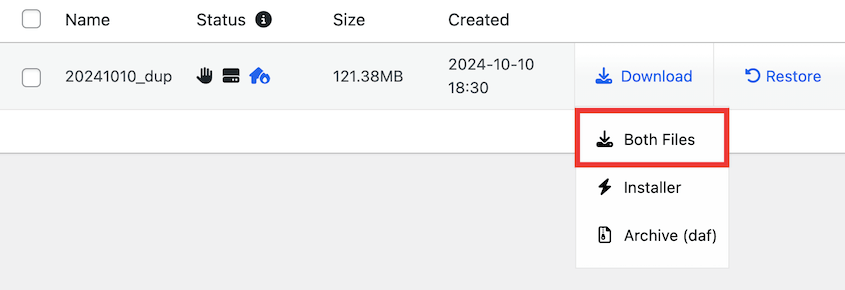
That’s your rollback point. Everything from here is safe to investigate.
Step 3: Check Google Search Console and Browser Warnings
Your site might already be flagged, and you just haven’t checked yet.
Log into Google Search Console for your site and open the Security Issues report in the left sidebar. If Google’s crawlers found malware, spam content, or deceptive pages on your site, they’ll show up here with details on what was found and when.
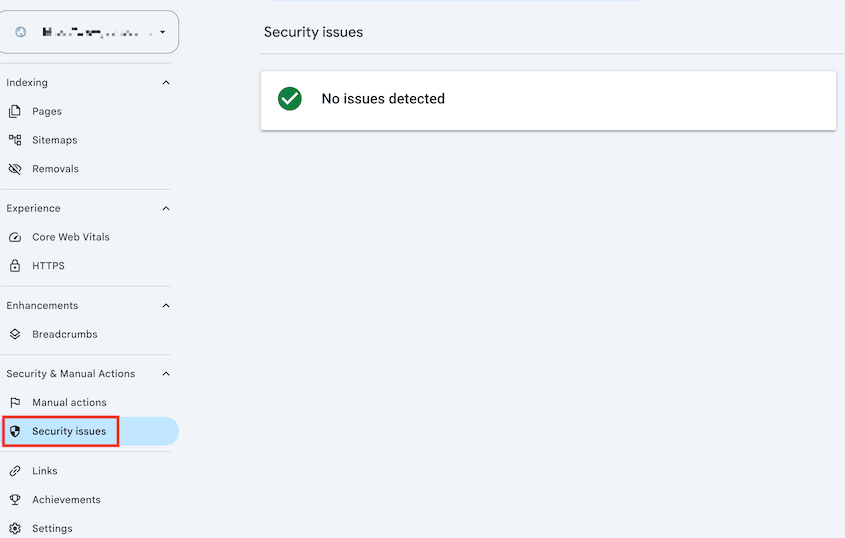
It’s worth knowing what each warning type means, since they point to different problems:
- Malware warning: Google found code designed to harm visitors, like a drive-by download or an exploit script
- Deceptive pages warning: your site is showing visitors something misleading, often a fake login page or a phishing attempt
- Harmful downloads warning: your site is serving a file Google considers dangerous, even if you didn’t put it there
An empty Security Issues report is good news, but it’s not proof you’re clean. Google doesn’t catch everything, and it doesn’t catch things instantly.
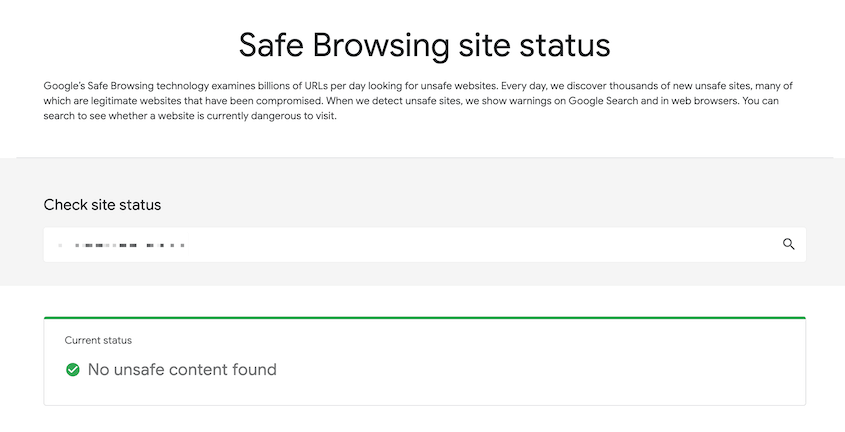
If you’ve seen a “deceptive site ahead” warning in Chrome, that’s Google Safe Browsing, a related but separate system from Search Console.
You can check your site’s status directly at Google’s Safe Browsing site status page by entering your domain.
Step 4: Scan Your Files for Unfamiliar or Recently Modified Code
This is the step most people skip, and it’s usually where I find the problem.
Connect to your site via FTP, SFTP, or your host’s file manager. Navigate to your WordPress root directory and sort the file list by modification date, most recent first.
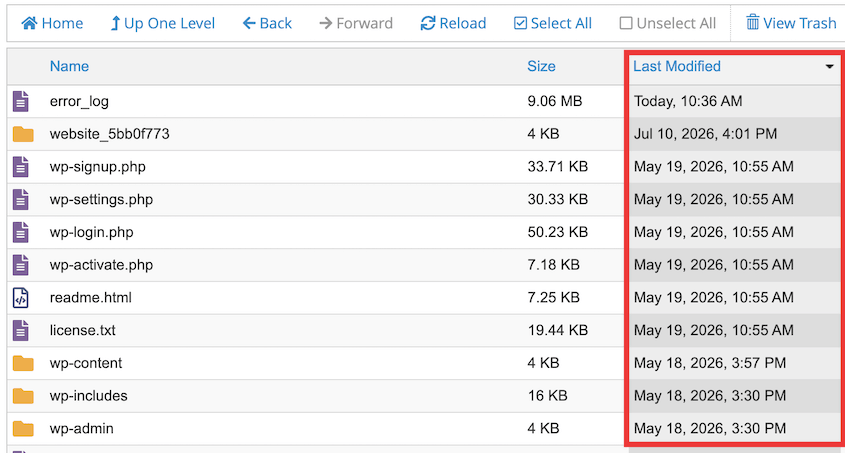
Any unexpected recent changes are worth a closer look. That’s true even if the filename looks harmless.
Here’s what I actually look for:
- PHP files sitting somewhere they don’t belong, especially inside wp-content/uploads, which should only contain media, not executable code
- Long strings of random-looking characters inside a file, often the result of
eval(base64_decode())or similar obfuscation used to hide malicious code from a casual read - A theme or plugin file that’s been modified but the plugin itself hasn’t been updated recently
- File names that look almost right, like wp-user.php sitting next to the real wp-users.php
If you took a Duplicator backup before this infection started, or you have access to your host’s older backups, compare the current files against that clean version. Anything different is either a legitimate update you made or something that needs explaining.
Don’t delete anything yet. This step is about finding and noting what looks wrong, not fixing it.
I’ve seen people spot something suspicious, delete it immediately, and take down a working feature because it turned out to be a legitimate plugin file that just looked unfamiliar. Confirm before you act.
Step 5: Check Your Database for Injected Content and Rogue Users
File-level scanners miss this step constantly because there’s often no file to flag. The infection lives entirely in your database.
I’ve found spam links sitting quietly inside post content that never showed up in a file scan. I’ve also found malicious redirects tucked into widget settings and admin accounts created directly in the database with no corresponding activity anywhere else in WordPress.
Open phpMyAdmin or your host’s database tool and check these spots:
- The wp_users table. Look for admin accounts you don’t recognize, especially ones with recent registration dates you can’t account for.
- Post and page content. Search for <script> tags, <iframe> tags, or unfamiliar links you didn’t add. A quick way to do this is by searching the wp_posts table for the term script or a suspicious domain.
- The wp_options table. Check the siteurl and home values match your actual domain. Malware sometimes alters these to redirect visitors without touching a single file.
- Widget and theme customizer settings. Stored as serialized data in wp_options, these can carry injected scripts that only run for logged-out visitors, which is why you might not have noticed anything browsing your own site while logged in.
If you find a rogue admin account, don’t delete it yet.
Note the username and the date it was created. You’ll want that information in step 7 when you check the Activity Log for what that account actually did.
Step 6: Run a Malware Scan for a Second Opinion
Everything up to this point has been manual. That catches a lot, but not everything.
Run a WordPress security scanning tool against your site as a second opinion.
Wordfence and Sucuri’s SiteCheck are both common choices. Each one checks for known malware signatures, common backdoor patterns, and file integrity against the original WordPress, plugin, and theme code faster than you could by hand.
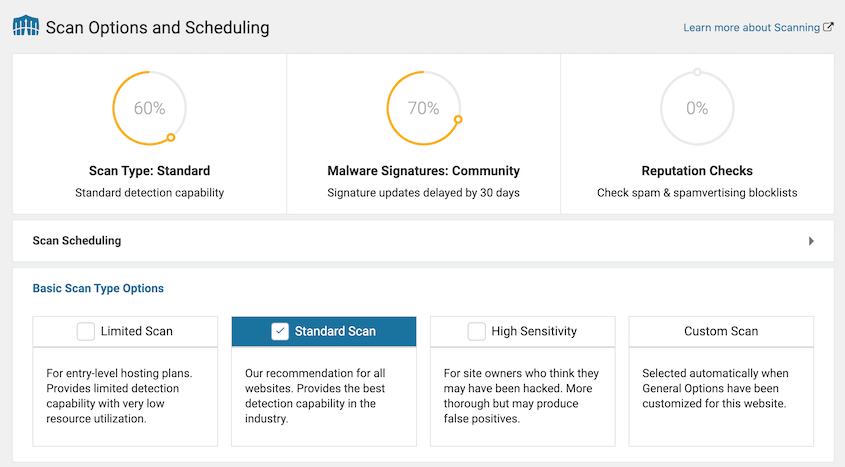
Treat the results as a cross-check, not a verdict. Compare what the scan flags against what you already found in Steps 4 and 5.
If it surfaces something new, investigate it the same way: check the modification date, look at the code, and confirm it’s not a legitimate file before you touch it.
False positives happen more than you’d expect. A scanner might flag a plugin file simply because it uses code patterns that resemble obfuscation, even when the plugin is completely legitimate.
Don’t delete something on the scanner’s word alone if your manual check in Step 4 didn’t already raise a flag on it.
Step 7: Review Your Activity Log to Trace What Changed and When
By now you probably have a list of suspects: a modified file, rogue admin account, or injected redirect. What you don’t have yet is a timeline.
That’s when the Activity Log plugin can help.
Duplicator Pro’s Activity Log records a full audit trail of changes across your site: file edits, plugin installs, user creation, login attempts, and setting changes. Each is recorded with a timestamp, severity level, and the account responsible.
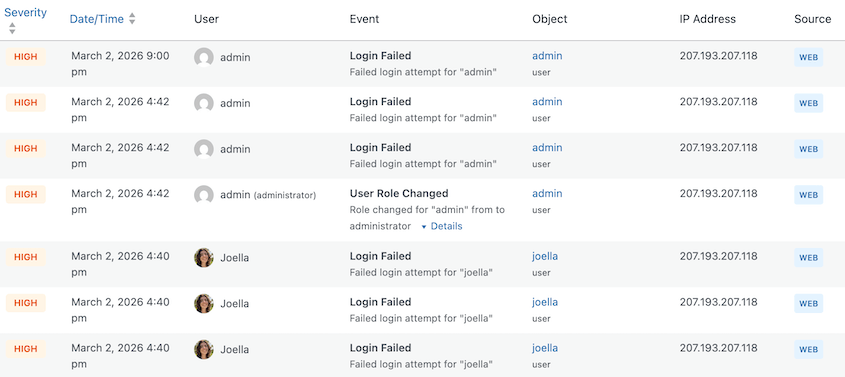
Open Activity Log and filter by the date range when you first noticed symptoms in Step 1.
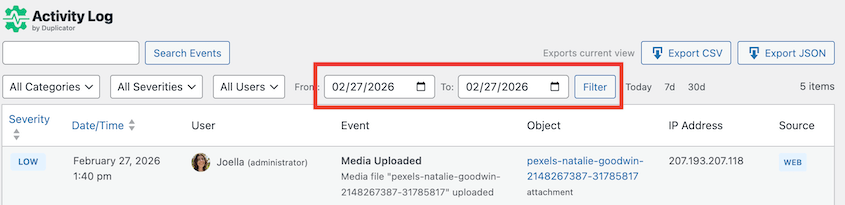
If you found a rogue admin account in Step 5, search the log for that username. You’ll see:
- When the account was created
- What it logged in from
- What it did before you caught it
That timestamp matters more than it might seem right now.
It tells you how far back the infection goes, which is the number you’ll need in the next section to figure out whether a clean backup actually exists.
How to Remove Malware Once You’ve Found It
You’ve got a list of what’s infected and roughly when it started. Now it’s time to get rid of it.
Here’s what you’ll do, in order:
- Decide between restoring a backup or removing files manually: which path makes sense depends on what you found in Step 7, and picking wrong means either wasted time or a reinfected restore.
- Restore a pre-infection backup if you have one: the fastest fix, when it’s available, replacing every infected file and database entry in a single action.
- Manually remove infected code if you don’t have a clean backup: delete or replace what you identified in Steps 4 and 5. It’s slower and riskier, but the only option without a clean restore point.
- Close the door that let the malware in: otherwise you’re cleaning this up again in a month, since restoring or deleting the malware doesn’t touch the vulnerability that let it in.
Step 1: Decide Between Restoring a Backup or Removing Files Manually
Take the timestamp you found and compare it against your backup history.
If you have a full site backup from before that timestamp, restoring it is almost always faster and safer than removing files one by one.
A restore replaces every infected file and database entry in one action, including anything you might have missed in Steps 4 and 5.
If your infection has been sitting there for weeks and your most recent clean backup is older than that (or you don’t have a backup that predates it at all), restoring isn’t an option. You’re removing the infection manually instead.
Check this now, before you do anything else in this section. It decides which of the next two steps you actually need.
Step 2: Restore a Pre-Infection Backup
Restoring a clean backup is usually the fastest path to get back online after a malware infection. I’ll show you how to do this with Duplicator.
Open Duplicator and go to the Backups screen. Find the backup dated before your infection started and click Restore.
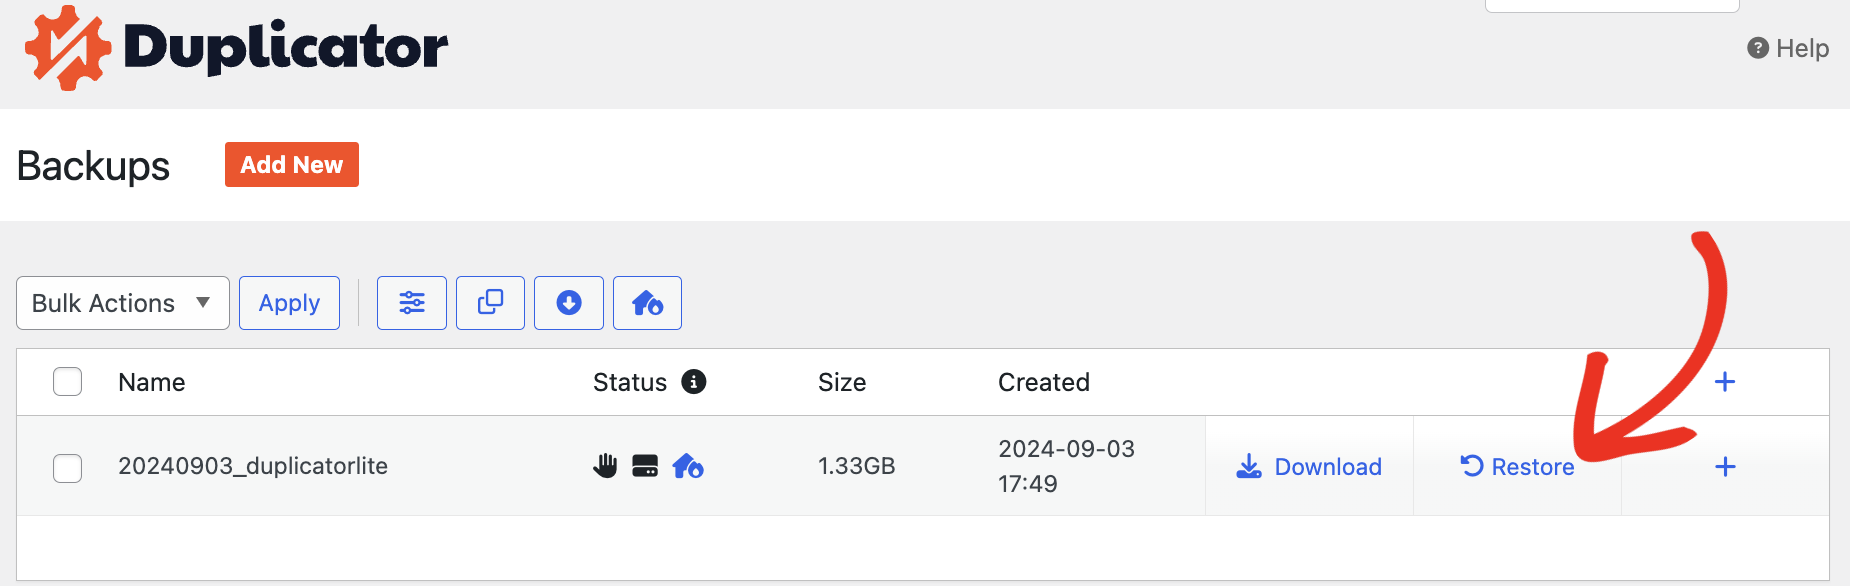
Duplicator walks you through confirming the backup and rebuilding your site from it. When it’s done, your site matches exactly how it looked before the infection.
I’ve used this more than once to turn what looked like a multi-hour cleanup into a two-minute restore.
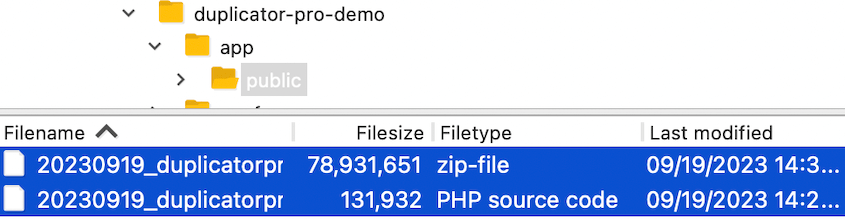
If your site is bad enough that you can’t even log into wp-admin, you’re not stuck. Duplicator Pro lets you restore directly, without needing WordPress to load first.
Re-upload your backup files to your site’s root directory and launch the installer from there.
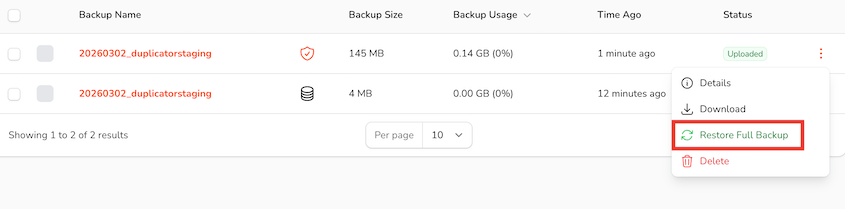
If you upload backups to Duplicator Cloud, you can also restore backups remotely from here.
You’ll know it worked when the malware warning signs are gone: no redirects, no pop-ups, no browser warnings, and a clean report if you re-run Search Console’s Security Issues check.
Step 3: Manually Remove Infected Code
Manually removing malware is the harder path than restoring a backup. It works, but it takes patience.
Confirm you have a backup before you touch anything in this step. You’re about to delete files and edit database entries directly. If you get one wrong, that backup is what stands between a quick fix and a broken site.
Work through what you flagged in Steps 4 and 5:
- Delete the unfamiliar files you identified in Step 4: the stray PHP files, the obfuscated code, the files with names that looked almost right
- Remove the injected content, spam links, and rogue admin accounts you found in Step 5
- If a core WordPress file was modified, don’t try to repair it by hand. Download a fresh copy of WordPress from wordpress.org and replace the affected core files directly
Go slowly here. Delete one thing, then check that your site still loads and the feature it was part of still works before moving to the next.
I’ve seen a cleanup script delete a file a theme depended on and take the homepage down with it. That mistake is a two-minute fix if you have a backup and a much longer one if you don’t.
Once you’ve worked through everything on your list, re-run a security scan to confirm nothing was missed.
Step 4: Close the Door the Malware Used to Get In
Whether you restored a backup or cleaned things up manually, your site is now completely clean. However, it’s still vulnerable to the same infection tomorrow.
Restoring or removing malware doesn’t fix whatever let it in.
Work through this before you consider the job done:
- Update whatever let the malware in. If Step 4 or Step 7 pointed to an outdated plugin, theme, or WordPress core version, update it now. If you’re not sure which one, update everything.
- Change every password. Every admin account, plus your FTP, hosting, and database credentials. Assume anything that was accessible during the infection is compromised.
- Remove any admin accounts you didn’t recognize in Step 5, if you haven’t already.
- Turn on two-factor authentication for admin accounts if you haven’t already.
This is the step people skip because the site already looks fine, and it feels like the work is done. It isn’t.
An infection that got in through an outdated plugin will get back in through that same plugin, sometimes within days, if you restore a clean site without patching the hole first.
Troubleshooting Common Errors
Not every malware security check goes smoothly. Here’s what to do when it doesn’t.
You Can’t Log Into wp-admin at All
What you see: The login page loads, but your credentials don’t work or the page redirects somewhere else.
Why it happens: Malware sometimes changes admin passwords, deletes admin accounts, or alters the siteurl value in the database to redirect the login page.
How to fix it: Use Duplicator Pro’s disaster recovery URL to restore a clean backup without needing wp-admin to load first.
If you don’t have Duplicator installed yet, you’ll need direct database or file access through your host to reset your admin password or correct the siteurl value manually.
The Scanner Says Clean but Something Still Feels Off
What you see: A malware scan comes back with no results, but you’re still seeing symptoms.
Why it happens: Scanners are good at known signatures, not custom or database-only infections. A rogue admin account or an injected redirect in wp_options won’t always trigger a file-based scan.
How to fix it: Go back through Steps 4 and 5 manually. Pay particular attention to the database checks in Step 5, since that’s the category scanners miss most often.
You Found the Infected File but You’re Not Sure It’s Safe to Delete
What you see: A file looks suspicious, but it’s inside a plugin or theme folder you actually use.
Why it happens: Malware often gets injected directly into existing plugin or theme files, rather than being added as a new file, specifically so it’s harder to tell apart from legitimate code.
How to fix it: Compare the file against a fresh copy of that plugin or theme, downloaded directly from its official source. If the code differs from the original, the difference is your infection. Replace the whole file rather than trying to edit out just the suspicious part.
Your Backup Might Already Be Infected
What you see: You go to restore a backup, but you’re not confident it predates the infection.
Why it happens: Malware can sit undetected for weeks. If your most recent backup was taken during that window, restoring it just brings the infection back.
How to fix it: Check the Activity Log timestamp against your backup dates. Restore the most recent backup that’s older than that timestamp, even if it means losing some content in between. A slightly outdated clean site beats a current infected one.
The Malware Keeps Coming Back After You Remove It
What you see: You clean the site, and within days, the same malware symptoms reappear.
Why it happens: The vulnerability that let the malware in the first time is still open, so the same attack gets back in the same way.
How to fix it: Update outdated software, change every password, and remove any admin accounts you didn’t recognize. If you’re not sure what let it in, check Activity Log for the date of the first suspicious action.
Nothing Above Is Working
If you’ve worked through this entire checklist and you’re still stuck, or the infection is too extensive to isolate on your own, it’s worth bringing in a professional cleanup service at that point.
A verified clean backup restore, if you have one, is still your fastest path back to a working site while you sort out the rest.
Frequently Asked Questions (FAQs)
How do I know if my WordPress site has malware?
Look for a combination of symptoms rather than just one. Unexpected redirects, browser warnings, sudden traffic drops, and unfamiliar admin accounts together are strong signals. One symptom alone, like a slow site, could have a completely different cause. Work through the checks in this post to confirm before assuming the worst.
Can I check for malware without a plugin?
Yes. Everything in Steps 1 through 5 of this post is manual: checking warning signs, reviewing Search Console, inspecting files by modification date, and searching your database for injected content. A scanning tool in Step 6 adds a useful second opinion, but it’s not required to find an infection.
What’s the difference between a hacked site and a slow or buggy one?
A hacked site usually shows symptoms you didn’t cause: redirects to sites you don’t recognize, new admin accounts, or a Google Safe Browsing warning. A slow or buggy site is typically explained by your own recent changes, like a new plugin, unoptimized images, or a hosting issue. If you can’t trace the cause to something you did, treat it as a possible infection until you’ve ruled it out.
Will Google penalize my site if it’s infected with malware?
Google doesn’t penalize your rankings directly, but a Security Issues flag in Search Console can trigger warnings that stop visitors from clicking through at all. That drop in traffic often looks like a ranking penalty even though it isn’t one. Getting flagged and cleaning it up also means requesting a review before the warning clears.
How often should I check my WordPress site for malware?
Weekly is a reasonable baseline for most sites, more often if you run an online store or handle customer data. Don’t wait for symptoms to show up, since the infections that do the most damage are often built to stay quiet for as long as possible.
Should I restore a backup instead of removing malware manually?
If you have a full site backup from before the infection started, restoring it is usually faster and safer than removing files one by one. It replaces everything at once, including anything you might have missed manually. If your most recent clean backup predates the infection by too long, or you don’t have one, manual removal is your only option.
Do I need to remove malware manually, or can I just restore a backup?
It depends entirely on your backup history. A pre-infection backup makes manual removal unnecessary; restoring it wipes out the malware in one step. Without one, manual removal is the only path, since there’s nothing clean to roll back to. Either way, you still need to patch whatever let the infection in, or you’ll be doing this again soon.
Catching Malware Early Beats Cleaning It Up Later
You now have a real process for checking and fixing malware, not just a scan-and-hope approach.
You know what warning signs to watch for, how to check your files and database for what most scanners miss, and how to trace exactly when and how an infection started using your activity log.
If you found something, you also know whether to restore or clean manually, and what has to happen afterward so it doesn’t come right back.
Don’t treat this as a one-time fix.
The sites that avoid repeat infections are the ones that check regularly, not the ones that only look when something’s already visibly wrong. Set a recurring reminder, weekly if you can manage it.
One more thing worth doing once you’re confident the site is clean: request a review in Google Search Console under the Security Issues report.
Google doesn’t automatically know you’ve fixed anything. Until you request that review and it clears, browser warnings and search snippet flags can stick around even on a fully cleaned site, costing you traffic for an infection that’s already gone.
Protect Your Site Before the Next Infection
The checklist in this post works, but it takes time you don’t always have when you’re already dealing with an active infection.
A recent backup and a full activity trail turn that same situation into a two-minute restore instead of a multi-hour cleanup. That’s the difference between catching this early and catching it too late.
Over 1.5 million WordPress professionals use Duplicator Pro to make sure a clean version of their site is always one restore away, with Activity Log to tell them exactly when something changed. Join them for a more secure site!
If this tutorial helped, these guides are worth bookmarking too.
- 4 WordPress Malware Removal Plugins That Clean Infected Files
- How to Clean Up a WordPress Site
- What To Do When You’re Locked Out of WordPress
- How to Recover a Hacked WordPress Site
- How to Optimize Your WordPress Database: Get a Fast Site in 10 Steps
- How to Protect Your Website From Hackers