
How to Migrate a Nonprofit Website Without Losing a Single Donation
 Joella Dunn
Joella Dunn
Joella Dunn
 John Turner
John Turner
John Turner
Migrating a website can feel risky for any organization.
For a nonprofit, there’s often even more at stake.
Your website may be where supporters learn about your mission, make donations, sign up for events, read your latest updates, or find information about the people and communities you serve.
Most non-profits stay put because the migration process feels complicated.
But with the right steps, there’s nothing to worry about.
In this guide, I’ll walk through how to migrate a nonprofit WordPress website the safe way!
Simply follow along, and you can move your nonprofit website (including its content, design, plugins, settings, and database) to a new server while minimizing disruption.
I’ll also highlight some things you should consider if your site uses a fundraising plugin like Charitable.
Table of Contents
- Why Would a Nonprofit Need to Migrate Its Website?
- Before You Migrate, Know What You're Moving
- In This Tutorial: Migrating a Nonprofit Website With Charitable
- What You Need Before You Start
- How to Migrate a Nonprofit Website Without Losing Donation Records
- Step 1: Record Your Donation Baseline
- Step 2: Pick a Cutover Window and Pause Active Campaigns
- Step 3: Build and Download a Full-Site Backup With Duplicator
- Step 4: Prepare the New Host
- Step 5: Edit Your Hosts File for a Zero-Downtime Migration
- Step 6: Install Your Site on the New Server
- Step 7: Reconcile Your Donation Records
- Step 8: Switch DNS and Remove Your Hosts File Entry
- Step 9: Update Your Payment Webhooks
- Step 10: Run a Test Donation and Check the Receipt
- Troubleshooting: When Donation Records Don't Match After a Migration
- Frequently Asked Questions (FAQs)
Why Would a Nonprofit Need to Migrate Its Website?
Most nonprofit owners migrate their websites because something pushes the move:
- Your host can’t handle campaign spikes. Budget hosting might slow down on Giving Tuesday, right when donors are trying to give.
- The site lives in someone else’s account. A volunteer or former agency set it up under their own login, and your organization needs to own it.
- Your organization is changing its name. A rebrand usually means a new domain, and your donation history has to come with you.
- Your current host is holding you back. A site that takes payments needs SSL, a current PHP version, and reliable backups.
Whatever the reason, your donation records are the one part you can’t recreate later. They’ll need to move successfully along with your posts, pages, and other website data.
Before You Migrate, Know What You’re Moving
Moving a WordPress website isn’t difficult simply because there are a lot of files to copy. It’s difficult because your website may do much more than simply publish content.
Before you start a migration, take a few minutes to think about what your nonprofit website actually does, and what you can’t afford to break.
Are you moving to a new host? Changing your domain? Taking over a site from an agency? Moving from staging to production?
The answer will determine what you need to plan for.
For example, if you’re only changing hosting providers, you may be able to move your existing website without changing its URLs or how visitors interact with it. But if you’re changing domains at the same time, you’ll also need to think about redirects, internal links, SEO, email, and third-party services.
If your website accepts donations, there’s another important consideration: your fundraising functionality needs to make the move with everything else.
Before migrating, make a list of the things your website depends on. That might include donation forms, fundraising campaigns, payment gateways, email notifications, contact forms, analytics, memberships, or other integrations.
In This Tutorial: Migrating a Nonprofit Website With Charitable
To make the process concrete, we’ll use a nonprofit WordPress website running Charitable throughout this tutorial.
Charitable is a fundraising plugin that lets nonprofits create donation forms and fundraising campaigns directly on their WordPress websites.
That makes it a useful example for this guide: we’re not just moving a collection of pages and images, but a website that plays an active role in fundraising.
We’ll use Duplicator to move the site to a new hosting environment and then walk through the checks you should make before considering the migration complete.
What You Need Before You Start
Before you start, make sure you have the following:
- Admin access to your current WordPress site, with Duplicator installed (the free version works, but Pro allows you to drag and drop a backup into the new location)
- A new hosting account where you can create a database, plus FTP or file manager access
- Logins for your payment processors (Stripe, PayPal, or Square)
- About an hour during a quiet time for donations
How to Migrate a Nonprofit Website Without Losing Donation Records
Even as a beginner, you can easily move your charity website without losing data.
Here’s what you’ll do:
- Step 1: Record your donation baseline: Write down your totals so you can prove nothing was lost.
- Step 2: Pick a cutover window and pause active campaigns: Keep the gap between backup and DNS switch short and quiet.
- Step 3: Build and download your backup with Duplicator: Package every file and database table, Charitable’s included.
- Step 4: Prepare the new host: Set up an empty database and find the new server’s IP address.
- Step 5: Edit your hosts file for a zero-downtime migration: See the new site privately while donors stay on the old one.
- Step 6: Install your site on the new server: Run Duplicator’s installer on your real domain without anyone else seeing it.
- Step 7: Reconcile your donation records: Match every number to your baseline before the site goes public.
- Step 8: Switch DNS and remove your hosts file entry: Send donors to the new site and catch any late gifts on the old one.
- Step 9: Update your payment webhooks: Make sure renewals and refunds keep reaching Charitable.
- Step 10: Run a test donation and check the receipt: Prove the full donation flow works on the live site.
Step 1: Record Your Donation Baseline
Before the migration, I recommend getting a baseline of your current nonprofit website. This way, you can compare your post-migration data to see if anything changed.
Charitable is our favorite WordPress donation plugin, and it makes it simple to get a pre-migration baseline.
Here’s everything you should track:
- Total donations and total raised: from Charitable » Reports
- Most recent donation date: from the top of Charitable » Donations
- Number of donors: from Charitable » Donors
- Active recurring donations: if you use Charitable’s Recurring Donations feature
Go to Charitable » Donations, click Export, and download the CSV. You can do the same with your campaigns, donors, and any Charitable reports.
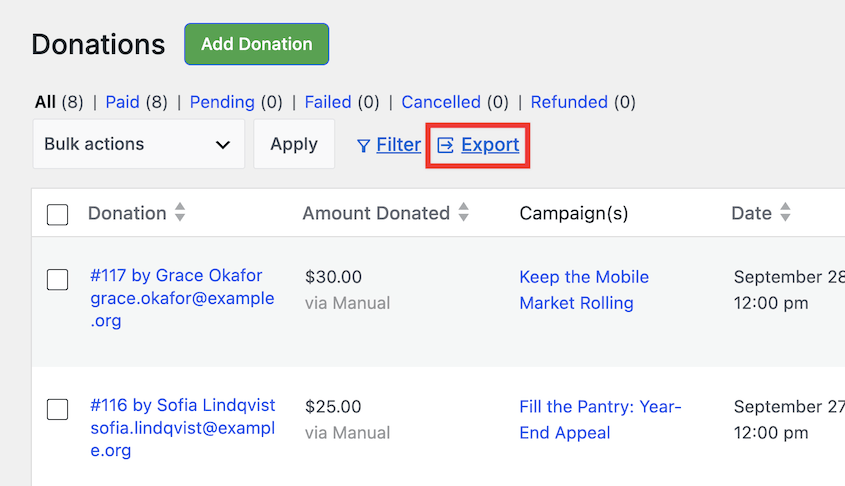
This will be a reference copy to check against after the migration.
Step 2: Pick a Cutover Window and Pause Active Campaigns
Your old site stays live during the migration. The only risky window is the gap between building your backup and switching DNS, so keep it short and quiet.
Your backup is a snapshot of your site at the moment you build it. The old site stays live the whole time, so donors can keep giving. But any gift made after that snapshot exists only on the old site, and it won’t be on the new one.
The shorter and quieter that window is, the fewer gifts you’ll need to find and add by hand later.
To pause active campaigns, you can set a temporary end date on each one or add a short notice to your donation page.
Not sure when your quiet time is? If you use MonsterInsights to track donations, you don’t have to guess.
MonsterInsights connects to Charitable through its eCommerce add-on and shows your donation data right in wp-admin.
Step 3: Build and Download a Full-Site Backup With Duplicator
To move a donation site safely, you need a tool that copies your whole database, not just your content. That’s why I’m using Duplicator.
Duplicator packages your entire site into one backup, then uses that same backup to rebuild it somewhere new. It doesn’t need WordPress installed on the new server, and it updates your URLs automatically if your domain changes.
Everything in this guide works with the free version. Duplicator Pro adds drag-and-drop imports, scheduled backups, and third-party cloud storage.
To get started, go to Duplicator » Backups and click Add New. Give your backup a name you’ll recognize, like “pre-migration,” and select the local storage location.
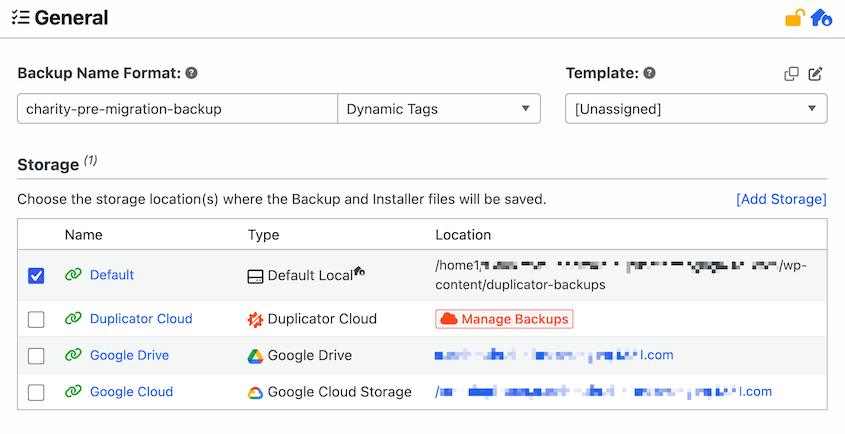
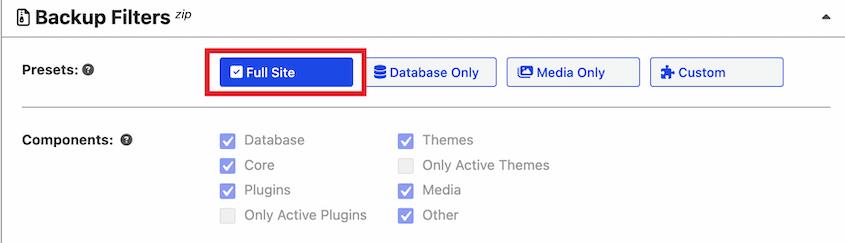
Choose the Full Site backup preset to include everything on your site. Click Next.
Duplicator scans your site first. If it finds a problem, it suggests a fix you can apply with one click.
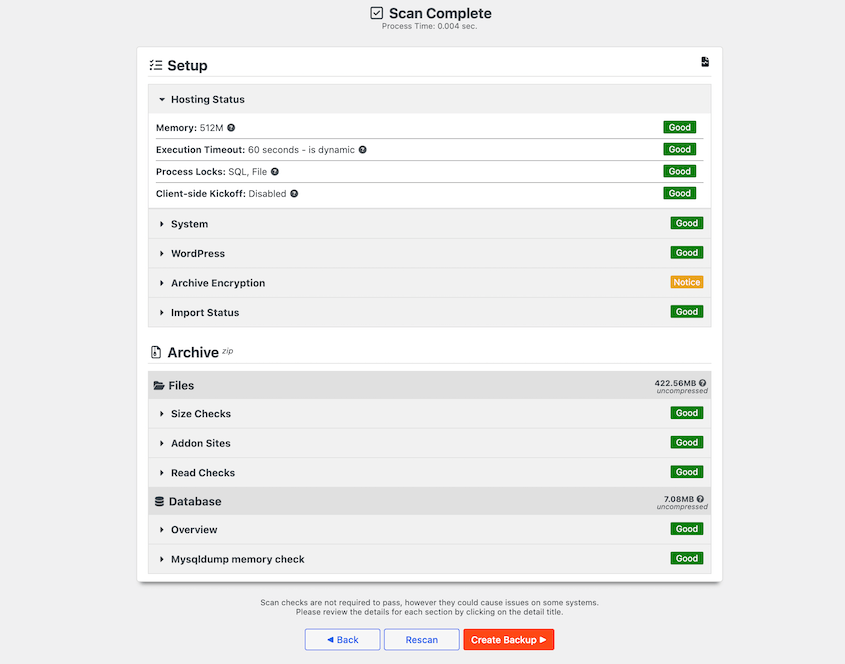
When the scan finishes, click Create Backup. You’ll know it worked when the backup shows as complete on your Backups list.
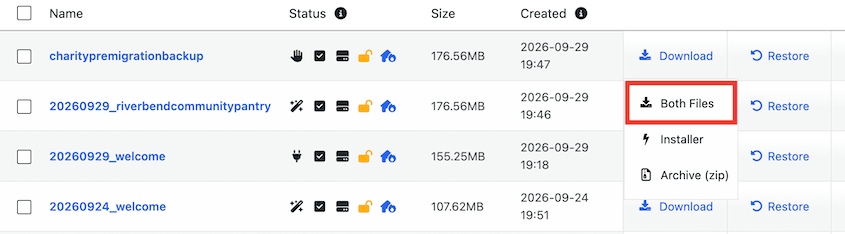
Now click Download in the backup’s row and choose Both Files. You’ll get two files:
- The archive: a zip file with your entire site and database
- The installer: a file called installer.php that rebuilds your site on the new server
Step 4: Prepare the New Host
To get started, log in to your new hosting account and do three things:
- Create a new database and database user. Write down the database name, username, password, and host.
- Add your domain to the account. If you’re changing domains, add the new one. Don’t touch DNS yet.
- Find your new server’s IP address. You’ll need it in Step 5.
With the free version of Duplicator, you don’t need to install WordPress first. Duplicator Pro users who want drag-and-drop import should install WordPress and activate Duplicator Pro on the new wp-admin. Remember to activate your license key.
Many hosts can’t issue a free SSL certificate until your domain points to them. So, expect a browser security warning while you preview the new site. You’ll add SSL later on in this tutorial.
Step 5: Edit Your Hosts File for a Zero-Downtime Migration
This is the step that keeps your donation page online the whole time.
Your hosts file is a small file on your computer that tells your browser which server to load for a domain. Point your domain at the new server there, and only you will see the new site. Your donors keep seeing and giving on the old one while you work in private.
You’ll add one line with the new server’s IP address and both versions of your domain:
203.0.113.10 yournonprofit.org www.yournonprofit.orgOn Windows: Open Notepad as an administrator. Open C:\Windows\System32\drivers\etc\hosts (set the file type to All Files to see it), add your line at the bottom, and save.
On Mac: Open Terminal and run sudo nano /etc/hosts. Add your line at the bottom, press Control+O to save, and Control+X to exit. Then run sudo dscacheutil -flushcache; sudo killall -HUP mDNSResponder to clear your DNS cache.
To check that it worked, open your domain in a private browser window. You should see the new host’s placeholder page, not your live site.
Step 6: Install Your Site on the New Server
Because of your hosts file, you can move your data to the new location, and only you can see it.
With the free version of Duplicator, upload the archive and installer.php to your site’s main folder (often public_html) with FTP or your host’s file manager.
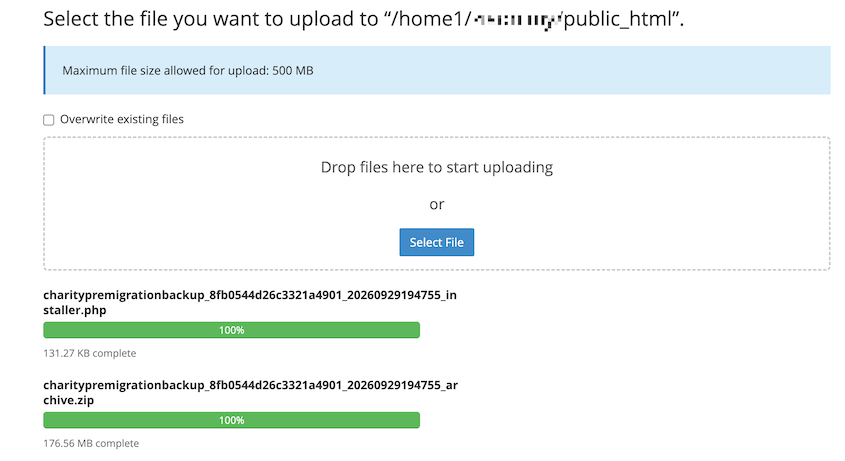
Then visit https://yournonprofit.org/[hashed-secure-data]_installer.php. Duplicator’s installer will open.
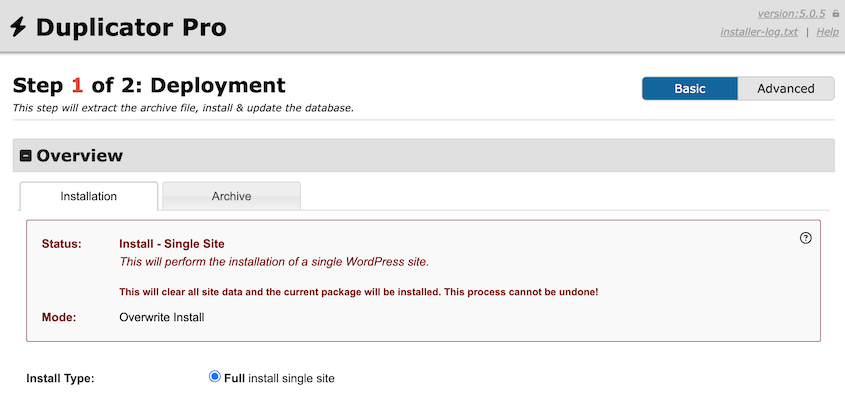
If you’re running a search and replace for a new domain name, make sure the Advanced view is selected.
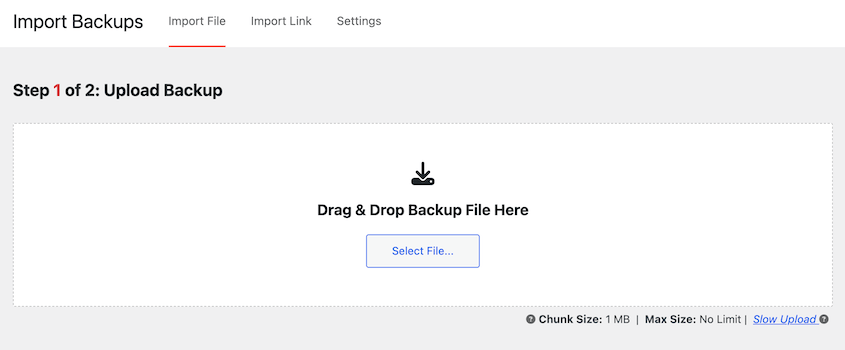
If you have Duplicator Pro, you won’t have to use FTP. Go to Duplicator » Import Backups on the new site. Upload your archive file and click Continue and launch the installer.
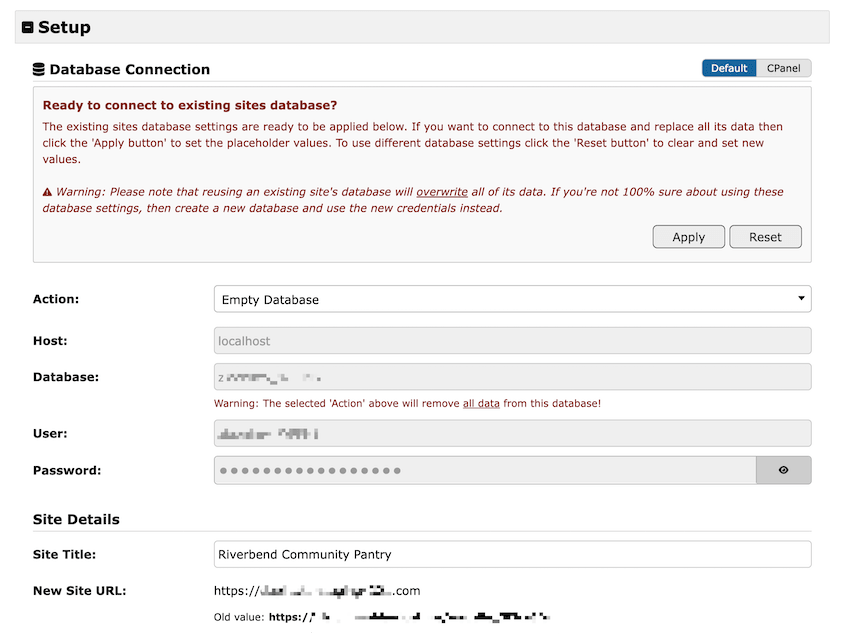
Either way, you’ll need to enter your new database credentials and validate them.
Accept the terms and notices and hit Next.
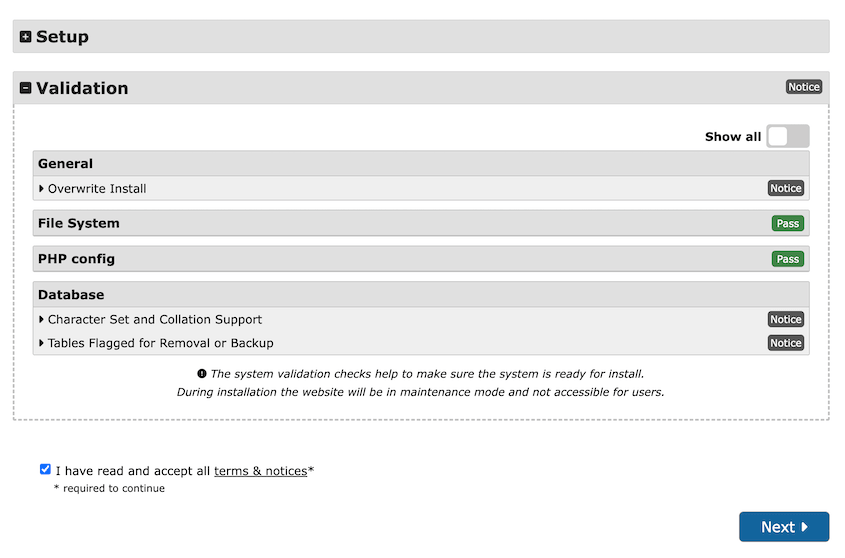
You’ll need to confirm the installation.
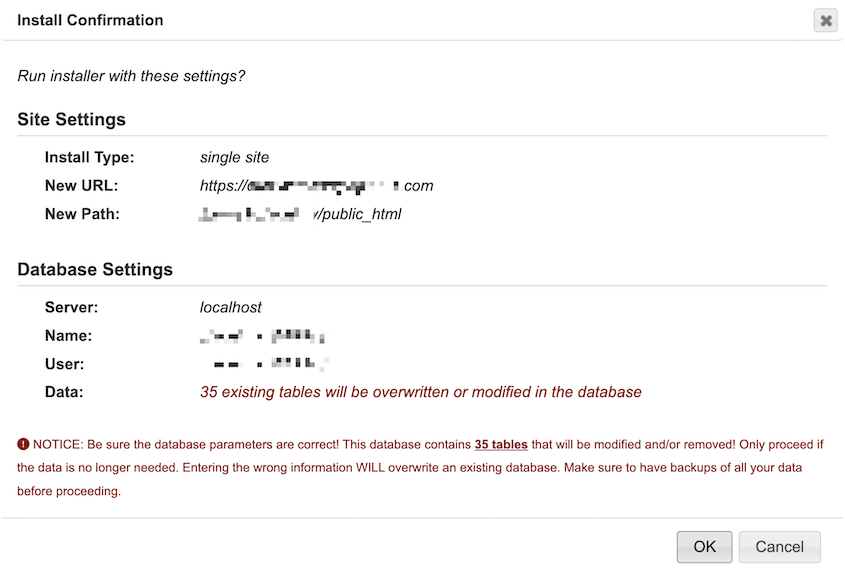
If your domain is changing, use the search and replace in Step 3 of the advanced installer. Duplicator swaps the old URL for the new one across your database automatically, including in Charitable’s settings.
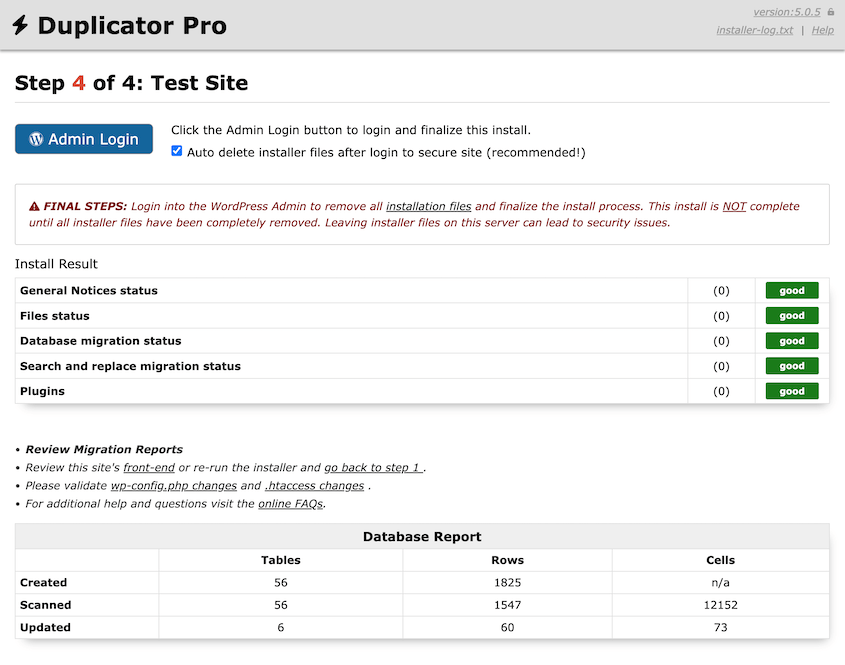
When the install finishes, click Admin Login. Click around your admin dashboard, making sure everything transferred correctly.
Step 7: Reconcile Your Donation Records
Your donors are still on the old site, so this is the safest moment to catch a problem.
Pull up your note from Step 1 and compare each number on the new site. Then spot-check a few records:
- Open 3 to 5 donor profiles. Each giving history should be attached to the right person.
- Open an older donation. The donor, campaign, and amount should all display.
- Visit your campaign pages. Progress bars should match, and donation forms should load.
- Check that your gateways show as connected in Charitable » Settings » Payment Gateways.
Don’t run a real test donation yet. Stripe sends its confirmation to your public address, which still points to the old server.
If every number matches, you’re ready for DNS. If anything is off, check the troubleshooting section below first.
Step 8: Switch DNS and Remove Your Hosts File Entry
To send everyone to the new site, log in wherever your DNS is managed (usually your domain registrar or old host) and point your A record or nameservers to the new server.
Then, delete the line you added to your hosts file so you see exactly what donors see.
DNS changes can take up to a day to reach everyone. Once your domain points to the new host, issue your SSL certificate and turn on HTTPS.
Keep your old hosting account active for at least a week. Some visitors will still reach the old server during that time, and a few may donate there.
Check the old site’s Charitable » Donations screen daily that week. If you find a new gift, click Add Donation on the new site’s Donations screen to enter it by hand.
Step 9: Update Your Payment Webhooks
If your webhooks point to the wrong place, Stripe keeps charging recurring donors, but Charitable never records the renewals or refunds.
What you need to do depends on your domain:
- Same domain: Webhooks follow DNS. In Stripe, go to Developers » Webhooks and check that recent deliveries succeeded.
- New domain: In Developers » Webhooks, update the endpoint to https://newdomain.org/charitable-listener/stripe.
Stripe’s test mode has its own webhook endpoint, so check that one too. For PayPal and Square, confirm each one is still connected in Charitable » Settings » Payment Gateways.
Charitable’s guide to setting up a Stripe webhook lists the exact events it needs.
Step 10: Run a Test Donation and Check the Receipt
Now that DNS points to the new server, make a small real donation on your live site. Then, make sure these events happen:
- The donation appears in Charitable » Donations as completed.
- The receipt email arrives. If it doesn’t, your new host’s email setup is the likely cause. WP Mail SMTP can help fix that.
- The refund syncs. Refund the donation in Stripe and check that its status updates in Charitable. That proves your webhook works.
Reopen your campaigns and remove any notices you added in Step 2.
Your donation site is now fully live on its new host!
If a campaign’s end date passed while it was paused, extend it before you share it again. Then let your supporters know giving is open. A short email or social media post is enough, and it gives anyone who tried to donate during the move a reason to come back.
Troubleshooting: When Donation Records Don’t Match After a Migration
Most problems on a donation site trace back to one of these.
Donations Made During the Migration Are Missing
What you see: Your new site’s totals are lower than the old site’s.
Why it happens: The gift was made on the old site after you built your pre-migration backup.
How to fix it: Find it on the old site or in Stripe, then click Add Donation on the new site’s Charitable » Donations screen.
Recurring Donations Renew in Stripe but Not in Charitable
What you see: Stripe shows charges going through, but Charitable doesn’t record them. A test donation might sit at pending too.
Why it happens: Your webhook still points to the old domain, or you tested before DNS switched over.
How to fix it: Update the webhook, then check its delivery log in Stripe. Retest only after DNS has switched.
Donations Show No Donor, or Donor Profiles Are Empty
What you see: Donations appear, but no donor is attached.
Why it happens: The site was moved with a content export or a tool that skipped Charitable’s donor tables.
How to fix it: Migrate again from a full Duplicator backup. Reconnecting donors by hand is slow, and it’s easy to attach a gift to the wrong person.
Donors Aren’t Getting Receipts
What you see: Donations go through, but receipt emails never arrive.
Why it happens: Many hosts block or limit WordPress’s default email function.
How to fix it: Set up SMTP with WP Mail SMTP.
Frequently Asked Questions (FAQs)
Why did my donations go missing during site migration?
Donation records could go missing in a WordPress migration for a few reasons:
- Donation plugins like Charitable keep donors in their own database tables. Donations are stored as WordPress posts, but donor profiles live in separate tables like
charitable_donors. WordPress’s Tools » Export screen moves the posts but not those tables, so donations arrive without the people who gave them. - Donations keep coming in while you migrate. A gift made on the old site after you build your backup won’t be in that backup.
- Payment webhooks point at your old address. A webhook is a message Stripe sends your site when something happens, like a monthly renewal or a refund. If your domain changes, Stripe keeps sending those messages to the old one.
These problems are easy to prevent once you know to look for them.
A full-site backup moves every table. A short cutover window keeps new gifts from being left behind. Plus, a quick webhook check keeps renewals recording.
Will recurring donations stop when I move my nonprofit website to a new host?
No, as long as you keep the same Stripe or PayPal account. Your payment processor bills recurring donations, not your web host, so they keep running. What can break is the connection back to your site. If your webhooks point to the wrong address, renewals still happen but don’t show up in Charitable.
Do donors have to re-enter their card details after a migration?
No. Card details are stored by your payment processor, not on your WordPress site. When you keep the same Stripe or PayPal account, donors’ saved payment methods and recurring gifts carry on as before. Most donors won’t notice the move at all.
Can I migrate a charity website for free?
Yes. The free version of Duplicator can build a full backup and install it on a new server. You’ll upload the files yourself with FTP or your host’s file manager. Duplicator Pro adds drag-and-drop imports, which can be simpler for non-technical users.
Is there a Duplicator discount for nonprofits?
Yes. Duplicator offers discounted Pro and Elite licenses for registered nonprofits. You’ll need to share proof of your status, such as an IRS determination letter for a US 501(c)(3). You can apply on the Duplicator nonprofit license page.
I’m switching from GiveWP or Donorbox. Is this the right guide?
Not quite. This guide covers moving a Charitable site to a new host or domain. Switching donation tools means importing your records into Charitable. Charitable has guides for switching from GiveWP and switching from Donorbox.
Your Donor History Made the Move
You’ve moved every donation, donor, and campaign total, checked each one against a baseline, and kept your donation page open the whole time.
Over the next few weeks, watch your first recurring renewal cycle to make sure Stripe and Charitable agree. And keep checking the old host for late gifts until DNS has fully switched.
One last tip: build a fresh backup on the new site as soon as your records match. Name it “post-migration baseline.” If anything goes wrong in the first few weeks, that’s the known-good copy you’ll want to restore.
Protect Your Donations Moving Forward
Your donor records sit behind every thank-you note, tax receipt, and year-end appeal. Losing them costs more than time. It costs trust.
More than 1.5 million WordPress professionals use Duplicator Pro to back up, migrate, and restore their sites. Upgrade today to set up automatic backups every hour, day, week, or month.
Registered nonprofits can also apply for discounted Pro and Elite licenses.
If this tutorial helped, these guides are worth bookmarking too.
- The Pre-Migration Checklist That Prevents Website Migration Disasters
- The Complete Post-Migration WordPress Testing Checklist (2026)
- Your Site Migration Is Going to Fail (Unless You Avoid These Mistakes)
- What 8,000+ WordPress Support Tickets Reveal About Why Migrations Break
- SEO Migration Checklist: 10 Steps to Success in 2026