Ever noticed your WordPress site loading slowly?
That sluggish performance has to do with what’s happening behind the scenes. Your database is quietly collecting digital junk (forgotten drafts, spam comments, and abandoned tags) that’s slowing your site to a crawl.
Most site owners never realize this hidden problem until visitors start bouncing away from their pages.
I’ve seen perfectly designed WordPress sites struggle with conversion rates simply because their databases were carrying years of unnecessary baggage.
In this post, I’ll show you how to optimize your WordPress database. You’ll learn what’s worth keeping and what’s just dead weight.
Here are the key takeaways:
- Database bloat causes slow loading times: Post revisions, spam comments, and unused data accumulate over time
- 10 proven optimization methods from using plugins like WP-Optimize to manual phpMyAdmin cleanup
- Always backup first: Use Duplicator to create database backups before making any changes
- Immediate performance benefits: Faster load times, better SEO rankings, and improved user experience
- Ongoing maintenance required: Regular cleanup prevents future slowdowns and server strain
Table of Contents
What Is the WordPress Database?
Your WordPress database is where all the essential data lives, including blog posts, web page content, usernames, and passwords.
When you first create a website, WordPress establishes a MySQL database on your web server. Every time someone visits your website, their browser sends requests to your server to retrieve information from your database.
Your WordPress database uses a technology called MySQL, which is an open-source database management system. It separates your data into different tables that work together to create your site.
WordPress has 12 core tables. Here’s what each one stores:
- wp_commentmeta — stores meta information for comments
- wp_comments — stores your blog’s comments
- wp_links — stores your blogroll links
- wp_options — stores the options in your admin settings
- wp_postmeta — stores post meta information
- wp_posts — stores data for pages, posts, and custom post types
- wp_terms — stores tags and categories
- wp_termmeta — stores metadata
- wp_term_relationships — stores the relationship between posts, categories, and tags, as well as the relationship between links and link categories
- wp_term_taxonomy — stores a description of the category, link, or tag used in the wp_terms table
- wp_usermeta — stores user meta information
- wp_users — stores users
These are the foundational tables in every WordPress database. As you install plugins and themes, these could add extra tables.
Why Should You Optimize Your Database?
Over time, your database collects post revisions, spam comments, and other unnecessary data. The heavier your database, the more your site will slow down.
When your load times are high, online visitors will quickly leave your website. If you want more traffic, better user experience, and improved search engine rankings, it’s time to optimize your database.
Here are some more reasons to optimize your database:
- Improve SEO because speed is a ranking factor for Google
- Increase conversions
- Reduce the risk of database errors
- Use fewer resources like CPU and memory, putting less strain on your server
- Increase scalability
- Improve security by backing up the database
- Allow WordPress themes and plugins to perform and interact without errors or decreased speed
- Avoid the expense of upgrading your server resources
What’s the Difference Between WordPress Database Optimization and Repair?
Database optimization means improving the efficiency of your WordPress database, which can speed up your website and enhance user experience. On the other hand, database repair refers to fixing any issues or errors that may be affecting its performance.
Imagine your database as a warehouse, filled with information. As data is added and removed, some parts of the warehouse are cluttered while others are empty.
That’s where database optimization comes into play. It organizes your data, just like you would organize a warehouse, making it easier to access the necessities.
Now, imagine the warehouse’s structure is compromised – maybe a wall is crumbling or the roof is leaky. That’s a clear-cut case for a repair job. Similarly, if your site is experiencing recurring errors due to malfunctions in your database, it’s time for a database repair.
So, while both optimization and repair are essential maintenance tasks, optimization ensures a smooth backend operation. However, repairs address specific performance issues caused by errors in your database.
What to Do Before Optimizing Your WordPress Database
Before you start optimizing your database, it’s important to back it up. This way, you can easily restore your database if anything accidentally gets deleted.
Duplicator is the best plugin for backing up your WordPress database. You can use either the free or premium version, although convenient features like automatic cloud backups are only available if you upgrade.
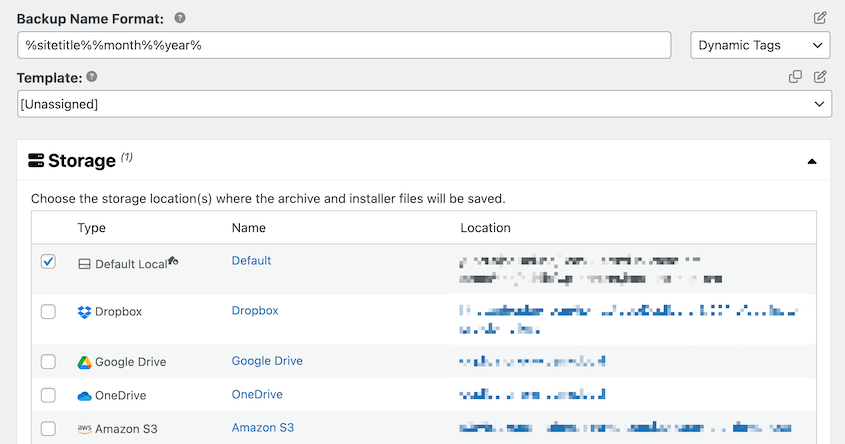
Once you install Duplicator, create a new backup. Name it using dynamic tags and choose a storage location.
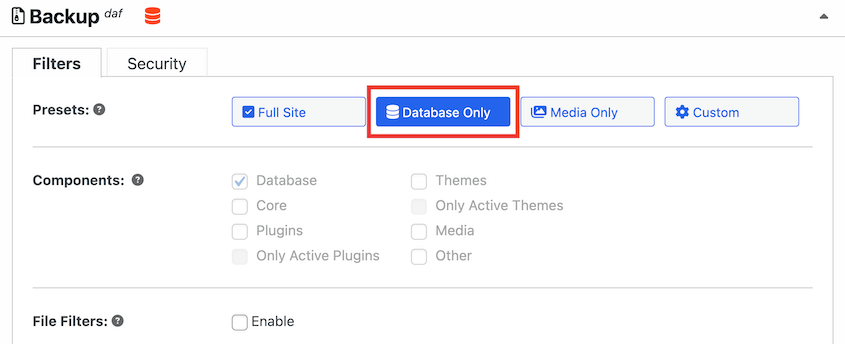
In the Backup section, select Database Only. However, you can also back up your entire WordPress site or create a custom backup file.
Finish building the backup. Now, you’re free to continue optimizing your database!
Keep in mind you can restore your database at any time. If the backup is stored locally, go to your Duplicator backup log and hit the Restore button.
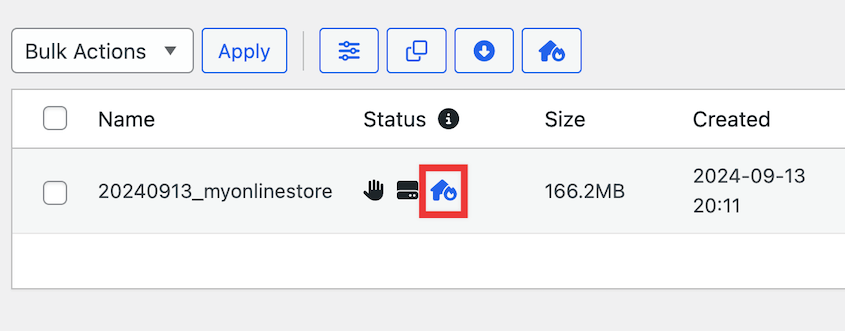
If you think a database error could lock you out of your WordPress dashboard, be sure to set a disaster recovery point. Click on the recovery ion next to a full backup.
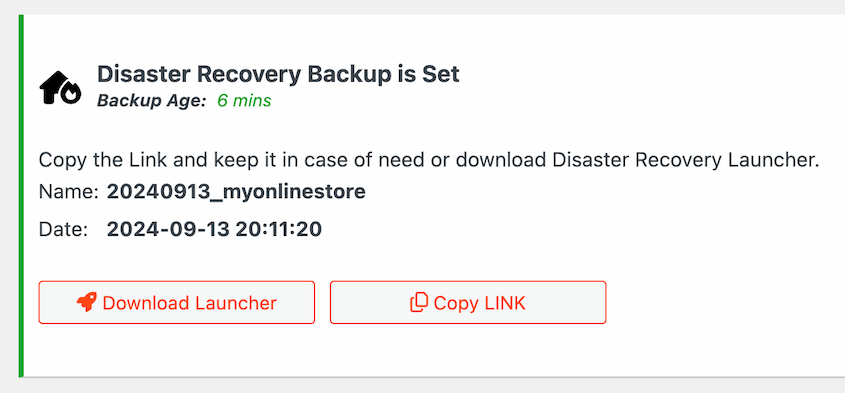
Then, copy the recovery link.
If anything happens, paste this link into a browser window. This will instantly roll back your site to a previous version.
How to Optimize a WordPress Database
At this point, you’re ready to optimize your database! Here are the key steps to get started:
- Install the WP-Optimize plugin: Automated cleanup for post revisions, spam comments, and database tables
- Manual phpMyAdmin optimization: Direct database table optimization for advanced users
- Use the WordPress built-in repair tool: Native optimization using wp-config.php modifications
- Empty trash regularly: Clear deleted posts, pages, and media files from database storage
- Delete post revisions: Limit or remove old drafts that accumulate over time
- Remove spam comments: Use Akismet to block and automatically delete spam entries
- Clean unused tags: Remove orphaned tags that no longer have associated content
- Delete pingbacks/trackbacks: Eliminate notification records from external site links
- Remove expired transients: Clear temporary data that’s no longer needed
- Uninstall bloated plugins: Remove resource-heavy plugins that store excessive data
1. Install a WordPress Database Optimization Plugin
It can take time and technical experience to manually optimize your database. To automate this process, you can install a plugin like WP-Optimize.
WP-Optimize is a multi-functional tool that can fully clean up your website. It can enable caching, compress images, minify code, and optimize the database. Plus, it’s a completely free plugin.
To get started, install and activate WP-Optimize. Then, go to WP-Optimize » Database.
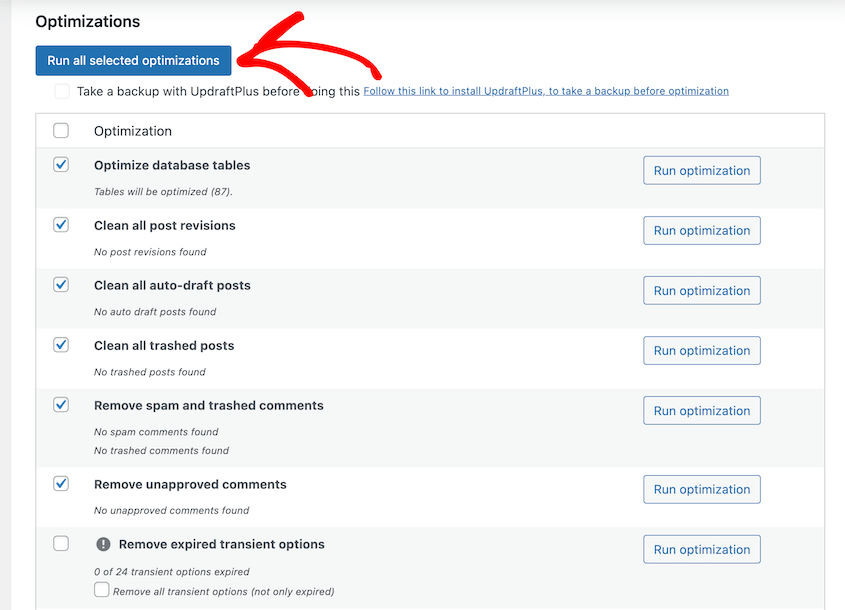
In the plugin settings, you’ll see a list of actions you can run on your database. These include cleaning up your post revisions, unapproved comments, and more.
Check all of the optimizations you want to run. After this, click on Run all selected optimizations.
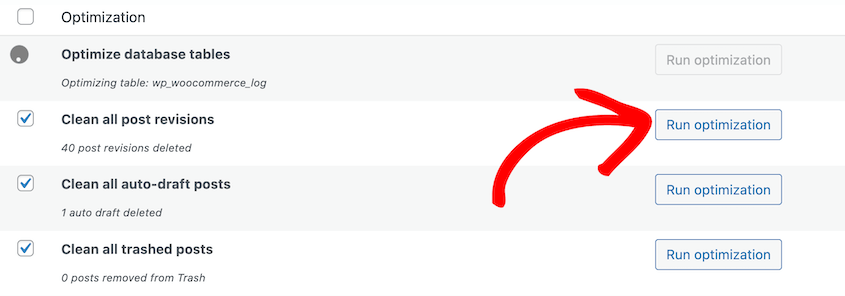
You can also run optimizations one at a time. To the right, click on Run optimization.
At the bottom of the page, you’ll see some actions with a warning next to them. These are more intensive operations. If your server crashes while these are running, your data could become corrupted.
If you want to run any of these flagged optimizations, be sure to create a full backup of your site beforehand.
After this, your database will automatically be optimized. There’s no need to continue to the next steps since WP-Optimize did them for you!
2. Manually Optimize Your Database
Another way to optimize your database is with phpMyAdmin, your database manager. This can give you more control over the optimization process.
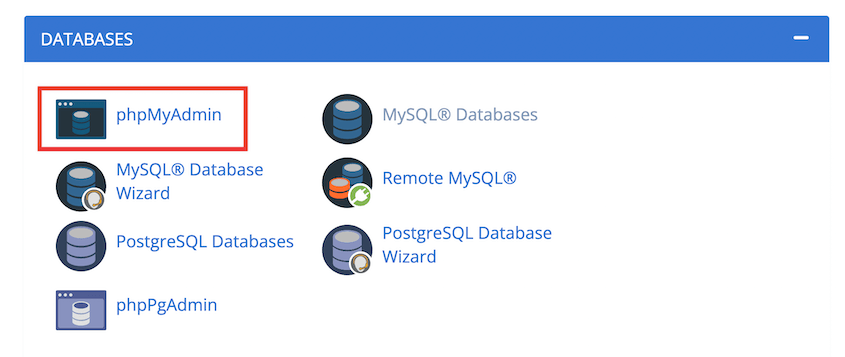
First, sign into your web hosting provider’s control panel. Usually, you can access phpMyAdmin in your cPanel dashboard.
In phpMyAdmin, click on the Databases tab. Then, select your database name.
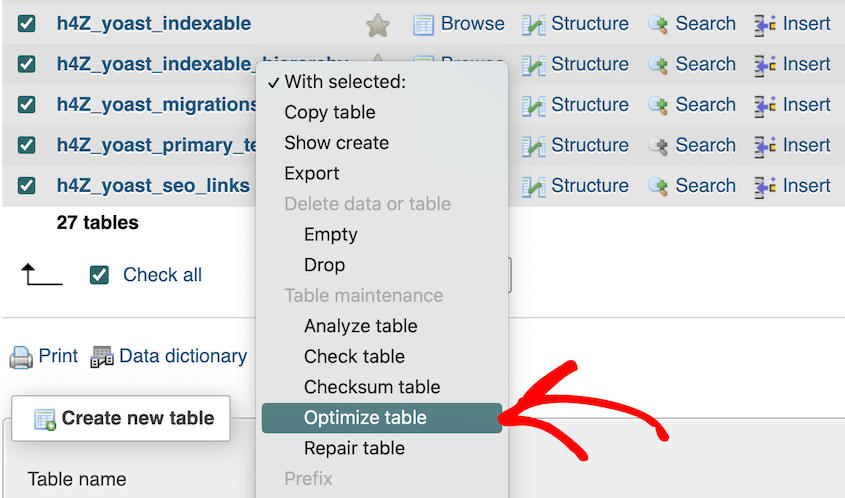
Now, you should see a list of database tables. Scroll to the bottom and hit Check All. Expand the With selected dropdown menu and choose Optimize table.
PhpMyAdmin will automatically create an SQL query that optimizes your database tables.
Using database queries, the performance of your website will improve. The size of your database will decrease, speeding up your page load times.
3. Use the WordPress Automatic Database Optimization
WordPress has a built-in way to optimize your database. All you’ll need to do is add this SQL command to your wp-config.php file.
define( 'WP_ALLOW_REPAIR', true );
Next, use this link to open the WordPress optimization tool:
http://www.yourwebsite.com/wp-admin/maint/repair.php
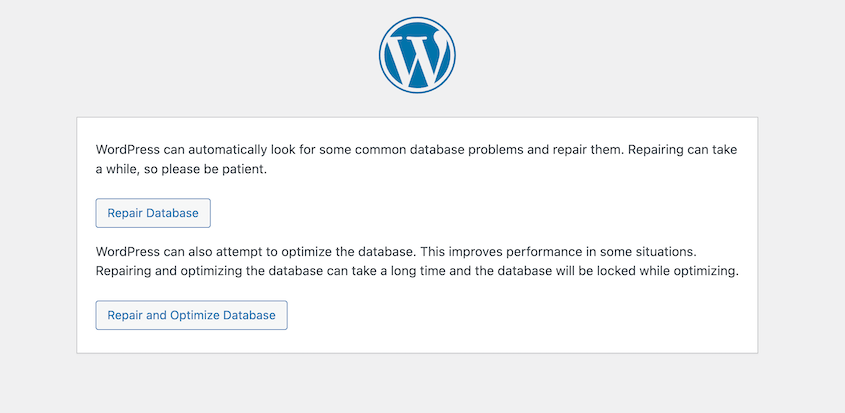
On this page, you can allow WordPress to repair and optimize your database.
Once this is done, remove the added code from your wp-config.php file.
4. Empty the Trash
When you delete items like old posts, they’ll get moved to the Trash folder instead of permanently deleted. As a result, your database could become bloated over time.
WordPress permanently deletes files after 30 days. But, you might want to empty your trash folder more often to optimize your database.
In your wp-config.php file, add this code:
define( 'EMPTY_TRASH_DAYS', 7 );
This changes the retention period to 7 days. However, you can change this number to any time that suits your needs.
5. Delete Post Revisions
If you run a blog, you’re probably constantly revising old posts to improve your SEO ranking. You might not realize that these post revisions are taking up space in your database.
To fix this problem, you can reduce the number of revisions allowed in your database. Go to your wp-config.php file and add this line:
define( 'WP_POST_REVISIONS', 2 );
This will only keep 2 post revisions for each post on your site.
If you want to, you can disable revisions altogether with this code:
define( 'WP_POST_REVISIONS', false );
Keep in mind that this prevents you from accessing any old post revisions. So, consider if you’ll ever need these in the future.
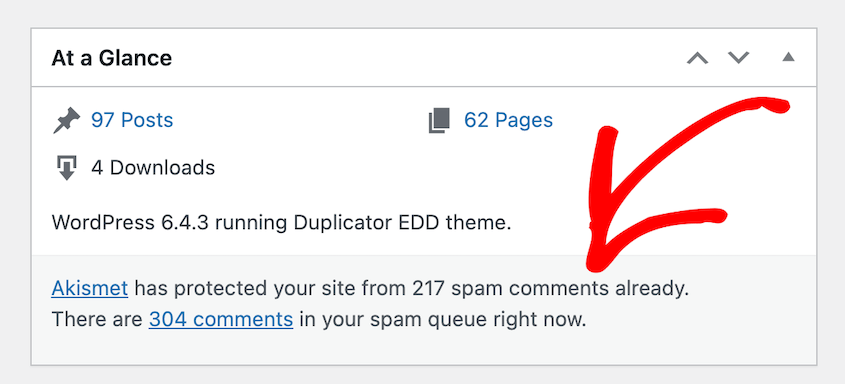
If you don’t block spam, your WordPress website could be flooded with spam comments. Like other files, spam comments are deleted after 30 days. During this time, they could add hundreds of unnecessary rows to your wp_comments database table.
A good way to stop receiving spam comments is to install a spam-blocker plugin. Akismet is a popular option that has over 5 million active installations.
After you install Akismet, it will automatically protect your site from spam comments. These will be sent to your spam queue.
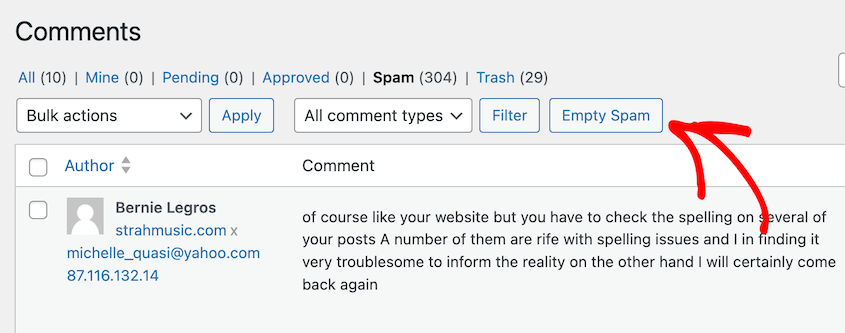
You can also have Akismet delete spam so that you never see it.
Otherwise, any spam comments will be deleted after 15 days. If you want to clear out your spam comments more frequently, click on Empty Spam.
This reduces bloat in your database.
Tags are a great tool for organizing your website’s content. They help group topics on your site, navigating users to relevant articles.
Over time, you may stop using certain tags. You might not even realize how much room they’re taking up on your database.
To delete them, use phpMyAdmin to connect to your database. Then, run this SQL query:
SELECT * FROM wp_terms wterms INNER JOIN wp_term_taxonomy wttax ON wterms.term_id = wttax.term_id WHERE wttax.taxonomy = 'post_tag' AND wttax.count =0;
If you have a different prefix than wp_, make sure to update this command.
Now, run these commands to delete all of your unused tags at once:
DELETE FROM wp_terms WHERE term_id IN (SELECT term_id FROM wp_term_taxonomy WHERE count = 0 );

DELETE FROM wp_term_relationships WHERE term_taxonomy_id not IN (SELECT term_taxonomy_id FROM wp_term_taxonomy);
8. Delete Pingbacks and Trackbacks
When you publish a post that links to an external website, you’ll send them a server notification. This is called a pingback. Trackbacks are similar, except they are sent manually.
If you run a popular website, you might have thousands of pingbacks and trackbacks in your database. So many sites linking to your content could take up unnecessary database space.
Fortunately, you can disable pingbacks and trackbacks. In your dashboard, find Settings » Discussion. Uncheck the first two options in the Default post settings.
If you already have a lot of trackbacks and pingbacks on your database, you can delete them in bulk. Simply run this command:
UPDATE wp_posts SET ping_status= “closed”;
Now your database is a little more optimized!
9. Delete Expired Transients
Transients are WordPress functions that allow developers to keep important information in a database for a specific amount of time. These records are kept in the options table.
Once transients expire, they can clutter your database. In turn, transients can negatively affect your site’s performance.
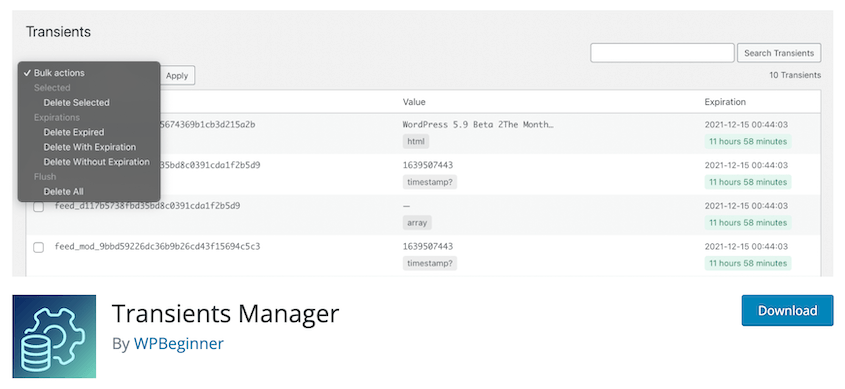
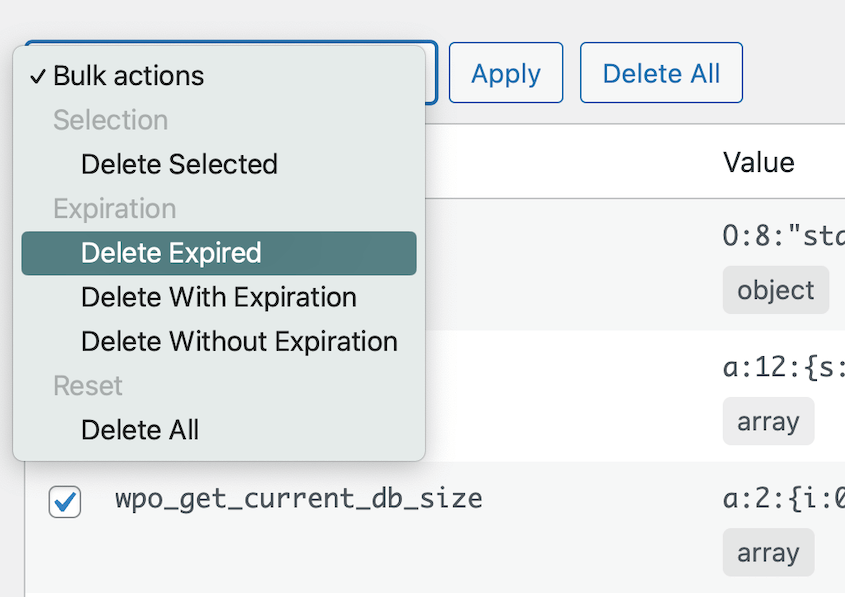
To delete transients, you can install the Transients Manager plugin. This gives you a beginner-friendly interface to start editing the transients on your site.
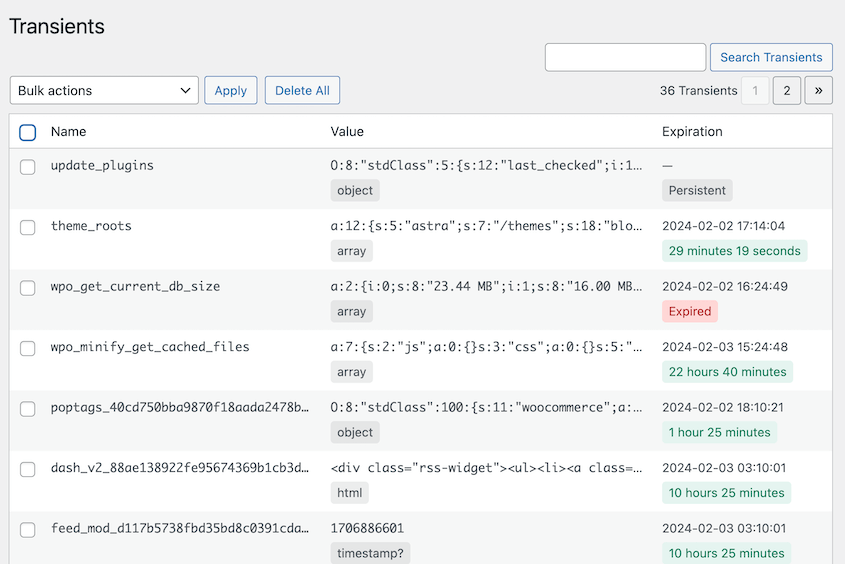
Go to Tools » Transients. From your list of transients, you’ll see if any are expired.
Bulk select your transients. In the Bulk actions menu, choose Delete Expired.
Now, you won’t have any expired transients bloating your database!
10. Remove Plugins that Add Bloat
Certain WordPress plugins store a lot of data in the database. Every new plugin you install adds to your database, but some are heavier than others.
Here are some plugins that can add bloat to your database:
- Anti-spam plugins
- Security plugins
- Analytics plugins
- Plugins that showcase related posts
- Link tracking plugins
If you notice that a specific plugin is using a lot of database storage, consider removing it. If you’re not sure if you should reduce your plugin use, read our guide on How Many WordPress Plugins Are Too Many.
FAQs About WordPress Database Optimization
How do I optimize my WordPress database?
You can optimize databases in WordPress by emptying the trash. It’s also a good idea to delete post revisions, spam comments, unused tags, expired transients, pingbacks, trackbacks, and resource-heavy plugins. You can also use a database cleanup plugin to remove unnecessary data from your database.
What is the best free WordPress database optimization plugin?
The best free WordPress database optimization plugin is WP-Optimize. It’s not only a caching plugin, but a full database cleaner. However, other popular options include Advanced Database Cleaner and WP-Sweep. These are all available for free on WordPress.org.
How do I reduce the size of my WordPress database?
To reduce the size of your WordPress database, you can install a plugin like WP-Optimize. Alternatively, log into phpMyAdmin and optimize all of the tables in your database. You can also try manually deleting post revisions, trashed comments, and other unnecessary data.
Conclusion
At this point, you have everything you need to optimize your WordPress database!
While you’re here, you may like these extra WordPress tutorials:
Do you need to save a copy of your database before you start optimizing it? Download Duplicator Pro to instantly back up your database and restore it in one click!
Joella is a writer with years of experience in WordPress. At Duplicator, she specializes in site maintenance — from basic backups to large-scale migrations. Her ultimate goal is to make sure your WordPress website is safe and ready for growth.


