
![[New] Introducing Duplicator 5.0: AI Backups, AutoTune, and Extra Free Features](https://duplicator.com/wp-content/uploads/2026/09/Duplicator-5-0-Announcement.jpg)
How to Fix a Failed WordPress Backup: Settings vs. Server Limits
 Joella Dunn
Joella Dunn
Joella Dunn
 John Turner
John Turner
John Turner
Your WordPress backup failed. The notice mentions a chunk size or an archive engine, and you don’t know what either means.
So, you search the error. The top result lists a few things to try (raise the memory limit, switch engines, shrink the chunks, exclude a folder). None of them say which one applies to your specific server.
Each guess costs you another 10 to 30 minutes of troubleshooting.
I’ve done that loop myself. Change one setting, rebuild the backup, watch it fail at the same spot, then change another setting and start over.
In Duplicator 5.0, the plugin runs that testing for you. It’s called AutoTune. It tests your backup settings against your server, saves the ones that work, and tells you when the problem isn’t a setting at all.
In this post, I’ll show you how to fix a failed WordPress backup. You’ll end up with a backup that finishes and a clear answer on whether your host is the problem.
Here are the key takeaways:
- A failed WordPress backup comes from either a backup setting or a server limit, and the fix depends on which problem you’re dealing with.
- Read the failure notice first, because Duplicator can fix some failures in a single click.
- Duplicator’s AutoTune runs real test backups, changes one setting per failure, and saves the configuration that works best.
- The Server Overview panel tells you when the problem is your host’s limits, so you stop tuning settings that were never the issue.
- AutoTune’s test backups aren’t restorable, so build a real one afterward and set up automatic backups for ongoing protection.
Table of Contents
Why Do WordPress Backups Fail?
Most failed backups fall into one of two buckets. Knowing which one is happening to your site decides the fix, and it can save you an entire afternoon of troubleshooting.
Here are the two main reasons WordPress backups fail:
- Settings problems: The way the backup is built doesn’t suit your server. That covers the archive engine (how your files get packed), the chunk size (how much work happens in each server request), and the database engine (how your database gets exported). A backup plugin like Duplicator can adjust all of these.
- Server limits: Your host caps something the backup needs. That might be the PHP time limit, the PHP memory limit, a blocked loopback request (your site can’t send a request to itself), or a 32-bit PHP build. Only your host, or you in your hosting panel, can change these.
Server limits are more common than most people expect. In Duplicator’s own analysis of support tickets, roughly 1 in 4 failed backups trace back to a host limit stopping the build partway through.
Many people spend hours tuning backup settings when the problem was with the server.
The steps below sort out both. If you’d rather dig into the raw error first, I’ve written a separate guide on reading your backup logs.
What You Need Before You Start
You don’t need much for this. Most of it is already in place if you’ve tried to run a backup.
Here’s what to check before fixing backup failures:
- Duplicator 5.0 or newer. AutoTune and the failure fixes are in both the free plugin and Duplicator Pro.
- Some free disk space. AutoTune runs real test backups on your server, so it needs room to write them.
- Nothing else running. Duplicator builds one backup at a time, and it won’t start a backup while WordPress, a plugin, or a theme is updating. Let anything in progress finish first.
- Access to your hosting panel. You’ll only need this if the problem turns out to be a server limit.
How to Fix a Failed WordPress Backup
The fastest way to fix a failed WordPress backup is to start with your backup error notice. Then, let AutoTune handle the settings and check your server for anything a backup setting can’t reach.
Here’s what you’ll do:
- Step 1: Read the failure notice. Some failures come with a one-click fix (with Duplicator), so you may not need the rest of this guide.
- Step 2: Let AutoTune find settings that work. Duplicator’s AutoTune feature tests backup configurations against your server and saves the one that succeeds.
- Step 3: Check whether the problem is your server. The Server Overview shows which host limits are getting in the way and what to ask for.
- Step 4: Build a backup and confirm it’s complete. A real backup, built on the new settings, is the only proof the fix worked.
Step 1: Read the Failure Notice
To fix a failed backup without guessing, you need a backup plugin that tells you why it failed. That’s why I’m using Duplicator.
Most backup plugins hand you an error code and a log file, then leave the diagnosis to you. Duplicator explains each failure, checks your setup before a backup starts, and includes AutoTune to test settings against your server.
If Duplicator is already on your site, make sure it’s version 5.0 or newer. All the settings in this guide work with both the free and premium versions.
Duplicator explains every failed backup in plain language, and sometimes the fix is one click away.
To show you what that looks like, I forced a backup to fail on a test site. Duplicator came back with a notice titled Manual Backup Failed and this error:
Your hosting provider repeatedly stopped the archive build process, usually due to server resource limits. Switching to a different archive engine is recommended for better stability.
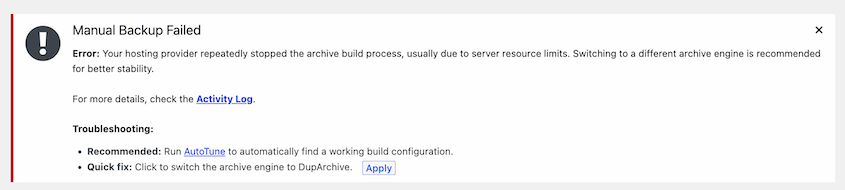
Under Troubleshooting, it gave me two ways forward:
- Recommended: Run AutoTune to automatically find a working build configuration.
- Quick fix: Switch the archive engine to DupArchive by clicking the Apply button.
This is a good example of how the two backup failure causes overlap. The true cause was a server limit, but the fix was a setting. DupArchive processes files in chunks instead of one continuous operation, so it can finish on hosts that cut long processes off.
In other words, a server limit doesn’t always mean a call to your host.
What you do next depends on what the notice offers.
Here are the three paths:
- You see an Apply button. Duplicator knows which setting to change. Click Apply, then create the backup again. If the backup finishes, skip ahead to Step 4.
- The notice recommends AutoTune. Head to Step 2. If you see both options, like I did, the quick fix changes a single setting, while AutoTune tests your whole configuration. That’s why Duplicator marks AutoTune as recommended.
- The backup never started. Duplicator checks your setup before it builds anything, and it stopped because something was missing. It lists exactly what’s wrong (a missing PHP extension, an engine your server doesn’t have, a folder Duplicator can’t write to, or leftover installer files). Fix those first, since AutoTune can’t test around them.
Some notices include host-specific guidance too. On LiteSpeed servers, for example, you’ll get a configuration snippet you can copy and paste to stop background workers from being interrupted.
For the full picture, click the Activity Log link in the notice. It opens Duplicator’s built-in record of that backup, including the settings it ran on and your server’s limits.
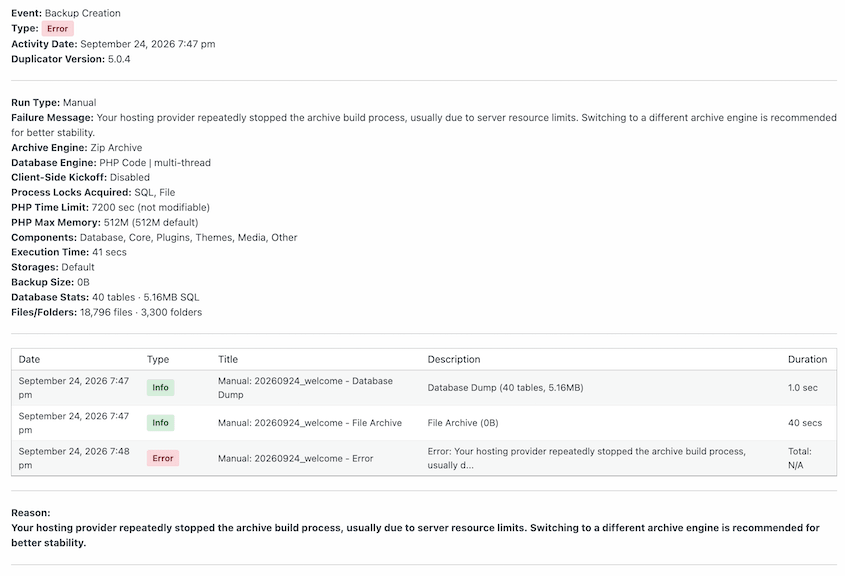
Here’s what’s worth checking in the entry:
- Archive Engine and Database Engine: The settings this backup used. My test ran on Zip Archive and the PHP Code database engine.
- PHP Time Limit and PHP Max Memory: Your server’s limits. If the time limit is marked “not modifiable,” Duplicator can’t raise it on its own.
- Client-Side Kickoff: Whether the backup was being driven from your browser. Mine was disabled, so the build ran on the server.
- The timeline: Each stage of the backup and how long it took. In my test, the database dump finished in 1 second, then the file archive stopped at 0B after 40 seconds. That tells you the build broke on your files, not your database.
If Duplicator gives you a one-click fix, use it. If not, go to the next step to allow Duplicator to troubleshoot for you.
Step 2: Let AutoTune Find Settings That Work
This is the step that replaces all the guessing.
AutoTune is a tool built into Duplicator that finds the right backup settings for your server. Instead of you changing one setting at a time and rerunning the backup, AutoTune runs real test backups and works out what your host supports.
You don’t have to learn what an archive engine or a chunk size is. You click one button, and Duplicator handles the testing.
To open it, click the AutoTune button at the top of the Backups screen. You’ll also find it as the AutoTune tab under Duplicator » Tools.
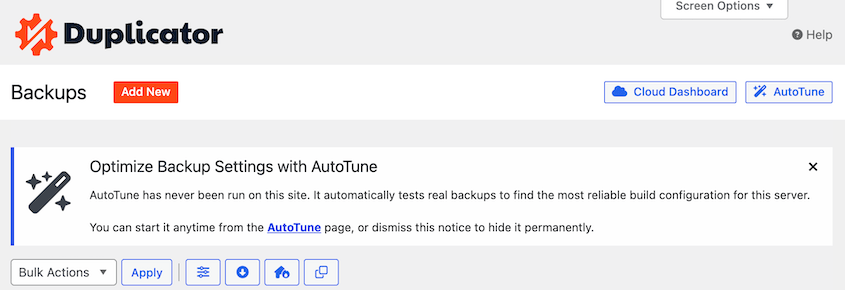
The AutoTune screen is split into three numbered sections.
Here’s what each one shows:
- Server Overview: What your server offers the build process, checked before any test backup runs. You’ll see which archive engines, database dump engines, backup workers, and PHP limits are available, with a green check next to each one that passes.
- Tuning Session: Every test backup AutoTune runs, with the configuration it tried and how long it took.
- Results: A before-and-after table of each setting AutoTune changed.
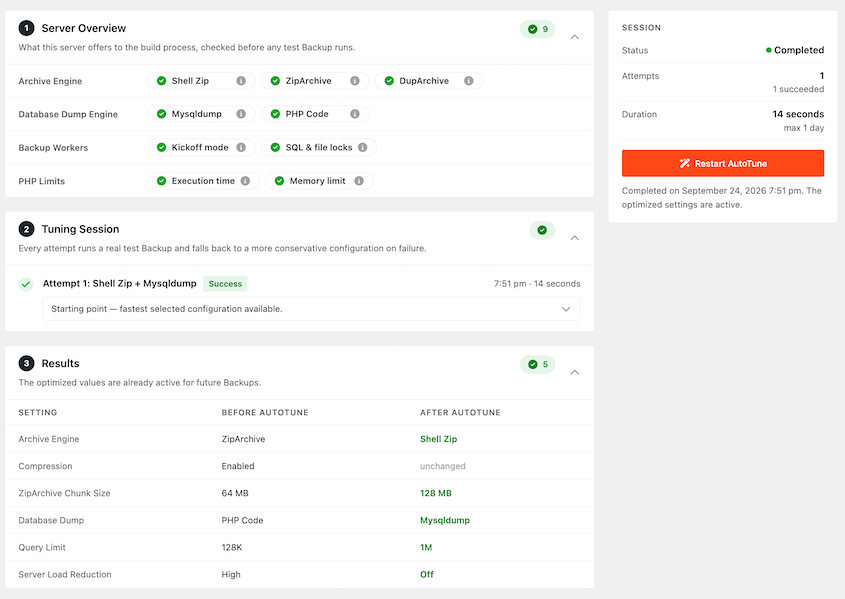
AutoTune starts with the fastest configuration your server supports. When a test backup fails, it falls back to a more conservative configuration and tries again. It keeps going until a backup succeeds.
Along the way, it can adjust these settings:
- Archive engine and compression: How your files get packed into the backup, and how tightly.
- ZIP mode and chunk size: How the archive gets built and how much work happens in each server request.
- Database engine and PHP dump mode: How your database gets exported.
- Server-load reduction: How much Duplicator holds back during a build to go easy on your server.
When a test succeeds, AutoTune saves that configuration. It’s active for every backup you run after that, so there’s nothing to apply.
Here’s what happened when I ran AutoTune on my test site. Every item in the Server Overview passed. The first attempt (Shell Zip with Mysqldump) succeeded, and the whole session took 14 seconds.
These are the settings AutoTune changed for me:
| Setting | Before AutoTune | After AutoTune |
|---|---|---|
| Archive Engine | ZipArchive | Shell Zip |
| Compression | Enabled | Unchanged |
| ZipArchive Chunk Size | 64 MB | 128 MB |
| Database Dump | PHP Code | Mysqldump |
| Query Limit | 128K | 1M |
| Server Load Reduction | High | Off |
My server could handle more than the old settings asked of it. So AutoTune moved everything toward speed: the Shell Zip engine, bigger chunks, the Mysqldump database engine, and no load reduction.
Step 3: Check Whether the Problem Is Your Server
Some failures have nothing to do with Duplicator’s settings. They come from the limits your host sets, and no plugin can change those.
Duplicator doesn’t pretend otherwise. When it hits a server-level problem, it tells you what’s wrong and what to do about it.
You’ll find that information in the Server Overview panel on the AutoTune screen. Each check gets a pass or a fail, with advice attached when something needs your attention.
Here’s what each check means and what to do if it fails:
- Worker mode: Whether Duplicator can build backups in the background on your server. If it fails, follow the advice in the panel, which usually points to something your host needs to allow.
- Loopback: Whether your site can send a request to itself. When it can’t, Duplicator falls back to building the backup in your browser instead. That kind of build only moves forward while a page on your site is open, which is why some backups sit at 0% and never budge.
- HTTP authentication: A password-protected staging or development site can block the background requests Duplicator relies on. Duplicator detects this kind of password protection automatically.
- Process locks: These stop two build processes from running over each other.
- PHP time limit and memory limit: How long a single request can run and how much memory it can use. If either fails, use the values AutoTune’s advice recommends when you talk to your host.
If anything fails, you’ll need your host’s help. Most hosting support teams can change these limits quickly once they know exactly what to change.
Here’s a message you can copy, fill in, and send:
Hi, my WordPress backup plugin (Duplicator) is failing because of a server limit. Its server check flagged the following: [list the failed checks]. It recommends [paste the values or changes from the advice text]. Could you make these changes for my account, or let me know if they’re not available on my plan? Thanks!
Once your host confirms the change, run AutoTune again. It’ll test against your new limits and save settings that make use of them.
Step 4: Build a Backup and Confirm It’s Complete
AutoTune’s test backups prove your settings work. They aren’t the backup you’ll restore data from.
So make a real one now.
Go to Duplicator » Backups and click Add New. Let it run to the end.
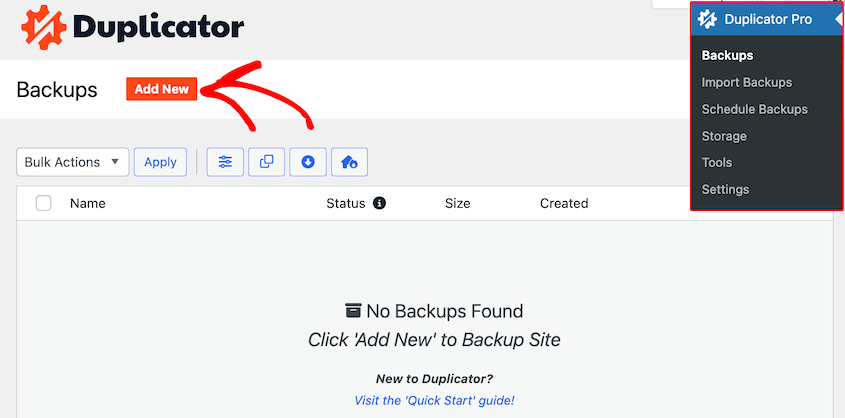
Then, open the backup’s details. It reports the engine that was used to build this specific backup. If it matches what AutoTune saved in Step 4, you know the backup ran on the new settings.
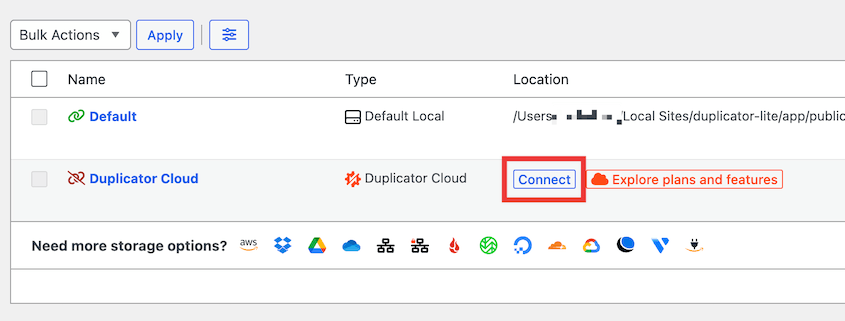
In our WordPress backup failure research, backups tend to fail while sending a copy to a third-party storage provider. That’s why I recommend connecting Duplicator Cloud, a native cloud storage service for Duplicator.
In the free plugin, you can connect Duplicator Cloud and start sending backups to the cloud. Upgrade to Duplicator Pro to automate backups and never worry about them again.
If you’ve never restored a backup, try one on a test site. This ensures your backup routine is set up to succeed in an emergency.
Troubleshooting: When Your WordPress Backup Still Fails
AutoTune handles most failed WordPress backups. A few situations still trip people up, and they’re easy to fix once you know what’s happening.
“A Backup Is Already Running”
What you see: AutoTune or Create Backup refuses to start, with a message that another backup is in progress.
Why it happens: Duplicator builds one backup at a time across everything (manual backups, schedules, transfers, WP-CLI, and AutoTune). It also won’t build while WordPress, a plugin, or a theme is updating. A scheduled backup that started a few minutes ago is the usual culprit.
How to fix it: Wait for the running job to finish, then try again. The Backups list shows what’s currently building.
The Backup Sits at 0% and Never Moves
What you see: The backup starts, the progress bar stays at 0%, and nothing happens.
Why it happens: Your site can’t make loopback requests, so Duplicator is building the backup in your browser. That kind of build only moves while a page on your site is open.
How to fix it: Open any page on your site in a browser tab, and the build will pick up. For a lasting fix, ask your host to allow loopback requests, then rerun AutoTune.
A 64-Bit PHP Notice Blocks Your Backup
What you see: Duplicator won’t create a backup and shows a notice about 64-bit PHP.
Why it happens: Your server is running a 32-bit PHP build, and Duplicator needs 64-bit PHP to create backups.
How to fix it: Ask your host to switch your site to a 64-bit PHP build. On some hosts, you can change it yourself in the hosting panel.
It Worked Last Month and Fails Now
What you see: Backups that used to finish start failing, and you didn’t change anything.
Why it happens: Your host may have upgraded PHP, lowered a limit, or moved you to a new server. Your site may also have grown enough that the old settings can’t keep up.
How to fix it: Run AutoTune again. It’ll find settings that work on your server as it is today.
Frequently Asked Questions (FAQs)
Why does my WordPress backup keep failing?
Either the backup settings don’t suit your server or your host has a limit the backup keeps hitting (like a PHP timeout or a blocked loopback request). Duplicator’s AutoTune fixes the first problem by testing settings until one works. For the second, its Server Overview tells you exactly what to ask your host to change.
What should I do if my backup fails halfway through?
Start with the failure notice in Duplicator » Backups. If it shows an Apply button, click it and rebuild. If it recommends AutoTune, run it and let Duplicator test settings until a backup succeeds. If the backup still stops partway, check the Server Overview for a failed limit, since that points to something only your host can change.
What does AutoTune do in Duplicator?
AutoTune finds backup settings that work on your server by running real test backups. It starts with the fastest configuration and, after each failure, changes only the setting responsible. When a test succeeds, it saves that configuration automatically. If the problem is a server limit it can’t change, it reports it in the Server Overview with advice on how to fix it.
Is AutoTune available in the free version of Duplicator?
Yes. AutoTune is a core feature in Duplicator 5.0 and newer. It’s included in the free plugin as well as every Duplicator Pro plan. You’ll find it at the top of the Backups screen or under Duplicator » Tools. The only requirements are an administrator account and a server running 64-bit PHP.
Will running AutoTune slow down my site?
AutoTune runs several real backups in a row, and each one uses server resources while it builds. Most visitors won’t notice on a quiet site, but on a busy one, it’s best to run AutoTune outside your peak hours. If you use scheduled backups in Duplicator Pro, they pause automatically until AutoTune finishes.
Rerun AutoTune Every Time Your Host Changes
You’ve gone from a failed WordPress backup to one that finishes as efficiently as possible. You also know whether your host was part of the problem.
Keep in mind that the right settings aren’t permanent. A PHP upgrade, hosting plan change, server migration, or big content import can all shift what works.
Rerun AutoTune after any of these major changes, before your next failed WordPress backup tells you to.
Plus, a backup that worked once isn’t ongoing protection. Your site keeps changing between manual backups, with new posts, new orders, and plugin updates. The day you need a backup is rarely the day you remembered to make one.
Duplicator Pro runs your backups on a schedule, sends them to off-site storage like Google Drive, Dropbox, or Amazon S3, and keeps only as many as you need. It’s trusted by more than 1.5 million WordPress professionals.
If this tutorial helped, these guides are worth bookmarking too.
- Stop Guessing Why Backups Fail (Check These Logs Instead)
- What Breaks WordPress Backups: Lessons From 1,400+ Support Tickets
- Why Your WordPress Backup Is Slow (And How to Fix It)
- The Safe Way to Back Up WordPress With AI Agents
- How to Restore WordPress From a Backup (In Less Than 5 Minutes)