Your WordPress site is thriving. Traffic is growing. Your audience is expanding.
But there’s a problem.
Your current hosting plan can’t keep up. Load times are sluggish. Crashes are becoming all too common.
It’s time to move your WordPress site to a new host. With the right approach, you can migrate your content with no downtime or data loss. Just a smooth transition to better performance.
In this tutorial, I’ll show you how to move your WordPress website to a new hosting provider!
Here are the key takeaways:
- Use Duplicator Pro to easily download your entire site files and database in one zip file
- Update your hosts file to access the new server while keeping your site live for visitors
- The migration process takes under an hour: install Duplicator, back up the original site, create a new database, import the backup into the new server, and update the DNS
- After importing, update your DNS nameservers to point your domain to the new host (48-hour propagation)
Quick Summary: How to Move a WordPress Website to a New Host
Moving your WordPress site to a new host involves a few key steps: finding a reliable hosting provider, installing a migration plugin like Duplicator, creating a complete backup of your original site, updating your hosts file to avoid downtime, setting up a new database, importing your website data, and updating your DNS nameservers.
The entire migration can be completed in under an hour with the right preparation, ensuring your growing website gets the performance and resources it needs.
Table of Contents
Why Move Your WordPress Site to a New Host?
When setting up your first website, you’ll choose a hosting plan with resources that meet your needs. However, as your audience grows, your web host may not be able to support your site anymore.
In this case, I’d recommend finding a better web host. Migrating your site will give you:
- Faster loading speed
- Better uptime
- Enhanced security
- Extended features
- More customer support
If you plan on owning a website for a long time, you’ll outgrow your hosting plan at some point. Especially if you start with a cheap hosting server, you’ll eventually need to find your site a new home.
Although migrations can seem technical and overwhelming, anyone can do it! With the right tools, you’ll quickly move your content to a new host without losing any data.
How to Move Your WordPress Website to a New Host
Let’s walk you through the process of moving your WordPress website to a new host!
Here’s a quick overview of the host migration process:
- Find a New Web Host: Choose a reliable provider like Bluehost, SiteGround, or WP Engine that meets your performance needs
- Install a WordPress Migration Plugin: Set up the Duplicator plugin on your original site and activate your license key
- Create a Backup of Your Original Site: Generate a complete backup containing your website files and database
- Update Your Hosts File: Modify your local hosts file to access the new host while keeping your site live for visitors
- Create a New Database: Set up a fresh MySQL database on your new hosting account with proper user permissions
- Import Your Website: Drag and drop your Duplicator backup into the new website and follow the migration wizard
- Update Your DNS: Point your domain to the new host by updating nameservers
Step 1: Find a New Web Host
Chances are, your current hosting provider is causing poor loading speed or doesn’t provide enough resources for your growing audience.
Shopping for a new web host can be overwhelming. With all of the different providers and plans out there, you might not know where to start.
To make your decision easier, here are some providers I personally recommend:
This affordable web host has many reliable shared hosting plans. For as little as $1.99 per month, you can get a WordPress hosting plan with a free Content Delivery Network (CDN) and 10 GB of storage.
Since SiteGround runs on Google Cloud, it tends to have fast loading speed and good uptime. Its plans are cost-effective and even come with a free migration tool.
If you want some extra security and a performance boost, check out WP Engine. This managed web host can be a good option if you receive a lot of visitors or want to outsource your WordPress maintenance tasks.
Once you purchase a web hosting plan, go ahead and install WordPress.
Keep in mind that some WordPress hosts will automatically migrate your original website for you. If you want to do it yourself, continue to the next step!
Step 2: Install a WordPress Migration Plugin
Don’t panic if your web host doesn’t offer a built-in migration service.
To safely migrate your content without data loss, you can use Duplicator Pro. This is the best WordPress migration plugin because it allows you to move your site without coding experience.
Here are some benefits of using Duplicator Pro:
- Drag-and-drop WP migration
- Cloud storage to Duplicator Cloud, Google Drive, Dropbox, OneDrive, Amazon S3, and more
- One-click backup restores
- Disaster recovery
- Supports Multisite and large sites
- Create staging sites
- Automatic backup schedules
- Step-by-step migration wizard
- Custom search and replace
- Dedicated customer support
Not sure if Duplicator is a good migration tool? See how Mario Röder uses Duplicator to migrate online stores with over 150,000 products!
To get started, choose a subscription for Duplicator Pro. The premium plans come with drag-and-drop migrations, which I use all the time for fast and easy moves.
When finished with your purchase, download Duplicator and install it on your original site.
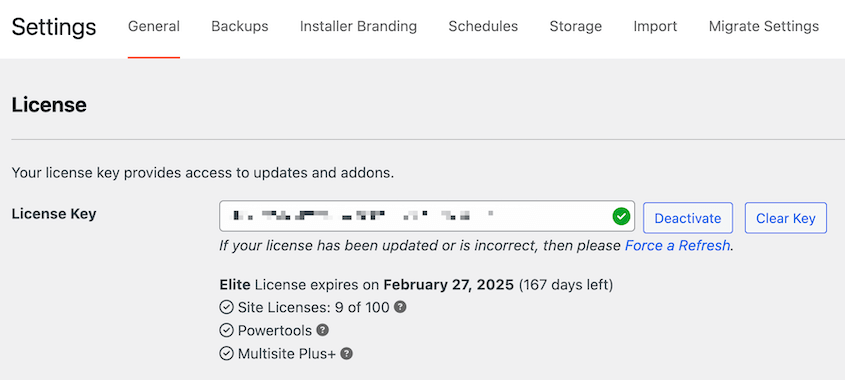
As a final step, you’ll need to activate your license key. Copy the key. Then head over to Duplicator Pro » Settings » General.
Paste your license key and hit Activate.
Step 3: Create a Backup of Your Original Site
Next, you’ll save all of your original WordPress files into a single backup. This makes it easy to transfer to a new location like a different web host.
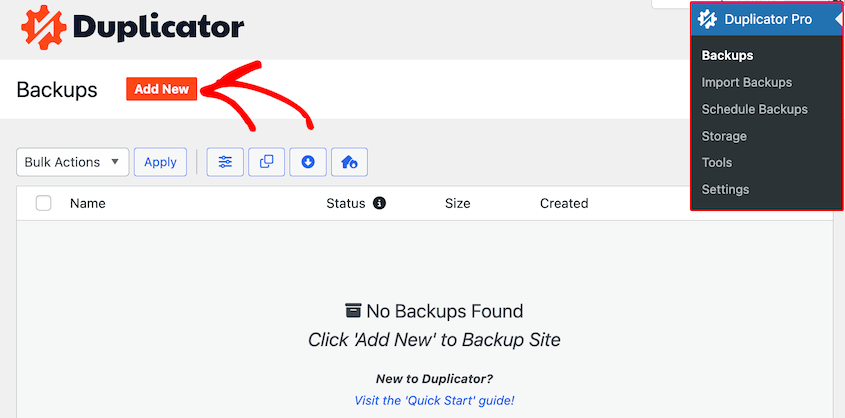
Using Duplicator, start by clicking on Backups » Add New.
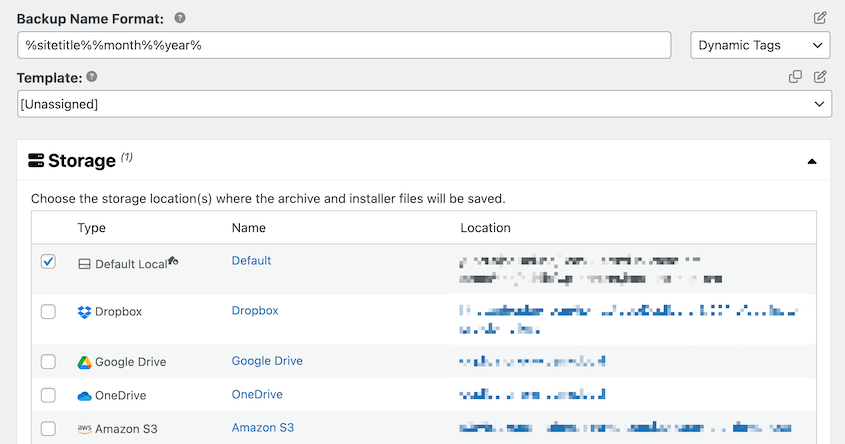
Name the backup and choose the Local storage location.
Open the Backup section. To migrate your entire site, click on Full Site.
If you want to exclude certain data from the migration, choose Custom. Feel free to add file and database filters as well.
For most migrations, create full backup of the original site so all your data transfers to the new location.
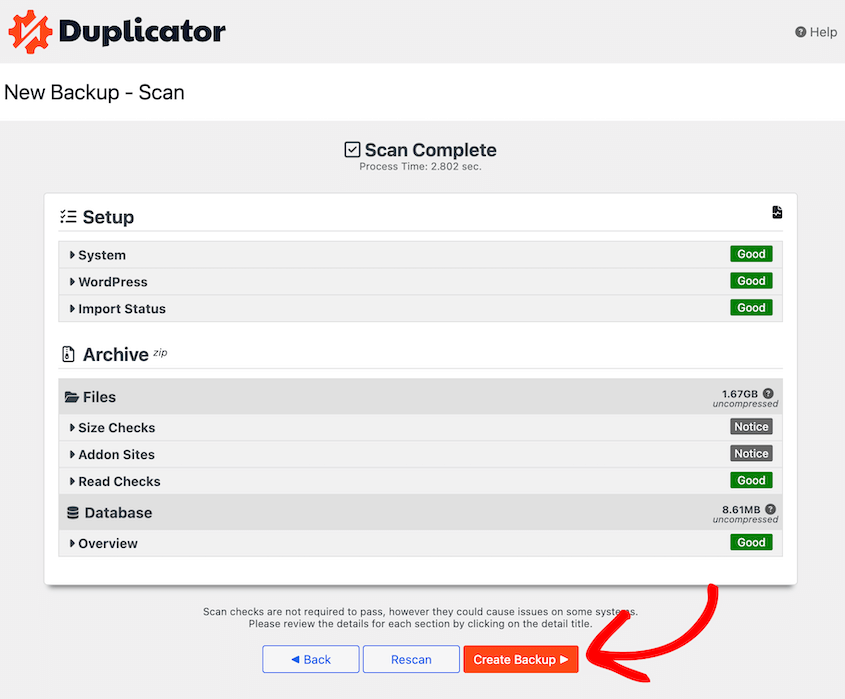
Unlike other migration plugins, Duplicator thoroughly scans your site for any issues. You can resolve problems before they affect your migration.
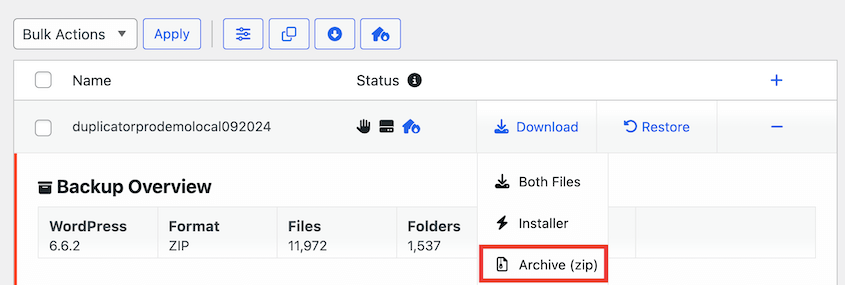
To finish, hit Create Backup. Once Duplicator backs up your site, you’ll see it on the Backups page.
With Duplicator Pro, all you’ll need to download is the archive, which is a zip file with all of your WordPress data.
If you’re using Duplicator Lite or want to set up the new site without installing WordPress, you’ll need to download the installer too.
Step 4: Update Your Hosts File
When you want to move to a new host, you might think you’ll face inevitable downtime. However, your website can be live as you set up the new site.
To do this, you’ll have to make a few changes to your hosts file. This is a file on your local computer that maps hostnames to IP addresses.
By updating your hosts file, you’ll make your computer think your site has moved. You’ll access your new host’s files while your audience still visits the original site on your old host.
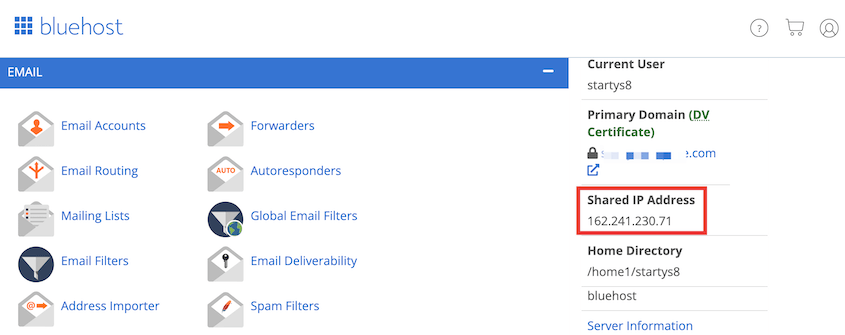
Find your new host’s IP address. Usually, this will be in your hosting control panel.
Bluehost users can click on Advanced and the IP address will be under General Information.
Now you can pull up your hosts file. How you do this will depend on your operating system.
If you’re a Mac user, open Terminal and run this command:
sudo nano /private/etc/hosts
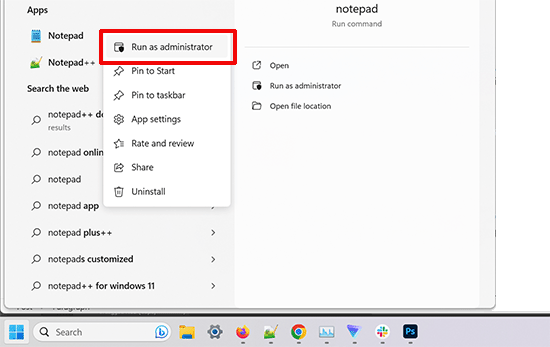
For Windows users, open the Notepad app. Right-click on it and run it with administrator privileges.
In Notepad, go to File » Open and find this folder:
C:\Windows\System32\drivers\etc
Here, find and open the hosts file.
Once you open the hosts file, add your new IP address and your domain name at the bottom. It should look like this:
192.168.1.22 www.example.com
Save your changes. Your new host’s files are now linked to the domain name on your computer.
After you finish migrating your site, remember to undo this change!
Step 5: Create a New Database
Before you move your website, it’s important to create a new WordPress database on your new host server. If you already have one set up, skip this step.
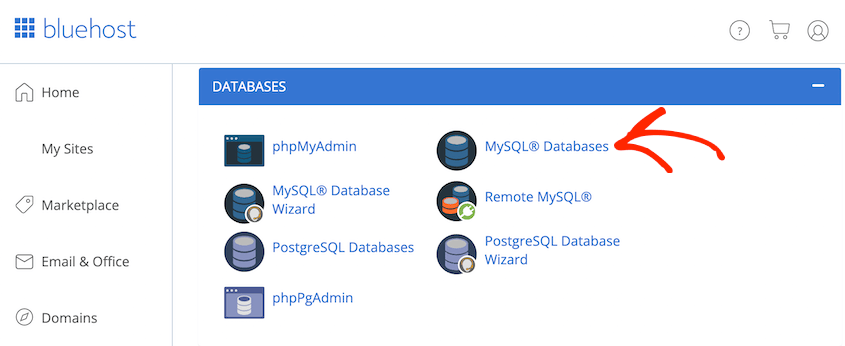
Many hosting companies make this process easy. With Bluehost, open your cPanel dashboard and click on MySQL Databases.
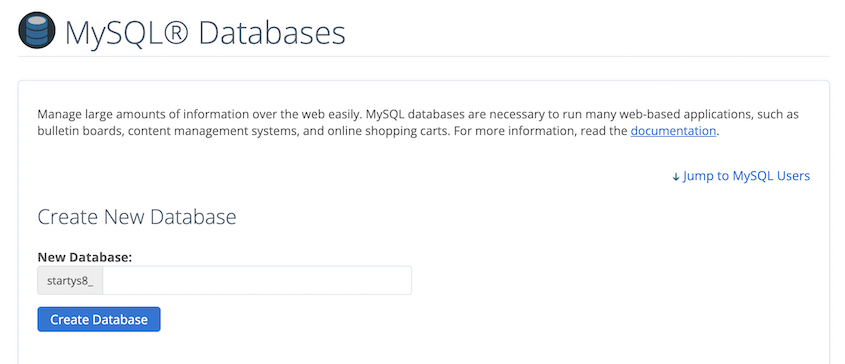
At the top of the page, enter a name for the new database and hit Create Database.
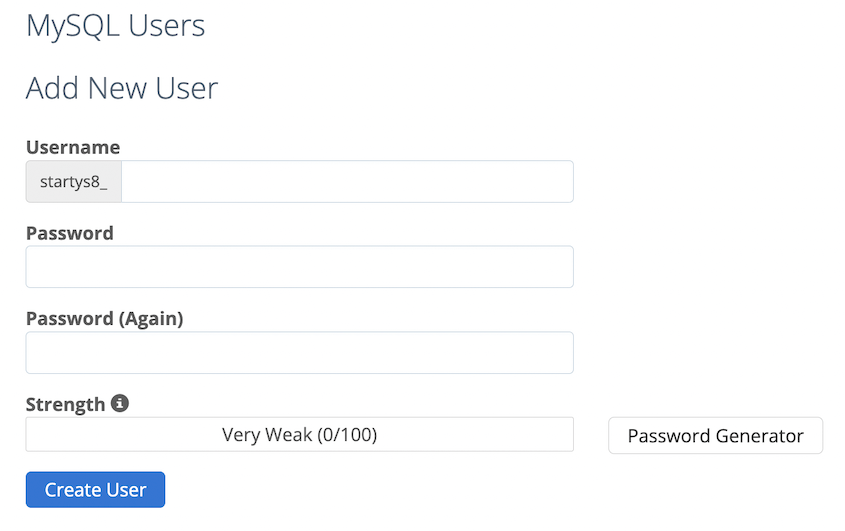
The new database will also need a new user. Under MySQL Users, enter a username and password to create the user.
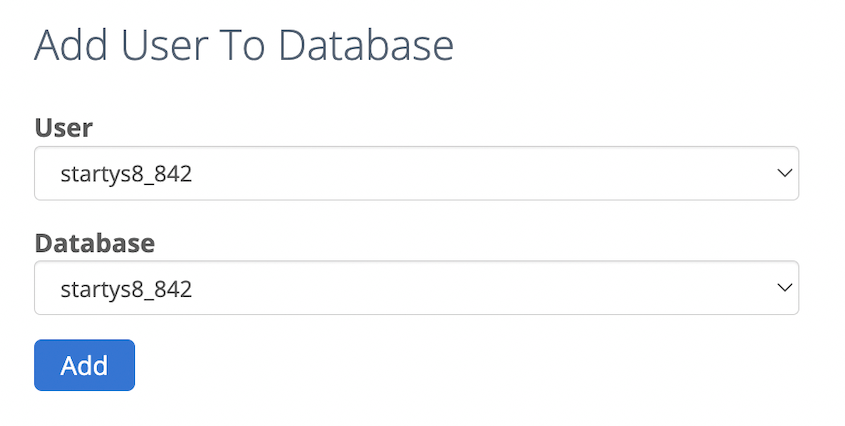
Then, add the user to the database you just created.
Assign the user all privileges. After this, it’s time to import your original WordPress website!
Step 6: Import Your Website
Although you could upload your backup files to an FTP client, Duplicator Pro offers an easier way.
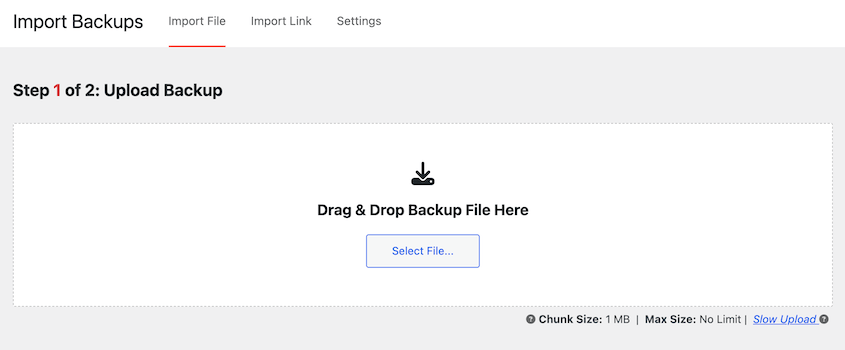
Once you have WordPress set up on the new site, install and activate Duplicator. Then, find the Import Backups page.
Drag and drop your archive file into the box. After it uploads, click Continue.
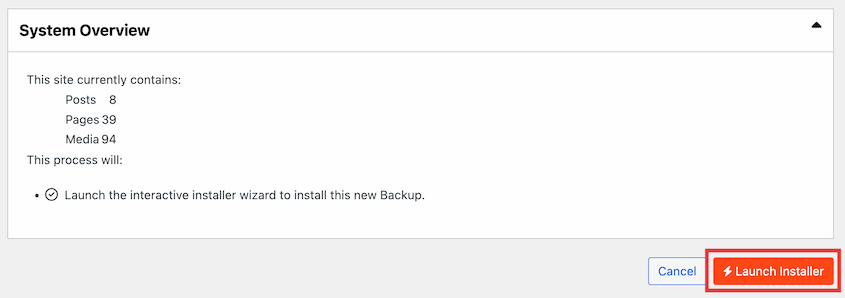
On the next page, Duplicator will show you all the data on your current site. Since you’re moving to a new server, this is likely a blank WordPress installation. To continue, hit Launch Installer.
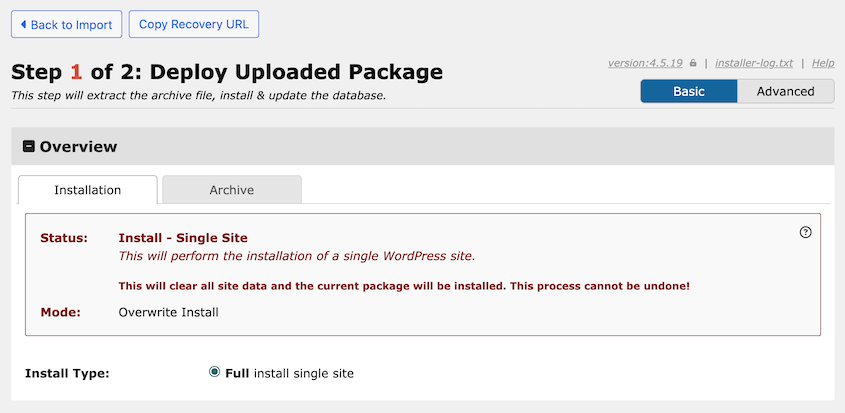
The Duplicator migration wizard will help you install the original site. Be sure to choose Full install single site as the Install Type.
For the Setup section, enter your database name, username, and password. This should be the same information for the database you created.
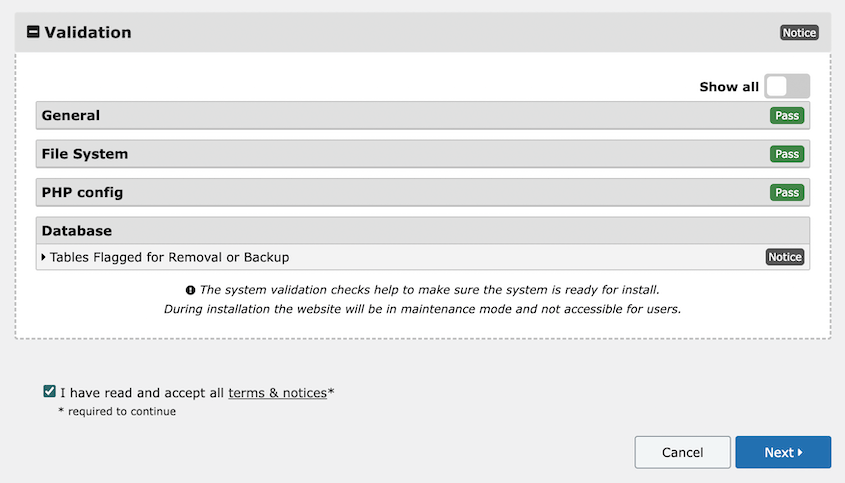
Under Validation, you may see notices. After you review them for any issues, accept the terms and notices. Then, click on Next.
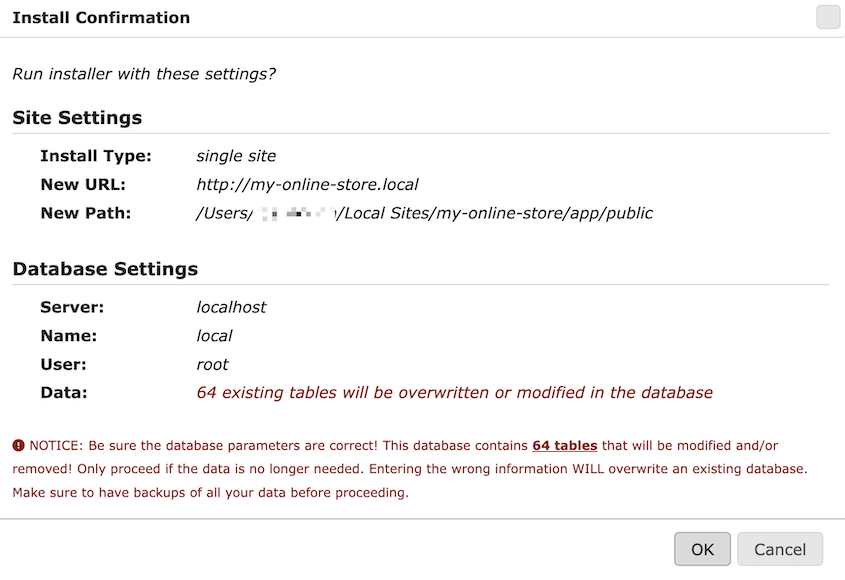
By importing your old website, Duplicator will completely overwrite the new site. You’ll have to confirm the installation.
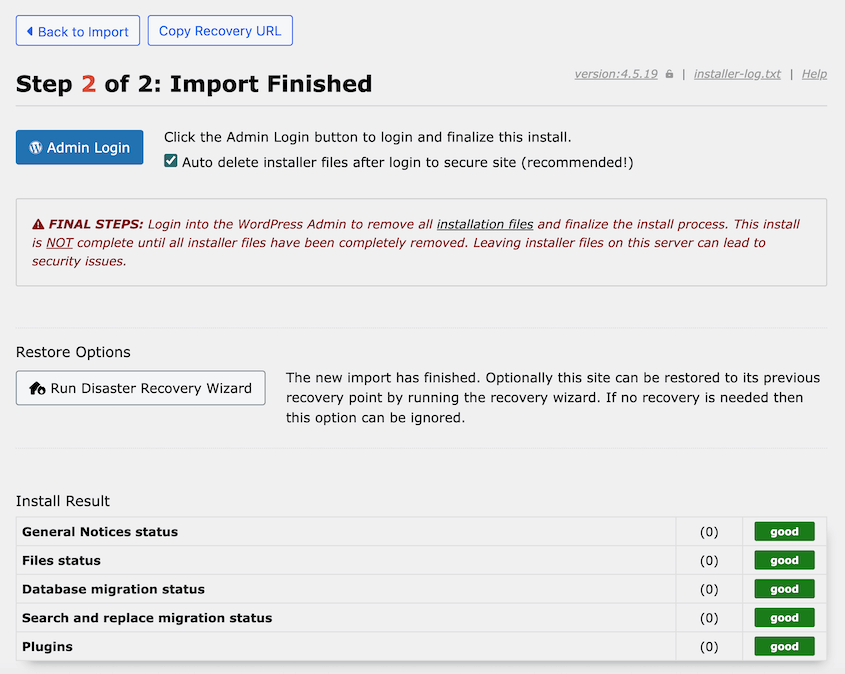
Once the migration finishes, use the Admin Login button to access your new site’s wp-admin dashboard.
Check the functionality of your new site to make sure everything transferred correctly.
Step 7: Update Your DNS
By now, you’ll have migrated a copy of your site’s files and database to the new web host. You’ll also need to make sure your domain points to the new hosting account.
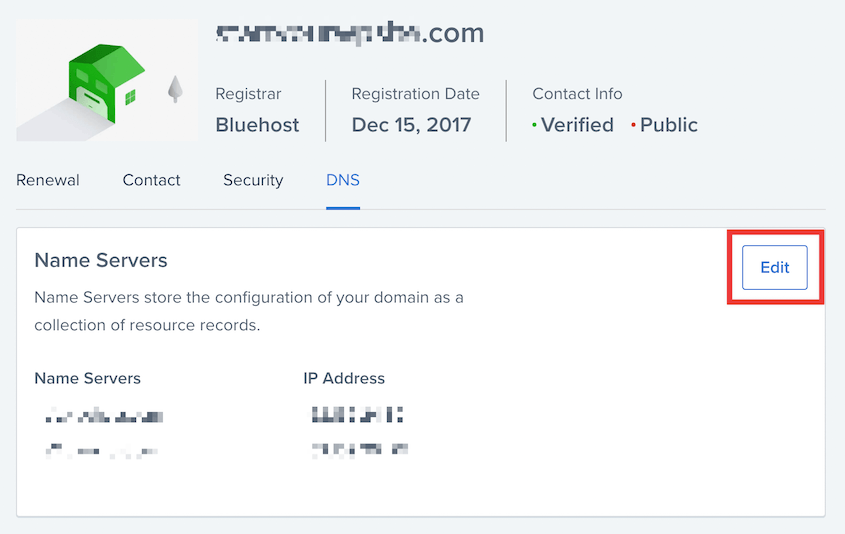
This involves updating your Domain Name System (DNS) nameservers. Open your old web hosting account or domain registrar and find your DNS information.
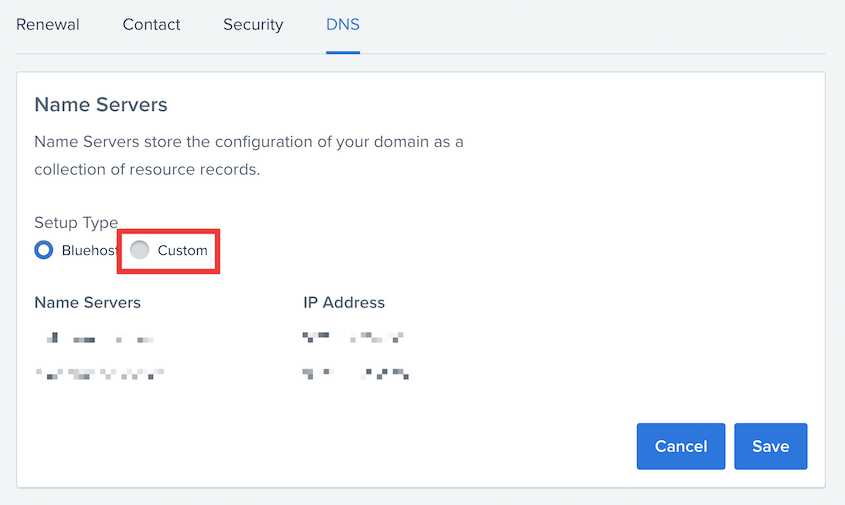
There should be an option to edit your nameservers. Select Custom as the nameserver type.
Then, enter the nameservers for your new hosting provider.
After you save this change, your DNS will point to the new host. Keep in mind that it may take up to 48 hours for this to propagate.
For extra tips on cleaning up your new site and preparing for visitors, see my complete WordPress migration checklist.
Frequently Asked Questions (FAQs)
How do I migrate my WordPress site to a new host for free?
You can migrate your WordPress site to a new host for free by installing Duplicator Lite. This free WordPress plugin allows you to package your existing website into a zip file. Then, you can upload this file to your new host’s directory and launch the Duplicator installer.
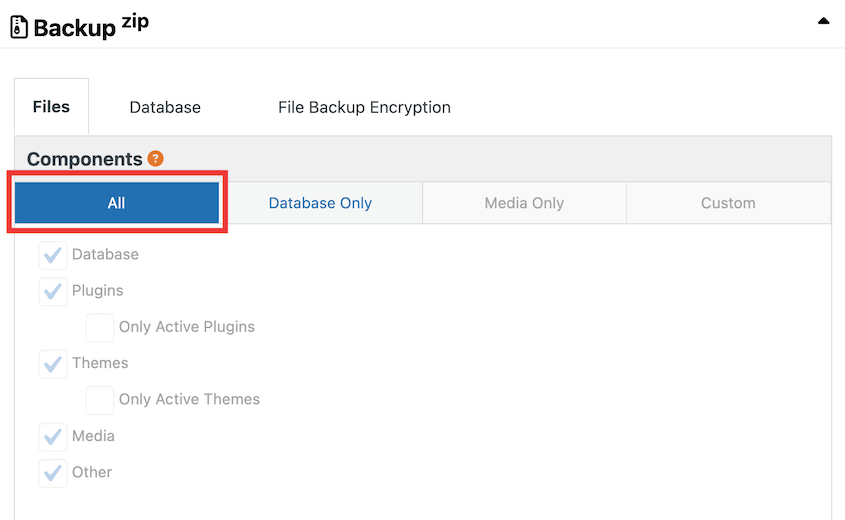
First, be sure to install and activate the free version of Duplicator. Next, create a new backup. Select All under Components to include all the files and database tables in your current site.
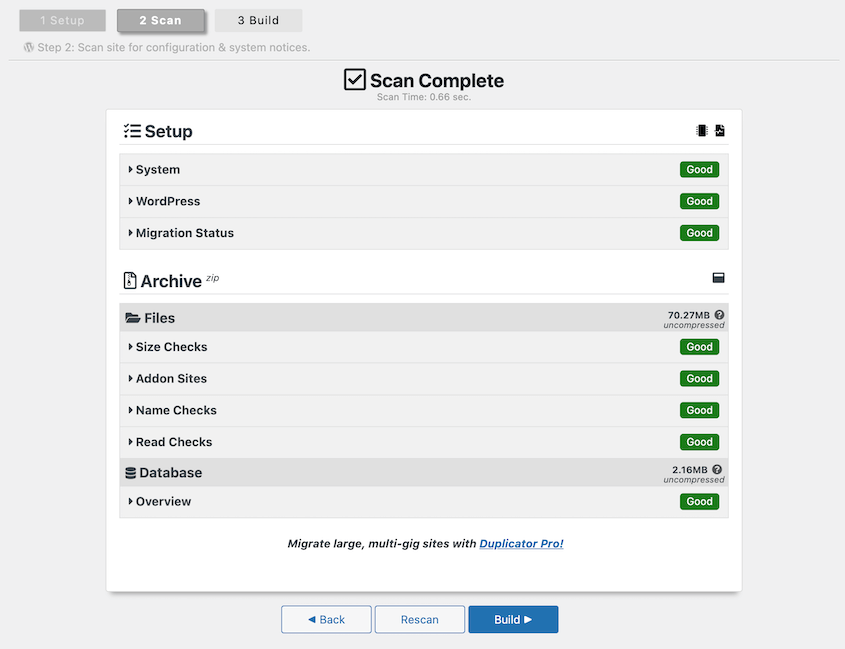
Duplicator will scan your website and notify you of any issues. After reviewing them, click Build.
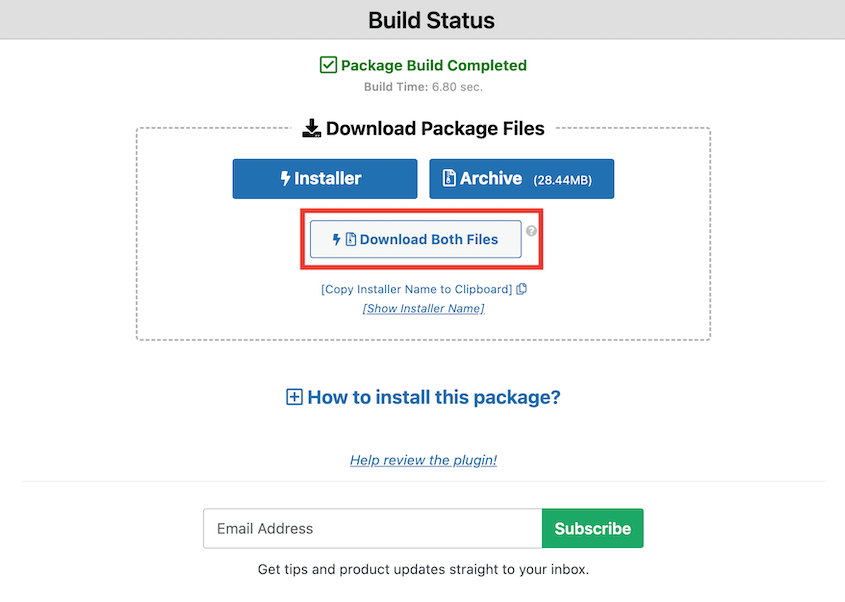
Now, you’ll see new archive and installer files. The archive contains all of your site’s files, while the installer will unpack and install the archive. On this page, hit Download Both Files.
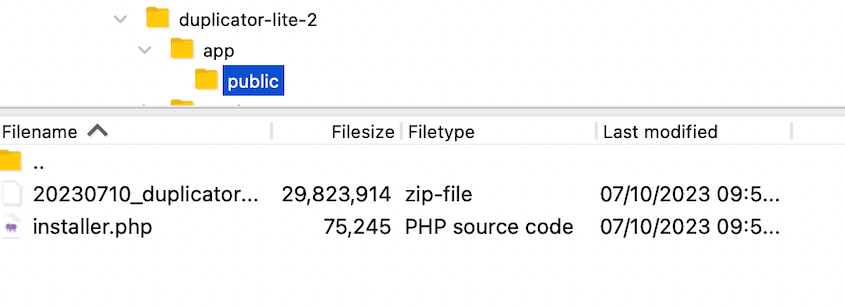
After this, open a File Transfer Protocol (FTP) client, cPanel, or the custom file manager for your new host. In this tutorial, we’ll be using FileZilla, a free FTP client.
Once you open your new site’s files, find the public_html folder. Empty this directory and upload the archive and installer files.
Before you continue, create a new database on your new host. You can find instructions for this in Step 5 of the tutorial above.
In a web browser, paste this URL to launch the Duplicator installer: https://your-domain/installer.php
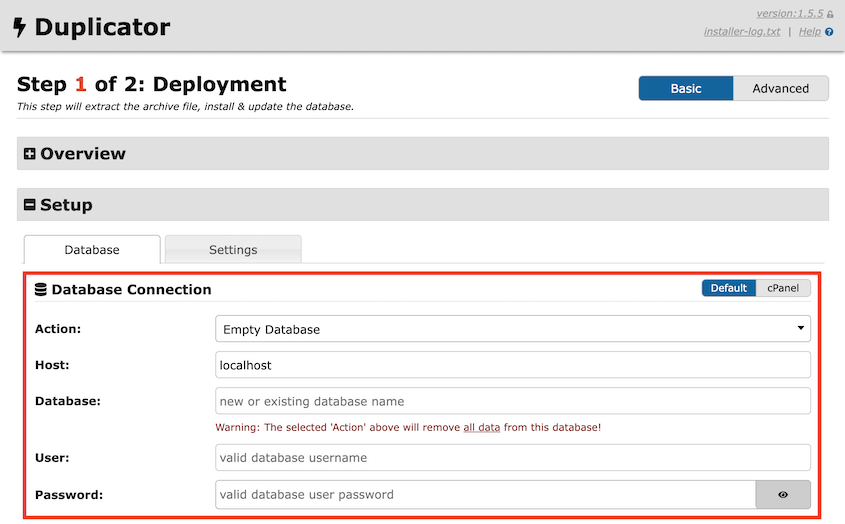
Under Setup, enter the information for your new database.
Then, hit Validate. Duplicator will test the database connection. If it is successful, accept the terms and notices and click Next.
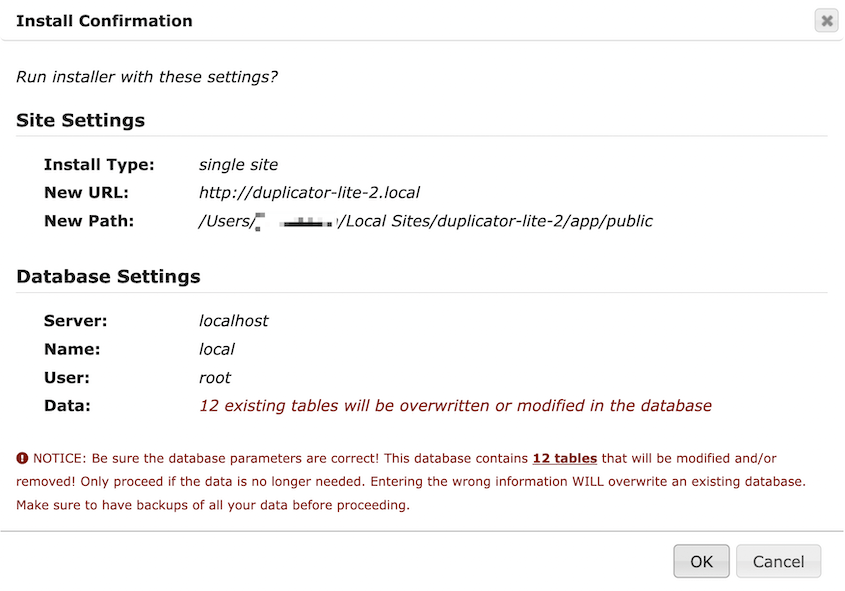
Lastly, confirm the install settings.
After the migration is finished, you’ll see an Admin Login button that you can use to access your new site.
Do you want a simpler migration process? Upgrade to Duplicator Pro to simply drag and drop your data into a new host!
How do I move my website from one host to another?
You can move your website to another host by creating a backup with Duplicator Pro. Then, drag and drop the backup’s archive file into the WordPress installation on the new host. This avoids using a File Manager or phpMyAdmin.
How long does it take to move a website to a new host?
With the right tools, it can only take a few minutes to move a website to a new host. Duplicator Pro is a plugin that can simplify the migration process to just a few steps. Using direct server transfers, you’ll perform a full site migration almost immediately.
How much does it cost to migrate a website?
If your new web host has a built-in migration tool, you can move your site for free. If it doesn’t, the best option is to install a plugin like Duplicator Pro. This tool supports unlimited backups and migrations starting at $69.30 per year. Alternatively, Duplicator Lite is available for free on WordPress.org.
Need more information? We found all of the hidden costs of migrating a WordPress site!
Is migrating a website hard?
Migrating a website is easy with Duplicator Pro. You can create a backup that contains your website files and database tables. Then, simply upload this zip file to your new site.
What are the risks of website migration?
If migrated incorrectly, you could lose organic traffic and decrease in SEO ranking. You may also face downtime or broken links. However, using a migration plugin like Duplicator Pro can help avoid all of these problems.
Just so you’re prepared for any possibility, here’s how to fix your WordPress site if it isn’t working after a migration.
How do I migrate a website manually?
You can manually migrate your WordPress website by using an FTP client like FileZilla to download your root directory, or public_html folder. After logging into phpMyAdmin, download your database as a SQL file.
Then, upload your old site files into the root folder for the new site. Create a new database and upload your original database. You’ll also need to update your wp-config.php file to reflect the new db_user, db_name, and db_password values.
Can I change my host and keep my domain name?
Yes, you can change your web host and keep your old domain name. You’ll have to disable domain privacy and update your nameservers to point to the new host. Then, you can authorize and start the domain transfer using your new hosting control panel.
How do I clone a WordPress site?
You can clone your WordPress site by installing Duplicator Pro and creating a full backup of the website. By downloading both the archive and installer files, you’ll have a full copy of your site that you can upload anywhere that supports WordPress.
Don’t Let Poor Hosting Hold You Back
Your website deserves a hosting environment that can keep up with your growth. Poor hosting frustrates your visitors, hurts your search rankings, and limits what you can achieve online.
By migrating to a better host, you’re investing in your site’s future and giving your audience the fast, reliable experience they expect.
Whether you’re dealing with constant crashes, sluggish loading times, or storage limits, now is the time to make the switch. Your website’s success depends on a solid foundation, and that starts with choosing the right hosting provider.
Ready for an easy migration to a new host? Upgrade to Duplicator Pro to move your website’s content in just a few clicks!
While you’re here, I think you’ll like these related WordPress guides:
Joella is a writer with years of experience in WordPress. At Duplicator, she specializes in site maintenance — from basic backups to large-scale migrations. Her ultimate goal is to make sure your WordPress website is safe and ready for growth.


