
How to Manually Restore Your WordPress Site
 Joella Dunn
Joella Dunn
Joella Dunn
 John Turner
John Turner
John Turner
TL;DR: In a hurry? Here’s how to do it step by step:
- Download a copy of your broken site first
- Upload and extract your backup files
- Import your .sql file in phpMyAdmin
- Check the database details in wp-config.php
- Resave permalinks and clear every cache
- Test logins, forms, and key pages
That white screen stares back at you where your WordPress site should be.
Maybe it’s a critical error message instead. Or perhaps your admin dashboard won’t load after that plugin update you thought would be quick and harmless.
Whatever triggered it, your site is broken. Visitors see nothing. You’re locked out. Revenue stops flowing.
To get your website back (when you don’t have a backup plugin), you need to know how to manually restore your WordPress site. It’s a skill that puts complete control back in your hands, no matter how broken things get.
When disaster strikes and you don’t have easy restore options, manual restoration becomes your lifeline.
Table of Contents
When Would You Need to Restore Your Website?
Why choose the hard way when automated solutions exist? Sometimes you don’t have a choice.
Your wp-admin dashboard is completely inaccessible—no login screen, no recovery options, nothing. The site won’t even load enough to run a plugin.
Manual restoration isn’t your first choice; it’s your last resort. But certain disasters leave you with no other option.
Here are the most common scenarios that demand a manual restore:
- A failed core, plugin, or theme update that locks you out of wp-admin. The dashboard won’t load, error messages block access, or the site displays a white screen of death.
- A malware infection or security breach. Your hosting provider might have suspended your account, or you’ve discovered malicious code throughout your files.
- A significant user error, like deleting critical files or content. Someone accidentally removed essential WordPress files or wiped out important database tables.
- A server crash or a failed migration to a new host. Your hosting environment failed, or something went wrong during a server transfer that corrupted your site.
- Your one-click restore plugin is failing. Server timeouts, memory limits, or corrupted plugin files can make automated restoration impossible.
- The only backup you have is a manual one. Your hosting provider gave you a .zip file of your site files and a .sql database export. No backup plugin was involved.
In each of these situations, the normal fixes are off the table.
You can’t access your dashboard to troubleshoot. One-click restore plugins won’t work. Your only path forward is rolling up your sleeves and doing it manually.
Which Recovery Path Do You Need?
Before you touch any files, figure out what you actually have to restore from. The right path depends on which backup survived.
Match your situation to one of these:
- Your host kept a backup. Check your hosting control panel before anything else. If your host has a recent backup, its restore tool is usually the fastest way back.
- You have a full backup. That means both your site files and a .sql database file. Follow every step in the next section.
- You only have the database. Skip the file steps and import the .sql file. Our guide to restoring a WordPress database covers this in more detail.
- You only have the files. Upload them as shown below. Your posts, pages, and settings live in the database, though, so anything missing there stays missing.
- Your site was hacked. Restore a backup made before the infection started, not your most recent one. Then change every password, check your admin users for accounts you don’t recognize, and update WordPress, your plugins, and your theme.
- You don’t have a backup at all. A manual restore won’t help. Try our guide to restoring WordPress without a backup instead.
How to Manually Restore a WordPress Site
Now for the main event—actually restoring your site.
Remember: WordPress has two parts that work together. Your files (themes, plugins, media uploads, core WordPress files) live on the server. Your database stores everything else (posts, pages, comments, settings, and user accounts).
You need clean backups of both to pull this off.
Before you start, gather these essential tools:
- Your site files backup (usually a .zip file containing all your WordPress files)
- Your database backup (a .sql file with all your content and settings)
- FTP client access (like FileZilla) or your hosting control panel’s File Manager
- Database management tool (like phpMyAdmin, accessible through your hosting dashboard)
Manually Restore WordPress Files
First, you’ll replace all the broken files with your clean backup.
Log into your hosting control panel and open the File Manager. You could also fire up an FTP client and connect to your server using your FTP credentials.
Navigate to your website’s root directory. This is usually called public_html, www, or just your domain name.
Don’t just delete everything yet. Even though it’s currently broken, download a copy of your current root directory first.
Then, delete everything in the directory.
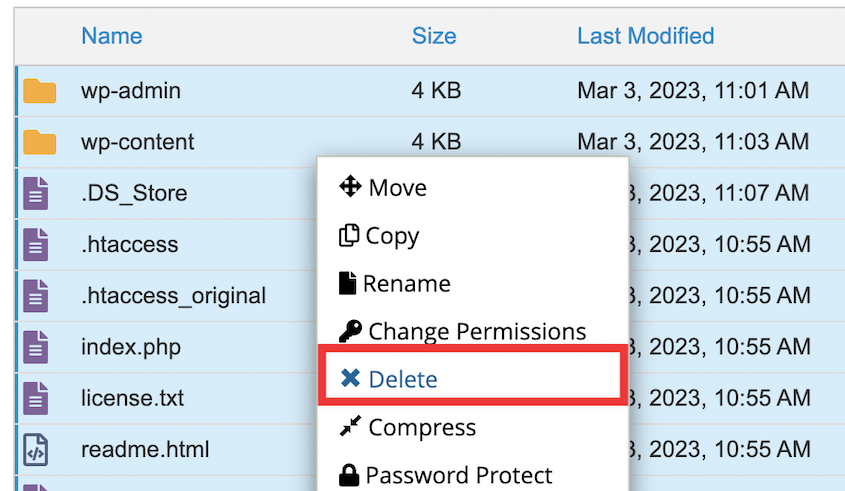
Upload your .zip backup file and extract the .zip file directly on the server.
Most hosting File Managers have an “Extract” or “Unzip” option when you right-click the file.
Your WordPress files should now populate the directory. Core files like wp-config.php and folders like wp-content should be there.
Manually Restore WordPress Database
Now comes the most important part—restoring your database. This is where all your content, settings, and user data lives.
Log into your hosting control panel and find the database section. Look for phpMyAdmin. Click it to open the database management interface.
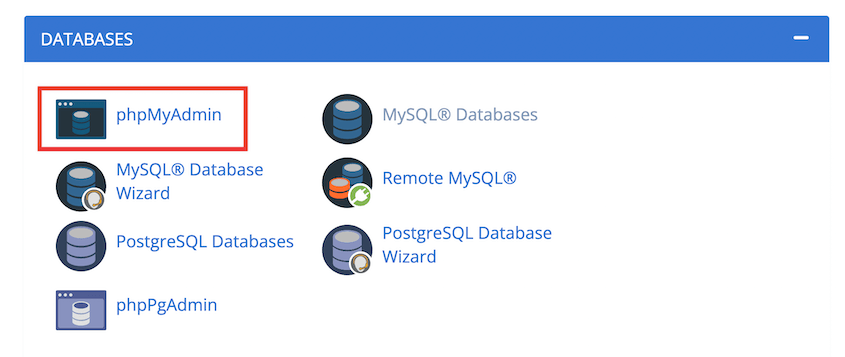
You’ll see a list of databases on the left side. Click on that database in phpMyAdmin.
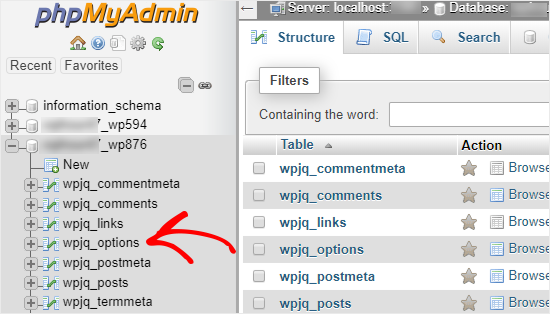
If you’re not sure which one belongs to your WordPress site, check your wp-config.php file. Open that file and look for the line that says DB_NAME. The value in quotes is your database name.
Find the Export tab at the top. Leave all settings as default and click Go. This downloads a .sql file to your computer—your safety net if things go sideways.
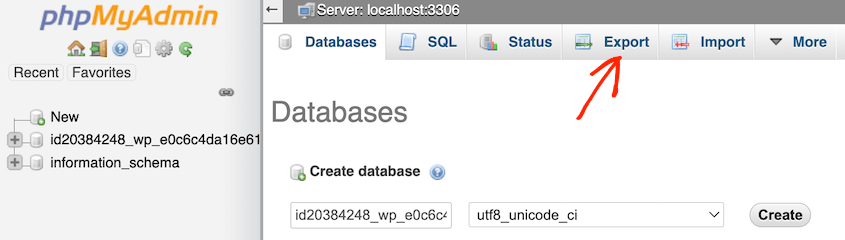
Now, go to the Import tab. Upload your .sql backup file from your computer.
Leave all other settings at their defaults and click Go.
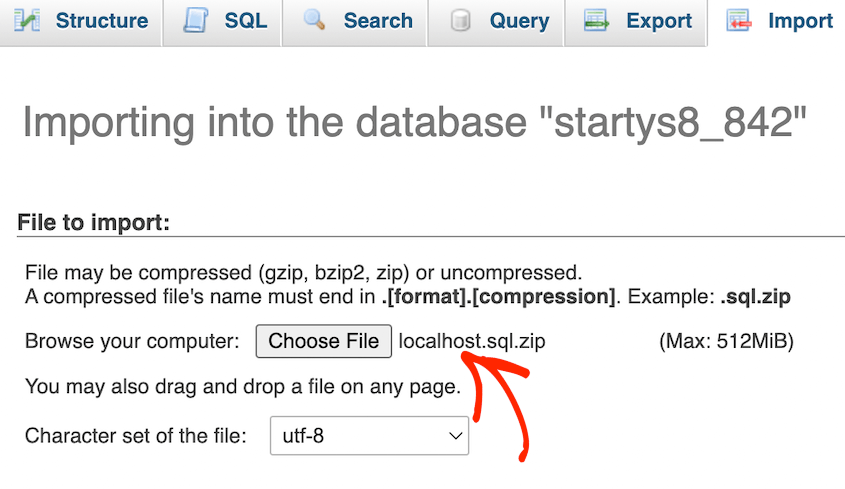
The import process will recreate all your tables and populate them with your backup data. This might take a few minutes for larger databases.
Verify wp-config.php File
Your files and database are restored, but they need to talk to each other properly.
The wp-config.php file is the bridge that connects your WordPress files to your database. If the connection details are wrong, your site won’t load.
Open your wp-config.php file (it’s in your root directory) and check these critical values:
DB_NAMEshould match your database name exactlyDB_USERshould be your database usernameDB_PASSWORDshould be your database passwordDB_HOSTis usuallylocalhost, but check with your hosting provider
Also verify that $table_prefix matches the prefix used in your database tables. Most sites use wp_ but some use custom prefixes like xyz_ for security.
If any of these values are wrong, update them and save the file.
Refresh Permalinks
Refreshing your permalinks fixes a big problem: 404 errors on your posts and pages.
WordPress stores permalink structure in the database, and sometimes that data gets jumbled during a restore. Refreshing it rebuilds the URL structure properly.
Log into your WordPress admin dashboard (you should be able to access it now). Navigate to Settings » Permalinks.
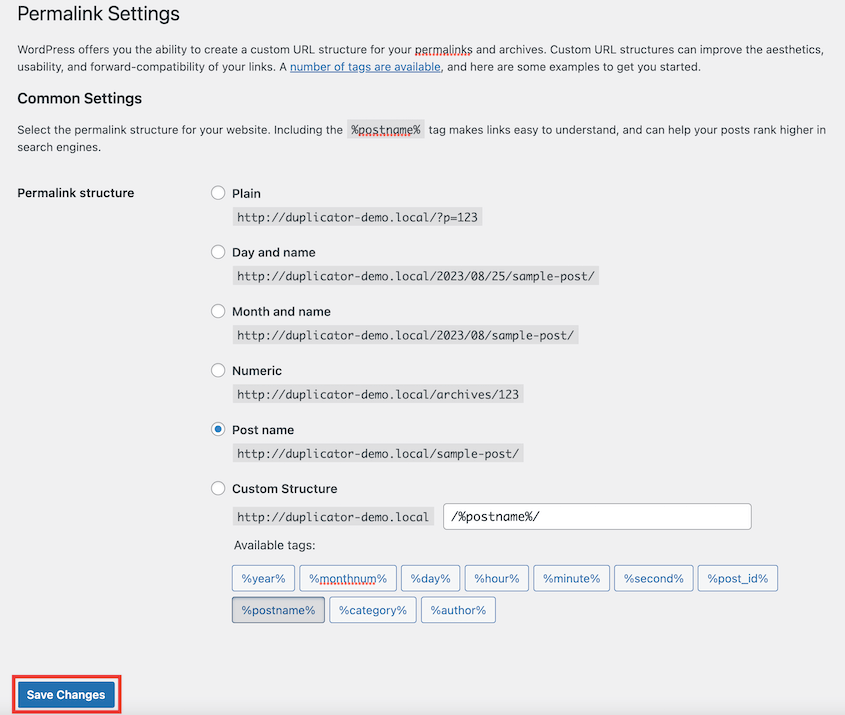
Don’t change anything. Just scroll down and click Save Changes.
This forces WordPress to regenerate its permalink structure and should eliminate those frustrating 404 errors.
Clear Caches
Old cached data can make your restored site look broken, even when everything is working perfectly.
Clear every type of cache you can think of:
- Plugin cache: If you use caching plugins like WP Rocket or W3 Total Cache, clear their cache through their settings pages
- Server-side cache: Many hosts provide caching that you can clear from your hosting dashboard
- CDN cache: If you use Cloudflare or another CDN, purge their cache through their control panel
- Browser cache: Clear your browser cache or try viewing the site in an incognito window
This ensures you’re seeing the actual restored site, not cached remnants of the broken version.
Verify Functionality
Time for the final test: making sure everything actually works.
Run through this checklist:
- Log in and out of wp-admin to confirm authentication works
- Check your homepage loads completely
- Navigate to a few internal pages and blog posts
- Verify that images are displaying properly
- Test critical functionality like contact forms or shopping cart checkout
- View the site on both desktop and mobile devices
If something isn’t working, don’t panic. Most issues at this stage are minor configuration issues or missed cache clearing.
What to Do If the Manual Restore Fails
Manual restores can fail in a handful of predictable ways. Here’s how to spot each problem and fix it:
- The database is too large for phpMyAdmin. Imports stop when the file is bigger than your host’s PHP limits allow (
upload_max_filesize,post_max_size,memory_limit, andmax_execution_time). Use the database restore tool in your hosting control panel, runmysql -u username -p databasename < backup.sqlif you have SSH access, or ask your hosting provider to import the file for you. - WordPress shows the installation screen. It can’t find your tables. Check that
DB_NAMEand$table_prefixin wp-config.php match the database you just imported. - You see permission errors. Uploaded files can pick up the wrong file permissions. WordPress folders should usually be set to 755 and files to 644, which you can change in your FTP client or your host’s File Manager.
- The site keeps sending you to its old address. If the domain changed, add
define( 'WP_HOME', 'https://example.com' );anddefine( 'WP_SITEURL', 'https://example.com' );to wp-config.php, using your real address. - The backup won’t extract or import. The archive may be incomplete or corrupted. Try the next most recent backup rather than forcing a broken one.
Restore WordPress in Minutes with Duplicator
The manual restoration process you just learned works, but it’s complex and risky.
Every step carries the potential for human error. Miss one database setting, and your site won’t load. Upload files to the wrong directory, and you’ll start over.
Duplicator eliminates this complexity entirely. It’s a backup plugin trusted by over 1.5 million active users.
Instead of juggling separate file and database backups, Duplicator packages everything into a single archive file plus an installer script.
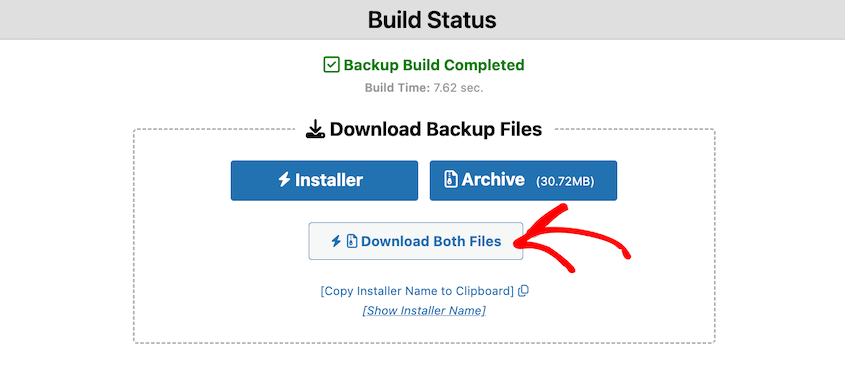
Upload these two files to your server, run the installer, and it handles the database import and configuration automatically.
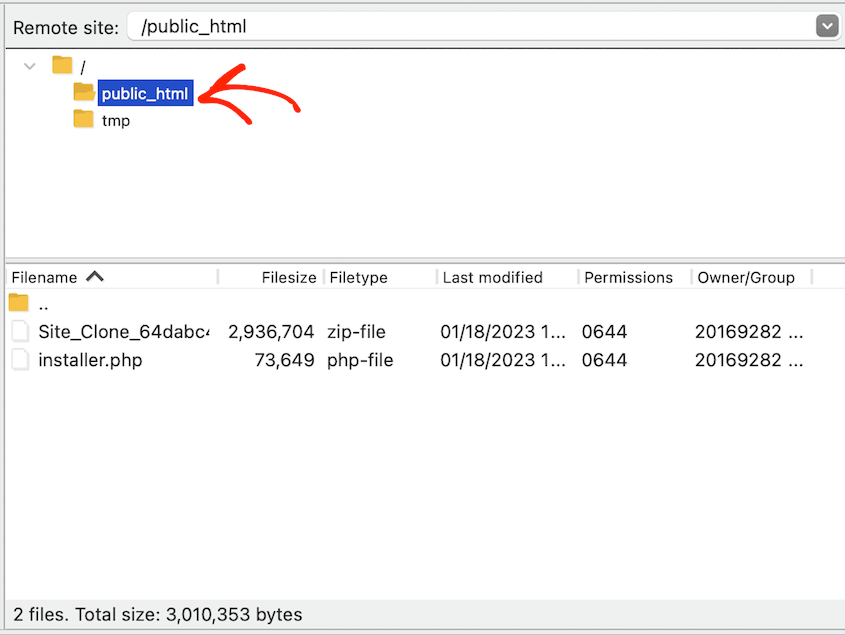
What takes you an hour manually happens in under five minutes with Duplicator.
Plus, it’s the only backup plugin that can restore your site without needing dashboard access. It’ll restore a completely broken site!
More importantly, it removes the high-stakes guesswork. The installer handles all those critical database connections and configurations that can break your site if done incorrectly.
Frequently Asked Questions (FAQs)
How do I restore my WordPress site to a previous date without a backup?
Start with your hosting provider, since many hosts keep recent backups of their own even if you never made one. If yours doesn’t, you can rebuild content from saved snapshots in the Wayback Machine or from the last crawled copy in Google Search Console’s URL Inspection tool. Our guide to restoring WordPress without a backup walks through both. To prevent future loss, always enable automated backups through a plugin like Duplicator.
How do I manually transfer a WordPress site?
Manually transfer a WordPress site by downloading all files via FTP, exporting the database with phpMyAdmin, and uploading both to the new server. Update the wp-config.php file with the new database details and adjust domain or URL settings in the WordPress database to complete the migration.
How do I manually enter recovery mode in WordPress?
You don’t enter recovery mode on your own. Since WordPress 5.2, when a plugin or theme causes a fatal error, WordPress automatically emails your site’s admin address a special link. Open that link to log in with the broken plugin or theme paused, then deactivate or update it. If the email never arrives, enable debugging in wp-config.php to find the error directly.
How do I restore a WordPress backup on localhost?
Restore a WordPress backup on localhost by installing local server software like XAMPP or MAMP, creating a new database in phpMyAdmin, and importing the backup database file. Copy your WordPress files into the localhost directory, update wp-config.php with the new database details, and then access the site from your local browser.
How do I back up and restore a WordPress site to a new server?
Back up and restore a WordPress site to a new server using Duplicator. Install the Duplicator plugin, create a backup, and download both the installer and archive files. Upload them to the new server and run the installer script. It asks for your new database details and updates the site’s URLs for you.
Where are WordPress backups stored?
It depends on what made the backup. Your hosting provider keeps its own backups on its systems, and you’ll find them in your hosting control panel. A backup plugin usually saves backups on your server first, then sends copies off-site if you’ve connected cloud storage.
Duplicator saves backups on your server by default. The free version can also send them to Duplicator Cloud, and paid plans can send them to Google Drive, Dropbox, Amazon S3, OneDrive, or FTP/SFTP.
For a manual restore, keep a copy on your own computer too. A server that’s down can take its local backups down with it.
How do I access my WordPress backups?
If you can still log in, open your backup plugin from the WordPress dashboard. In Duplicator, go to Duplicator » Backups to download or restore any backup.
If wp-admin won’t load, check the backup tool in your hosting control panel, or connect with FTP or your host’s File Manager. Most backup plugins keep local copies inside the wp-content folder. Backups sent to cloud storage can be downloaded straight from that service, like your Google Drive or Dropbox account.
Next Steps: Secure Your Site for Good
Manual restoration is a reactive skill. It’s something you use after disaster strikes.
The smarter approach is being proactive.
Regular, automated backups are your site’s insurance policy. When you have fresh, reliable backups running automatically, site disasters become minor inconveniences instead of business-ending catastrophes.
Duplicator Pro handles this protection. It creates scheduled backups that automatically save to off-site cloud storage like Google Drive, Dropbox, or Amazon S3. Your backups live safely away from your server, protected even if your hosting account gets completely wiped out.
Set it up once, and your site stays protected indefinitely.
Don’t wait for a disaster. Protect your site with Duplicator Pro and set up your automated backup schedule today.
While you’re here, I think you’ll like these other hand-picked WordPress resources:
- How to Back Up a WordPress Site Manually
- How to Manually Migrate a WordPress Site
- How to Restore a WordPress Site to a Previous Date Without a Backup
- STOP Making These Website Backup Mistakes
- How to Restore WordPress From a Backup (In Less Than 5 Minutes)