Migrating your WordPress site doesn’t have to mean sacrificing your search rankings. With the right strategy, you can preserve (and even improve) your SEO throughout the entire process.
You’ve likely spent years building your site and climbing the search results. The thought of losing all that progress during a site move can be daunting, and rightly so.
In this guide, I’ll walk you through a complete SEO migration checklist, from pre-move planning to critical post-launch checks.
Whether you’re moving to a new domain or switching platforms, you’ll learn how to protect your organic traffic and maintain visibility.
Here are the key takeaways:
- A successful move requires setting a clear timeline and defining the scope to prevent traffic loss.
- You’ll need to record current SEO metrics before moving to accurately measure the migration’s success.
- Using plugins like Duplicator and MonsterInsights simplifies technical tasks and data tracking.
- Implementing 301 redirects and performing post-launch audits are non-negotiable for preserving link equity.
- Notifying Google via Search Console is the final step to ensure fast re-indexing.
Table of Contents
What Is a Site Migration?
A website migration involves moving your entire WordPress website to a different location. Depending on your goals, this could be to a new server, hosting provider, or domain name.
Here are the different types of migrations:
- Domain or Subdomain Update: Changing your website’s primary address (from olddomain.com to newdomain.com) often for rebranding or consolidation.
- Hosting Plan Upgrade: Moving to a new web host or server to support a growing audience or improve performance.
- Site Structure or Design Change: Redesigning or restructuring a website, often by first migrating it to a staging environment to safely implement major changes before pushing them live.
- Content Management System (CMS) Migration: Shifting your website to a new platform or framework (like moving from WordPress.com to WordPress.org) to enhance security, functionality, or performance.
How Can Migrations Impact SEO and Rankings?
A website migration is a significant undertaking that can have both immediate and long-term effects on your Search Engine Optimization (SEO) and search rankings.
Potential Negative Impacts:
- Temporary Organic Traffic Decrease: Google has to re-index your WordPress site, which can lead to a short-term dip in organic traffic.
- Technical Errors: Improper execution can result in critical issues like broken links, 404 errors, missing images, or duplicate content.
- Increased Bounce Rate: Errors lead to a higher bounce rate, signaling poor user experience (UX) to search engines and potentially harming your Search Engine Results Page (SERP) position.
Potential Positive Impacts:
- Improved Site Performance: Migrating to a better web host can dramatically increase site speed and loading times, which are crucial ranking factors.
- Enhanced User Experience (UX): A well-executed site redesign or structural change can significantly improve site navigation, aesthetics, and overall user satisfaction.
- Long-Term SEO Gains: While initial dips may occur, the long-term benefits of improved performance and user experience often lead to higher search rankings and increased organic traffic.
A comprehensive, pre-planned approach is key to minimizing negative impacts and maximizing the SEO benefits of your migration.
What Is SEO Site Migration?
SEO site migration is the process of relocating a website (to a new domain, host, or CMS) while preserving its existing search engine rankings, organic traffic, and established SEO value.
The goal is to transition all SEO equity, minimize disruptions, and ensure continuous high search visibility.
Why Is SEO Migration Important?
SEO migration protects your website’s hard-earned search engine rankings and organic traffic when transferring data to a new domain, hosting provider, or server.
Without a proper SEO migration strategy:
- You risk significant drops in search visibility due to broken links, missing pages, and content indexing issues.
- Valuable backlinks and established authority can be lost.
- User experience can be severely compromised, leading to higher bounce rates.
On the other hand, a well-executed SEO migration ensures continuity and can even enhance your site’s performance post-move.
A successful SEO migration strategy enabled a prominent shopping mall website to not only maintain but increase its organic traffic by 5x post-relocation. This shows you the powerful impact of proper planning!
SEO Migration Checklist: 10 Steps to Protect Your Rankings
Whether you run a blog or an e-commerce store, migrating your content without losing SEO can be tricky. But, you don’t have to be an expert in technical SEO, digital marketing, or web development.
To make the migration process beginner-friendly, I’ve created a website migration checklist.
By following these steps, you’ll quickly transfer your site to another location while keeping its search traffic and conversions!
1. Plan the SEO Migration
Effective planning is the key to any successful SEO migration. This initial phase defines the entire process.
- Define Migration Goals & Scope: Clearly articulate why you’re migrating (e.g., new domain, host, CMS, or staging site work) and precisely what data will be moved.
- Establish a Realistic Timeline: Set achievable deadlines for each phase of the migration.
- Involve Key Stakeholders: Inform all relevant team members (developers, marketing, content creators).
- Choose a Migration Date: Select a period of historically low organic traffic and user engagement. This minimizes potential disruption to your audience and reduces the impact of any unexpected issues.
2. Prepare For Your Specific Migration
The next step will depend on the type of move you’re undertaking. Let’s walk through some common scenarios.
- New Domain Migration: Get your new domain name from a reputable domain registrar or your new hosting provider.
- New Host Migration: Research and select a reliable hosting provider and hosting plan that meets your site’s performance needs.
- Site Structure/Design Change: Create a staging site to safely implement and test major structural or design changes without affecting your live website.
- HTTPS Migration: Acquire and install an SSL certificate from your web host to enable secure HTTPS protocol.
- Platform (CMS) Change: Select your new Content Management System (CMS) and set up the necessary accounts and initial configurations.
3. Record Your Current Benchmarks
Before starting any migration, you should capture a snapshot of your website’s current performance metrics.
This pre-migration data will serve as a benchmark for evaluating the success and impact of your move.
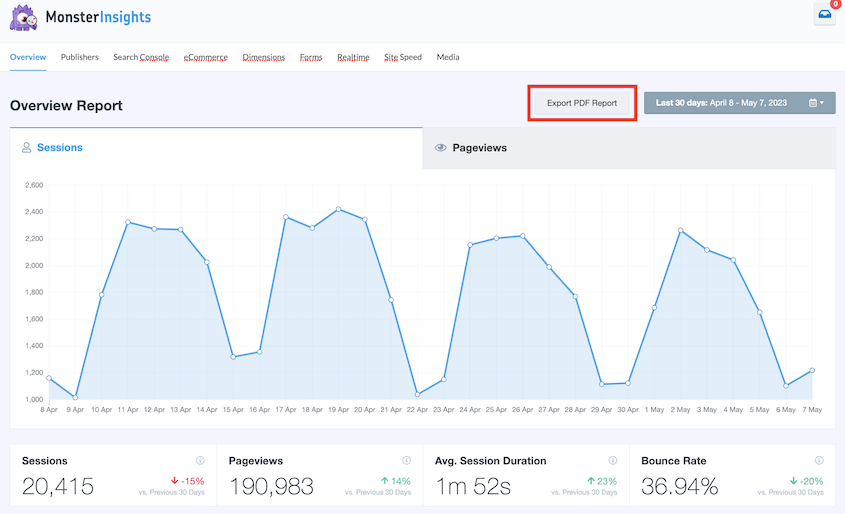
Collect Key SEO Performance Metrics with MonsterInsights
To get real-time analytics for your site, I’d recommend installing MonsterInsights. This plugin seamlessly integrates Google Analytics with your WordPress dashboard.
MonsterInsights makes it easy to monitor the health and visibility of your site. You’ll get detailed reports on key SEO performance indicators like:
- Organic Traffic: Track users, sessions, and pageviews.
- Page Speed: Review Core Web Vitals and overall loading times.
- Keyword Rankings: Use the Search Console tab to identify your top-ranking pages and keyword positions.
To save these insights, simply hit Export PDF Report within MonsterInsights. This ensures your pre- and post-migration SEO performance is documented and easy to compare.
Plan Your Redirects: Before migrating, carefully map all existing URLs to their new destinations. This step will help you set up 301 redirects, avoid 404 errors, and preserve your site’s SEO value and link equity.
4. Create a Copy (Backup) of Your Site
A full backup of your WordPress site serves two purposes: It’s the source file for your migration, but it also creates a safety net for recovery
You could manually download your files and database, but this is a complicated process. There are many ways to accidentally break your site, so a better option is to use a WordPress backup and migration plugin.
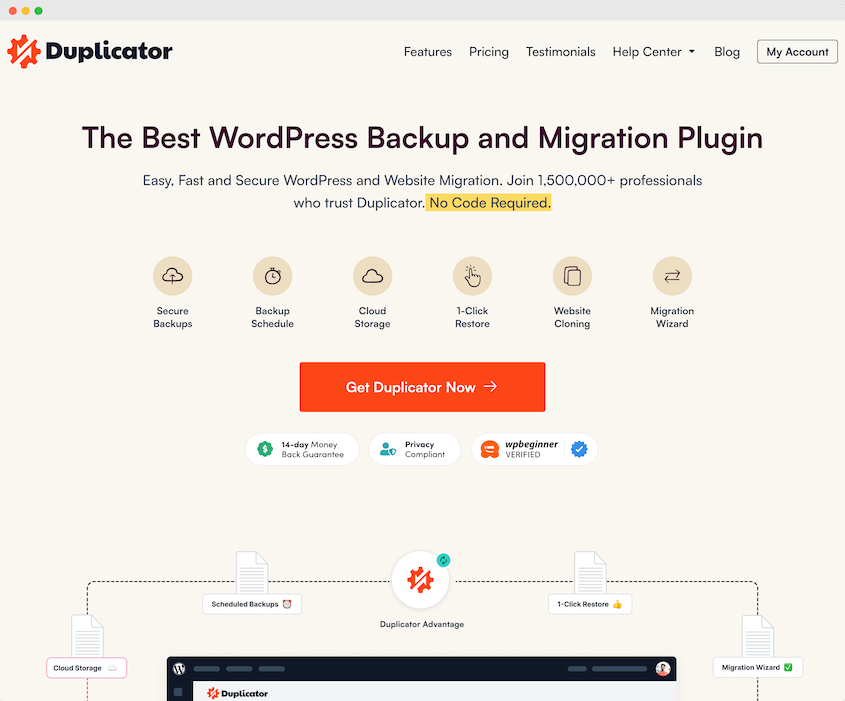
Duplicator is my favorite tool for backing up and migrating WordPress websites. It bundles your WordPress files and database into a single zip file in just a few minutes. Then, Duplicator allows you to simply drag and drop this backup into a new site.
Duplicator Pro’s Key Features:
- Manual and automatic backups
- 1-click backup restoration
- Support for cloud backup storage locations
- Drag-and-drop migrations
- Step-by-step WordPress migration wizard
- Built-in custom search and replace functionality.
- Compatibility with Multisite networks and large websites.
- Duplicator Cloud storage (up to 150GB)
- Free WP Media Cleanup plugin with Elite
Quick Summary: How to Safely Back Up Your Site With Duplicator
- Install and activate Duplicator Pro.
- Create a new backup.
- Name the backup and select the storage location.
- Exclude unnecessary files to keep the backup lean.
- Scan the site and download the full backup archive.
To get started, select a subscription for Duplicator Pro. You could choose the free version, but a premium plan supports drag-and-drop migrations. This makes it much easier to migrate your website without harming SEO.
After your purchase, open your WordPress dashboard and install Duplicator.
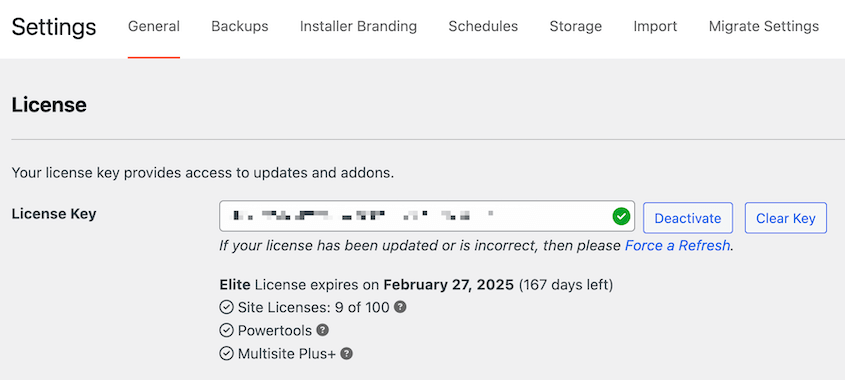
Then, find Settings » General. Paste your license key and hit Activate.
On your website, there are many different plugins, themes, media files, and database tables. Instead of moving all of this data separately, you can combine them into a single zip file.
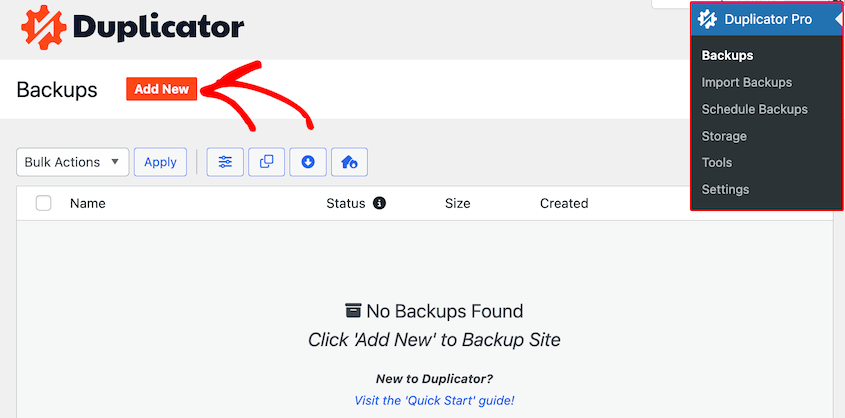
First, head over to Duplicator Pro » Backups » Add New.
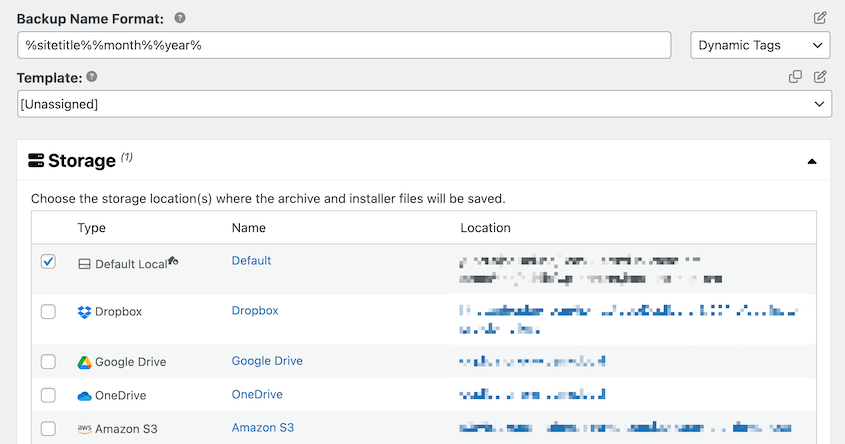
Name the backup. Although Duplicator supports many cloud storage locations, save the backup to your local server.
A typical migration will move all of your site’s files and database information to the new location. However, you might want to clean up your website by only migrating necessary data.
For example, you can choose to only back up active plugins and active themes. By excluding inactive tools, you’ll remove anything you don’t normally use.
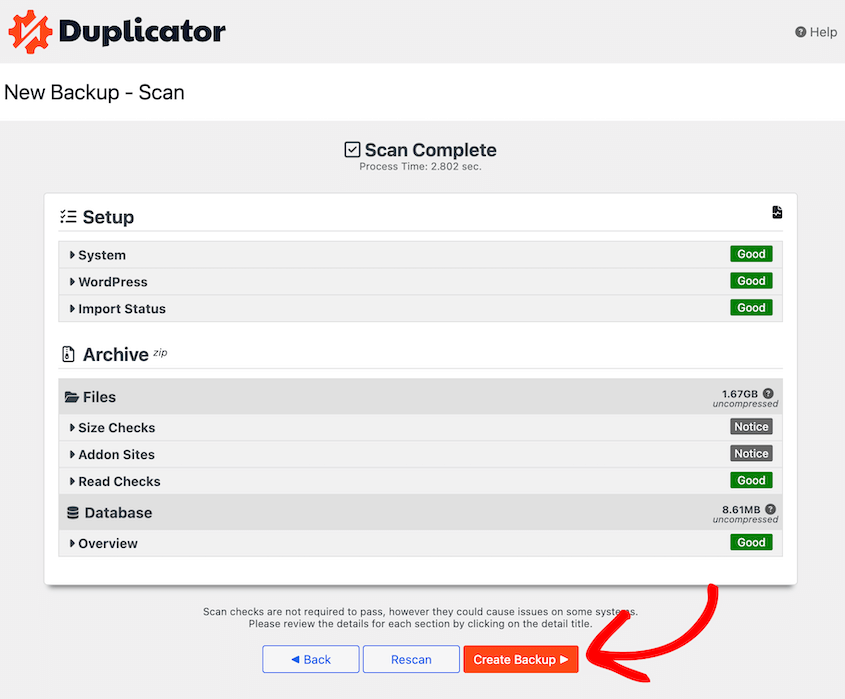
After hitting Next, Duplicator will scan your entire site for any issues. This ensures that the migration will run smoothly.
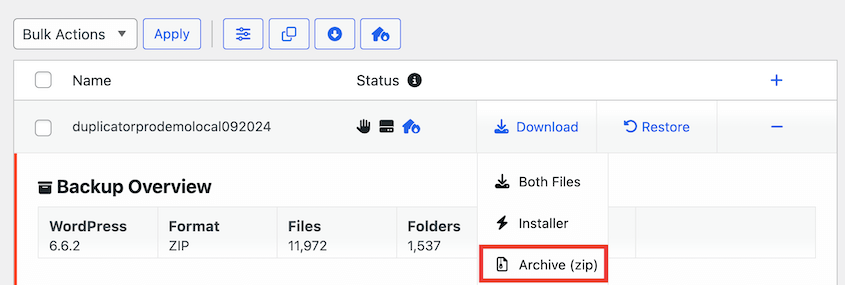
Once you finish building the backup, you’ll need to download it. Open the Backups page again and find the one you just created.
Select Download » Archive.
You’ll only need the installer file if you’re uploading the backup directly to a File Manager or FTP client. As a Duplicator Pro user, however, you can simply drop this archive file into a new WordPress installation.
Now you have a backup of your WordPress site that you can restore if you need to. This full copy also is the first step in the SEO migration!
5. Update Your Hosts File For Zero Downtime
Minimizing downtime during an SEO migration keeps your site accessible to both users and search engine crawlers, preventing any negative impact on your rankings.
For a zero-downtime migration, you can add an entry to your computer’s hosts file. Essentially, this file maps your hostnames to IP addresses.
What is a Hosts File?
A hosts file is a local computer file that maps hostnames (like www.yourdomain.com) to their corresponding Internet Protocol (IP) addresses. By modifying it, you can direct your computer to the new server before DNS changes propagate globally.
Here’s How to Update Your Hosts File in 4 Easy Steps:
1. Find Your New Host’s IP Address
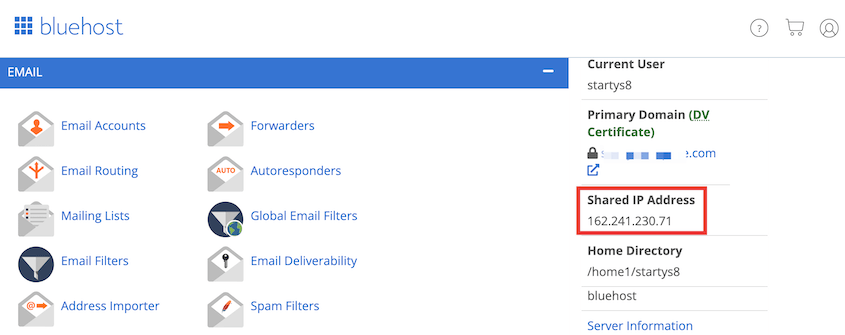
First, locate the IP address for your new hosting provider. This will vary based on your web host, but Bluehost users can find it under General Information.
2. Open Your Hosts File
Next, open your hosts file. On a Mac, you can use Terminal to run this command:
sudo nano /private/etc/hosts
3. Add a New Hosts Entry
Go to the bottom of the file and add a new entry with your new IP address and your old domain name, like this:
192.168.1.22 www.example.com
4. Save and Remove After Migration
Finally, save the file. Remember, this entry should only remain while you’re migrating your site. Delete it once the migration is complete.
Block Early Indexing: You don’t want your new site indexed until the migration is finished. To block search engine crawlers, create a robots.txt file and add noindex attributes. You could do this manually, but SEO plugins like AIOSEO come with a built-in robots.txt editor.
6. Create a New Database
A fresh database is essential on your new hosting server to house your WordPress website’s content and settings.
If you haven’t already, you’ll need to create a new database on the server you’re migrating to. You can usually do this in your hosting dashboard.
Here’s how to create a new database step-by-step before migrating your WordPress site:
1. Create a New Database
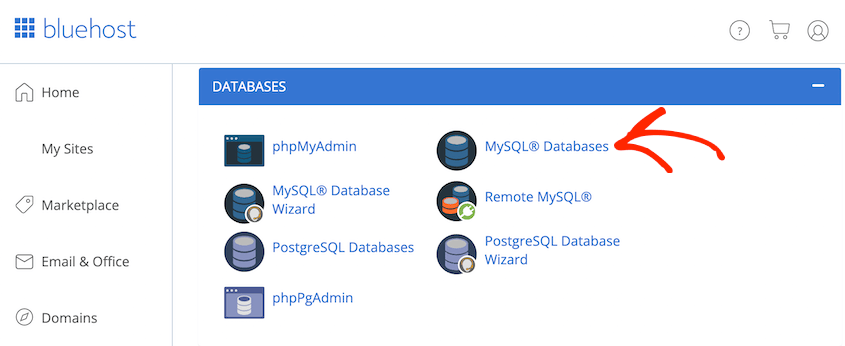
If you haven’t already, create a new database on your new server. This is typically done through your hosting dashboard. For example, Bluehost users can find this option under MySQL Databases.
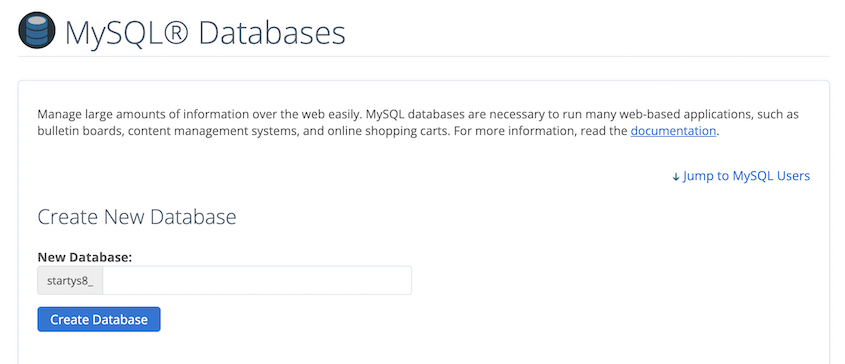
2. Name Your Database
Enter a name for your new database and click Create Database to set it up.
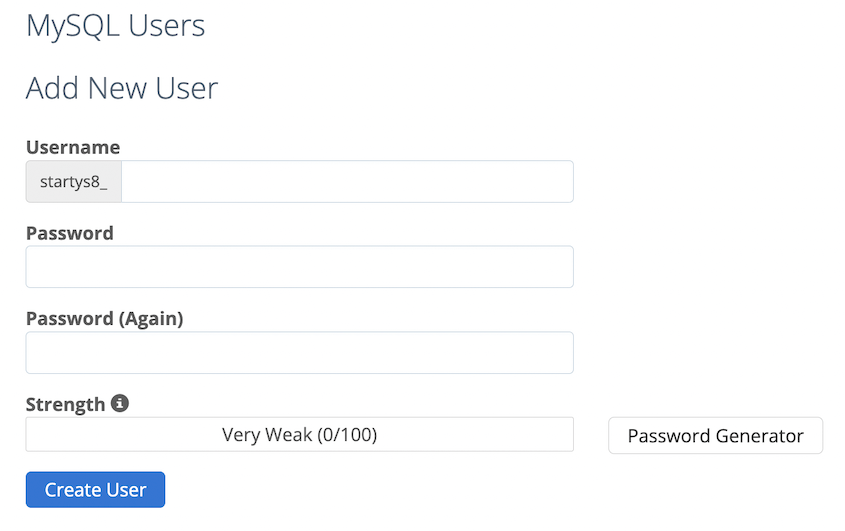
3. Create a New Database User
Next, locate the MySQL Users section and create a username and password for a new database user.
4. Assign User to Database
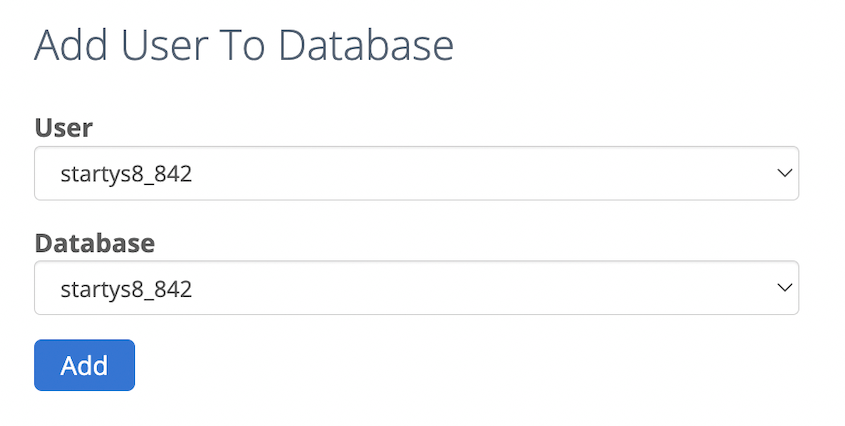
Finally, add the new user to your newly created database and grant all permissions.
Once these steps are complete, you’re ready to migrate your site!
7. Import Your Website
With your new database ready, it’s time to import your website’s content. Duplicator Pro streamlines this process significantly.
Quick Summary: How to Import Your WordPress Website With Duplicator
- Install Duplicator on your new site to prepare for the import.
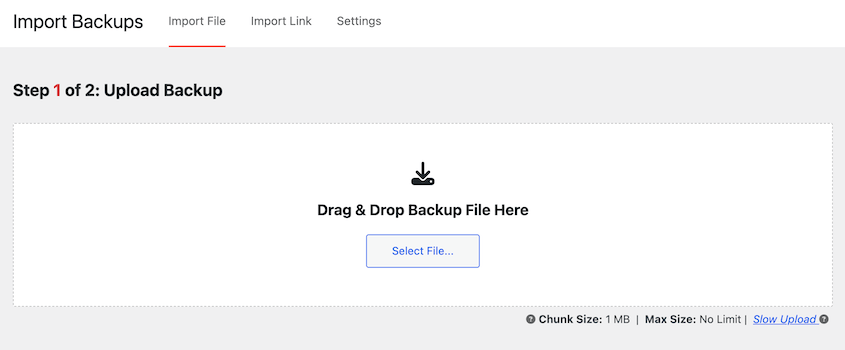
- Upload your backup file to the Import Backups page.
- Connect to the new database to complete the site setup.
- Update URLs if needed using the search and replace feature.
- Finalize the migration and log in to your new dashboard.
To import your old website into the new server, install Duplicator on the second site. Then, open the Import Backups page.
Drop the backup file that you downloaded earlier into this import box. Once it’s ready to install, click on Continue.
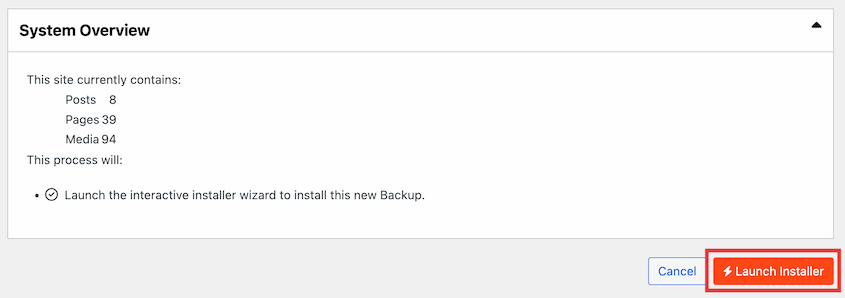
You’ll need to hit Launch Installer to confirm that you want to replace everything on the current site.
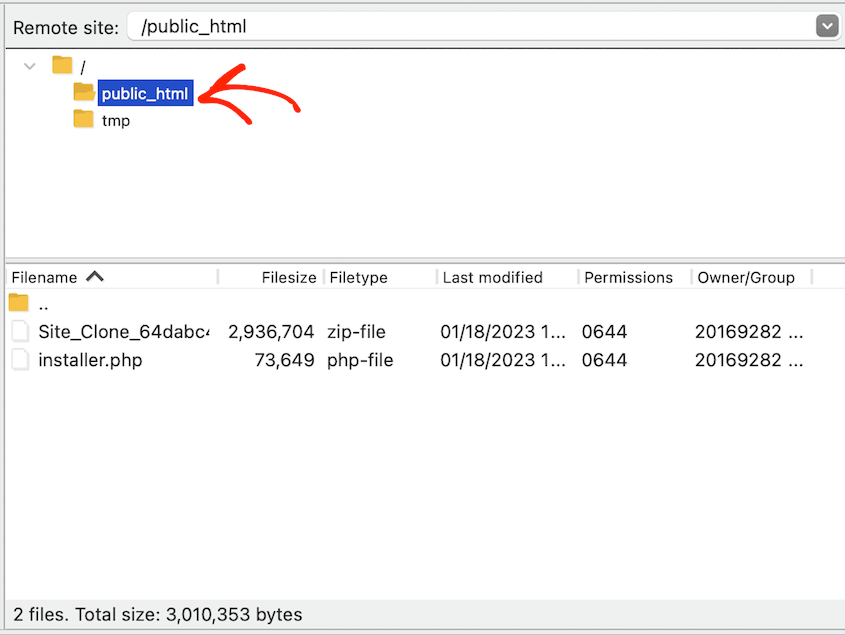
If you don’t want to install WordPress, you can upload the archive and installer files directly to the new server.
To launch the installer, all you’ll need to do is visit this URL: https://your-domain/installer.php
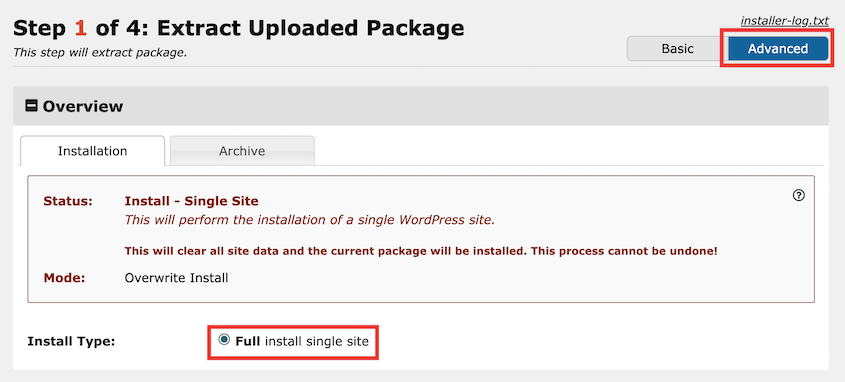
Before continuing with the installation, click on the Advanced option at the top of the page. Make sure the install type is Full install single site.
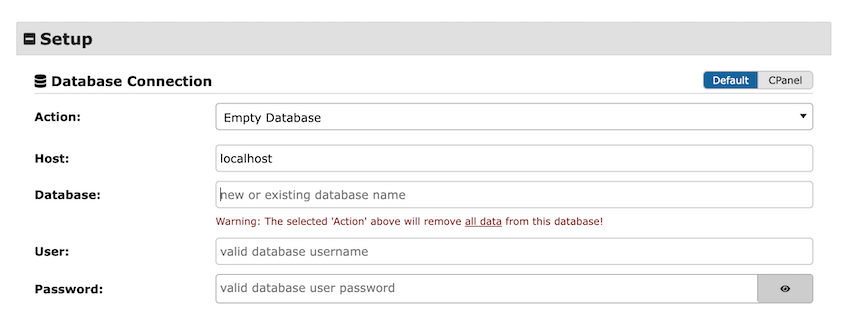
Under Setup, fill out the information for the new database.
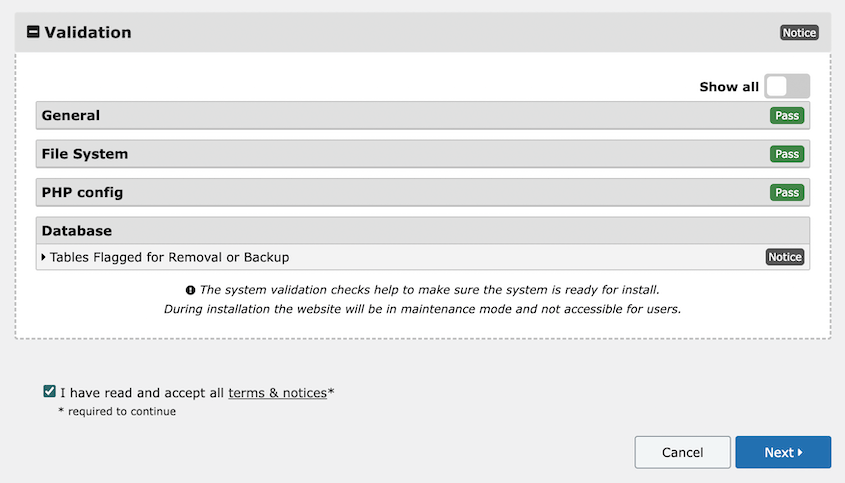
Then, click Validate. Accept the terms and notices and hit Next.
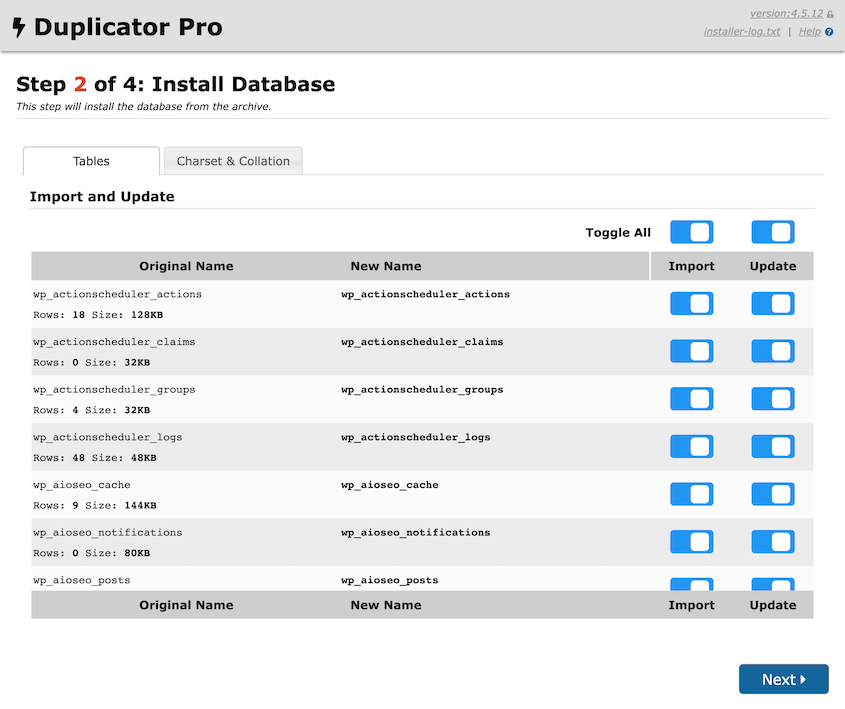
With the advanced view, you can customize which database tables are installed.
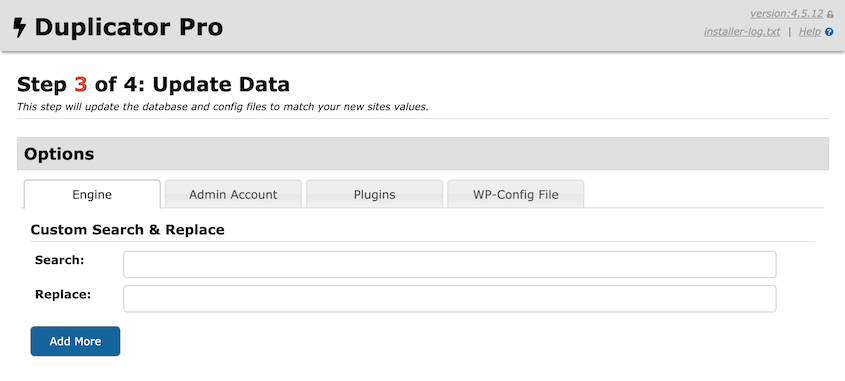
The next step is important if you’re migrating to a new domain name. Duplicator has a built-in search and replace feature, so you can enter your old URL in the Search box and the new URL in the Replace box.
This will replace any mention of your old domain with the new one. You won’t have to manually perform a search and replace function on your database.
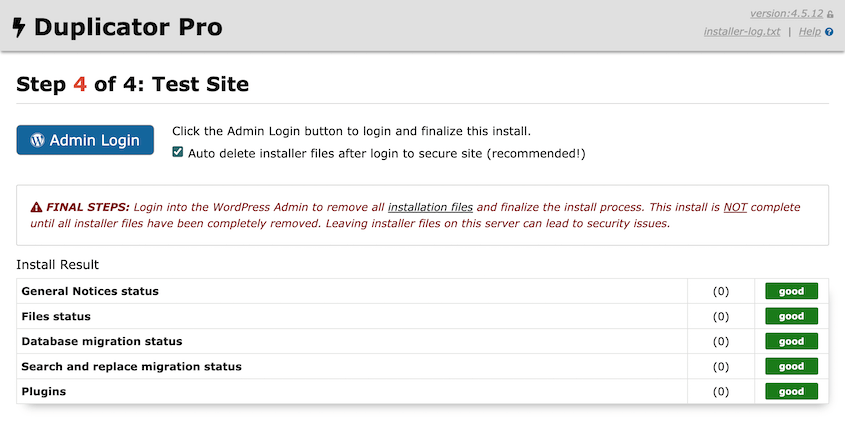
After this, your site will be migrated! Use the Admin Login button to sign into your new dashboard.
Post-Migration Check: To make sure your site migrated correctly, look over its functionality on the front end. In this post-migration check, make sure there are no broken links or duplicate content.
8. Implement 301 Redirects for Old URLs
Redirecting old URLs is is one of the most important steps to preserve SEO during a migration. 301 redirects signal to search engines that a page has permanently moved, transferring its link equity and authority to the new URL.
Use a Reliable Redirect Manager:
While manual .htaccess redirects are possible, a redirect plugin simplifies the process.
All-in-One SEO is a WordPress SEO plugin that allows you to manage your site’s SEO without an expert. Along with on-page SEO analysis and SEO audit checklists, AIOSEO comes with a Redirection Manager.
Using the Redirection Manager, you can perform an SEO-friendly full site redirect. This will ensure that any backlinks or internal links redirect properly after a migration.
Here’s how to do it in 3 easy steps:
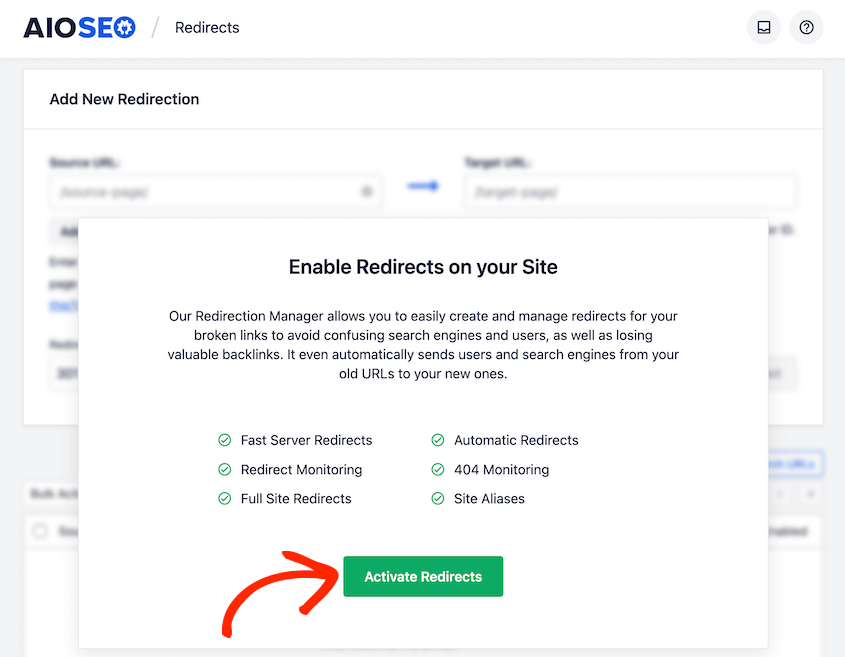
1. Activate the Redirect Manager
Once you install AIOSEO, go to the Redirects page and activate it.
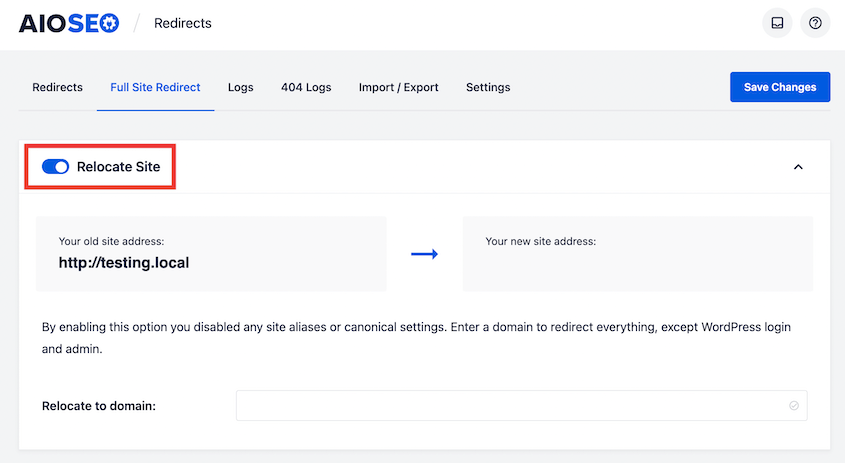
2. Enable a Full Site Redirect
Next, find the Full Site Redirect tab and turn on the Relocate site setting.
3. Set a Destination URL
Enter your new site address and click Save Changes to complete the redirect.
After your new site is live and redirects are set up, a thorough SEO audit will identify and fix any issues that may have emerged during the migration.
Use an SEO Audit Tool: Tools like AIOSEO will fully scan your website for any new issues that might’ve popped up after the migration.
Key SEO Audit Focus Areas:
- Crawlability & Indexability: Ensure all intended pages are crawlable and indexable by search engines.
- Broken Links: Double-check for any internal or external broken links that might have been missed.
- Duplicate Content: Verify that no duplicate content issues have emerged between the old and new sites.
- Canonical Tags: Confirm canonical tags are correctly pointing to the preferred (new) versions of pages.
- Meta Data: Review all titles, meta descriptions, and headings for accuracy and SEO effectiveness.
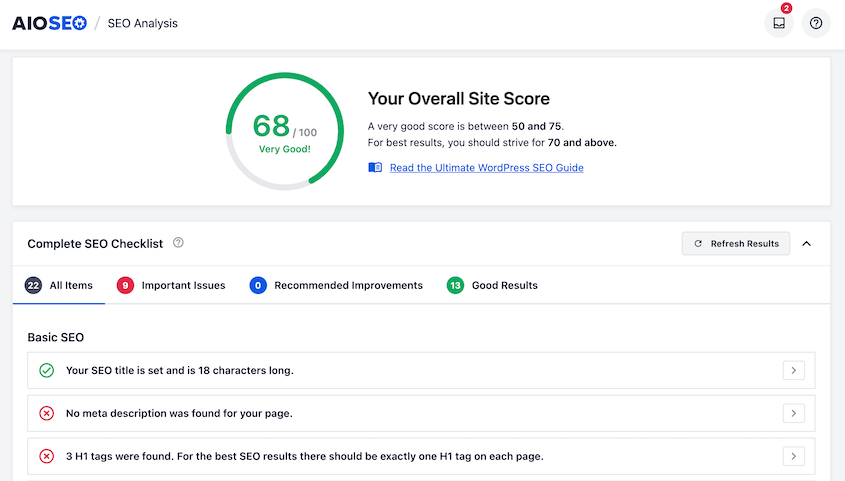
How To Perform an SEO Audit on Your Site With AIOSEO:
1. Access SEO Analysis
In your dashboard, go to All in One SEO » SEO Analysis. Here, your site is scored based on how its SEO is set up.
2. Review and Fix SEO Issues
Go through the SEO checklist. Fix the important issues first, then continue to AIOSEO’s recommendations.
3. Enable XML Sitemap
Find the Sitemaps page. Enable the sitemap on your newly moved site.
4. Submit Sitemap to Google Search Console
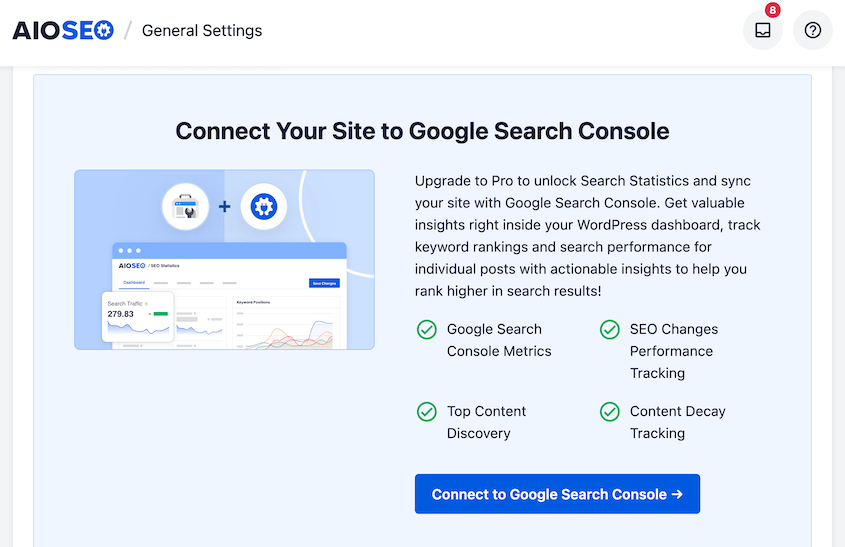
An XML sitemap is crucial for efficient indexing. Use AIOSEO’s Sitemaps page to enable your sitemap, then connect your Google Search Console account to automatically submit it.
This notifies Google of all important pages on your new site, helping with timely re-indexing after migration.
Once you’re finished, you’ll have a fully optimized site for search engines!
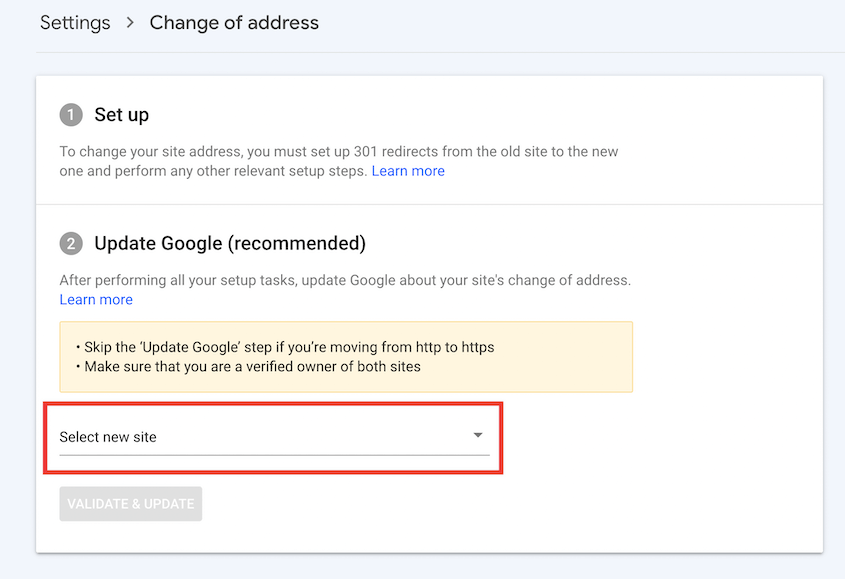
Notifying Google of your site migration helps ensure fast, accurate re-indexing and protects your existing search visibility.
Here’s how to add your new domain as a separate property in Google Search Console (GSC) and verify its ownership:
1. Add New Domain Property
Open Google Search Console and add your new domain as a property.
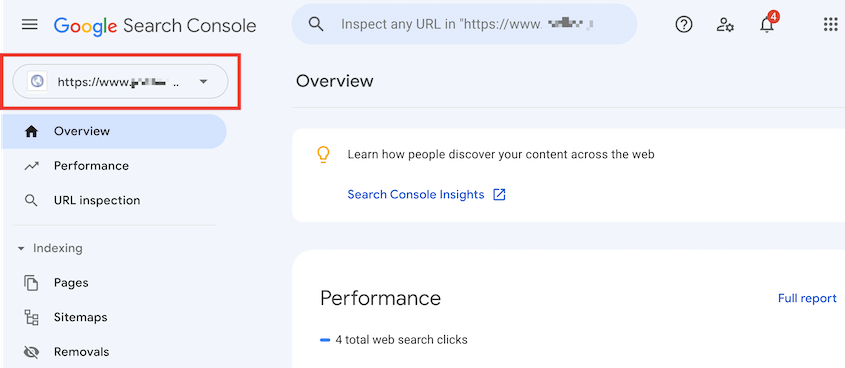
2. Select Old Domain Property
In the Console, choose the property for your old domain, the one you’re migrating from.
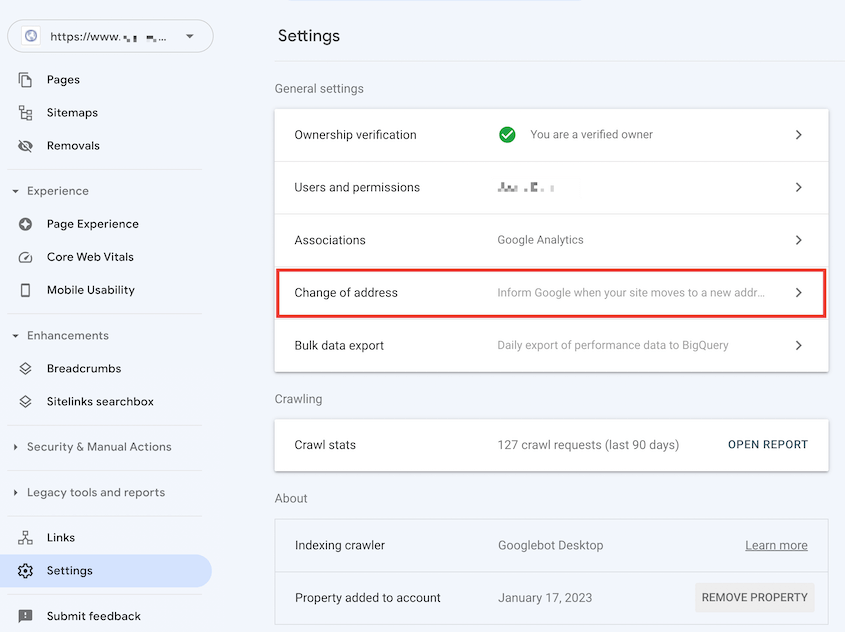
3. Initiate Change of Address
Go to Settings » Change of address to begin the migration process.
4. Validate and Confirm Migration
Select your new domain, click Validate & Update, and Google will begin transferring SEO signals to the new site.
Now that you’ve redirected your site and informed Google about the migration, all of your new pages will eventually have the same organic traffic as the old ones!
Key Takeaways: SEO Migration Checklist
1. Plan Ahead: Define migration goals and timelines. Choose optimal periods to minimize traffic disruption.
2. Preparation is Key: Customize your actions based on the type of migration: domain, host, or CMS changes require specific preparations.
3. Benchmark Current Performance: Use tools like MonsterInsights to document current site metrics, ensuring you can measure post-migration success.
4. Back Up Your Site: Use reliable tools like Duplicator to securely back up your entire site for easy restoration if needed.
5. Manage DNS Changes: Update your computer’s hosts file to prevent downtime.
6. Set Up New Infrastructure: Establish a new database ready for migration using tools like cPanel.
7. Migrate Content Efficiently: Use a plugin like Duplicator for easy site transfers with minimal risk of data loss.
8. Ensure Proper Redirection: Install SEO tools like AIOSEO to redirect old URLs to new ones, preserving link equity.
9. Conduct a Post-Migration SEO Audit: Analyze your site with AIOSEO to catch and correct any SEO issues caused by migration.
10. Inform Search Engines: Notify Google of your changes via Search Console to ensure your site gets indexed correctly.
Post-Migration Tips
To maintain strong SEO performance and a smooth user experience after migration, be sure to implement these additional best practices:
- Notify Other Search Engines: Utilize Bing Webmaster Tools’ Site Move tool to inform Bing about your domain change, preserving visibility in Bing searches.
- Update Local Business Listings: Revise your business information on Google My Business and Bing Places to reflect your new domain and any address changes.
- Verify Marketing Campaigns: Update all ad campaigns and social media profiles to point to the correct, new landing pages.
- Create Custom 404 Pages: Create an engaging, custom 404 error page that guides users back to relevant content or your homepage, reducing bounce rates.
- Content & Meta Data Review: Check all site content, headings, titles, and meta descriptions for any errors or outdated information post-migration.
- Canonical Tag Verification: Confirm that all canonical tags are correctly configured on your new site and return a 200 HTTP status code, indicating proper indexing.
- Schema Markup Review: If Schema markup (product, review, and FAQ schema) did not migrate correctly, manually copy and paste the necessary HTML or JavaScript into your new site’s files.
- Monitor Site Speed: Assess your new site’s loading speed with Core Web Vitals to ensure performance improvements.
- Track Keyword Rankings: Continuously monitor keyword performance using tools like Semrush to track any fluctuations or gains.
- Cancel Old Hosting: Once confident in the new site’s stability and performance, cancel your previous hosting account.
- Update Backlinks: Proactively reach out to key websites linking to your old domain and request they update their backlinks to your new URLs.
Frequently Asked Questions (FAQs)
Why is SEO important in a website migration?
SEO is important in a website migration because it helps maintain your website’s search engine rankings and organic traffic. Properly executed SEO strategies ensure that search engines understand your new site, minimizing the risk of losing visibility and authority.
Alternative: Screaming Frog is an SEO agency that can help you crawl your site before and after migrations. You can also use Semrush to track your visibility and keyword ranking.
Does redesigning a website hurt SEO?
Redesigning a website can boost SEO if you optimize navigation and improve User Experience (UX). However, be sure to test the new design on a staging site first. Then, move it to production using Duplicator Pro. Lastly, perform a post-launch audit to make sure everything is working correctly.
What is needed for a site migration?
All you need for a site migration is a WordPress migration plugin like Duplicator Pro. Using Duplicator, you can back up your site into a moveable zip file. Then, simply drag and drop this file into the new server!
Ensure Your Next Website Migration is SEO-Friendly
Executing an SEO site migration effectively will help you maintain and even improve your website’s search engine performance.
Here’s what makes for a smooth, SEO-safe website migration:
- Plan carefully: Define your migration goals and timeline. Involve the right people from the start.
- Benchmark your SEO: Back up your data and track current performance.
- Use the right tools: Duplicator Pro makes migrations simple. All in One SEO helps preserve your rankings.
- Audit thoroughly post-migration: Check for broken links, indexation issues, and redirect errors.
By following this checklist, you’ll minimize risk, protect your traffic, and set your site up for long-term SEO success.
While you’re here, you may also like these other WordPress guides:
Are you ready to move to a new web host? Try out Duplicator Pro to smoothly transfer your data without affecting SEO!
Joella is a writer with years of experience in WordPress. At Duplicator, she specializes in site maintenance — from basic backups to large-scale migrations. Her ultimate goal is to make sure your WordPress website is safe and ready for growth.


