Do you want to completely change the domain name for your website?
It’s a powerful move that can rebrand your site and breathe new life into your online presence. But it’s also daunting.
You’ll need to move your data to the new URL. Redirects need to be in place to transition the old domain to the new one.
Fortunately, it’s an easy process. You can update your domain name without losing content, tanking your SEO, or worse — disappearing from the internet!
In this post, I’ll walk you through migrating your WordPress site to a new domain name.
Here are the key takeaways:
- Use a migration plugin like Duplicator Pro to avoid manual file transfers and reduce the risk of breaking your site
- Create a complete backup before starting—this includes all site files, database, themes, plugins, and uploads
- Set up 301 redirects from your old domain to prevent broken links and preserve your SEO rankings
- Update Google Search Console with your domain change to maintain search visibility and indexing
- Expect temporary traffic dips after migration, but proper redirects and search engine notifications minimize the impact
- Check for broken links and test all site functionality after the migration to ensure everything works correctly
Quick Summary: How to Migrate a WordPress Site to a New Domain
1. Back up the original site.
Duplicator can back up your entire website into a single zip file. This makes it easy to transfer your original content to the new domain name. After you build a backup, download it.
2. Create a database for the new site.
If your web host hasn’t already created a database for the new domain, you’ll need to. cPanel offers an easy way to do this.
3. Import your original content.
Drag and drop the original backup into the new site. Duplicator will walk you through the installation process, including replacing the old domain with the new one.
4. Ensure your new domain can be accessed.
To make sure visitors find the right content, add 301 redirects to the new domain name. You’ll also need to inform Google about the domain change.
Table of Contents
Why Migrate Your Site to a New Domain?
If it’s been years since you first launched your site, it might be time for a change.
One easy way to rebrand your content is by moving to a new domain name. You’ll have a completely different address for your WordPress website.
Here’s why you may need a new domain name:
- A better domain name has become available.
- You want to have a Top-Level Domain (TLD) instead of a free domain or subdomain.
- You just acquired ownership of a website.
- Your current domain name needs to be more readable or memorable.
- You want to rebrand your business.
Whatever the reason, you’ll want to find an easy (and safe) way to move your old content. This way, you can quickly update your domain without losing your current audience.
Our content wasn’t always at duplicator.com! When we rebranded, we moved to a new and improved domain name. In this tutorial, I’ll show you some of the techniques we used (so you can do the same).
How Does Domain Migration Affect SEO?
Before you decide to change your domain name, it’s important to consider Search Engine Optimization (SEO). Currently, search engines have crawled your website for a specific domain. When you change it, this can temporarily decrease your rankings.
After you migrate your WordPress site to a new domain, you’ll probably have lower organic traffic. However, there are ways you can minimize this impact.
Throughout this post, I’ll show you how to migrate to a new domain while considering your SEO.
Here are some steps to take during the process:
- Redirect old URLs using 301 redirects
- Notify search engines about the domain change
This might seem complicated, but I’ll walk you through every step along the way. When you migrate your site the right way, you’ll keep your traffic as consistent as possible.
How to Migrate a WordPress Site to a New Domain
Before you get started, you’ll need to purchase a new domain name. You can do this through a domain registrar, your current web hosting provider, or a new host.
Then, make sure you can access the WordPress dashboard for both your original and new sites. After you find your credentials from your hosting provider, log in by searching for yourdomain.com/wp-admin/.
Now that you’re set up, here’s an overview of the domain migration process:
- Install a WordPress Migration Plugin: Set up Duplicator Pro for easy drag-and-drop migrations
- Back Up Your Original Website: Create a complete backup of your site files and database
- Create a Database for the New Site: Set up a MySQL database for your new domain
- Import Your Website into the New Domain: Use Duplicator to transfer your content automatically
- Add 301 Redirects: Set up permanent redirects to preserve SEO and user experience
- Clean Up Your New Website: Check for broken links and ensure everything functions properly
- Inform Google About Your Domain Change: Update Google Search Console to maintain search rankings
Step 1: Install a WordPress Migration Plugin
As a beginner, you might not want to migrate your WordPress site manually. During this process, you’ll have to be familiar with editing your site files.
To avoid accidentally breaking your website, consider installing a migration plugin instead.
My favorite WordPress plugin for migrations is Duplicator. With this tool, you can quickly back up your current website files and database into a moveable zip file.
You won’t have to download all of your current site data manually.
Plus, Duplicator Pro comes with drag-and-drop functionality. After you build a backup of your current website, you can simply drop it into the site with your new domain.
Ergo Creative is a creative agency that uses Duplicator to migrate clients’ large sites in under 20 minutes. See how they do it!
To get started, select a subscription for Duplicator. There is a free version of the plugin, but Duplicator Pro’s drag-and-drop migrations make it much easier to move your site.
After you check out, open the WordPress dashboard for your old site. Then, install and activate the Duplicator plugin.
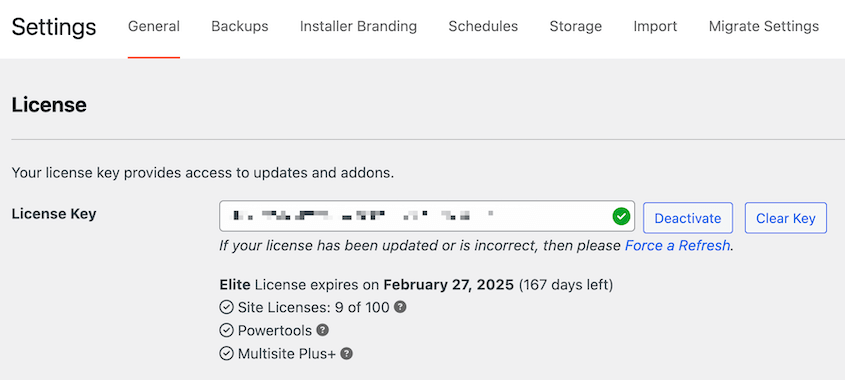
Lastly, you’ll need to activate the license key that you received with your purchase. To do this, go to Duplicator Pro » Settings » General.
Paste your license key. Once you click Activate, you can start using Duplicator!
Step 2: Back Up Your Original Website
Before migrating your website, you’ll need to create a backup just in case anything goes wrong.
Fortunately, Duplicator is also a backup plugin. You can use it to easily back up your site files and database into a single zip file.
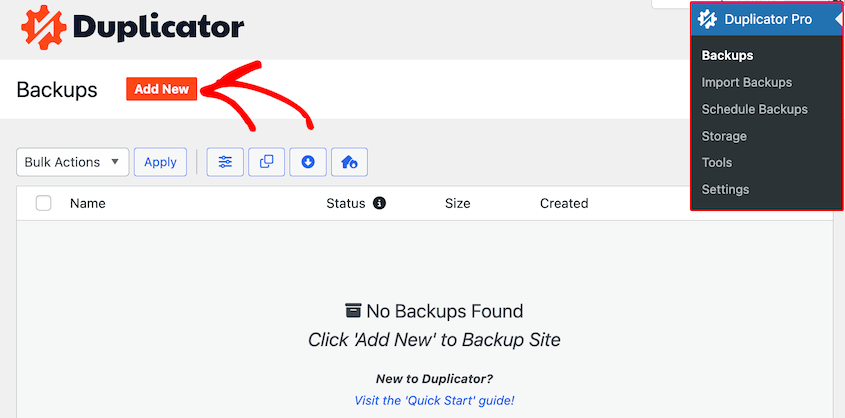
Find Duplicator Pro » Backups » Add New.
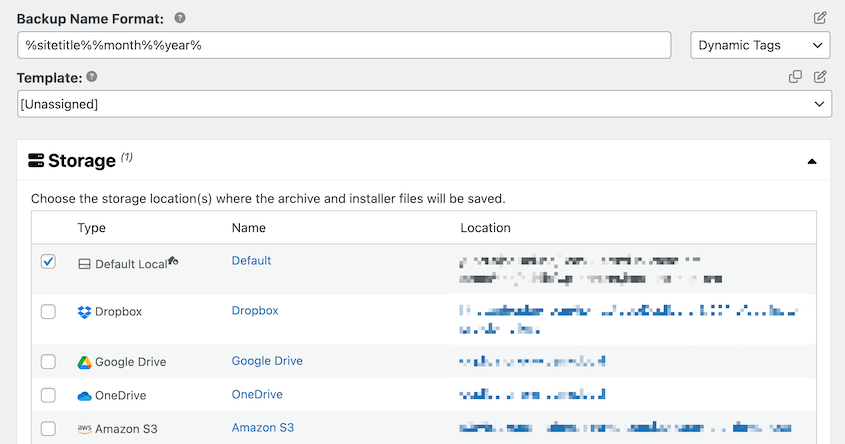
Give your backup a name and select the local storage location.
In the Backup section, choose Full Site.
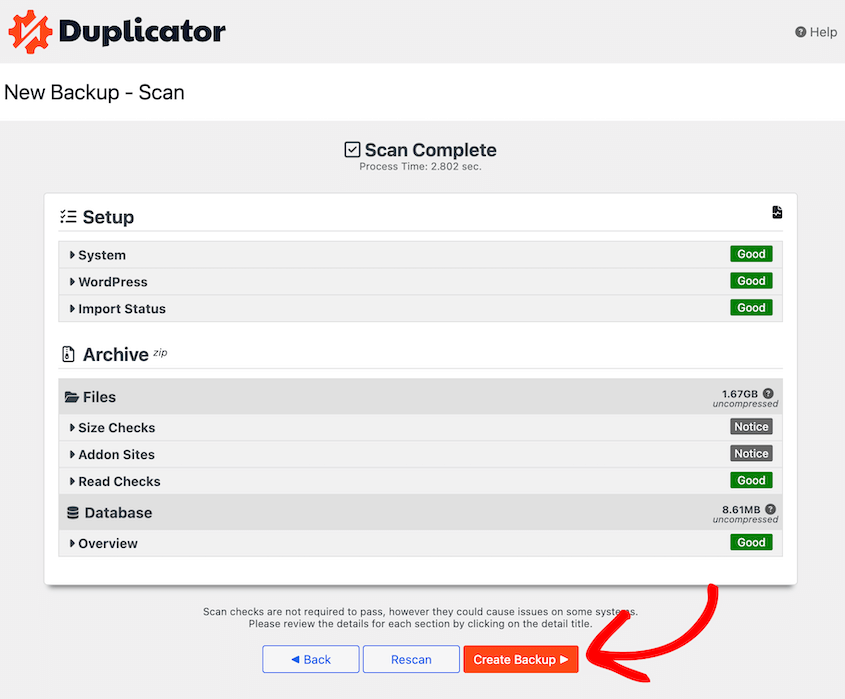
On the next screen, Duplicator will automatically check your website for any issues. Be sure to review these notices before clicking Create Backup.
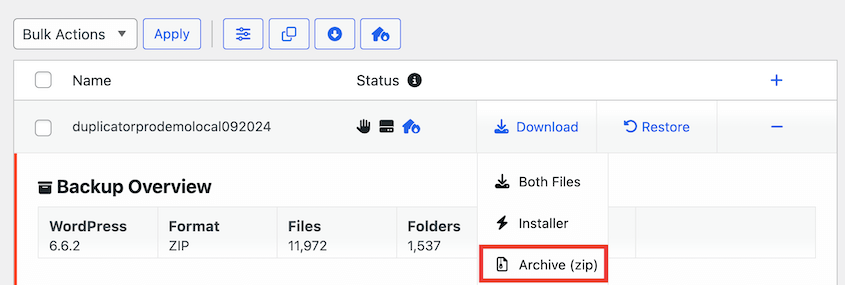
The plugin will then back up all of your website’s data. Next to the backup you just built, select Download » Archive.
This will download your backup’s archive file to your local computer. The archive will contain all your files, including your WordPress themes, plugins, uploads, permalink settings, and other custom data.
If you’re using Duplicator Lite, you also need to download the installer file. You can upload both the archive and installer files to the root directory of the new site, then visit https://your-domain/installer.php to start the migration.
However, Duplicator Pro allows you to simply drag and drop the archive file into your new website.
Step 3: Create a Database for the New Site
For the next step, you’ll need to create a new MySQL database. This is the database where you’ll upload your original WordPress files.
If you already created a new WordPress database for your new domain, skip this step!
Log into the control panel for your hosting account. Keep in mind that creating a new database might look different depending on your host.
In this tutorial, I’ll be using Bluehost.
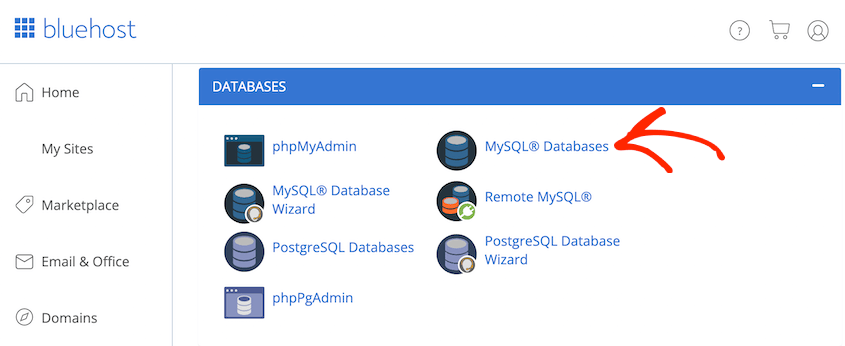
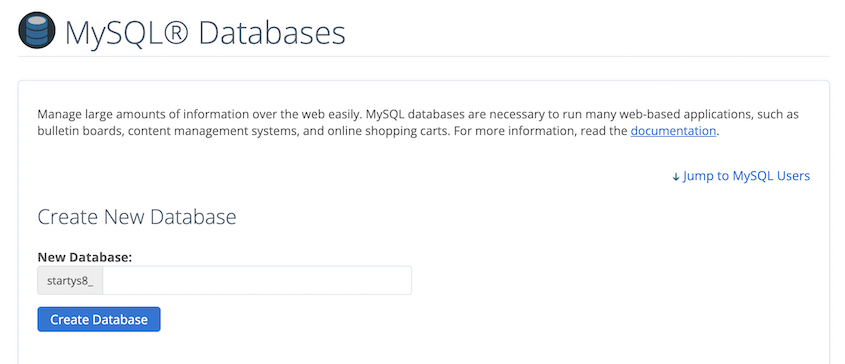
Once you log in, find your cPanel dashboard. Here, you should see a Databases section. To continue, open MySQL Databases.
Create a database by giving it a name.
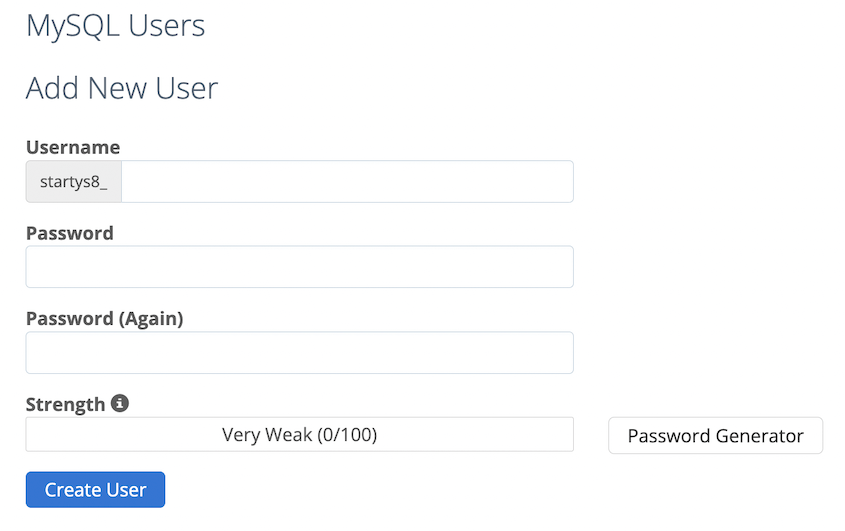
You’ll also need to add a new user to the database. Under MySQL users, assign a unique username and password to the database user.
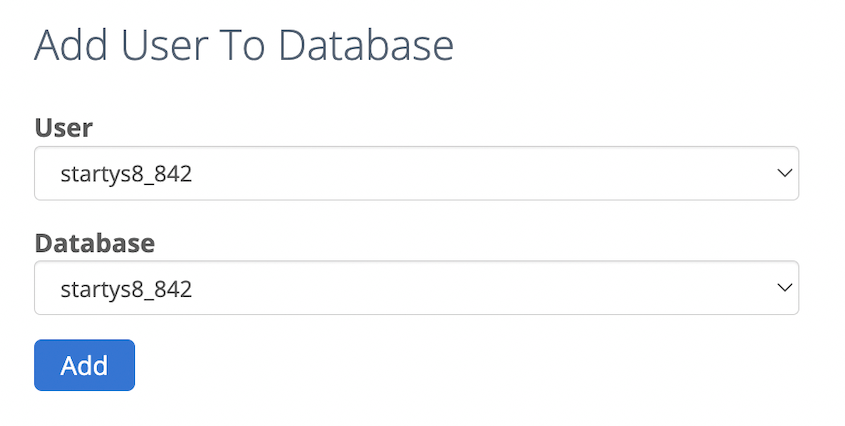
Lastly, find the Add User to Database settings. From the dropdown menu, select the user and database you just created.
Step 4: Import Your Website into the New Domain
To import your original website into the new domain, you might think you have to upload the files using an FTP client. Duplicator Pro simplifies this process.
Find your WordPress login credentials for your new domain and sign into your dashboard. Like with your original site, install and activate Duplicator Pro.
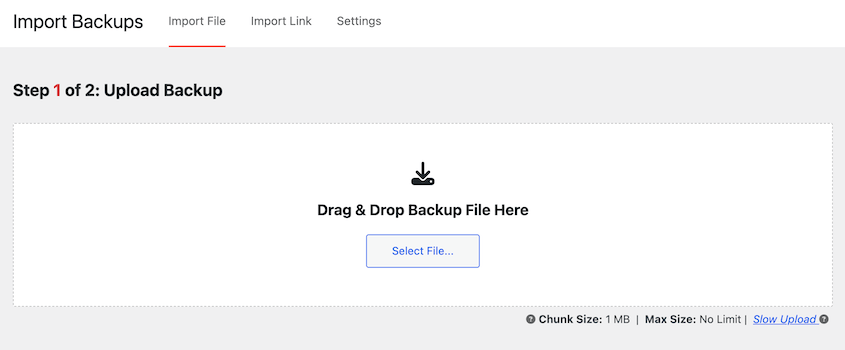
On the second WordPress installation, go to Duplicator Pro » Import Backups. Here, drag and drop your original archive file into the upload box.
Duplicator will tell you that the backup is ready to install. Hit Continue.
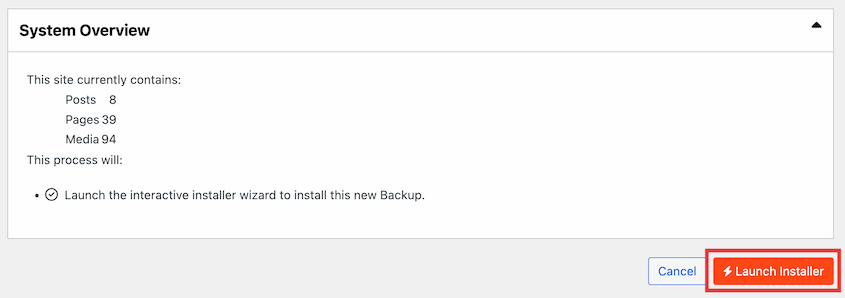
Next, click on Launch Installer.
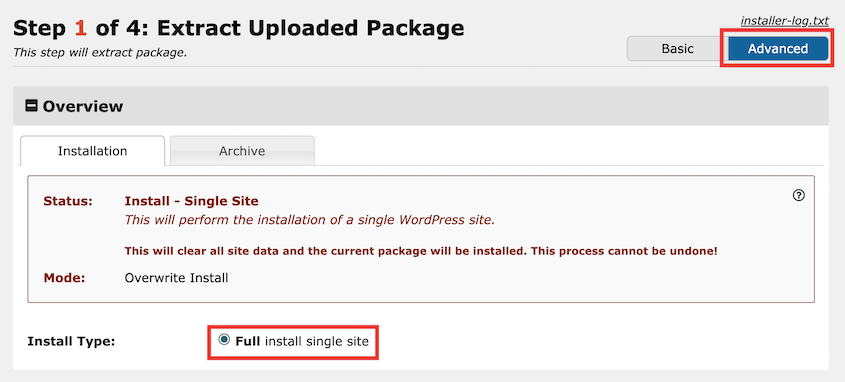
At this point, you’ll see the Duplicator installer wizard. For the Install Type, select Full install single site. In the top-right corner, choose the Advanced view.
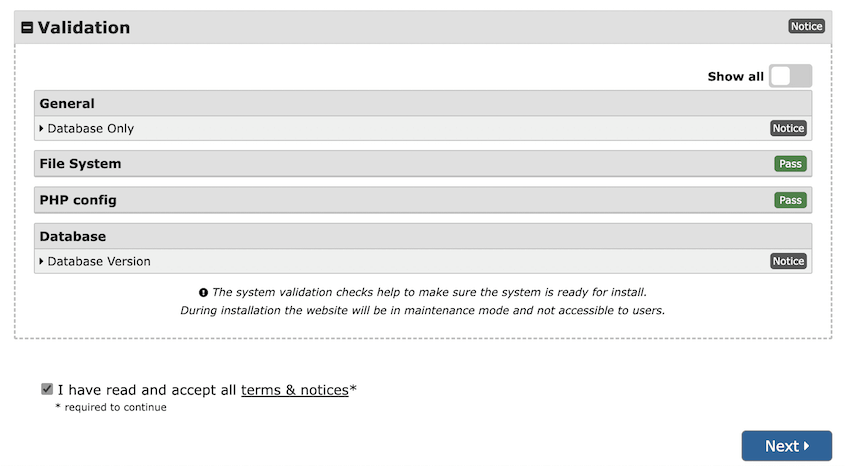
Under Setup, enter your new database name and credentials. Then, hit Validate.
Duplicator will check the installation and give you notices for any issues. To continue, select the terms and notices checkbox and click Next.
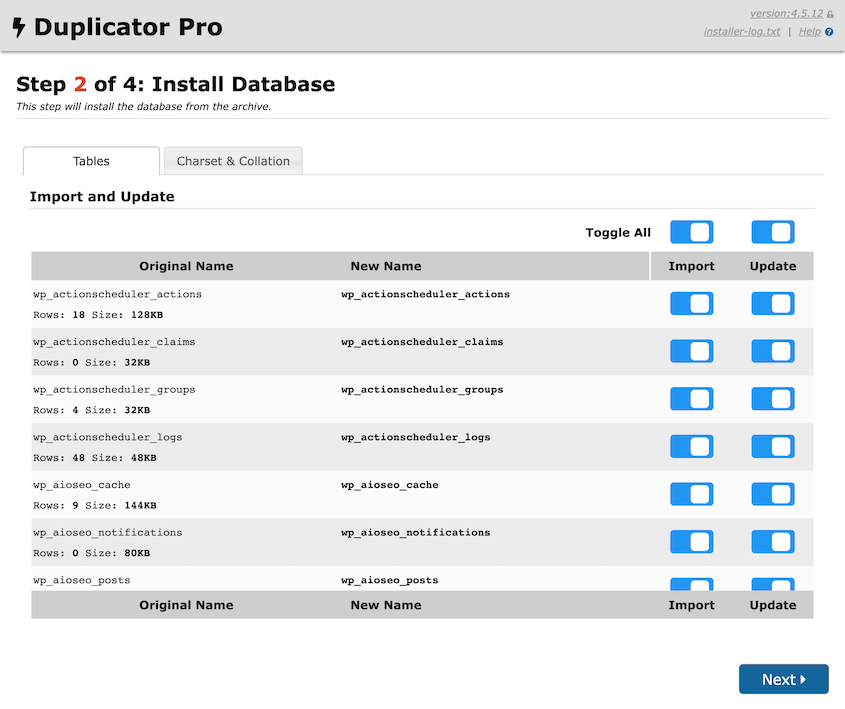
In Step 2, you can choose whether or not to import and update specific database tables.
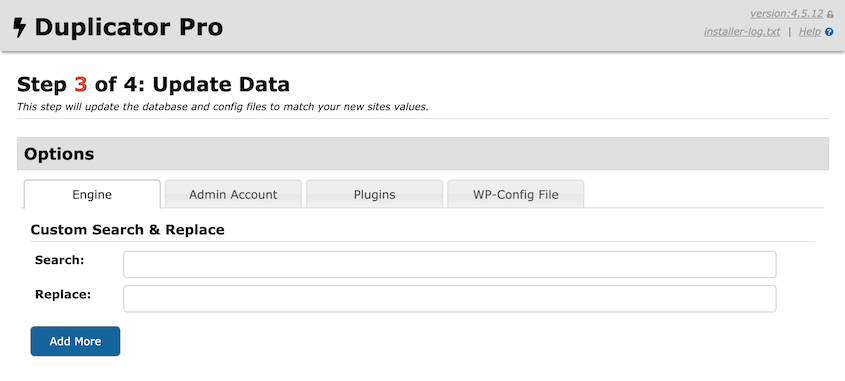
Since your database still references your old URL, you’ll need to replace it with the new one. With Duplicator, you can simply add your old domain in the Search box and your new one in the Replace box.
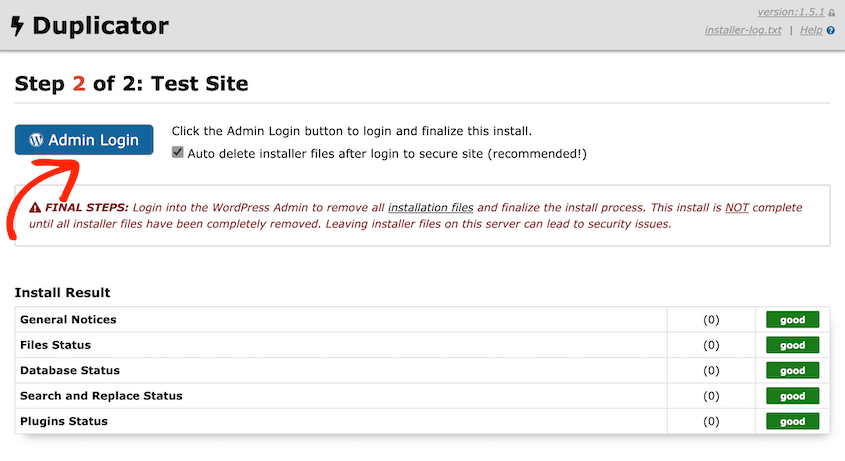
Duplicator will automatically import your original website. When it’s finished, you’ll see a review of the installation.
To log into your new WordPress site, click on the Admin Login button.
Step 5: Add 301 Redirects
After you move WordPress sites, you’ll also need to redirect your audience. This way, you won’t lose any of your devoted followers because of broken links.
A 301 redirect will take both users and search engines from the original page to a new one. It also tells search engines that your content has been permanently moved to a new site URL. This ensures that your content continues to rank high using the new domain.
You could manually create 301 redirects by editing your original site’s .htaccess file. If you aren’t familiar with code, this might be a daunting task.
I find it easier to set up redirects with All in One SEO (AIOSEO). This powerful SEO plugin has a built-in Redirection Manager.
Sign up for the AIOSEO Pro or Elite plan. After your purchase, download the plugin. Then, install and activate AIOSEO on your original WordPress site.
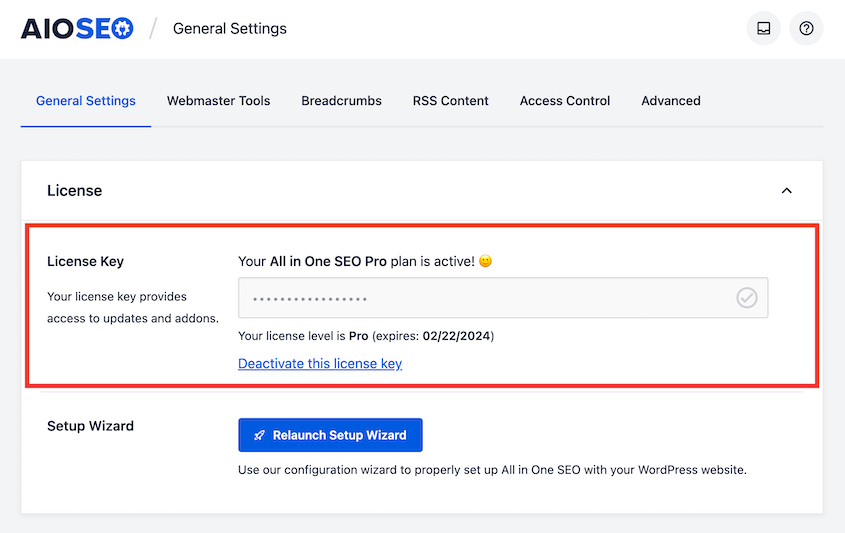
You’ll also need to activate your license key. Go to AIOSEO » General Settings and paste the license key for your plan.
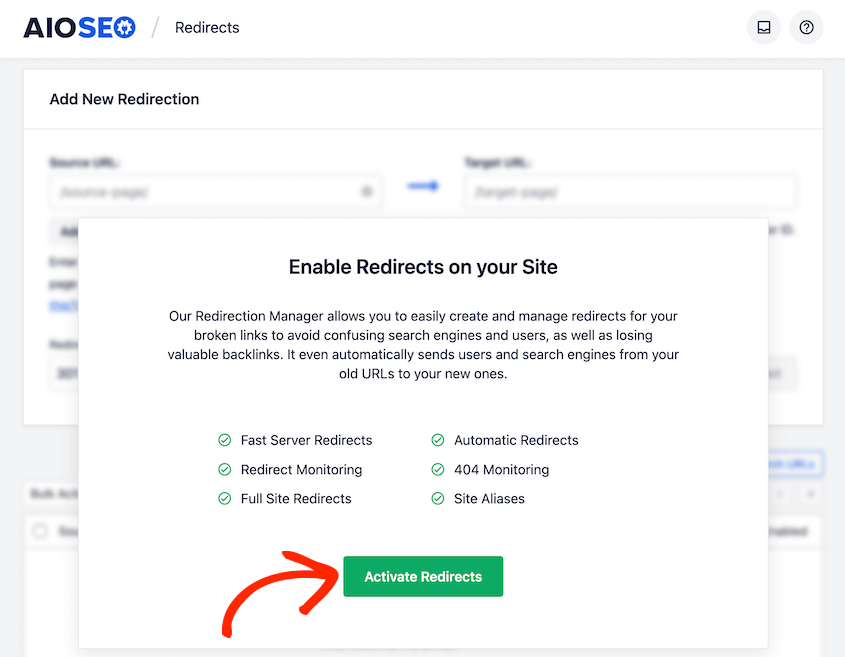
By default, the Redirection Manager will be disabled. To enable it, visit the Redirects page and hit Activate Redirects.
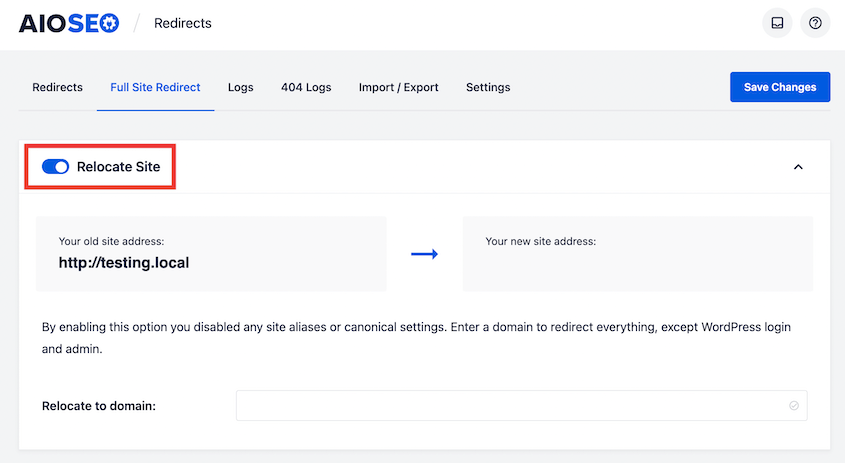
Click on the Full Site Redirect tab. At the top of the page, turn on the Relocate Site option.
Enter your new domain next to Relocate to domain. After you save these changes, your entire site will redirect to the new domain name.
Step 6: Clean Up Your New Website
After a migration, it’s a good idea to scan your website for broken links. If your URLs aren’t redirected properly, users might not be able to find your content.
The Broken Link Checker plugin is a great tool for this job. It automatically scans your site and notifies you of any broken links.
Once it’s activated, you’ll see a list of broken URLs on your site. Hit Edit URL and enter a new and healthy link.
Without a migration plugin like Duplicator, you’d have to also perform a search and replace on your database. This finds all instances of your old URL and replaces it with the new one.
As I mentioned earlier, Duplicator will automate this process for you.
Next, you’ll want to make sure your new site is functioning normally. Manually click through your entire website, evaluating whether the pages, images, contact forms, and other elements appear as they should be.
I want to make sure your new site is fully ready for visitors! So, go through all these website cleanup steps. Then, optimize your database.
For extra troubleshooting tips, here’s what to do if your WordPress site isn’t working after a migration.
Step 7: Inform Google About Your Domain Change
If you want to migrate your website without losing any SEO, you’ll need to tell Google that you’ve made the move. Once you do this, search engines will be able to locate your new site, index it, and display your content in search results.
To quickly update your site’s domain, you can simply adjust a few settings in Google Search Console. This is a Google-owned tool that provides data about how you appear in Google searches.
Add both of your websites as two different properties. If you’re not sure how to do this, read this comprehensive guide on Google Search Console.
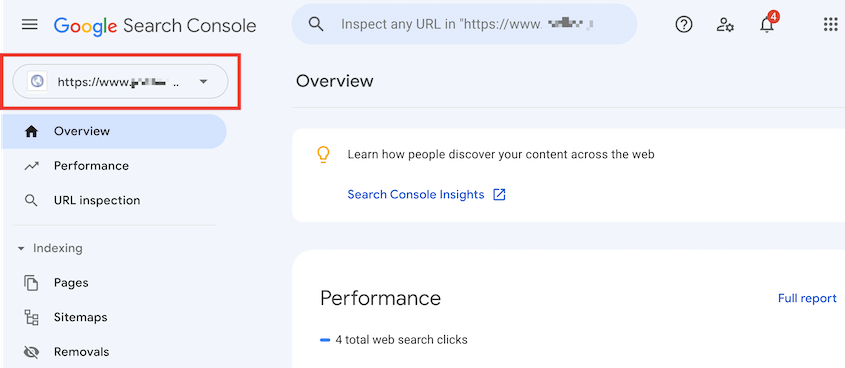
Once both domains are in Google Search Console, find the dropdown menu in the top-left corner. Select your old domain name.
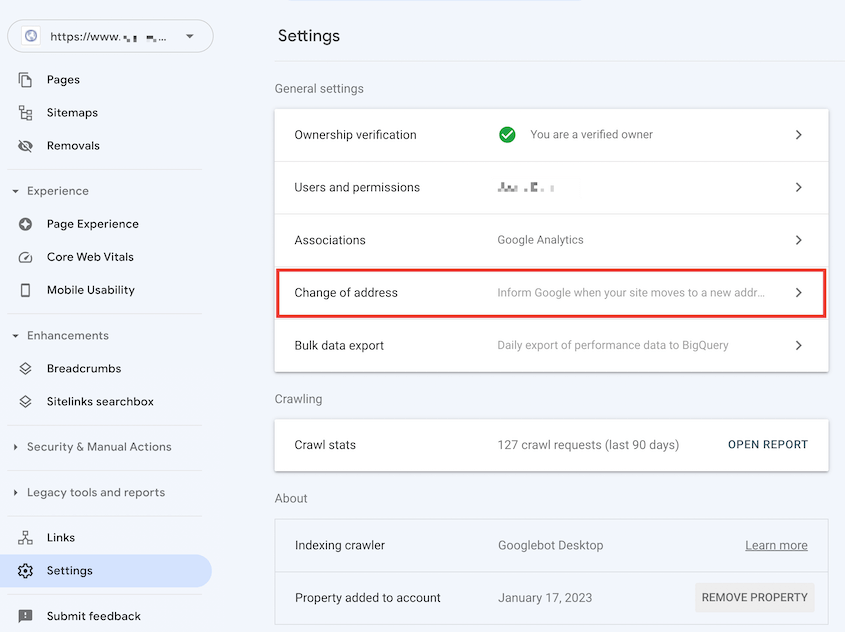
Then, click on Settings. On this page, select the Change of address option.
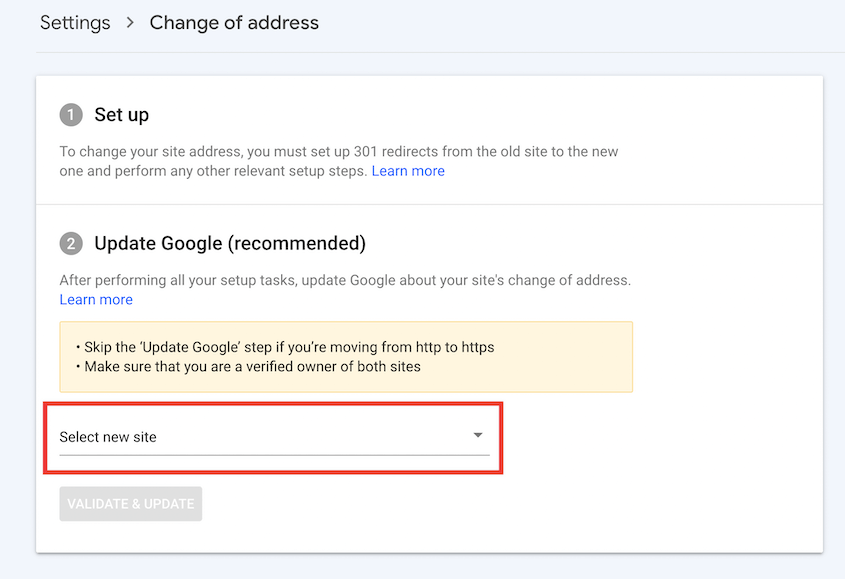
Use the Select new site dropdown to choose the property for the new domain.
Once you hit Validate & Update, Google Search Console will walk you through the next steps in your domain migration request.
In my opinion, you should also use social media posts, email newsletters, or push notifications to announce your new domain change. This will tell your audience that you rebranded your WordPress blog or small business.
Frequently Asked Questions (FAQs)
Can you change the domain of your WordPress site?
Yes, you can change the domain of your WordPress site. This process involves updating the WordPress Address and Site Address settings in the WordPress dashboard, followed by updating the database to reflect the new domain. Additionally, you may need to set up redirects to ensure visitors are directed to the new domain properly.
Can you transfer a WordPress website to another domain?
Yes, you can transfer a WordPress website to another domain. You’ll need to export your site’s content, including files and the database, then import them to the new domain. A WordPress migration plugin like Duplicator simplifies this process.
How do I manually move a WordPress site to a new domain?
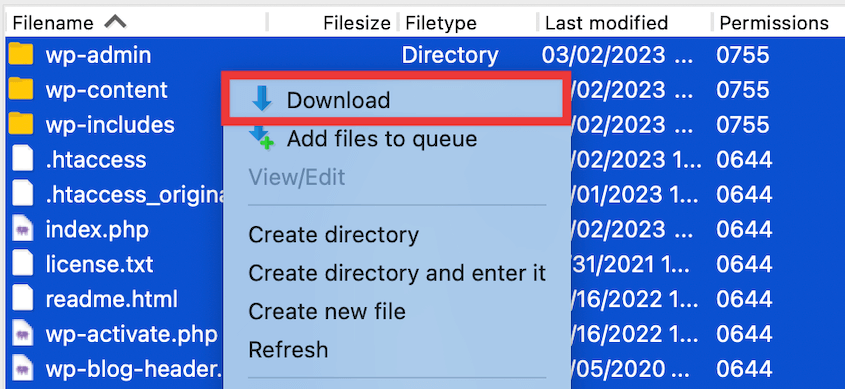
You can manually move your WordPress site to a new domain using a File Transfer Protocol (FTP) client and phpMyAdmin.
However, keep in mind that this always comes with the risk of accidentally breaking your live site. If you decide this is the best option, make sure to back up your original website beforehand.
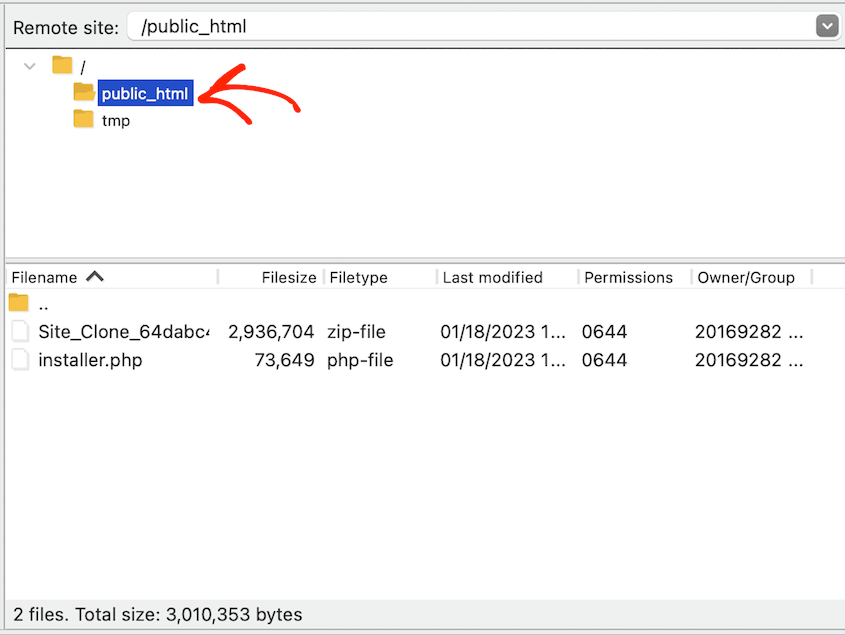
First, you’ll need to access the files for your original site. Usually, your WordPress hosting provider will have a dedicated File Manager for your account. Alternatively, you can use a third-party FTP/SFTP client like FileZilla.
Then, download all of the files in your site’s public_html folder. This is the root directory for your website.
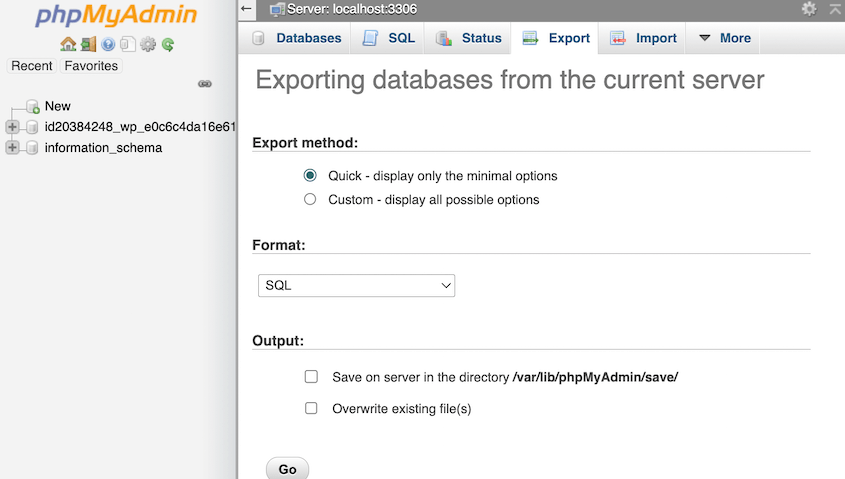
To manually download your database, log into phpMyAdmin and hit Export. This will allow you to download a SQL file with all your database information.
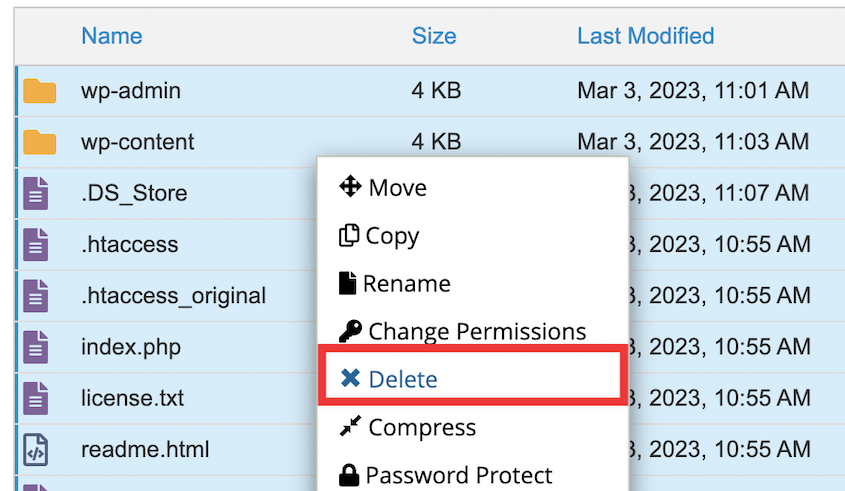
Now, open the files for your new website. Delete all of the files in the public_html folder and upload your original files.
Then, you’ll need to create a new database and database user for the new site. You can follow the steps included in the tutorial above.
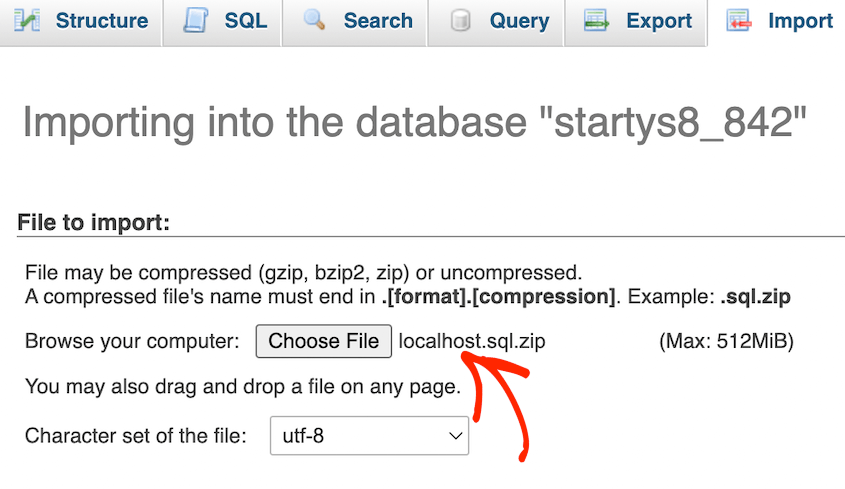
Once you have a new database, open phpMyAdmin and select it. Then, go to Import and upload your original database in a zipped SQL file.
Next, open your new site’s wp-config.php file. Find the db_name, db_user, and db_password values and update them. You’ll also need to replace any mention of your old domain name.
Finally, you may need to search and replace mentions of your old URL on the database. To do this, you can download a plugin like Search & Replace Everything.
How can I move my WordPress site to a new domain for free?
You can move your WordPress site to a new domain for free by downloading the free version of Duplicator. After installing and activating the plugin, create a new backup. Then, download both the installer and archive files.
Now, open the files for your new site. Similar to a manual migration, empty the root directory and upload both of your Duplicator files.
After this, search for this URL in a new browser: yournewdomain.com/installer.php
This will automatically launch the Duplicator installer. You can follow the step-by-step walkthrough on installing your backup.
Once you can access your new site, be sure to delete the installer file. It’s also important to redirect old content and notify search engines about the update.
For a detailed walk-through of this process, read our guide on migrating a WordPress site for free.
What is the best WordPress migration plugin?
The best WordPress migration plugin is Duplicator. It allows you to back up your website, save your data to the cloud, and move your files anywhere that can host WordPress. With Duplicator, you’ll be able to simply drag and drop your old website files into your new rebranded site!
How do I clone my WordPress site to a new domain?
To clone your WordPress site to a new domain, use Duplicator to create a full backup of your site. Download the backup and import it into the new server. In the migration wizard, let Duplicator replace your old domain with the new one. If you want to keep your old site, don’t use any permanent redirects.
Your New Domain Awaits
You now have everything you need to successfully migrate your WordPress site to a new domain without losing traffic, breaking links, or compromising your SEO rankings.
I recommend keeping your old domain active for at least 6-12 months, even if it’s just redirecting to the new site. This gives search engines plenty of time to fully transfer your rankings and ensures anyone with bookmarks or old links can still find you.
You can avoid manually migrating all your WordPress files and database information. Download Duplicator Pro to quickly drag and drop your site data to a new domain!
While you’re here, I think you’ll like these WordPress tutorials and tool roundups:
Joella is a writer with years of experience in WordPress. At Duplicator, she specializes in site maintenance — from basic backups to large-scale migrations. Her ultimate goal is to make sure your WordPress website is safe and ready for growth.


