You pour your heart into your blog. All those late nights spent writing posts. Days spent tweaking the design until it was just right.
Then, out of nowhere, something unexpected happens.
I’ve seen it happen to so many blogs, and even to my own sites in the early days.
Your site crashes. Or worse, it gets hacked – trust me, that’s a headache you want to avoid.
Suddenly, all that hard work you put in? It could all disappear in a flash.
That’s why backups are absolutely essential. In my experience, they are the number one thing you need to have in place.
Backups let you sleep at night knowing your blog is protected.
In this post, I’ll walk you through how to back up your WordPress blog the right way. We’ll look at different methods, so you can choose what works best for you.
Table of Contents
Why Bother Backing Up Your Blog?
Let me tell you, things can and do go wrong with blogs. I’ve seen it happen more times than I can count over the years.
It’s not about being negative. It’s about being realistic and prepared.
Think of it like having a spare tire in your car. You hope you never need it, but you’re sure glad it’s there if you get a flat. Blog backups are the same thing.
Let’s look at some common problems and how backups can save you.
Cyber Attacks
Imagine logging in one day and your site looks totally different. Or worse, it’s showing ads for things you’d never promote.
Hackers can break into your site and cause all sorts of trouble. They might steal data, delete your content, or just mess things up for fun.
I’ve helped clients clean up hacked sites, and it’s never a fun process.
Hackers can add malware to your site, which can slow things down, redirect your visitors to bad sites, or even get your site blocked by search engines.
But here’s the good news. If you have a recent backup, you can wipe out the hacked or infected site and restore a clean version from before the trouble started.
It’s like hitting the reset button. Backups are the fastest way to recover from these kinds of attacks.
Plugin and Theme Conflicts
WordPress is open-source, so it has thousands of free plugins and themes for you to use. They let you add all sorts of cool features and designs to your blog.
But sometimes, things clash. A new plugin might not play nicely with your theme. Or two plugins might fight with each other.
Updates can also cause problems. I remember one time, a theme update completely messed up the layout of one of my sites.
Suddenly, things break. Your site looks weird. Features stop working. You might even see error messages that look like gibberish.
This can be really frustrating, especially if you’re not a tech expert. Figuring out what went wrong can take hours.
But if you have a backup from before you installed that new plugin or ran that update? You can quickly go back to the way things were.
Just restore your site from the backup. Problem solved! You’ll undo the errors with a simple click.
Server Issues
You trust your web host to keep your site online. Most of the time, it does a good job. However, even the best hosts have problems.
Servers can crash. Hardware can fail. I’ve heard stories of entire data centers having outages. It’s rare, but it happens.
If your web host has a major problem, your site could go offline. It might be down for hours, or even days.
That’s lost traffic, lost customers, and a lot of stress.
Most good hosts do have a backup system, but relying only on their backups can be risky.
You don’t always have control over when they back up, how often, or how easy it is to restore.
If you have your own backup stored somewhere else, you’re in a much better position. You can move your site to a new host and restore your backup.
You’re not totally dependent on your original host to get you back online. Having a backup gives you control and options.
Human Error
We’re all human. Sometimes we click the wrong button or delete the wrong file. I know I’ve done it myself more than once!
Maybe you’re cleaning up your media library and accidentally delete an image you needed. Or you’re editing a page and accidentally delete a whole section of content. Or maybe you’re trying to customize your theme and you make a small change that breaks the whole thing.
It’s easy to do. Especially when you’re in a hurry or trying something new.
But again, backups come to the rescue. If you delete something by accident or make a mistake that messes up your site, a backup lets you undo it. You can just restore your site to a point before you made the error.
How to Back Up Your WordPress Blog
Okay, so now you know why backups are important. Let’s talk about how to actually back up your WordPress blog.
It’s much easier than you imagine, especially with the tools available today.
No matter which method you pick, the goal is the same: to protect your hard work and have a way to get your site back online if anything goes wrong.
Method 1. Use a WordPress Backup Plugin
Plugins add extra features without you having to write any code. Think of them as apps for your website.
And guess what? There are plugins specifically designed just for backups. They make the whole process pretty simple.
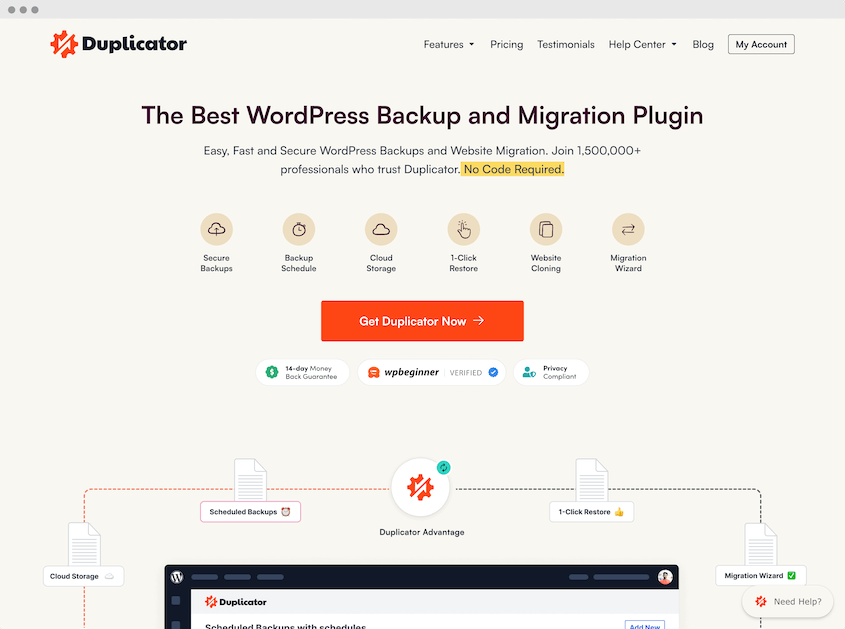
Over the years, I’ve tried quite a few of them, and my favorite is Duplicator. It’s reliable and easy to use, even if you’re just starting out with backups.
First, you need to install the plugin. This is just like installing any other plugin in WordPress.
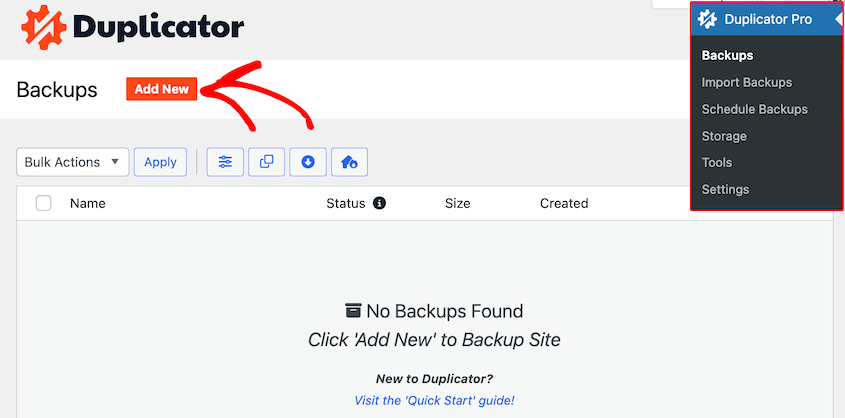
Then, create a new backup.
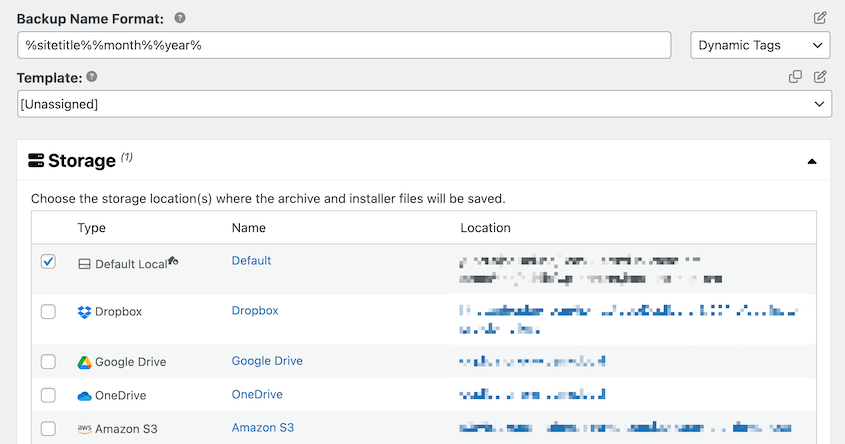
Now, Duplicator will guide you through the backup process. Customize the name with dynamic tags and choose a storage location.
For now, the default setting is fine. It’ll save the backup on your website’s server.
We’ll talk about other storage options later, like saving backups to the cloud. But for this first backup, your server is okay.
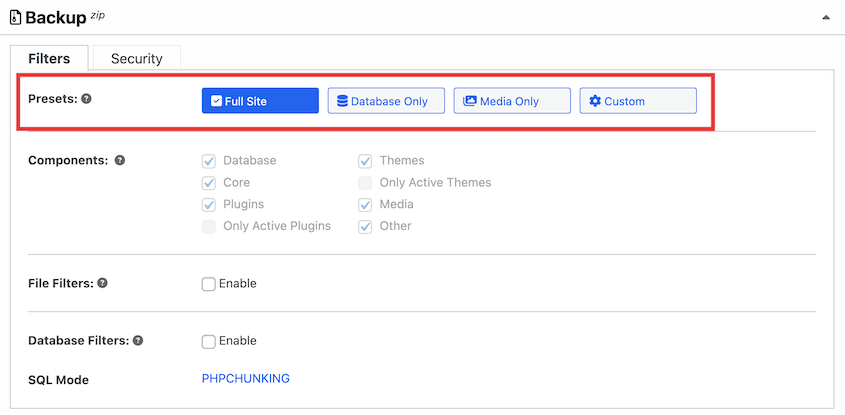
Next, use the presets to decide what data on your site is backed up. I’d recommend creating a full site backup, at least to get started.
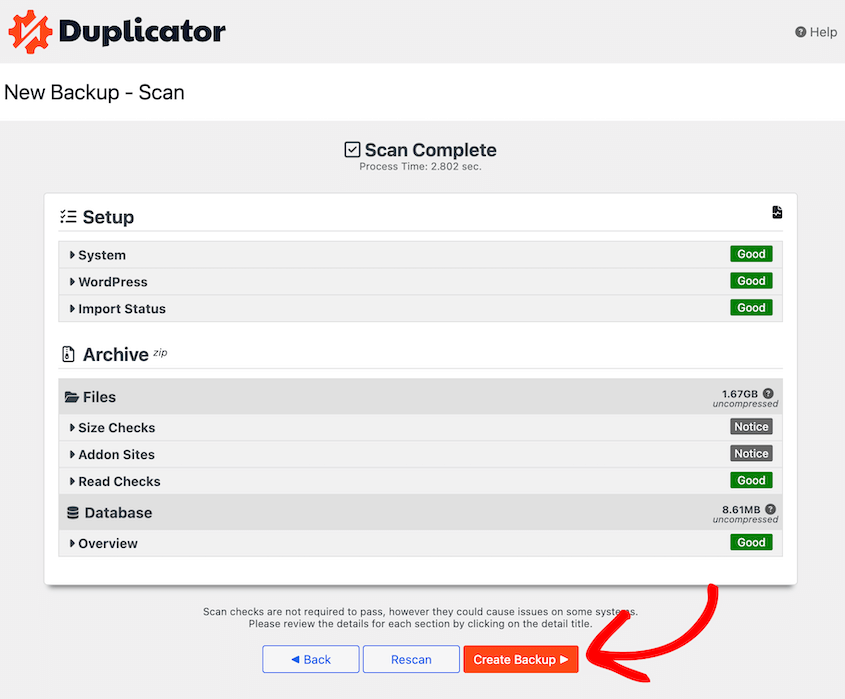
Click the Next button at the bottom. Duplicator will now scan your site. It checks everything to make sure it can create a backup.
If everything looks okay, start the backup.
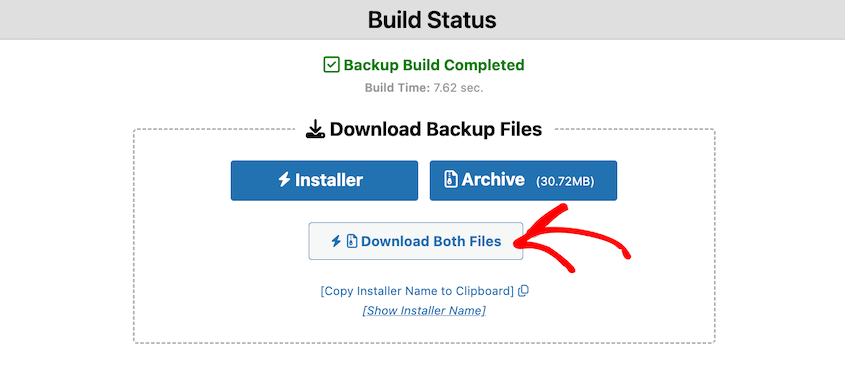
Once the backup is built, Duplicator will give you two files: the installer and the archive. You need to download both of these files.
The archive file is the big one – it contains all your website data. The installer file helps you unpack the archive if you ever need to restore it.
Keep both of these files safe! Save them somewhere on your computer where you can find them again.
And that’s it! You now have a copy of your blog safely stored on your computer.
Method 2. Manually Back Up Your Blog
Sometimes, you might want to back up your blog without using a plugin. It’s a bit more hands-on, but it’s good to know how to do it.
Manual backups involve two main parts. You need to back up your files and your database. Your website is made up of these two things working together.
Manually Backing Up Your Files
First, we’ll tackle the files. To back up your files manually, you’ll typically use an FTP client or a file manager like cPanel.
FTP stands for File Transfer Protocol. It’s a way to connect to your website’s server and move files back and forth between your computer and the server. You need an FTP program (like FileZilla, which is free) to use FTP.
cPanel is a control panel that many web hosting companies provide. It gives you a web-based interface to manage your hosting account.
One of the tools in cPanel is the File Manager. This lets you manage your website files directly through your web browser.
For manual backups, we need to download certain key folders from your website’s server to your computer.
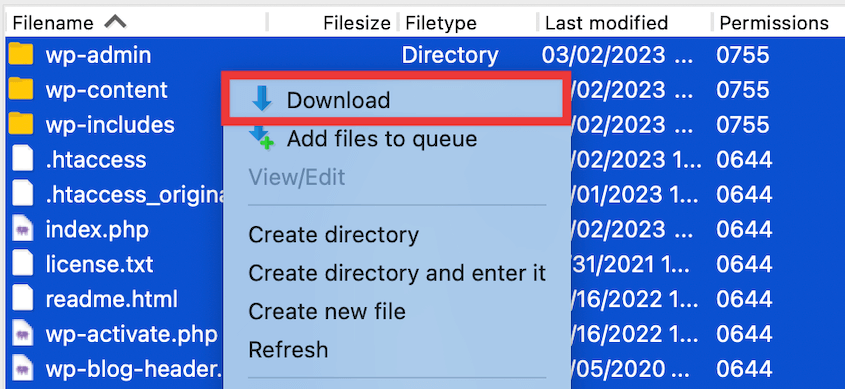
Using FTP or cPanel, navigate to the main directory of your WordPress installation (where folders like wp-admin, wp-content, and wp-includes are located). Then, you’ll download these folders and files to your computer.
Just drag and drop (in FTP) or use the download function (in cPanel). Save them in a safe place on your computer, just like we talked about for plugin backups.
Manually Backing Up Your Database
Next up is the database.
Think of your database as the brain of your WordPress website. It’s where all your posts, pages, comments, settings, and lots of other important information are stored. Without the database, your website wouldn’t have any content.
To back up your database manually, you’ll use a tool called phpMyAdmin.
phpMyAdmin is a web-based tool for managing databases. It’s often provided by web hosting companies as part of their hosting control panel (like cPanel again).
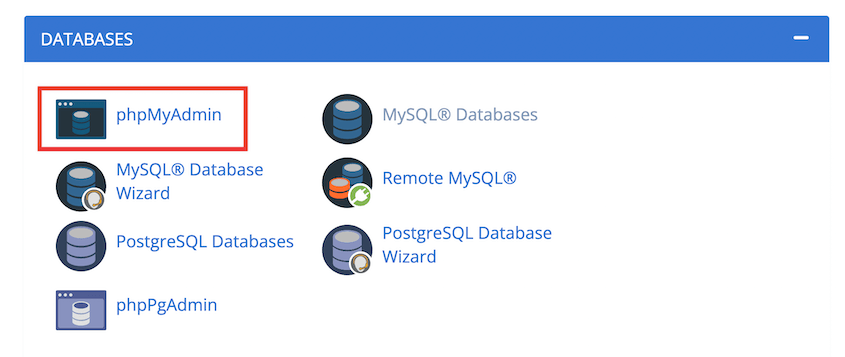
To back up your database, log in to your hosting account’s control panel (like cPanel). Look for phpMyAdmin in the tools section. It might be under Databases or something similar.
Once you’re in phpMyAdmin, you’ll see a list of databases on the left side. You need to find the database that your WordPress site uses.
If you’re not sure which one it is, you can find the database name in your wp-config.php file that we talked about backing up earlier.
Open wp-config.php in a text editor on your computer. Look for the line that says define('DB_NAME', 'your_database_name_here');.
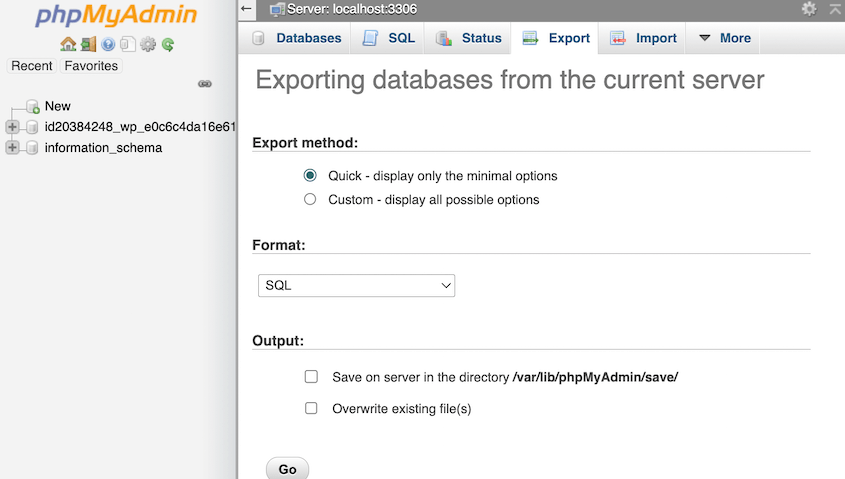
Once you know the name, find it in the list in phpMyAdmin and click on it. Now that you’ve selected your database, look for the Export tab.
For a simple backup, you can usually just use the Quick export method. Under Format, make sure SQL is selected. SQL is the standard format for database backups.
Then, just click the Go button. phpMyAdmin will export your database and download it to your computer as a .sql file. This file contains all your database data in text format.
Save this .sql file in the same safe place on your computer where you saved your website files from the manual backup.
Why I Don’t Recommend Manual Backups
I’ve done my share of manual backups over the years, especially back when plugins weren’t as advanced as they are now.
But honestly, manual backups are not the best choice for regular, ongoing backups.
Manually backing up files and databases takes time and effort. You have to log in to FTP or cPanel, navigate folders, download files, then go to phpMyAdmin, and export the database… It’s a multi-step process.
When you’re busy running your blog, it’s easy to put off, and then you might forget to do it regularly. I know I’ve been guilty of that in the past!
When you’re doing things manually, there’s always a chance you might miss a step or forget to download a crucial file. Did you remember to get .htaccess? Did you export the correct database?
Human error is always a factor. Plugins automate this and make it less likely you’ll miss something important.
Manual backups are, well, manual. You have to remember to do them. And you have to manually perform all the steps every time.
Life gets busy, and it’s easy to let backups slide. Before you know it, weeks or even months have gone by since your last backup.
Just like making manual backups is more complex, restoring from them is also more involved than using a plugin. You have to manually upload files via FTP and import the database via phpMyAdmin.
It’s definitely doable, but it takes more time and technical skill compared to a plugin’s one-click restore.
Method 3. Rely on Your Web Host
Many web hosting companies offer backup services as part of their hosting packages.
When you’re first starting out, this might sound really convenient.
“Great,” you might think, “my host is already backing things up, so I don’t have to worry about it!”
And it’s true, many hosts do perform backups. This is definitely better than nothing, and it can be a lifesaver in certain situations.
However, relying solely on your web host’s backups is not enough for real peace of mind. In my experience, it’s best to think of your host’s backups as a secondary safety net, not your primary backup plan.
Why I Don’t Recommend Relying on Web Host Backups
Many hosts do daily backups. If they only back up once a day, and something goes wrong just before their next scheduled backup, you could lose almost a full day’s worth of changes and new content.
Imagine writing a whole blog post and then losing it because your last host backup was from yesterday! I’ve seen this happen, and it’s frustrating.
Plus, you don’t have much control over your web host’s backups. You might not be able to easily access them yourself to download them.
Often, you have to contact their support team to request a restore. This can take time. And if you just want to grab a quick backup to have on hand before making a change, you usually can’t do that with host backups.
You’re relying on their schedule and their system. I prefer to have more direct access and control over my own backups.
Some hosts might limit how many restores you can do per month for free. If you have a problem and need to restore your site multiple times, you could end up paying extra fees.
It’s always good to check your hosting agreement to see what their backup policy is and if there are any extra costs involved.
What if something happens to your web host’s backup system itself? It’s rare, but data loss can happen even to big companies.
If your host has a major server issue that affects their backups, and you’re relying only on them, you could be in trouble.
Web host backups are better than nothing, but they are not ideal as your only backup strategy. Think of them as a bonus layer of protection.
Automatic Cloud Backups: My Favorite Way to Protect My Blog
Let’s talk about what I really think is the best way to back up your blog. And that’s automatic cloud backups.
Automatic cloud backups are easy, they’re reliable, and they give you the best protection with the least amount of hassle.
Once you set them up, you can mostly forget about them, knowing your backups are happening in the background, automatically.
Cloud backups are stored in a completely separate location, away from your web server. So, even if something catastrophic happens to your hosting server, your backups are safe and sound somewhere else in the cloud.
That’s why I’m such a believer in automatic cloud backups. They just make so much sense for protecting your valuable blog.
Ready to set them up?
I love using Duplicator Pro for automatic cloud backups. The backups are just so reliable and hassle-free.
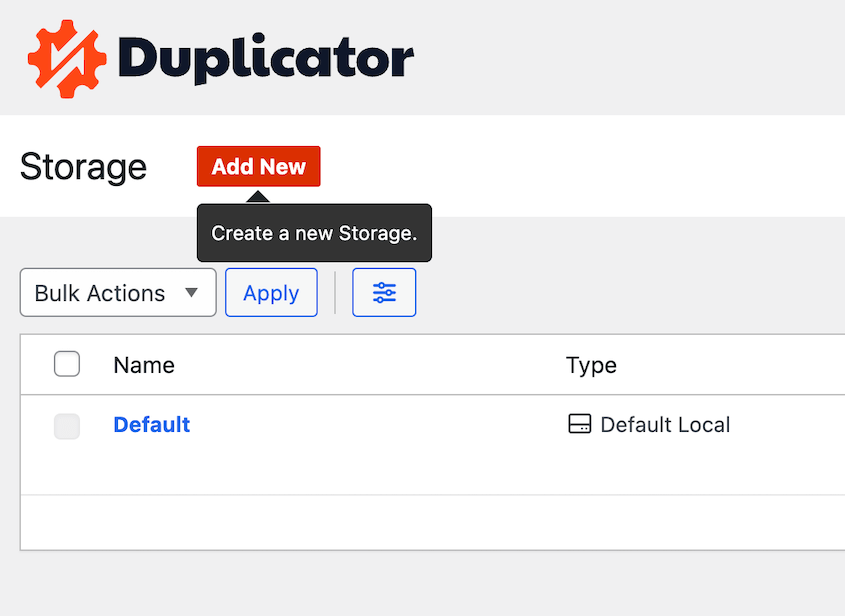
First, connect your favorite cloud storage provider. This way, you can send backups to the cloud.
Here are some easy beginner backup tutorials for popular cloud services:
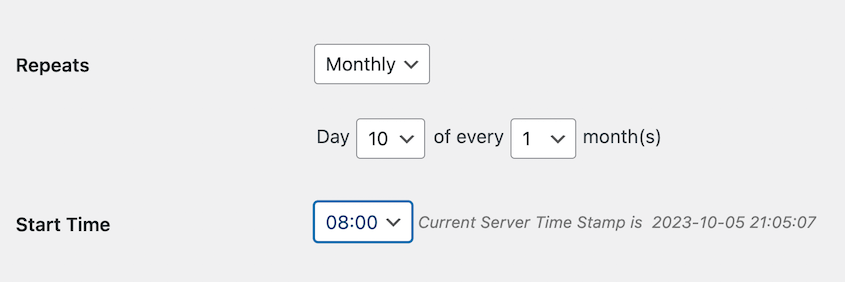
Then, create a new backup schedule. Choose how often you want backups to run.
For most blogs, daily or weekly backups are a good starting point. If you update your blog very frequently (like multiple times a day), hourly backups might be a good idea.
Choose the cloud storage service you want to use. Once you save the schedule, Duplicator will automatically send backups to the cloud.
You don’t have to do anything else! It all happens behind the scenes. You’ll even get email notifications when backups are completed successfully (or if there are any issues).
Now you can relax knowing your backups are running automatically and safely stored in the cloud.
Restoring Your Blog When Things Go Wrong
What happens when your site crashes, gets hacked, or something else goes haywire? This is when your backups become your best friend.
Knowing how to restore your blog from a backup is just as important as creating the backups in the first place.
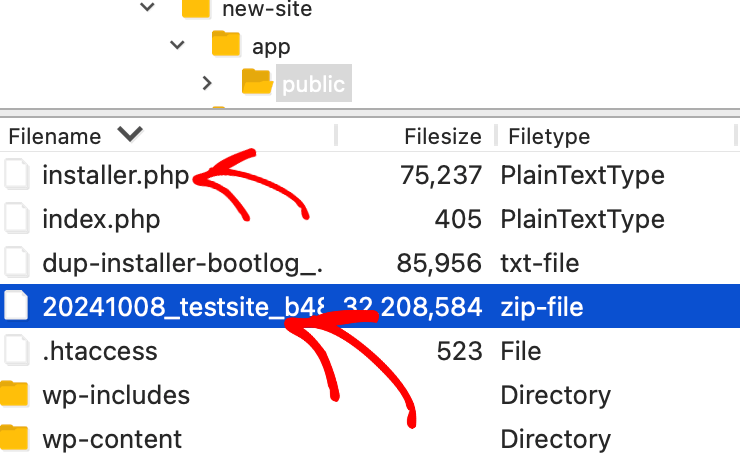
First, you need to locate the two files we talked about earlier: the installer and the archive. Remember downloading them when you created your backup?
Next, you need to upload these two files to your website’s server. We’re going back to using FTP or cPanel File Manager for this step, just like we did for manual backups.
You want to upload these files to the root directory of your website, where WordPress is installed.
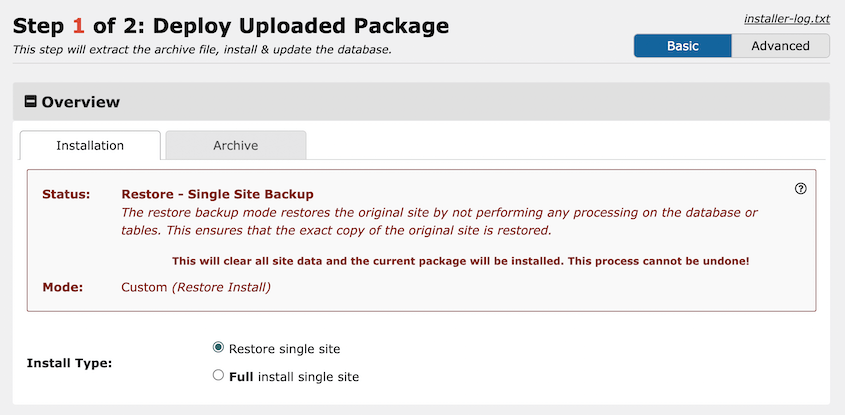
To run the installer, open your web browser and go to your website’s address, followed by /installer.php.
For example, if your domain is yourdomain.com, you would type yourdomain.com/installer.php.
The Duplicator installer will guide you through a few steps to restore your site. It’s pretty user-friendly.
You can also initiate a restore directly from your WordPress admin area with just one click. This is super convenient for quick restores.
The most important thing to remember is that you can only restore a backup you’ve already made. You can’t restore if you don’t have a backup!
That’s why it’s so crucial to set up regular automatic backups before anything goes wrong. You don’t want to be scrambling to create a backup after your site is already hacked or broken. Think ahead and be prepared.
Frequently Asked Questions (FAQs)
How do I back up my blog for free?
Back up your blog for free using Duplicator Lite. Install the plugin from your WordPress dashboard, create a new backup, and download both backup files it generates. The backup archive includes all your site files and database, allowing full restoration anytime without cost.
How do I back up my blog without a plugin?
Back up your blog without a plugin by manually exporting your database and copying your site files. Use phpMyAdmin to export the database as a .sql file, then access your server via FTP or cPanel to download all WordPress files. Store both backups securely for future restoration.
What’s the best WordPress backup plugin for blogs?
The best WordPress backup plugin for blogs is Duplicator. It creates full-site backups, including files and databases, and lets you download them for free. Duplicator also supports scheduled backups, easy WordPress migrations, and fast restores, making it ideal for bloggers who want reliable and simple backup options.
Where should I store my WordPress blog backups?
Store your WordPress blog backups in multiple secure locations. Use external cloud storage like Google Drive, Dropbox, or Amazon S3, and keep a local copy on an external hard drive. Storing backups in different places protects your site from data loss due to server failure or hacking.
Do I need to be a tech expert to back up my WordPress blog?
You do not need to be a tech expert to back up your WordPress blog. Tools like Duplicator make the process simple with step-by-step wizards. Even beginners can create full backups and restore sites without writing any code or accessing complex settings.
Final Thoughts
It’s not a matter of if something will go wrong with your site. It’s a matter of when. And when that day comes, you’ll be incredibly grateful that you took the time to set up backups.
Here’s an extra tip from my years of experience: Don’t just assume your backups are working perfectly. Go through the process of restoring your site from a backup on a test site or staging environment.
Make sure you know how to do it, and that your backups are actually restorable. This will give you real confidence that your backup system is solid and will work when you need it most.
And finally, if you want to make backups even easier, more automatic, and more reliable, I highly recommend checking out Duplicator Pro.
It has scheduled backups, direct cloud storage, super-fast one-click restores, and a bunch of other cool features that will give you more peace of mind.
If you’re serious about protecting your blog (and you should be!), take a look at Duplicator Pro and see if it’s the right fit for you.
While you’re here, I think you’ll like these other WordPress guides:
Joella is a writer with years of experience in WordPress. At Duplicator, she specializes in site maintenance — from basic backups to large-scale migrations. Her ultimate goal is to make sure your WordPress website is safe and ready for growth.


