Ever stared at a blank white screen when trying to access your WordPress site? Or maybe you’ve encountered the dreaded “Fatal error: Allowed memory size exhausted” message?
These frustrating issues often stem from a simple yet crucial aspect of your WordPress setup: the memory limit.
Think of your WordPress site as a busy kitchen. The memory limit is like the size of your countertop. If it’s too small, you’ll quickly run out of space to work, and things start to fall apart.
In this guide, I’ll walk you through how to increase PHP memory limits in WordPress.
Here are the key takeaways:
- WordPress memory limit is the maximum amount of server memory (RAM) that a script on your website can use. When your site tries to do more than the limit allows, you’ll see errors like the “white screen of death” or a “fatal error” message.
- For most sites, a memory limit between 128MB and 256MB is sufficient. More complex sites like eCommerce stores or multisite networks may need 512MB or more.
- Before making any changes to core files, always create a complete backup of your WordPress site. A mistake could take your site offline, and a backup is your safety net.
- The most common methods to increase memory limit involve editing the wp-config.php, php.ini, or .htaccess files. You can also use a plugin or, as a final solution, upgrade your hosting plan.
Table of Contents
What Memory Limit Does WordPress Require?
WordPress itself is pretty modest. Out of the box, it can run on as little as 64MB of memory. But let’s be honest, who uses WordPress without any bells and whistles?
For most WordPress sites, you’ll want to aim higher. A good starting point is between 128MB to 256MB.
This gives your site enough breathing room to handle common tasks, plugins, and themes without breaking a sweat.
But some situations might call for even more memory. For example:
- You’re running an e-commerce store
- Your site is media-heavy with lots of images or videos
- You use resource-intensive plugins
- You’re managing a multisite network
In these cases, you might need to bump up your memory limit to 512MB or even higher.
Remember, more isn’t always better. Setting your memory limit too high can be overkill and might even cause issues with some hosting providers. The key is finding the right balance for your specific WordPress site.
How to Check Your WordPress Memory Limit
Before you start tinkering with your memory limit, it’s crucial to know where you’re starting from. Let’s talk about a few ways to peek under the hood.
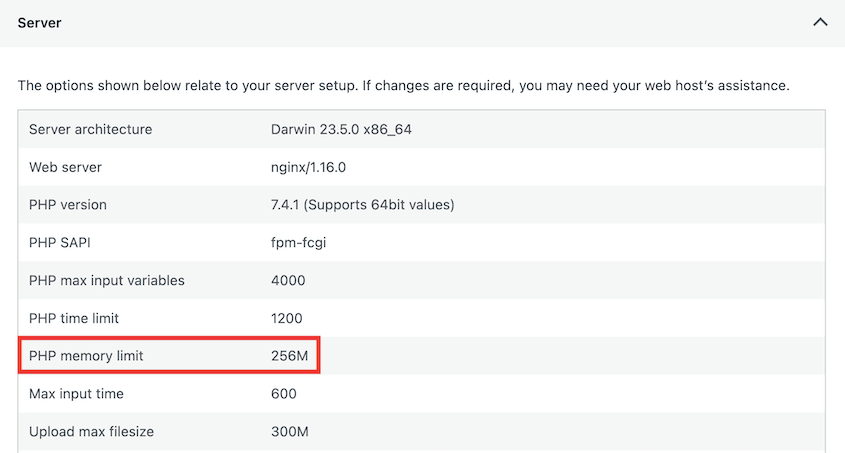
WordPress often displays your current memory limit right in the admin area. Go to Tools » Site Health. Click on the Info tab.
Expand the Server section. You should see a line that says PHP memory limit. This tells you your current setup.
Sometimes, you can check your PHP memory limit in your hosting account’s control panel.
Alternatively, open your wp-config.php file and look for this line:
define('WP_MEMORY_LIMIT', '256M');
The number tells you how much memory limit your website has.
When Do You Need to Increase Your Memory Limit?
Your WordPress site will show signs when it’s running out of memory. These signs don’t always mean you need to increase your WordPress memory limit. They could indicate other issues like poorly coded plugins or themes.
However, if you’re experiencing these problems regularly (especially after adding new features to your site), it’s worth checking your memory limit.
Here are the red flags to watch for.
The White Screen of Death
Suddenly, your site goes blank. No error message, no WordPress dashboard, just a white screen staring back at you. This ominous White Screen of Death often signals that your site has run out of memory.
500 Internal Server Error
You might see this cryptic message pop up: 500 Internal Server Error. While it can have various causes, insufficient memory is a common culprit.
Memory Exhausted Error Messages
Sometimes, WordPress tells you exactly what’s wrong. You might encounter an error that says:
“Fatal error: Allowed memory size of XXXXXX bytes exhausted”
This is WordPress waving a big red flag saying it needs more memory!
Sluggish Admin Dashboard
Is your WordPress backend loading very slowly? Does it take forever to save a post or upload an image? A sluggish admin area could mean you have to increase WordPress memory.
Plugins Failing to Function
You activate a new plugin, and… nothing happens. Or worse, your site crashes. This could mean your site doesn’t have enough memory to handle the plugin’s operations.
What Causes the WordPress Memory Limit Issue?
Understanding these causes can help you approach memory limit issues more strategically.
However, keep in mind that increasing your memory limit is not always the right answer. Other times, optimizing your site’s efficiency is the smarter move.
Resource-Hungry Plugins
Plugins are fantastic for extending WordPress functionality, but they come at a cost. Some plugins that handle complex tasks like e-commerce, security, or site backups can be real memory hogs.
Poorly Coded Themes
Not all themes are created equal. A poorly optimized theme can chew through your memory very quickly.
It’s like leaving all the lights on in your house — it looks great, but it consumes lots of energy.
You might decide to increase the memory limit on your site, but you could also find a better WordPress theme. See our list of the best themes so you don’t run into the same problem again.
High-resolution images and videos can make your site look stunning. But they also require more memory to process. It’s a balancing act between visual appeal and performance.
Traffic Spikes
Sudden popularity can be a double-edged sword. A traffic surge means more visitors but also more work for your server. Each visitor requires a slice of memory, and when you run out of it, things start to break.
Inefficient Database Queries
Every time WordPress needs information, it queries the database. Inefficient queries get the job done but use up more resources along the way. This can exhaust your available memory.
WordPress Itself
As WordPress grows and adds new features, it naturally requires more resources. Older sites running on minimal hosting plans might find themselves stretched thin as WordPress evolves.
What to Do Before Increasing Your Memory Limit
Before we start tweaking your WordPress memory, there’s a critical step you shouldn’t skip: backing up your site.
Adjusting your memory limit involves editing core WordPress files. While it’s usually straightforward, things can go wrong. A simple typo could take down your entire site.
That’s where backups come in – they’re your safety net. If anything goes wrong, you can restore the backup and immediately roll back what you just did.
You could manually back up your files and database. But why make life hard?
Duplicator Pro is a backup plugin that makes it easy to create copies of your WordPress site. You can use it to build backups in under a minute!
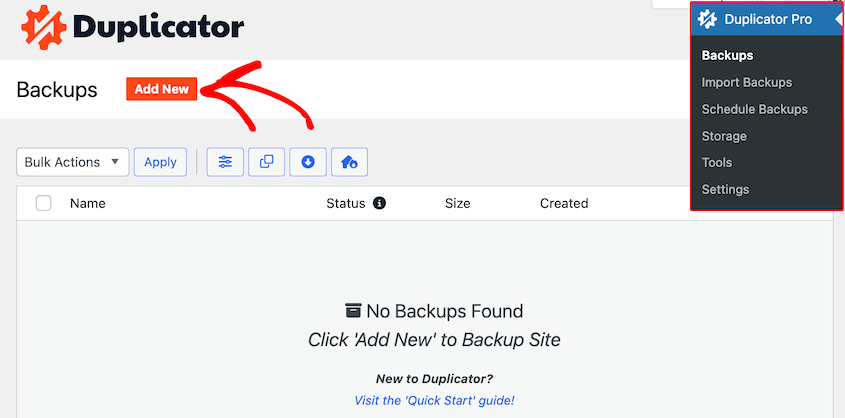
After installing Duplicator, find Backups » Add New.
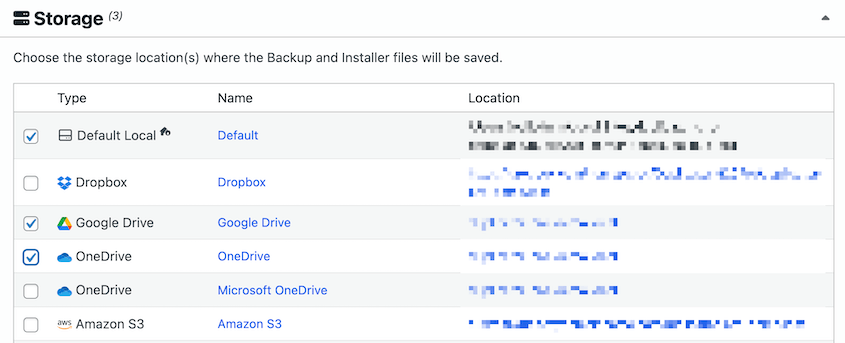
Name the backup and choose a storage location. To better protect your data from server errors, you could send the backup to the cloud. However, for one-click disaster recovery, save the backup locally.
Expand the Backup section. For a complete backup, select the Full Site preset.
Continue building the backup. Duplicator will automatically copy your files and database and send them to your favorite storage location.
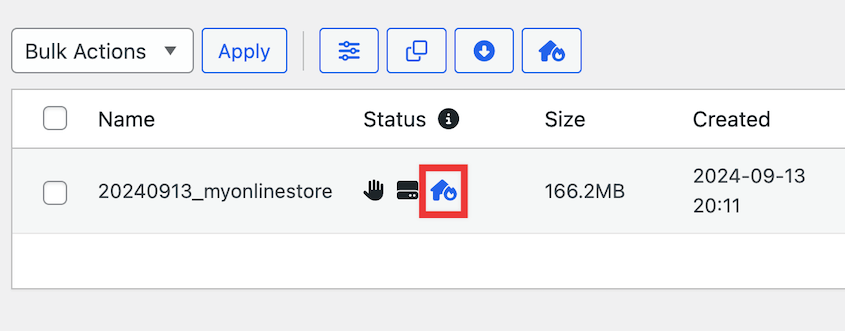
As a final precaution, I’d recommend setting a disaster recovery point. Find a complete backup that’s stored on your local server. Click on the blue icon next to it.
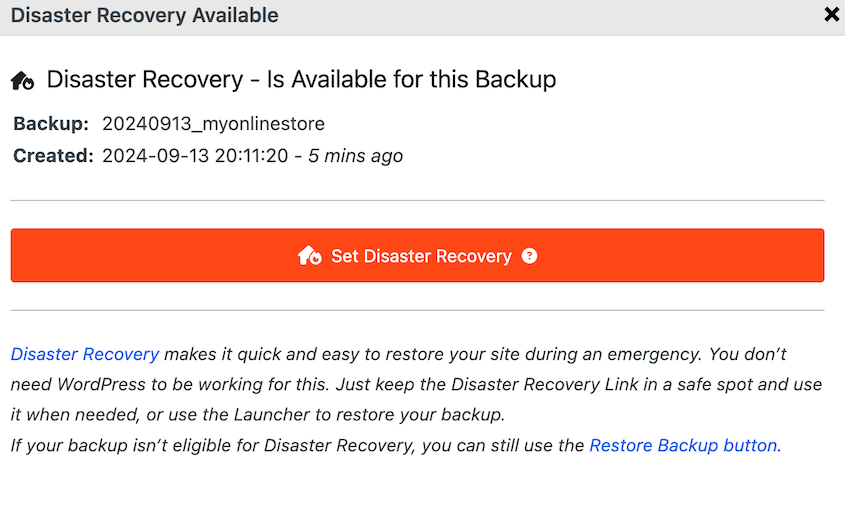
In the pop-up window, confirm that you want this to be the disaster recovery point.
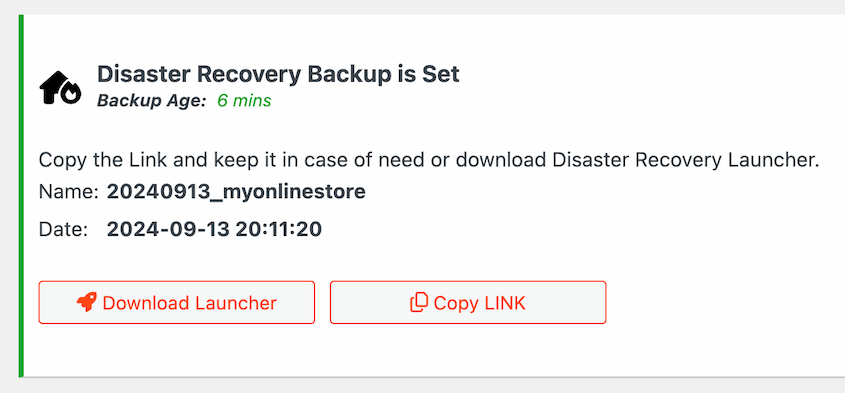
Duplicator will give you two ways to restore your site: a link and a file. Copy the recovery link and save it in a safe location. Do the same with the launcher file.
If anything goes sideways while increasing your memory limit, paste the recovery link in a browser window. Or, open the file.
Now you’ll have the confidence to make changes without worrying about devastating errors!
How to Increase Memory Limit in WordPress
Now that we’ve covered the basics and you’ve safely backed up your site, it’s time to roll up our sleeves and get to work. There are several easy methods to increase the WordPress memory limit, and we’ll walk you through each one.
Remember, not all methods will work for every hosting environment. If one doesn’t do the trick, don’t worry – just move on to the next one.
- Method 1: Edit wp-config.php File: This is the most common and recommended method, where you add a single line of code to a core WordPress file.
- Method 2: Edit PHP.ini File: This method involves changing the memory limit setting at the server level, either through a cPanel editor or by editing the file directly.
- Method 3: Edit .htaccess File: For servers running on Apache, you can add a line to your .htaccess file to increase the memory limit.
- Method 4: Use a Plugin like WP Memory: A beginner-friendly option that avoids editing code, though it may not work if your host has set a hard limit.
- Method 5: Upgrade Your Web Hosting Plan: If you’ve tried everything else, it may be time to move to a hosting plan with more server resources.
Method 1: Edit Your wp-config.php File
Your wp-config.php file contains configuration details for your WordPress website. It’s where you can tweak various settings, including the memory limit.
Connect to your website using an FTP client or your hosting provider’s file manager. Navigate to your WordPress root directory (usually public_html or www).
Look for the wp-config.php file. Open it in a text editor.
Look for a line that contains the phrase: WP_MEMORY_LIMIT.
It could look something like this:
define( 'WP_MEMORY_LIMIT', '32M' );
If you see this line, increase the “32” to a higher number.
If you don’t see it, you might need to add it yourself. Find the following line:
/* That's all, stop editing! Happy publishing. */
Just before this, add the following code:
define('WP_MEMORY_LIMIT', '256M');
This sets your memory limit to 256 megabytes. Adjust the number if you need more or less.
After you’re finished editing the wp-config.php file, upload it back to your server. Overwrite the existing wp-config file with the new one.
Refresh your WordPress admin area and check if the memory limit has increased.
If this method doesn’t work, your hosting provider might be restricting changes to the memory limit. Don’t worry – we’ve got more tricks up our sleeve.
Method 2: Edit Your PHP.ini File
If tweaking wp-config.php didn’t do the trick, it’s time to edit your PHP.ini file. This file controls the PHP settings on your server.
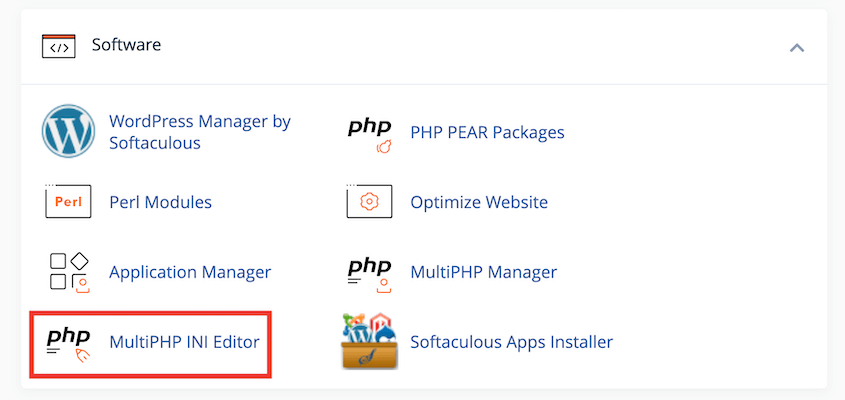
Some web hosts allow you to edit the php.ini file in your hosting control panel. For example, Bluehost has a MultiPHP INI Editor in cPanel.
With this tool, find the memory_limit value. Adjust it as needed.
If your web host doesn’t have a php.ini editor, you can use an FTP client or file manager.
Look for a file named php.ini in your root directory. Don’t see it? No worries, you can create one.
Open the php.ini file (or your new text file) in a text editor.
Add or modify this line:
memory_limit = 256M
Again, adjust the number based on your needs.
Save the file. If you created a new file, name it php.ini.
Upload the php.ini file to your WordPress root directory.
Some hosts use custom locations for php.ini files. If this method doesn’t work, check with your hosting provider for the correct location.
Pro tip: While you’re in the php.ini file, you might also want to adjust other PHP settings that can impact WordPress performance, like max_execution_time and post_max_size. But remember, with great power comes great responsibility – only change what you understand!
Method 3: Edit Your .htaccess File
If the previous methods didn’t work, don’t worry. You can also edit your memory limit in the .htaccess file. This file controls your site’s configuration if your web host uses an Apache server.
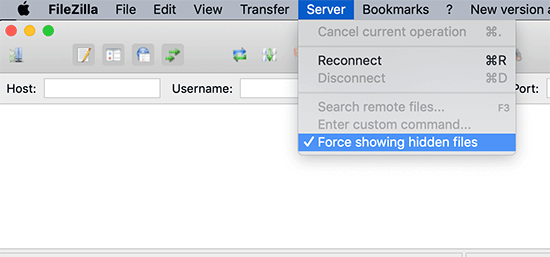
Your .htaccess file will be in your site’s root directory. If you don’t see it, it’s a hidden file. In this case, you’ll need to force show your hidden files.
Open the .htaccess file in a text editor.
Add this line at the bottom of the file, above the line that says #END WORDPRESS:
php_value memory_limit 256M
This will increase PHP memory to 256MB. Feel free to tweak the number based on your needs.
Save the file and upload it back to your server. Clear your cache and check if the memory limit has increased.
The .htaccess file is powerful but sensitive. A small typo can take down your entire site. If your site goes down after making these changes, simply delete the lines you added or restore your backup.
Also, some shared hosting environments don’t allow PHP settings to be changed via .htaccess. If you encounter an Internal Server Error after making these changes, remove them and try the next method.
Method 4: Use a Plugin to Increase Memory Limit
If you’re not comfortable editing files directly, or if your hosting provider restricts these changes, a plugin might be your best bet. Some plugins can increase the WordPress memory limit, giving you a beginner-friendly option.
Look for a well-rated plugin with recent updates. Some options include:
Most of these plugins work automatically once activated. Some might have settings you can adjust.
The beauty of using a plugin is its simplicity. Just a few clicks and you’re done. You won’t have to edit any files!
But remember, plugins are not magic wands. They still need to work within the constraints of your hosting environment. If your host has set hard limits, even a plugin won’t be able to bypass them.
Also, keep in mind that adding plugins can potentially slow down your site. It’s a bit ironic – you’re adding a plugin to solve a performance issue, but too many plugins can create new performance issues. Use this method wisely.
Method 5. Upgrade Your Web Hosting Plan
Sometimes, no amount of tweaking can overcome the limitations of your current hosting environment. If you’re constantly dealing with memory issues, you might want to upgrade your hosting plan or find a completely new WordPress hosting provider.
Here’s when to consider upgrading your hosting:
- You’ve tried all other methods without success.
- Your site is consistently slow or crashing despite optimizations.
- You’re running a resource-intensive site (e-commerce, membership, or high-traffic).
- Your business is growing and you need more reliable performance.
Higher-tier plans often come with more RAM, CPU power, and higher PHP memory limits. More resources mean faster load times.
If you have a shared hosting plan, you’ll share resources with other websites. By upgrading, you’ll have dedicated servers, leading to less downtime and fewer performance issues.
When you’re ready to upgrade, contact your host about your options.
Otherwise, you may need to move to an entirely new web host. Some providers have free migration services. You can also use Duplicator Pro to simply drag and drop your data into the new location.
Upgrading to a better host gives you room to grow and can eliminate many performance issues. Afterward, monitor your site’s performance to make sure it’s meeting your needs.
FAQs About Increasing the WordPress Memory Limit
How do I optimize memory in WordPress?
What causes high memory in WordPress?
High memory usage often comes from inefficient code in themes or plugins, large amounts of content or media, complex database queries, or high traffic volume. Sometimes, it’s a combination of these factors.
What is the best memory limit for WordPress?
The ideal memory limit varies based on your site’s needs, but most sites run well on 256MB to 512MB. Always start with the lowest limit that works for your site and increase gradually if needed.
How do I fix memory issues in WordPress?
Start by identifying problematic plugins or themes through deactivation tests. Use debugging tools to pinpoint issues, and consider upgrading your hosting if problems keep happening.
How often should I check my WordPress memory limit?
Monitor your memory usage regularly, especially after adding new plugins or features. Monthly checks are a good starting point for most sites.
Can I decrease my WordPress memory limit?
Yes, you can decrease your WordPress memory limit. However, it’s not usually recommended unless you’re certain your site can function with less memory. Lowering it too much can cause functionality issues.
What is the maximum upload limit for WordPress?
WordPress upload limits can range from 2MB to 500MB. Your actual limit depends on your hosting provider’s settings. It can often be changed in your php.ini file or through your hosting control panel.
Conclusion
After you increase the PHP memory limit of your site, keep a close eye on its performance. Monitor, adjust, and repeat. WordPress site management is an ongoing process, not a one-time fix!
While you’re here, I think you’ll like these extra WordPress guides:
Don’t wait for a memory issue to take down your site. Get Duplicator Pro now and create your first backup in minutes. Your future self will thank you!
Joella is a writer with years of experience in WordPress. At Duplicator, she specializes in site maintenance — from basic backups to large-scale migrations. Her ultimate goal is to make sure your WordPress website is safe and ready for growth.


