Your website might be bleeding money right now, and you don’t even know it.
Slow loading times, constant downtime, and security vulnerabilities are silent killers of e-commerce.
I’ve watched countless online stores lose customers and revenue because they’re stuck on terrible hosting.
But here’s the good news: migrating your WooCommerce site isn’t the technical nightmare you think it is.
With the right strategy, you can breathe new life into your online business, boost performance, and create a rock-solid foundation for growth.
In this guide, I’ll show you exactly how to migrate your WooCommerce store without losing a single customer or dropping in search rankings!
You’ll learn:
- Why migrating your WooCommerce site can boost performance and revenue
- Essential pre-migration checklist to avoid common mistakes
- Step-by-step process for zero-downtime WooCommerce migrations
- How to update DNS and set up redirects without losing SEO rankings
- Best practices for informing Google about your site migration
Quick Summary: How to Migrate a WooCommerce Site
1. Back up your WooCommerce site.
Since you don’t want to lose any data, use
Duplicator Pro to fully back up your WooCommerce site. Download the backup files.
2. Update your hosts file to avoid downtime.
Find your computer’s hosts file and add your old domain name and new IP address. This will trick your computer into thinking your site has moved. Visitors can still see your old site while you work on the new one!
3. Set up the new website.
This step varies depending on where you plan on moving your WooCommerce site. You may need to find a new hosting plan, domain name, or local server. When you’re done, create a new database for the site.
4. Import your backup into the new location.
If you’ve already installed WordPress on the new site, simply drag and drop your backup file into Duplicator’s Import page. You can also skip this step by uploading both the archive and installer to the new server. Either way, Duplicator will walk you through the rest of the migration.
5. Make sure the new WooCommerce site is accessible.
Finally, update your DNS and add 301 redirects from the old site to the new one. To keep your search rankings, inform Google about the migration.
Table of Contents
Why Migrate Your WooCommerce Site?
If your business is losing conversions, you might optimize your online store by speeding up the checkout page, building an email newsletter, or reducing your prices. However, the problem might be your web hosting provider.
A poor web host can cause slow loading times and downtime. To solve this problem, you can migrate your WooCommerce site to a WordPress host with better infrastructure.
Let’s dive into some more reasons for a WooCommerce migration!
Target a Different Market
If you’re expanding your business internationally or targeting a specific geographic location, it makes sense to move your store closer to your target audience. This can help reduce latency and improve website accessibility for customers in that region.
Better Scalability
As your business grows, you may need more resources and advanced features to handle increased traffic and transactions. Upgrading your hosting plan can provide higher performance, better server configurations, and enhanced scalability to meet your evolving needs.
Enhance Security
If you’ve experienced security breaches, moving to a more secure server can help protect your store and customer data.
Improve Support
You might be unsatisfied with your current hosting provider’s customer support. Finding a host with a reputable and responsive support team can ensure your store runs smoothly.
Rebranding
Migrating to a new domain name allows you to create a new brand identity. As a store owner, you can choose a domain that aligns better with your business goals, target audience, or brand values.
You might also want to completely redesign your existing store. In this case, migrate a copy of your site to a staging environment. Here, you can test changes without affecting your live website.
Before Migrating Your WooCommerce Store
Here’s a quick checklist of things to handle before you start that migration:
✅ Choose Your New Hosting Provider
Don’t just jump ship without a destination! Research and select a new hosting provider that better suits your needs. Consider factors like server speed, uptime guarantees, security features, and customer support.
✅ Audit Your Current Site
Are there any plugins you no longer use? Themes you’ve abandoned? A pre-migration cleanup reduces baggage and can even improve performance on your new host.
✅ Backup, Backup, Backup!
Yes, backing up is a step during the migration process too, but it’s essential to have a recent, reliable backup before you start anything. Consider it your safety net!
✅ Enable Maintenance Mode
Just in case something unexpected happens, it’s wise to put your site into maintenance mode. This will display a friendly message to visitors instead of potential errors. Consider using a plugin like SeedProd to quickly create a professional-looking maintenance page.
✅ Disable Caching, Firewall, and Redirect Plugins
Temporarily disable caching, firewall, and redirect plugins on your old site. These plugins can sometimes interfere with the migration process and cause unexpected issues. You can re-enable them once the migration is complete on your new site.
✅ Verify PHP and Server Settings
Check the PHP version and server settings on both your current and new hosting environments. Ideally, they should be as similar as possible to ensure compatibility and avoid potential problems after migration.
✅ Inform Your Team
If you have a team, let them know about the upcoming migration. This ensures everyone is on the same page and can prepare for any potential temporary disruptions.
✅ Set a Migration Time
Plan to migrate during a low-traffic period. Weekends or late evenings are often good choices for e-commerce sites as fewer customers are actively shopping. Minimizing traffic during the move reduces the chance of any customer disruption.
✅ Test Your Current Site’s Speed
Run a speed test on your current WooCommerce site with tools like the IsItWP Speed Test. This way, you can objectively measure the performance improvements after you migrate to your new host!
By taking these steps before you start the actual migration, you’ll be setting yourself up for a much more successful and less chaotic move.
How to Migrate a WooCommerce Site
For beginners, WooCommerce migrations can be a difficult process. To ensure you don’t lose any customers, you’ll need to successfully transfer all your product data, customer information, order history, order IDs, and other critical data to the new location.
Fortunately, it’s possible with the right tools!
Here’s a quick overview of how to migrate your WooCommerce site:
- Install a WooCommerce migration plugin: Get Duplicator Pro for drag-and-drop imports and large site support
- Create a full site backup: Export all your WooCommerce data, products, and settings into a single backup file
- Update your hosts file: Map your domain to the new IP address to avoid downtime during migration
- Set up your new WordPress installation: Install WordPress and create a database on your new hosting provider
- Import your backup: Drag and drop your backup into the new WordPress install and follow the migration wizard to transfer all data to the new location
- Update DNS nameservers: Point your domain to the new host
- Set up 301 redirects: Redirect visitors from old URLs to new ones using the AIOSEO plugin
- Notify Google of the migration: Update your domain in Google Search Console to maintain SEO rankings
Step 1: Install a WooCommerce Migration Plugin
Manually migrating a WordPress site can be a complex and time-consuming process. It requires some technical experience with FTP clients and phpMyAdmin.
To simplify the process, use a WordPress migration plugin.
Duplicator Pro is a plugin that provides a more efficient way to migrate your website. You won’t need to manually transfer your files and database to the new location!
With Duplicator, you’ll be able to back up your entire site into a single zip file. Then, you can easily move it to a new web host or domain name. Plus, it’s fully compatible with WooCommerce.
Since Duplicator can import/export your WooCommerce site with zero downtime, you can:
- Keep traffic consistent
- Improve conversions
- Avoid dips in SEO ranking
Duplicator is a user-friendly migration tool for all types of WooCommerce sites, regardless of size. Whether you have a small online store or a large e-commerce platform, Duplicator can handle the data migration seamlessly.
Not sure if Duplicator can handle your large WooCommerce site? See how Mario Röder uses it to migrate stores with over 150,000 products!
To get started, visit the Duplicator website and purchase a premium subscription. There is a free alternative, but we’d recommend upgrading to access drag-and-drop imports, disaster recovery, and large site support.
After downloading Duplicator Pro, you’ll need to install it in WordPress.
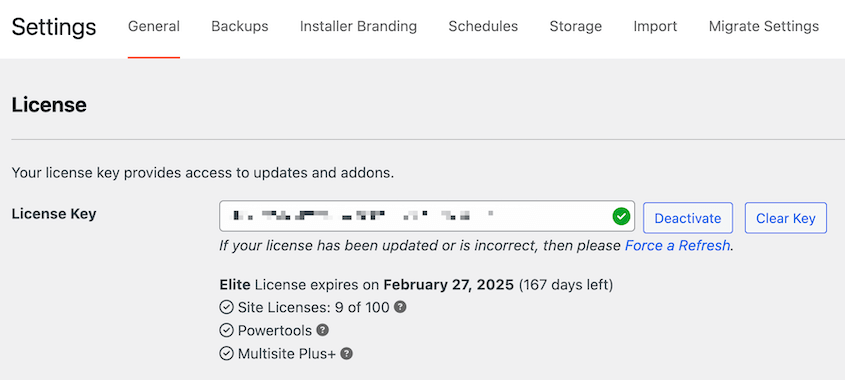
Finally, head over to Duplicator Pro » Settings » General. Paste your license key.
Once you hit Activate, you can use Duplicator to start your WooCommerce migration!
Step 2: Back Up Your WooCommerce Site
Duplicator Pro allows you to export data from your WooCommerce site. You can create a full backup, saving its content, plugins, themes, settings, and configurations.
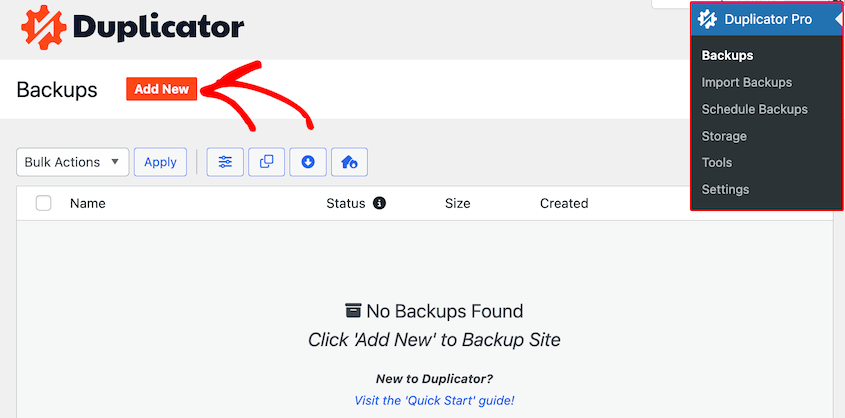
To do this, go to Duplicator Pro » Backups » Add New.
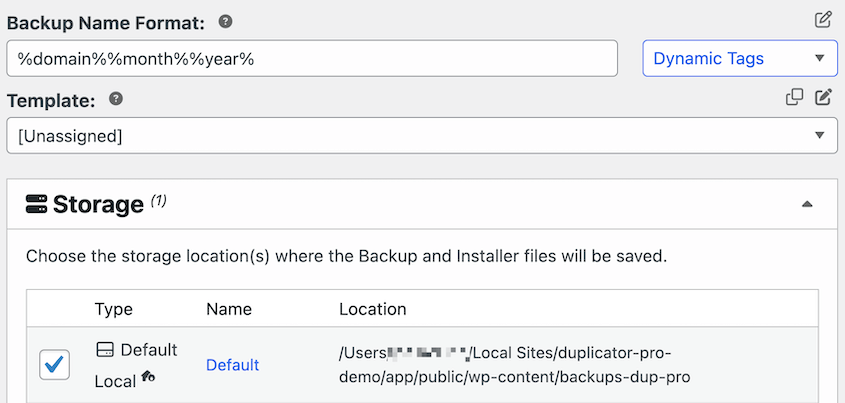
Feel free to customize the backup name. Then, choose Local as the storage location.
Next, choose exactly what data you want to migrate to the new server. Expand the Backup section. To migrate all of your data, select Full Site.
However, could be an opportunity to clean up your WooCommerce store. For example, you could only include active plugins and themes to remove any unnecessary software.
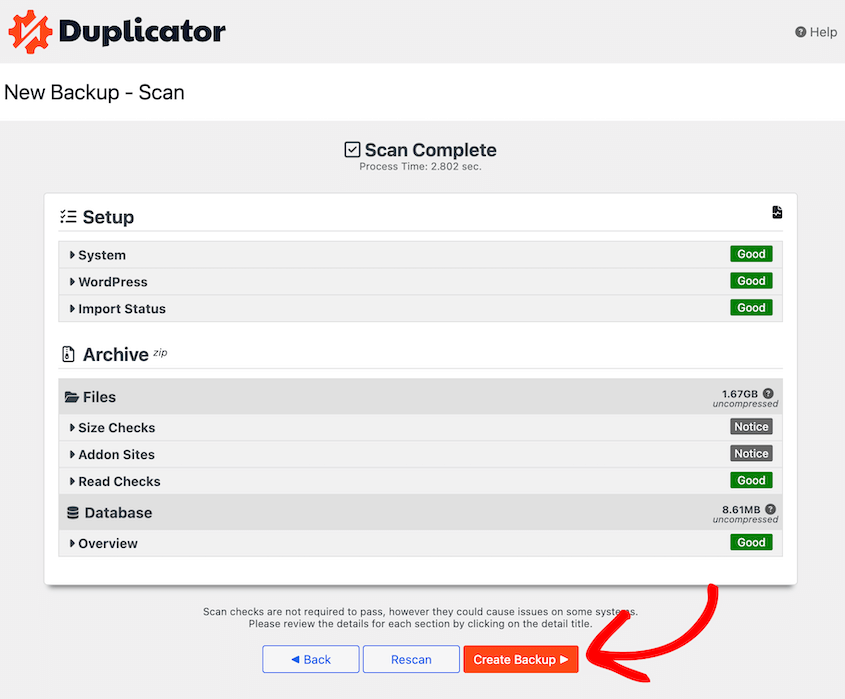
When you’ve finished customizing these options, click Next. Duplicator will scan your WooCommerce store and notify you of any issues before building the backup.
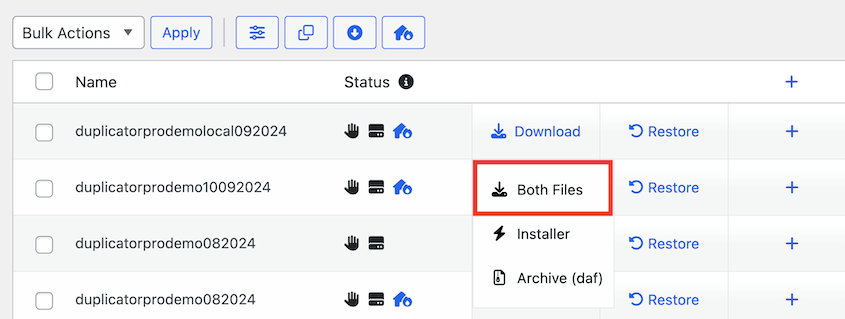
Review these notices and hit Create Backup. On the Backups page, download both files.
If you have a large WooCommmerce site on a shared web host, I’d recommend creating a backup as a DupArchive rather than a ZIP file.
This custom file format will allow you to avoid server timeout issues when compressing everything on your site into a single export file.
For more details, read my tutorial on how to migrate a large WordPress site!
Step 3: Update Your Hosts File
For e-commerce businesses, downtime is lost revenue. If your site is inaccessible, potential customers may abandon their shopping carts, seek alternative options, and lose trust in your store.
During a migration, you might expect downtime at some point. However, you can easily move your WooCommerce site without losing visibility. Since your site will be up, your Search Engine Optimization (SEO) rankings won’t go down.
To do this, you’ll need to add some data to your hosts file. This file is used to map domain names to specific IP addresses on your local computer.
By editing the hosts file, you can assign your new IP addresses to your old domain name. After this, your computer will think your DNS has been changed, allowing you to set up your new site while the old one stays online.
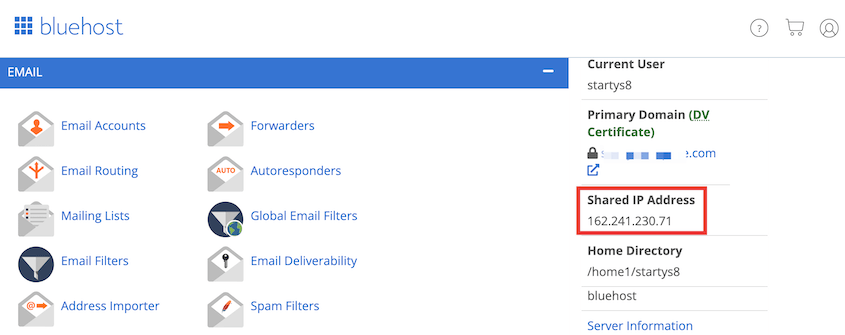
First, locate and copy your new IP address. For most web hosts, you’ll find this information in your control panel.
Then, open your hosts file. For Mac operating systems, you can run this command in Terminal:
sudo nano /private/etc/hosts
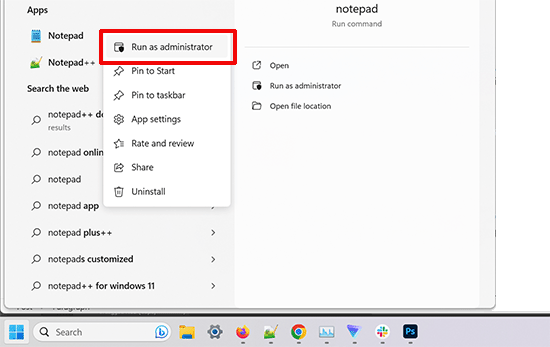
Windows users can open the Notepad app with administrator privileges.
Find the hosts file in this folder:
C:\Windows\System32\drivers\etc
In your hosts file, paste your domain name and new IP address in this format:
192.168.1.22 www.example.com
Save these changes. Now, your old domain is linked to your new host’s files. You’ll need to keep this entry until you finish migrating your WooCommerce site to the new server.
Step 4: Set Up the New Website
Now it’s time to set up your new WooCommerce site! Your web host will likely provide a way to install WordPress in one click. After you do this, you’ll need to create a database.
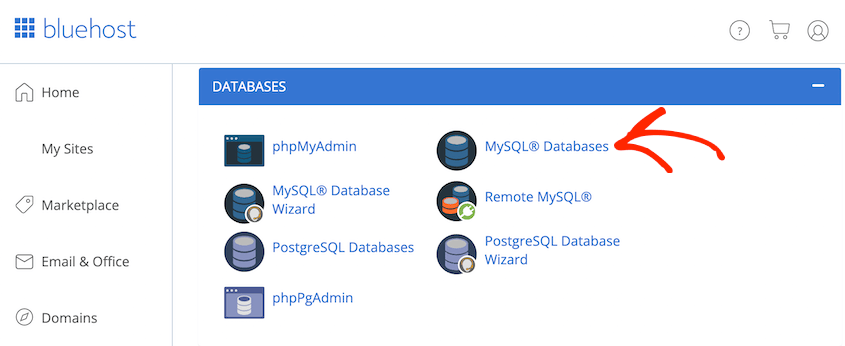
How you create a database will vary depending on your hosting provider. For Bluehost users, you can click on the MySQL Databases option.
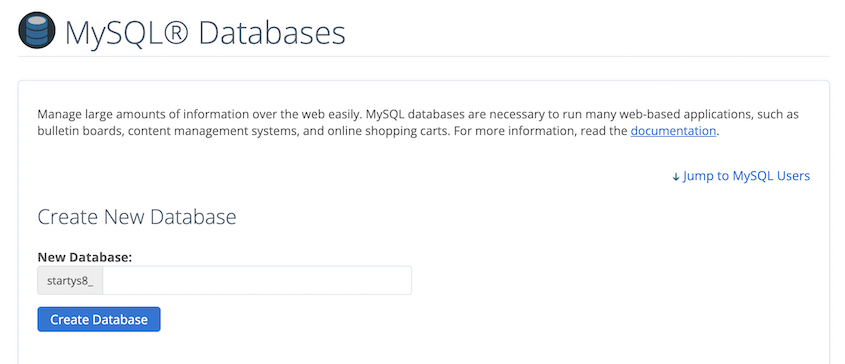
Then, name the new database and hit Create Database.
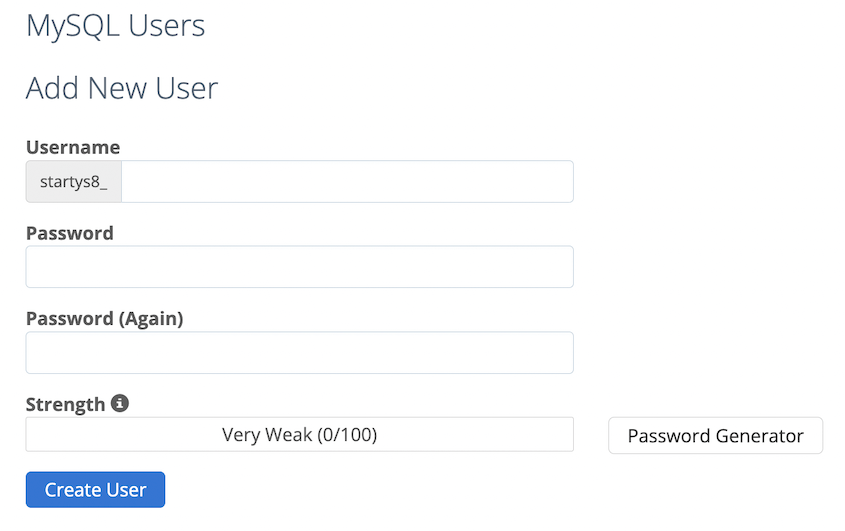
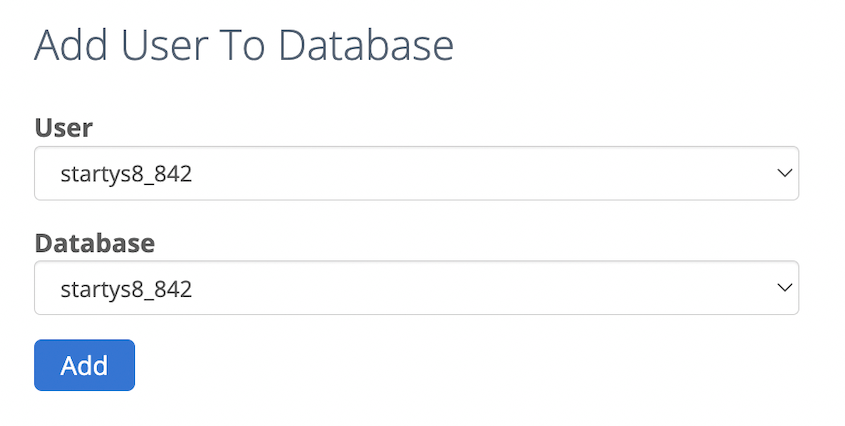
Along with your new database, you’ll need to create a new user. Find the MySQL Users section and enter a username and password.
Lastly, assign the user to the new database.
To fully prepare for the WooCommerce migration, install and activate Duplicator on your new WordPress dashboard.
Step 5: Import Your Site Backup
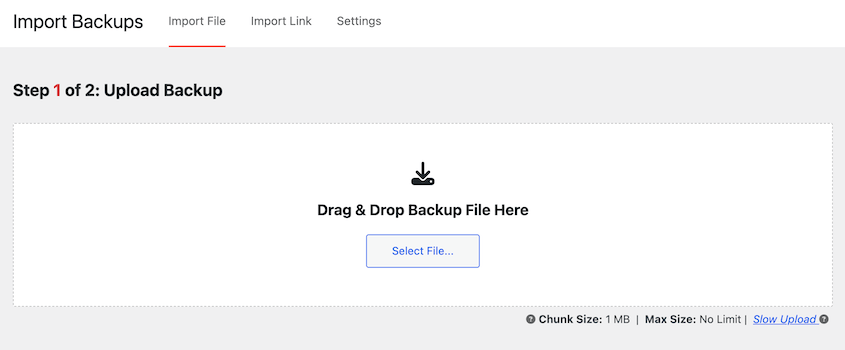
Once you have Duplicator Pro set up on your new site, you’ll be able to simply drag and drop the backup of your old site into the new one. This will transfer all of your store data into the new WordPress installation.
To do this, open Duplicator Pro » Import Backups.
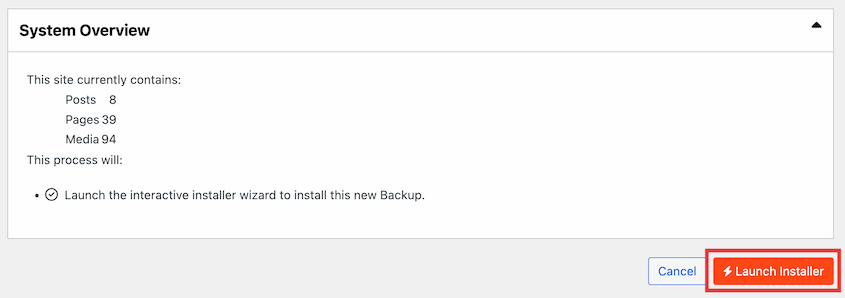
Import the archive file that you saved earlier. Once it uploads, hit Continue.
If you’re ready to replace the default WordPress installation with your original site, launch the installer.
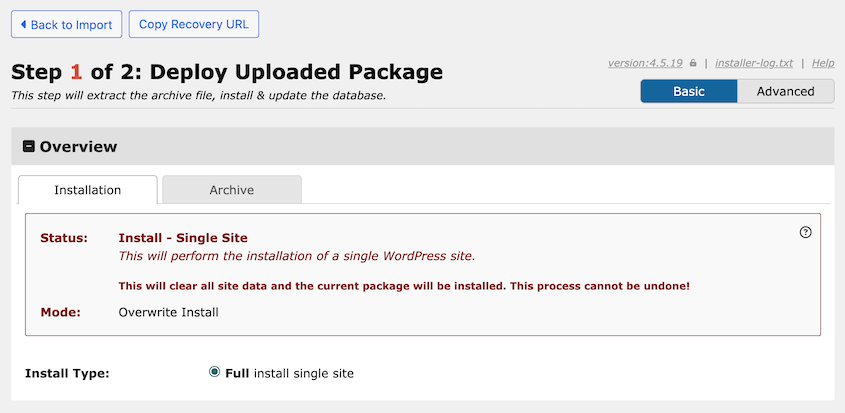
This will open the Duplicator migration wizard.
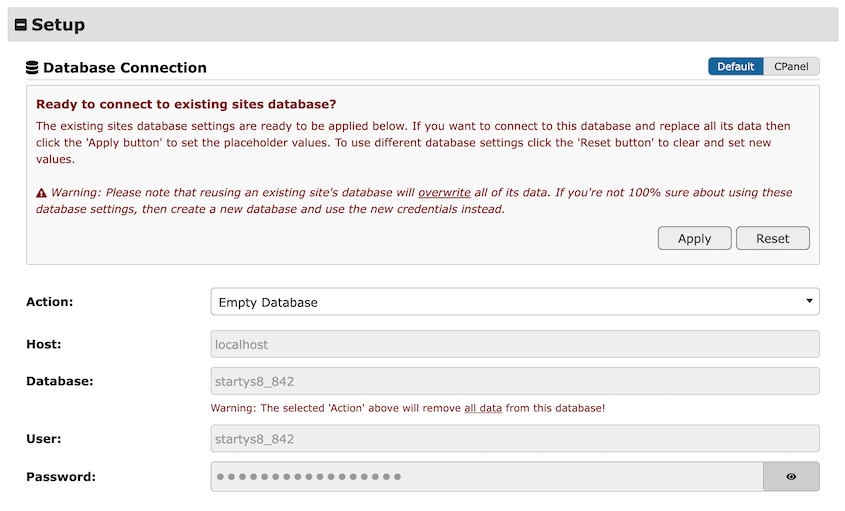
Using Duplicator’s drag-and-drop import feature, it’ll automatically connect to the site’s new database. However, check the Setup settings to make sure the database information is correct.
Next, validate the installation and review any notices. If everything looks correct, accept the terms and notices and continue.
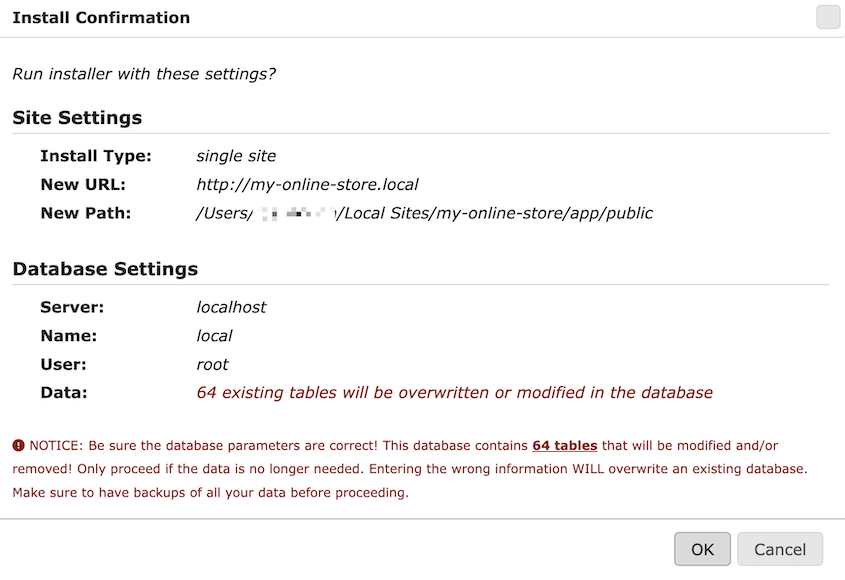
To finish the WooCommerce migration, you’ll have to confirm that you want to overwrite the current site.
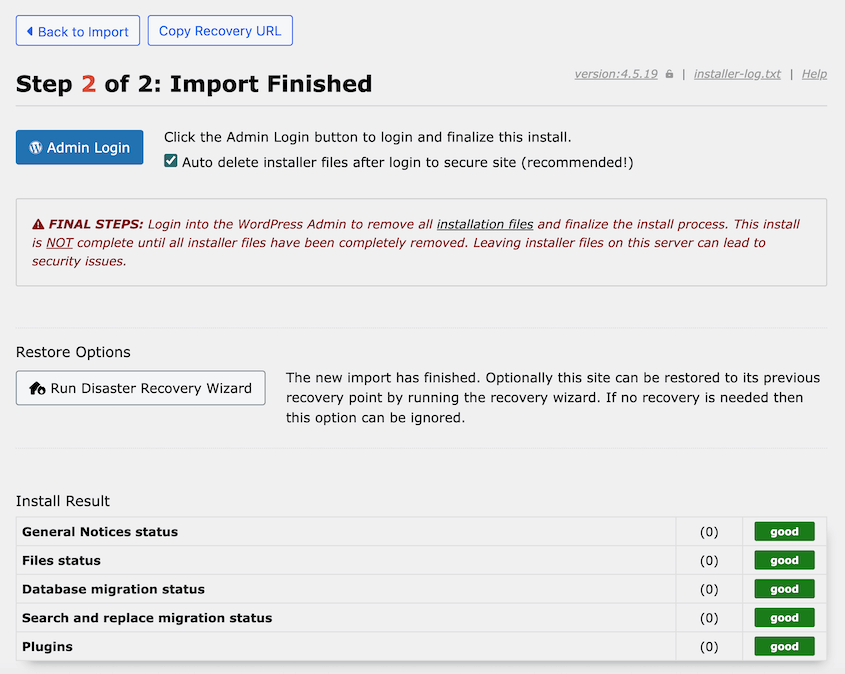
After this, there will be a data transfer from your old server to the new one. To sign in to your WooCommerce site, hit Admin Login.
You’ll see that Duplicator migrated your entire e-commerce site. It’ll import data including the WooCommerce plugin, tax rates, custom shopping carts, customer information, and WooCommerce product data.
Step 6: Update Your DNS
At this point in the migration process, there will be a fully functional copy of your WooCommerce site in a new location. Now, you’ll need to point your domain name to the new web host.
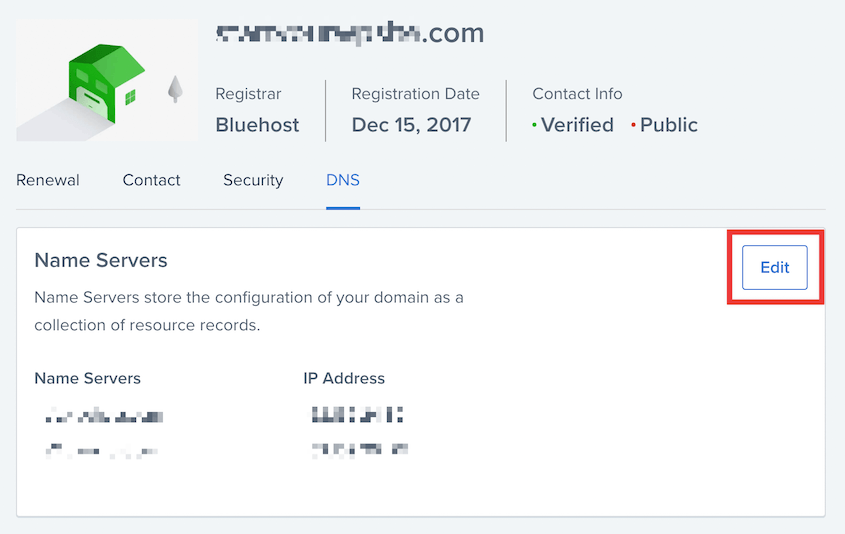
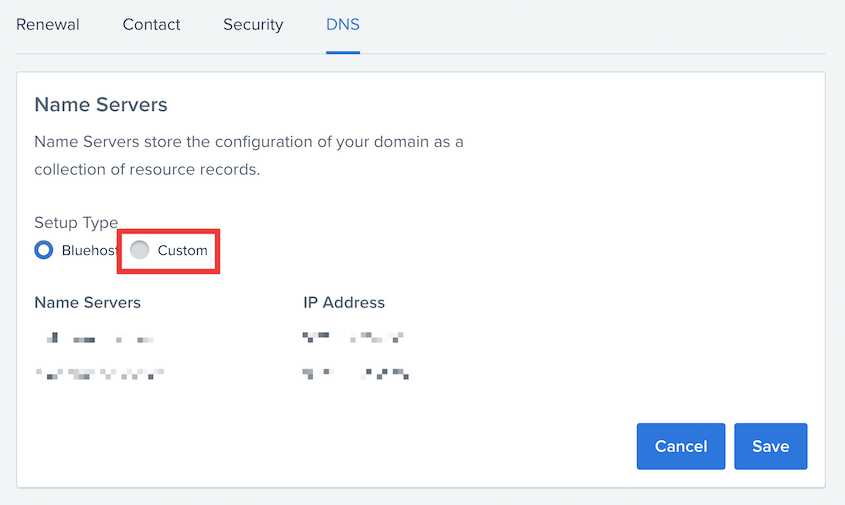
Log into your previous hosting account. Next, find your Domain Name System (DNS) nameservers settings and start editing them.
Instead of the default nameservers, choose Custom. Enter the nameservers specific to your new host.
Be sure to save this change. It’s important to note that you may have to wait up to 48 hours for your DNS to propagate.
Step 7: Add 301 Redirects
If you are migrating to a new domain name, you’ll want to make sure that visitors can easily access your new WooCommerce store.
An easy way to do this is to set up 301 redirects. This will inform search engines and users that your website has been permanently moved.
To improve your store’s search ranking, you’re probably already using an SEO plugin like AIOSEO. Fortunately, you can use this same tool to redirect your entire WooCommerce site. You won’t have to manually set up 301 redirects in your site files.
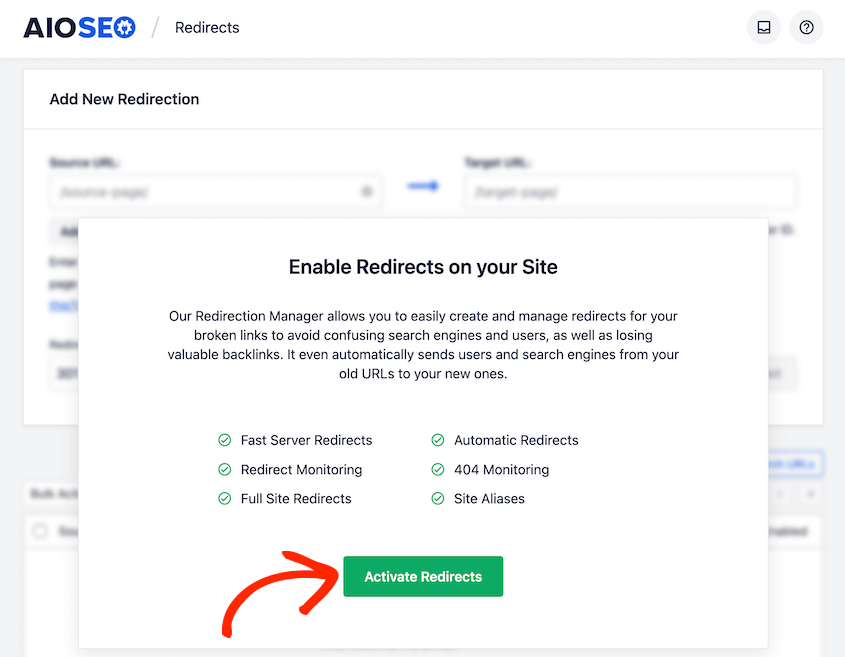
On your original site, make sure you have AIOSEO Pro installed. Then, go to the Redirects page and activate this feature.
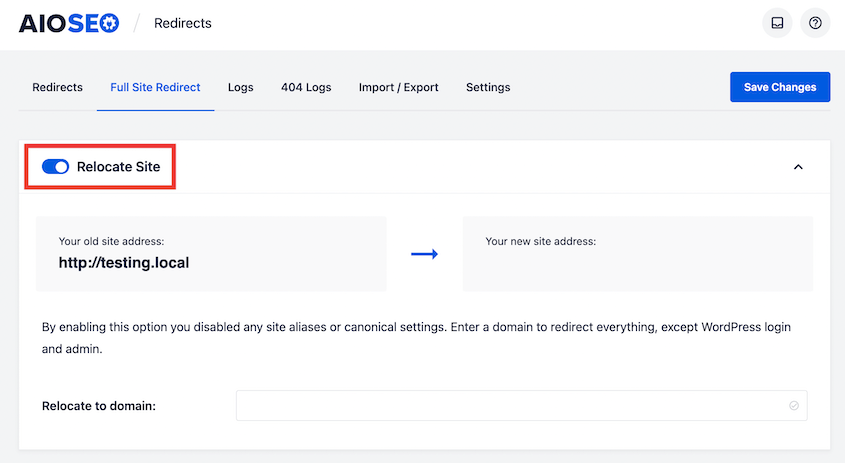
Finally, head over to the Full Site Redirect tab. Here, turn on the Relocate site option. Finally, enter your new store’s URL.
After this, hit Save Changes. Every time someone visits an old product page, they’ll automatically be redirected to your new site!
For domain changes, it’s important to notify Google right away. When you do, search engines know exactly where your WooCommerce site is. They’ll be able to find, index, and display your content more easily.
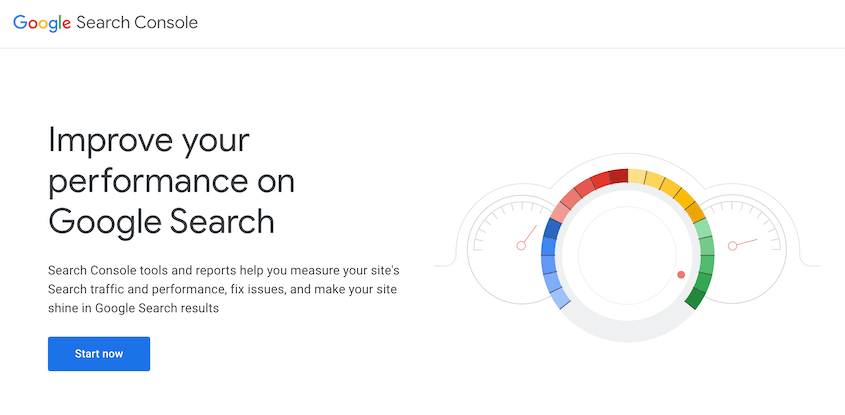
You can update your website’s domain in Google Search Console. This is a free tool that allows you to monitor and optimize your site’s presence in Google search results.
As a first step, make sure you have both the old and new WooCommerce sites added as properties. To help you with this, check out this tutorial on setting up Google Search Console.
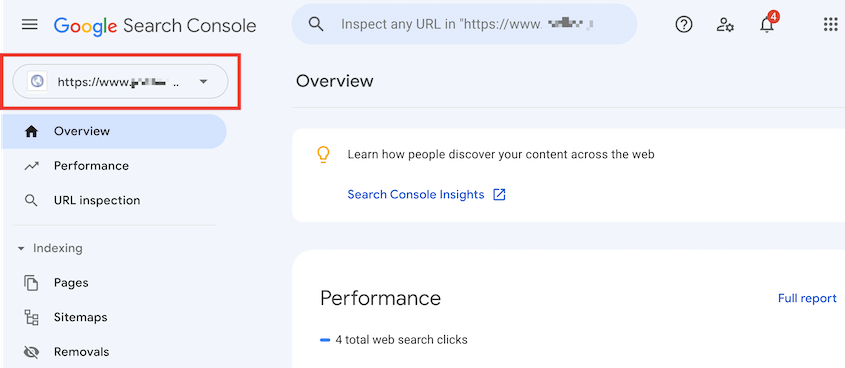
Next, you’ll see both properties available in the dropdown menu at the top of the page. Select your original domain name.
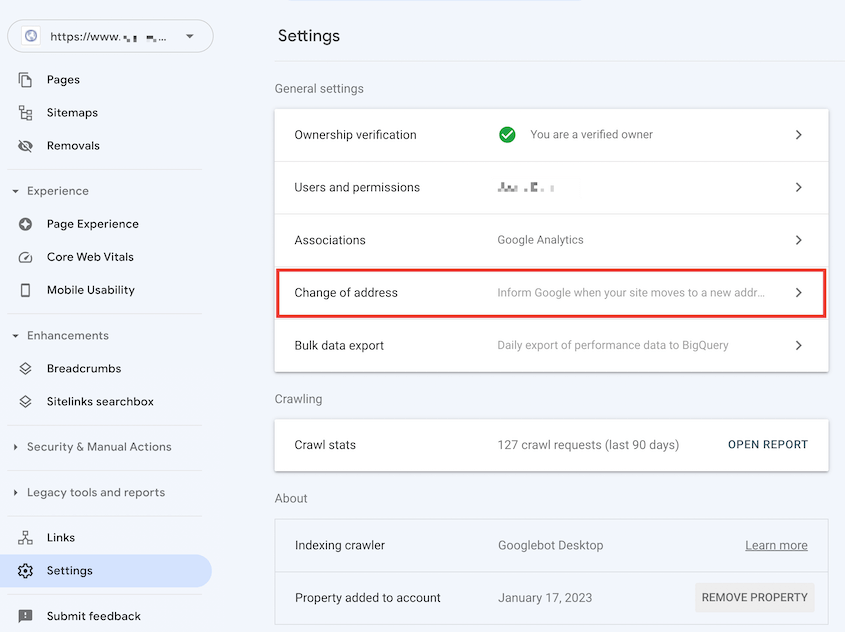
Then, find Settings » Change of address.
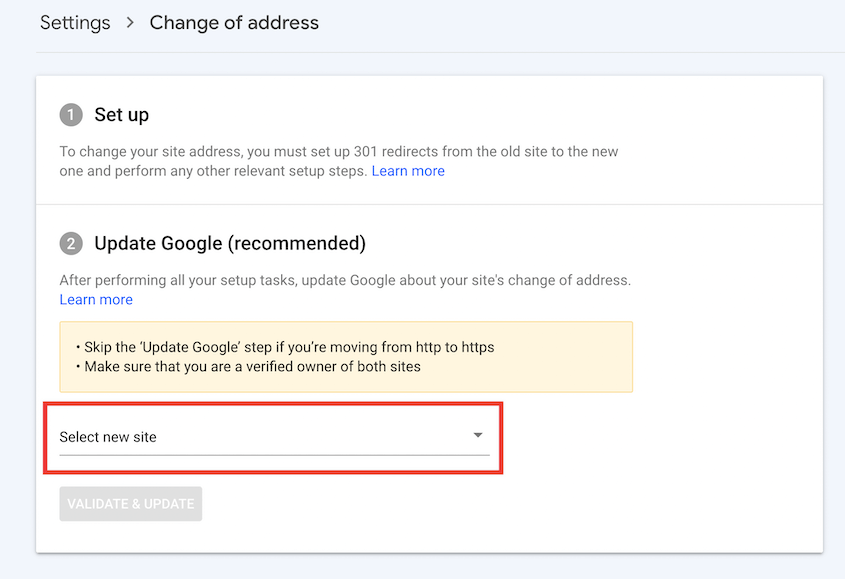
Now all you’ll need to do is select the property for the new WooCommerce site.
Click on Validate & Update to finish informing Google about the migration.
Frequently Asked Questions (FAQs)
How do I migrate WooCommerce to a new server?
You can migrate your WooCommerce store to a new server by installing Duplicator Pro and creating a full backup of your site. Then, drag and drop the generated archive file into the new WordPress installation. The Duplicator migration wizard will walk you through the process of importing your original data.
Alternative: Cart2Cart is an e-commerce migration service that can transfer data like product categories, images, orders, and product variants. It allows you to select your source and target carts and run a free demo migration.
How do I move my whole WordPress website to a new domain?
You can move your whole WordPress website to a new domain by creating a backup with Duplicator Pro and dragging and dropping it into the new website. After the migration, the AIOSEO plugin can help you redirect visitors from the old domain to the new one. Also, be sure to inform Google about the domain name change.
Why migrate from Shopify to WooCommerce?
WooCommerce is an open-source plugin that provides more flexibility and customization options than a Shopify store. You can use a wide range of free and paid extensions to enhance your store’s functionality and integrate with third-party services. Additionally, WooCommerce has no transaction fees, enabling you to have more control over your profit margins.
Alternatives: Adobe Commerce (formerly Magento) and BigCommerce are additional options for setting up your e-commerce store.
What is the best way to migrate a WooCommerce website?
The best way to migrate a WooCommerce website is to use Duplicator Pro to create a backup with your site’s files and database information. Then, simply drag and drop this backup into the new location. This allows even beginners to easily move their online stores without downtime or data loss.
How do I migrate WooCommerce products?
WooCommerce offers the Product CSV Import Suite extension that allows you to easily migrate products as a CSV file. If you want to use an XML file, you can use the native WordPress export tool. Alternatively, consider migrating your entire WooCommerce store with Duplicator Pro.
Conclusion
Migrating your WooCommerce site is a strategic business move.
You’ve got the blueprint. You know the steps. Now it’s time to take action. Don’t let fear of complexity hold you back from creating a faster, more secure, and more scalable online store.
Every minute you wait is another minute losing potential sales. Your competitors aren’t standing still, and neither should you.
Are you ready to safely move all of your WooCommerce products, orders, and other important data? Download Duplicator Pro for hassle-free site migrations!
While you’re here, I think you’ll like these other WordPress guides:
Joella is a writer with years of experience in WordPress. At Duplicator, she specializes in site maintenance — from basic backups to large-scale migrations. Her ultimate goal is to make sure your WordPress website is safe and ready for growth.


