I always knew backups were important, and my web host offered them, but it felt like a flimsy safety net. What if something happened on their end too?
I started looking for something truly flexible and secure, something that would give me real peace of mind.
That’s when Google Cloud caught my attention. It’s built on Google’s infrastructure, the same tech giants rely on. Suddenly, the idea of off-site backups felt incredibly secure.
If you’re like me and want to stop worrying about website disasters, let’s walk through how to set up Google Cloud backups for your WordPress site!
Here are the key takeaways:
- Google Cloud provides enterprise-grade security with the same infrastructure used by major tech companies
- Object storage handles unlimited data, unlike basic cloud services like Dropbox or Google Drive
- Costs start at $0.0012 per GB/month after a free $300 credit for new Google Cloud users
- Off-site backups protect against server crashes, hacks, ransomware, and WordPress errors
- Duplicator Pro simplifies the process by automating backups to many cloud storage providers
- Automatic scheduling available for hands-off backup management with customizable frequency
Quick Summary: How to Back Up WordPress to Google Cloud
1. Install a WordPress backup plugin that supports Google Cloud.
To back up your WordPress site to the cloud, install
Duplicator Pro. This backup plugin supports cloud storage providers like Google Cloud.
2. Set up a Google Cloud account.
Next, sign up for Google Cloud and create a new bucket. You should also generate access keys and copy them.
3. Connect your backup plugin to Google Cloud.
Now, create a new storage location in Duplicator. Fill out your new Google Cloud bucket’s information.
4. Create a Google Cloud backup.
Finally, create a backup. In the Storage settings, choose Google Cloud. Once Duplicator backs up your site, it’ll send the backup files to Google Cloud.
Table of Contents
What Is Google Cloud?
Google Cloud, or the Google Cloud Platform (GCP), is a suite of cloud computing services and products offered by Google. It provides a wide range of services that help businesses and developers to build, deploy, and scale applications.
Google Cloud is one of the leading cloud providers globally, behind Amazon Web Services (AWS) and Microsoft Azure. In fact, it takes up 14% of the cloud market share.
The GCP is a diverse platform that allows you to:
- Store an infinite amount of data in object storage
- Build generative AI applications
- Run data analytics
- Debug cloud applications
- Create virtual machines
Why Back Up Your WordPress Site to Google Cloud?
As a WordPress website owner, Google Cloud storage can be the perfect place to secure backups. Backing up your site to the cloud gives you a disaster recovery plan.
Cloud backups can protect your data from WordPress errors, hacks, or server crashes. When your backup is off-site, it won’t be corrupted by any issues on your site.
You might already be familiar with basic cloud storage like Dropbox or Google Drive. Unlike these options, Google Cloud is an object storage service. This means it can handle any amount of unstructured data.
Here are some benefits of using Google Cloud as a backup solution:
- Scalable infrastructure
- Security features like access control, data encryption, and signed URLs
- Different storage classes for different use cases
- Integrates with other Google Cloud services
- Cloud data protection from ransomware
- On-demand, instant recovery
- Application-consistent database backups
- Test data management (TDM)
If you want to try out Google Cloud, you can get started for free. New customers get $300 in free credits and access to over 25 different products.
After you run out of free credits, Google Cloud storage starts at $.0012 per GB per month. Unlike options like Wasabi or Backblaze B2, there are extra network egress and retrieval fees.
To find out how much Google Cloud would cost, you can use this pricing calculator.
Did you know that Google Cloud is not the only object storage service out there? Before you get started, read my reviews of the best cloud storage providers.
How to Back Up WordPress to Google Cloud
Now, I’ll show you how to back up your WordPress site to Google Cloud!
Here’s a quick overview:
- Install Duplicator Pro: A WordPress backup plugin with 10+ off-site storage integrations
- Create a Google Cloud Bucket: Set up a storage container with proper naming and regional settings
- Create Access Keys: Generate service account credentials for a secure connection
- Connect Google Cloud to Duplicator: Link Google Cloud storage to your backup plugin
- Create Cloud Backup: Run your first backup and select Google Cloud as the storage location
- Set Up Automatic Backups: Schedule recurring backups to the cloud (hourly, daily, weekly, or monthly)
Step 1: Install Duplicator Pro
Although you could manually back up your website and upload these files to Google Cloud, there’s a better way.
To avoid wasting time and effort, consider using a WordPress backup plugin that’s compatible with Google Cloud.
Duplicator Pro is the best WordPress backup plugin available. It supports 10+ different backup locations, so you can make sure your backup is in a safe location.
With Duplicator, you’ll easily connect your website to Google Cloud. By automatically sending backups to the cloud, you’ll make your WordPress workload just a little easier.
Here are all the cloud services you can use with Duplicator:
- Duplicator Cloud
- Google Cloud
- Google Drive
- Dropbox
- Amazon S3
- Microsoft OneDrive
- Wasabi
- DreamObjects
- Vultr
- DigitalOcean Spaces
- Cloudflare R2
- Backblaze B2
- Any other S3-compatible cloud storage service
To get started, sign up for a Duplicator Pro subscription. There is a free version, but you’ll need to upgrade to access its many cloud storage integrations.
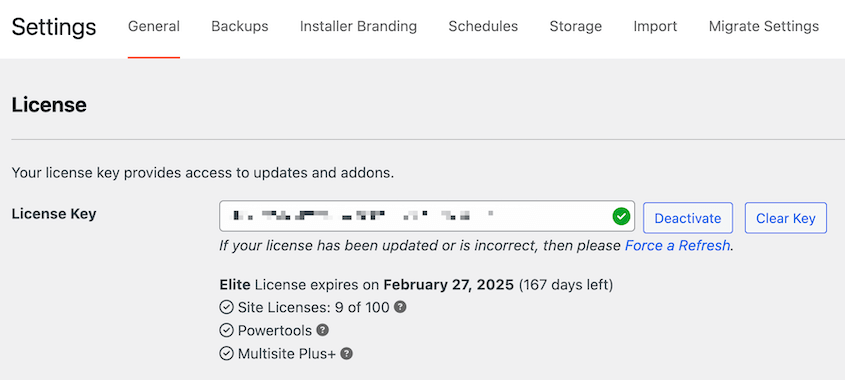
Be sure to copy your license key after checking out. Then, download Duplicator Pro and install it in WordPress.
As a final step, navigate to Duplicator Pro » Settings » General.
Paste your license key and hit Activate.
Step 2: Create a Google Cloud Bucket
At this point, you’ll need to create a Google Cloud account. Go to the company website and click on Get started for free. Alternatively, you can contact sales for a quote.
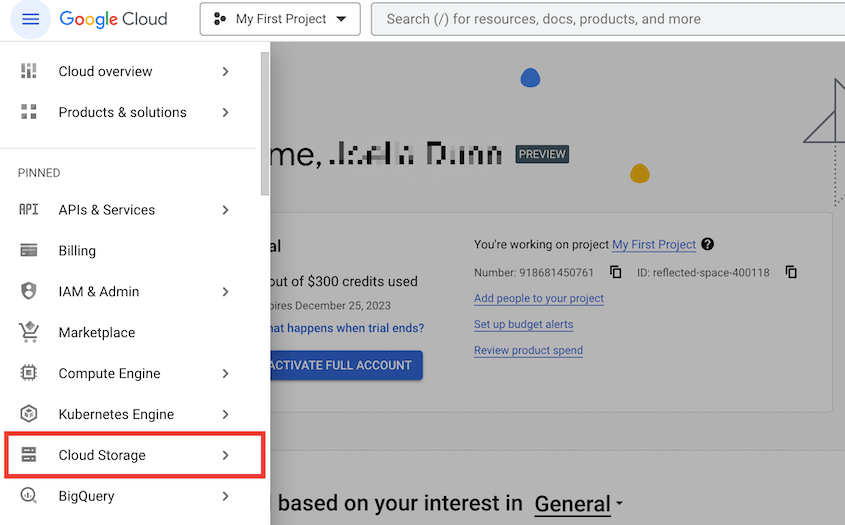
Once you log into your Google Cloud console, open the navigation menu and find Cloud Storage.
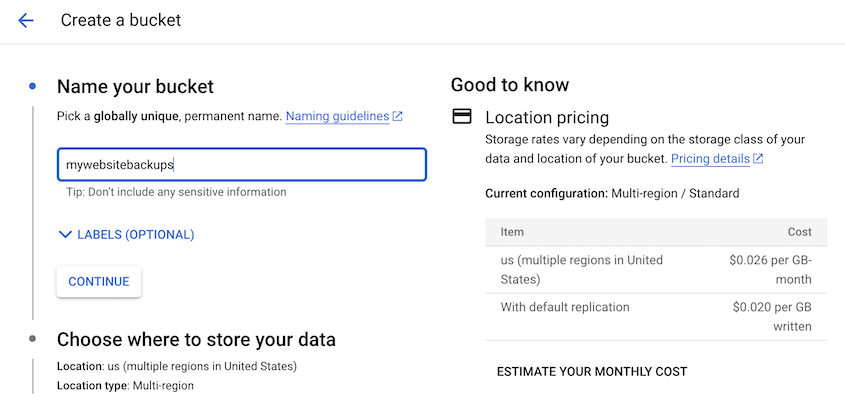
Then, select Buckets » Create.
Name the new bucket. Make sure to only use lowercase letters, numbers, hyphens, underscores, or dots.
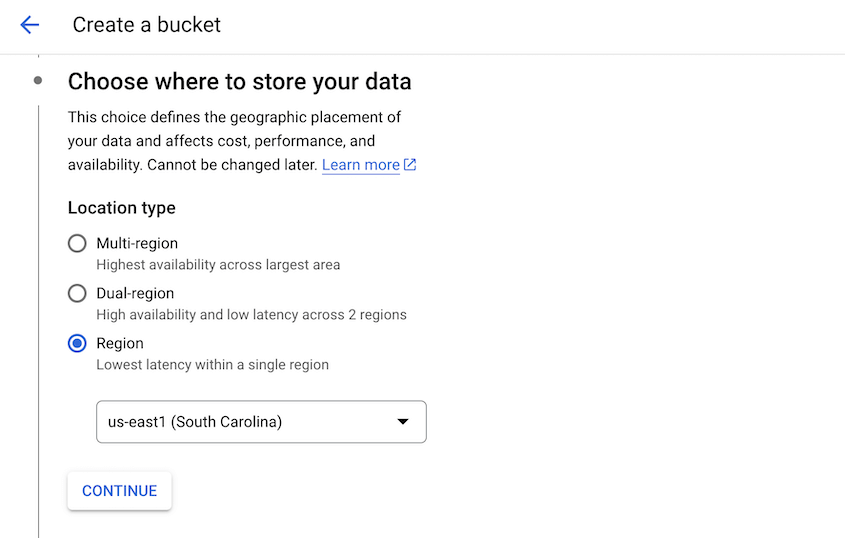
Next, choose a region where you want to store your data.
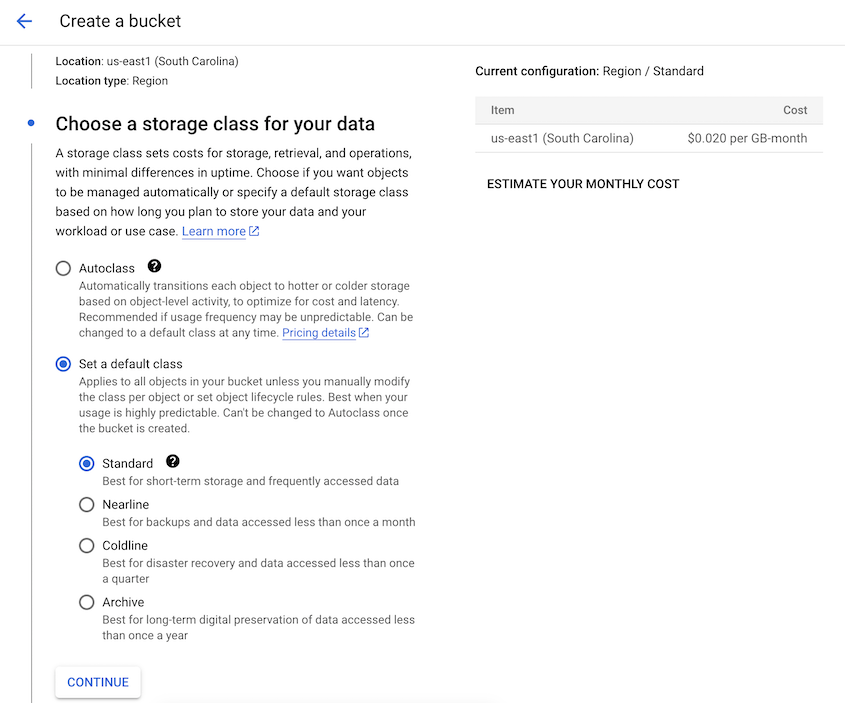
You can then set a storage class, which will determine the cost to store and retrieve data from the bucket.
You’ll have four options: Standard, Nearline, Coldline, and Archive. Choose one based on how often you plan to access your backups.
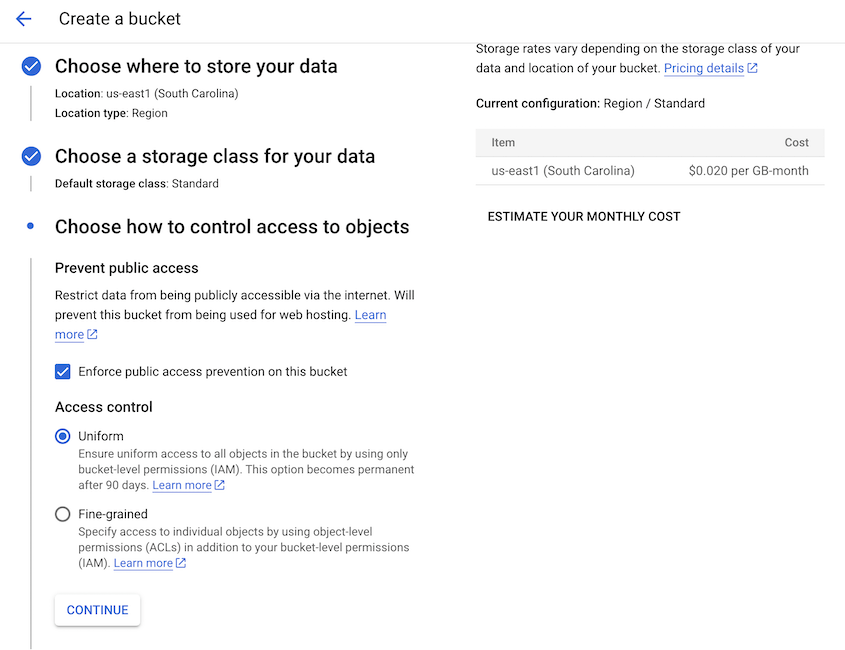
For the next step, customize your access control settings. Uniform access control will only rely on bucket-level permissions, while Fine-grained will allow you to set object-level permissions.
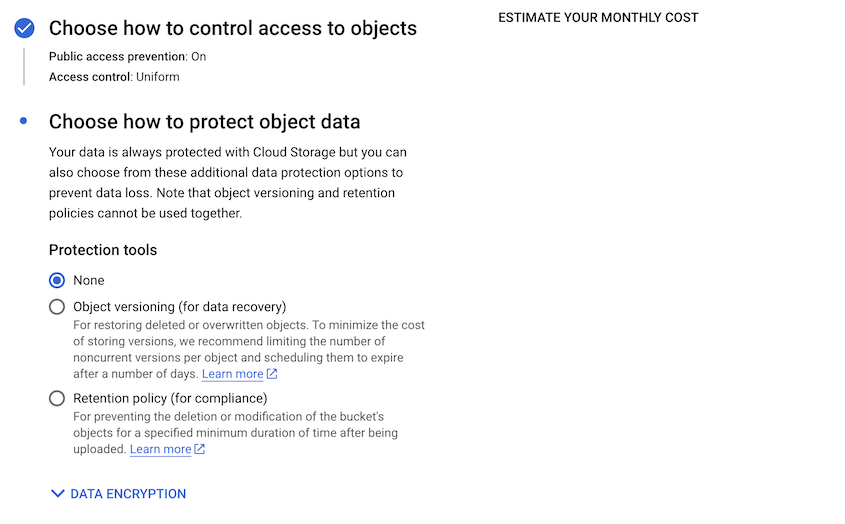
Under Protection tools, choose None or Object versioning.
After this, hit Create.
Step 3: Create Google Cloud Access Keys
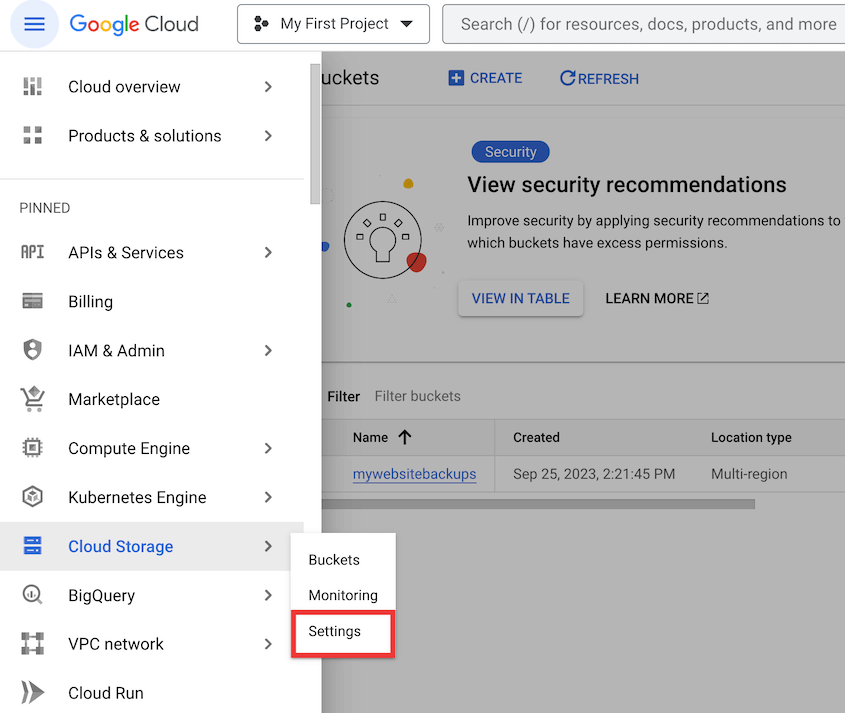
To connect Google Cloud and Duplicator, you’ll need to generate access keys for the new bucket. First, go to Cloud Storage » Settings.
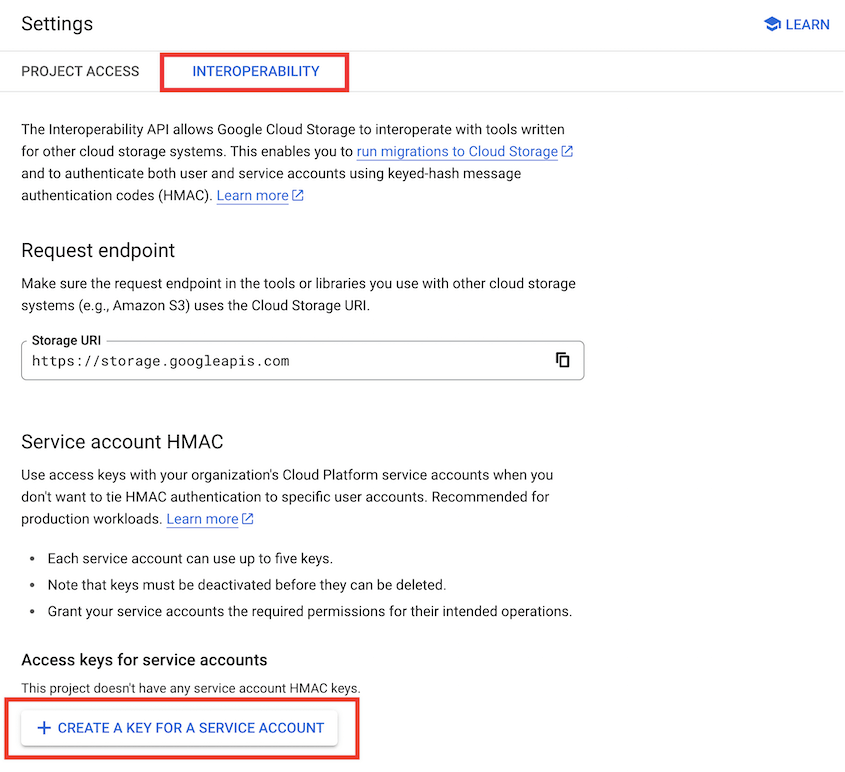
Click on the Interoperability tab. Here, hit Create a key for a service account.
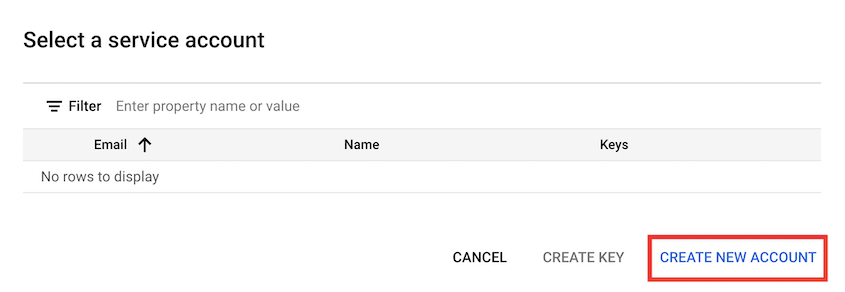
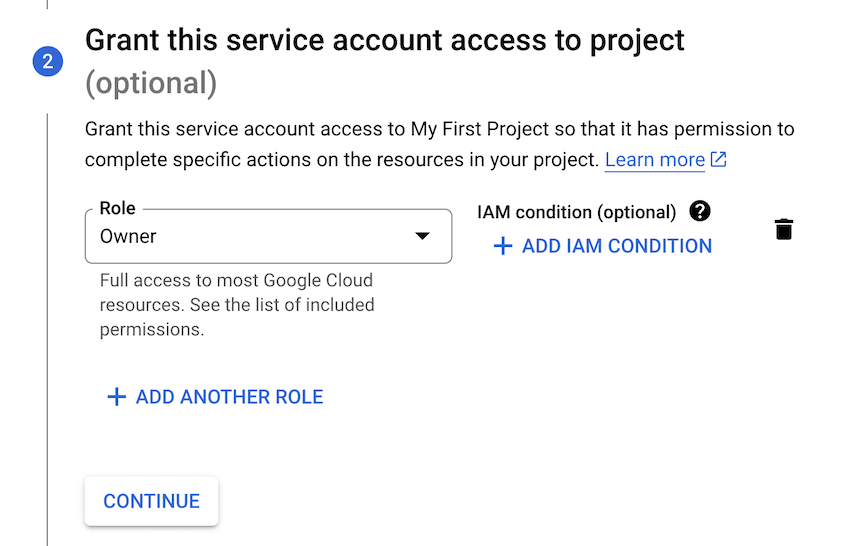
In the pop-up, create a new service account.
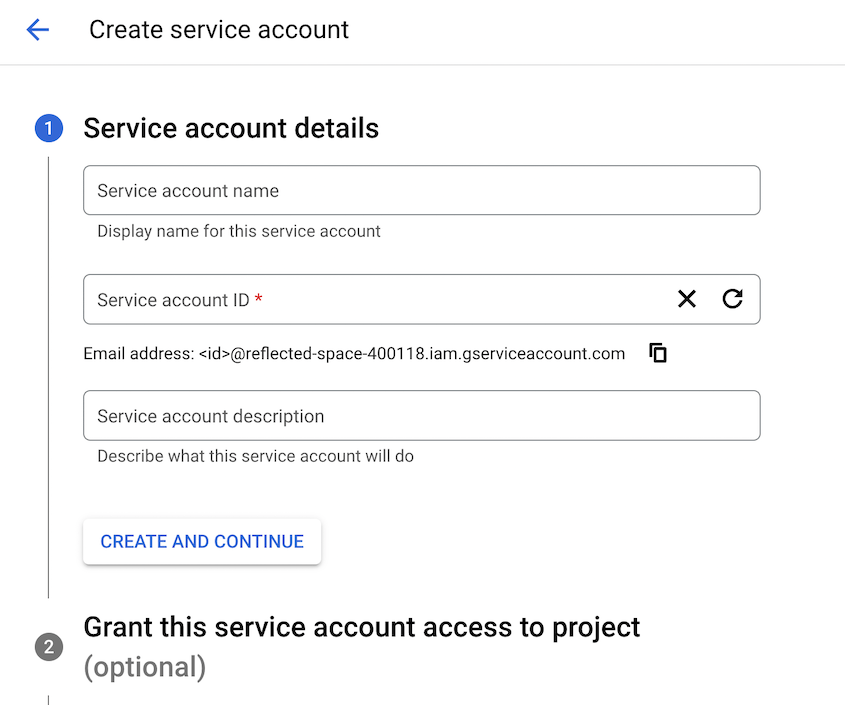
Enter an account ID and description.
For the Role, select Owner.
If you don’t want to give Google Cloud project owner access, add another role. Hit Create role.
Then, give the new role these permissions:
- storage.buckets.get
- storage.buckets.list
- storage.multipartUploads.abort
- storage.multipartUploads.create
- storage.multipartUploads.list
- storage.multipartUploads.listParts
- storage.objects.create
- storage.objects.delete
- storage.objects.get
- storage.objects.list
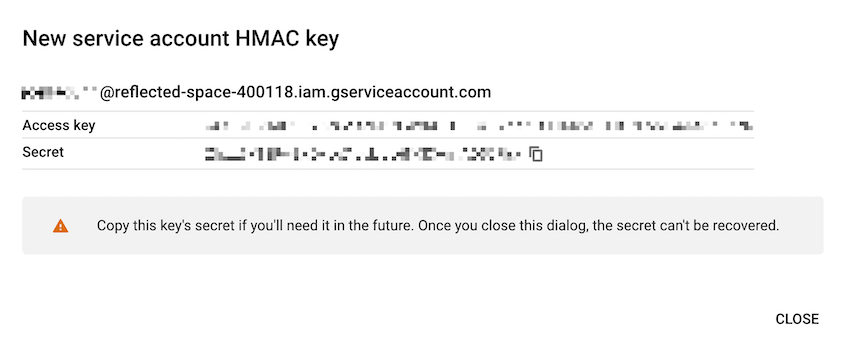
Once you finish creating a service account, you’ll automatically get new access keys.
Copy both of these to use in the next step.
Step 4: Connect Google Cloud to Duplicator
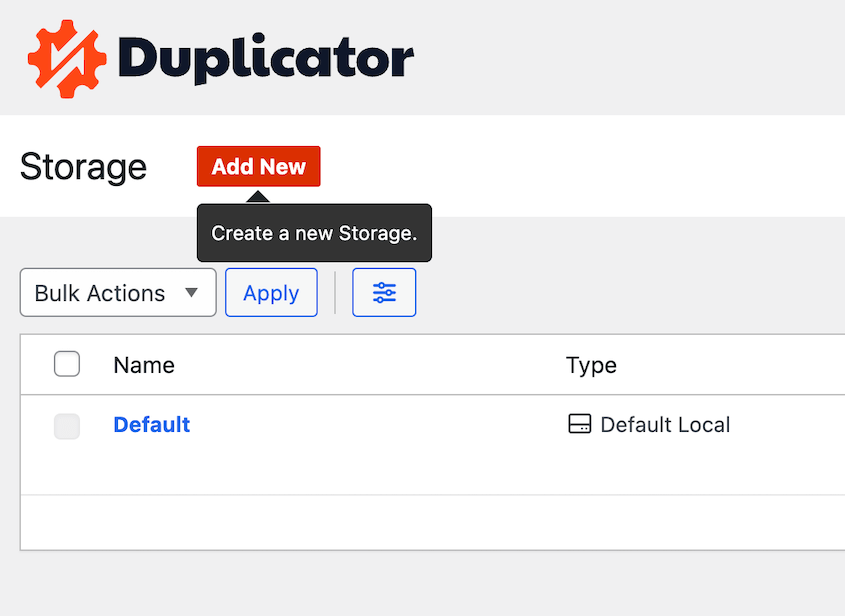
Your Google Cloud account is now fully set up! Go back to your WordPress dashboard and head over to Duplicator Pro » Storage » Add New.
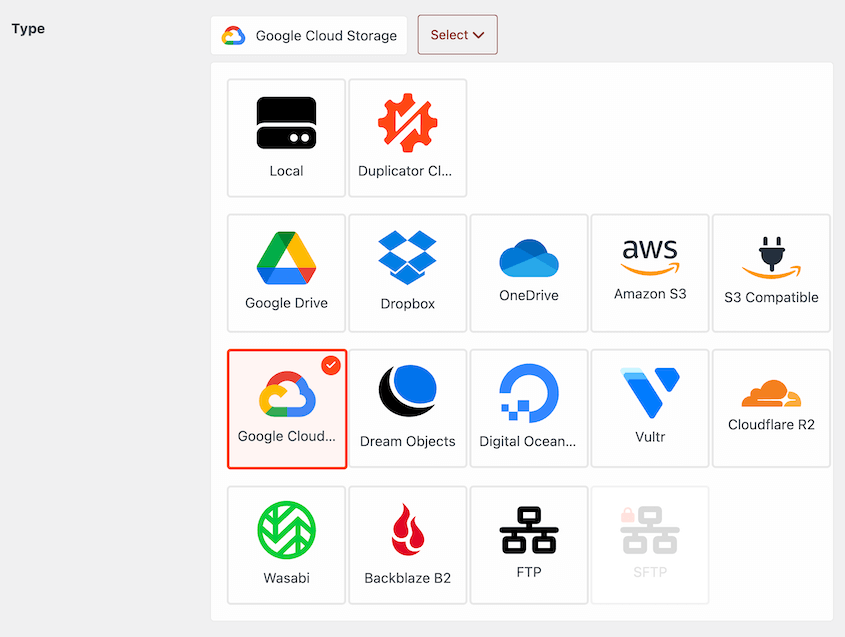
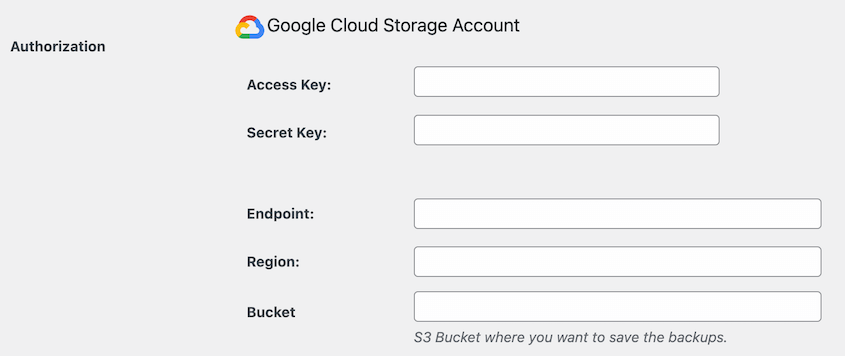
Then, name the new storage location and select Google Cloud Storage as the Type.
Scroll down to the Authorization section. Paste your access and secret keys.
For the endpoint, use this URL: https://storage.googleapis.com
You should also add your bucket name and region.
At the bottom of the page, you can adjust the Max Backups. This is the maximum number of backups allowed in your Google Cloud account at one time.
Lowering the max backups value can help you optimize your cloud storage space. See how Conceptstore Creative uses this feature in its agency workflow!
You should also disable full control ACL if you chose uniform access control when you set up the bucket.
Save the new storage location. To see if the integration is working, click on Test Storage. Duplicator will create and delete a small file on Google Cloud to test if it can do larger backups.
Step 5: Create a Google Cloud Backup
It’s time to back up your website to the cloud!
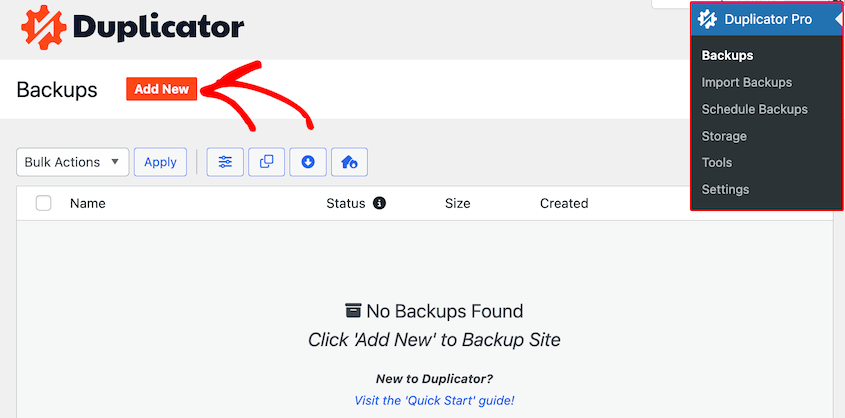
To do this, go to Duplicator Pro » Backups » Add New.
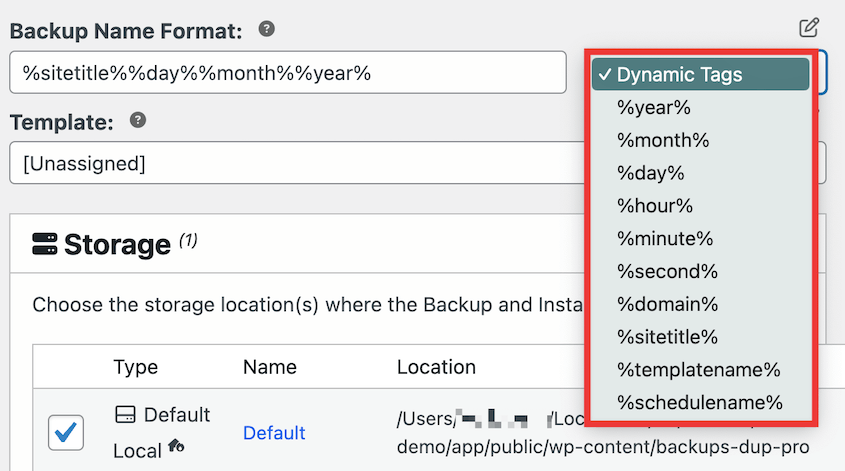
Name the backup using dynamic tags. These will automatically update when the backup is created.
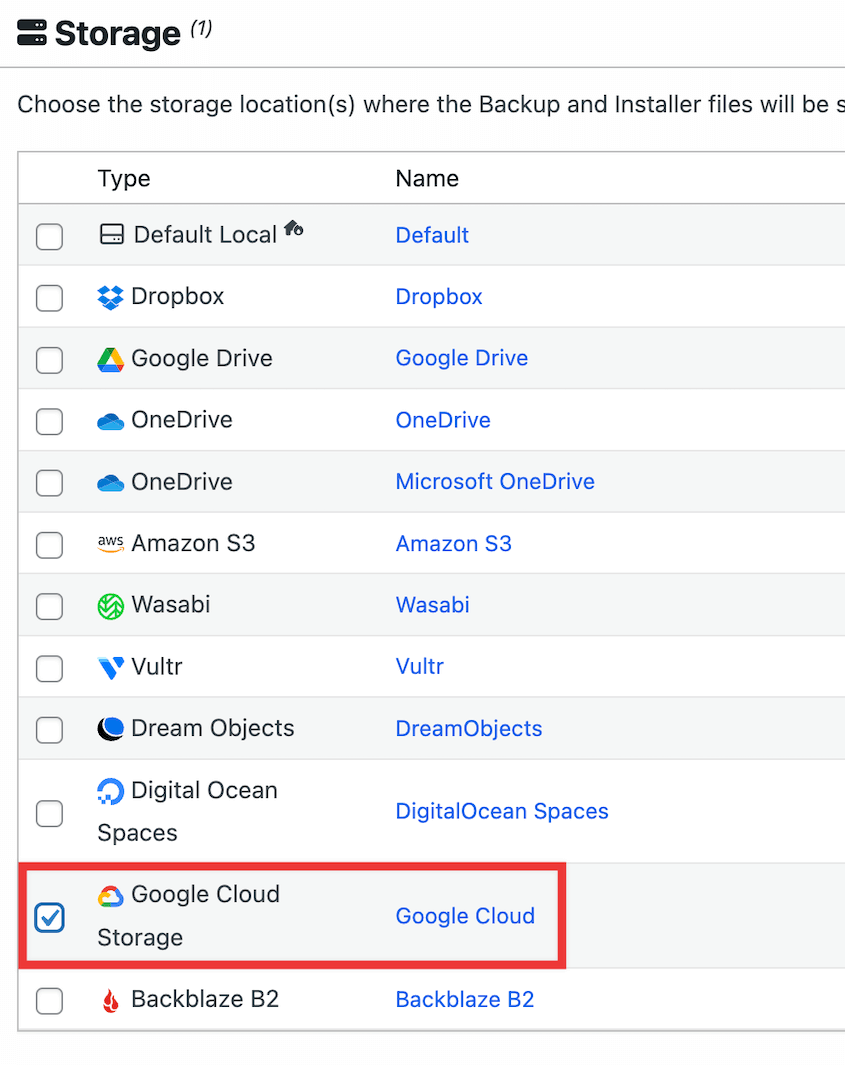
Then, choose Google Cloud as the storage location.
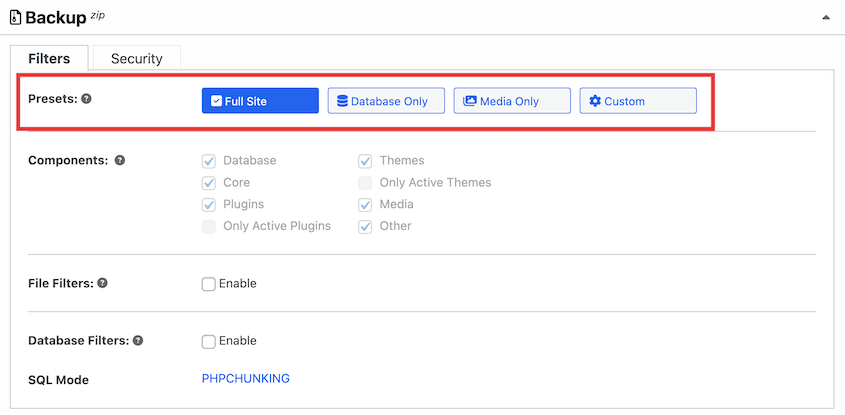
If you want to back up your entire website, select the Full Site backup preset. However, you can easily remove any unnecessary data, like the media library or inactive plugins, to clean up your backups.
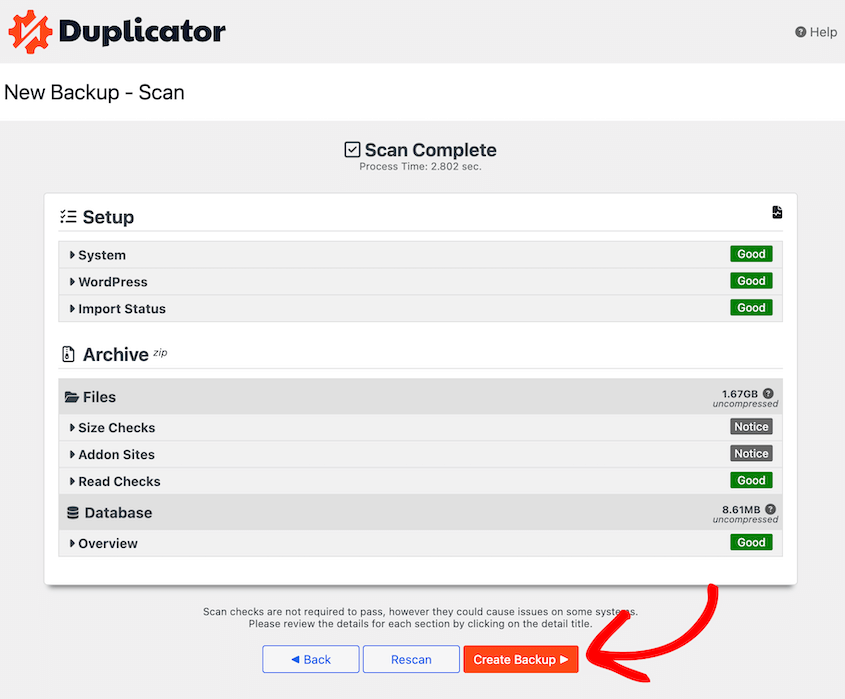
Once you click Next, Duplicator will run a scan of your site.
Review any flagged notices. If you’re ready to back up your site to Google Cloud, hit Create Backup.
Duplicator will automatically create a copy of your website and send it over to your Google Cloud bucket.
Step 6: Set Up Automatic Google Cloud Backups
Automatic backups make it easy to secure your site on a schedule. You can sit back and relax, knowing that Duplicator routinely sends your backup data to the cloud.
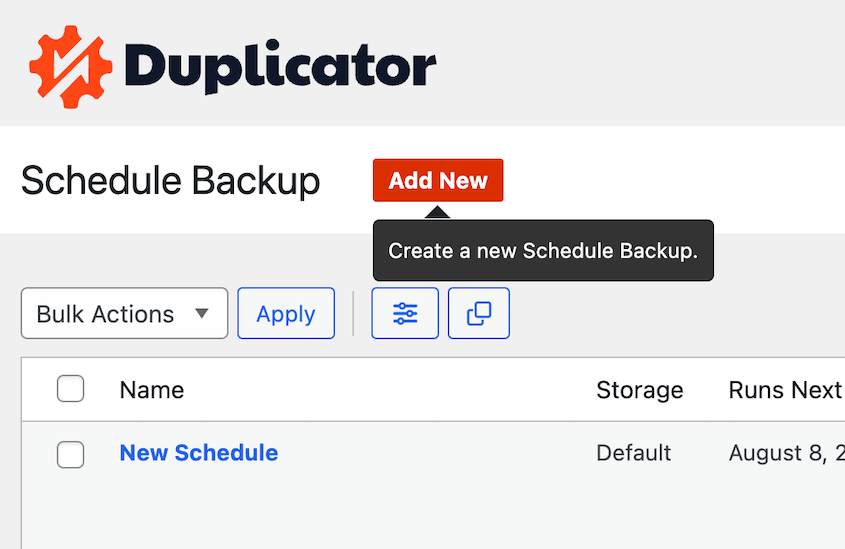
To set up your first backup schedule, go to Duplicator Pro » Schedule Backups » Add New.
Give the new schedule a descriptive name. If you want to fully back up your site, choose the Default template. However, you can create a new template for custom backups.
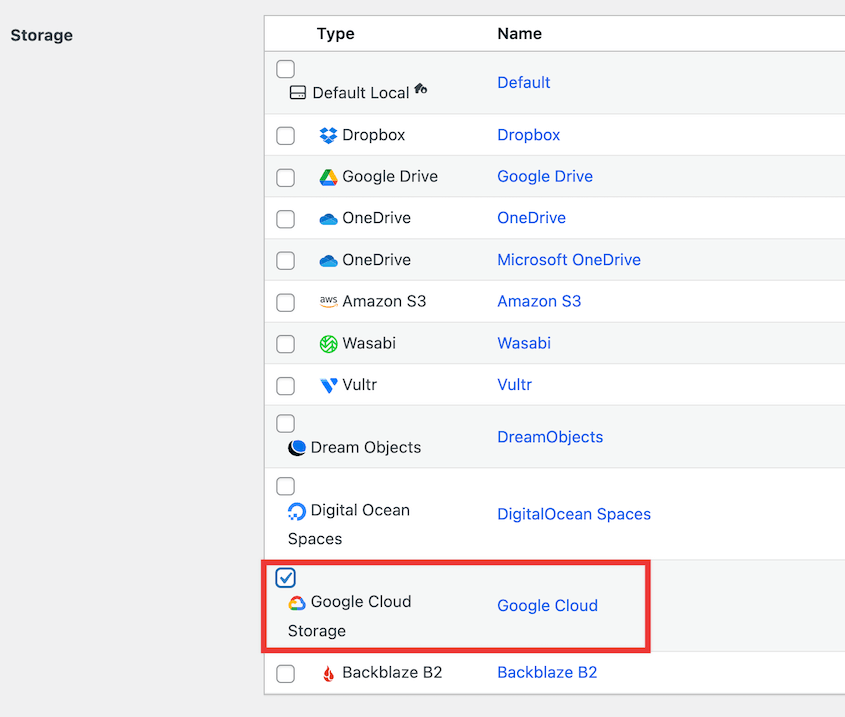
Then, be sure to select Google Cloud from the list of connected cloud storage locations.
With Duplicator, you can select one of these schedules:
- Monthly backup
- Weekly backup
- Daily backup
- Hourly backup
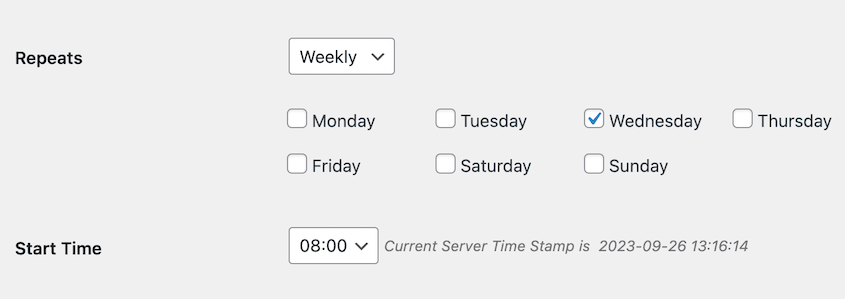
Once you pick one of these options, you’ll be able to set the exact time/date to run the backup. For example, you can select the day of the week for a weekly backup.
Set the Start Time. Since backup schedules require some web traffic, consider when your audience will be visiting your site.
When you’re finished, enable the schedule and save it.
How to Restore Your Google Cloud Backup
You’ll need to be prepared to restore a backup if your site experiences a critical error, cyber threats, or server downtime. This way, you’ll instantly restore its functionality and avoid data loss.
When this happens, open Duplicator’s Backups page. Find a recent full-site backup and hit the Restore button.
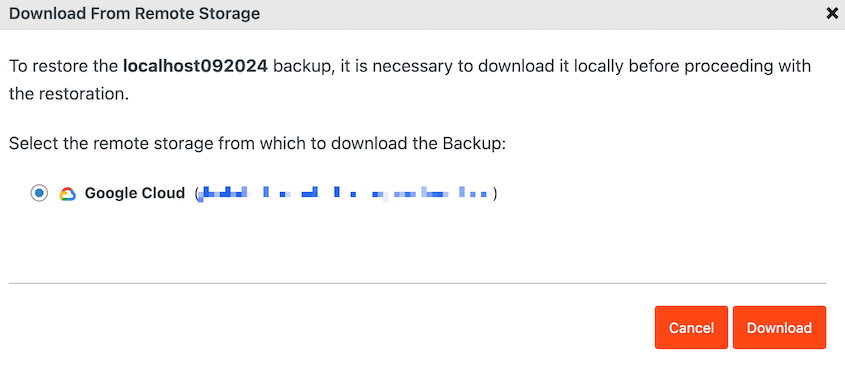
Since the backup is in Google Cloud, you’ll need to download it.
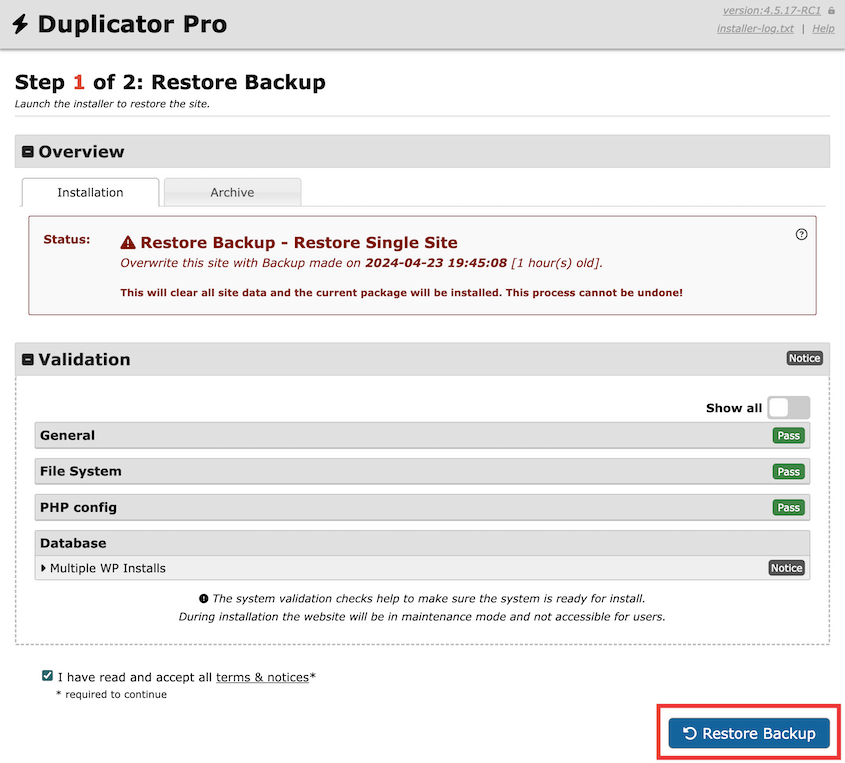
Duplicator will download your data from the cloud. Then, it’ll automatically open the recovery wizard. Here, click on Restore Backup.
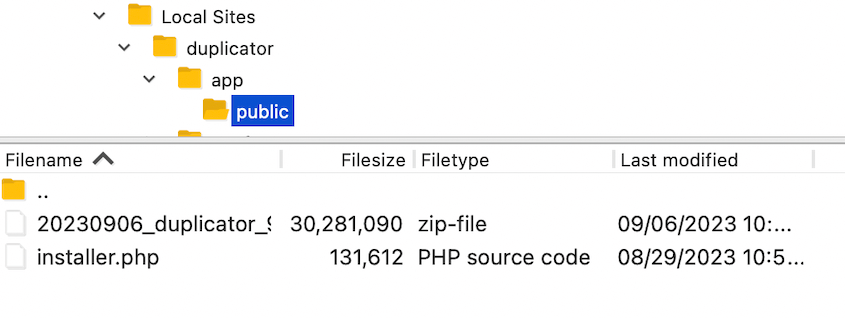
If you’re locked out of your dashboard, you might think your website is lost forever. Fortunately, you can restore your backup with an FTP client or cPanel.
With one of these file manager tools, upload both the installer and archive to your site’s root directory.
Then, you can visit https://your-domain/installer.php in a new browser window to launch the Duplicator installer. Make sure to replace “installer.php” with the name of your custom installer file.
FAQs About Google Cloud Backups
How do I do a Google Cloud backup?
You can do a Google Cloud backup by installing Duplicator Pro on your WordPress site. Then, add Google Cloud as a storage location. Create a new backup and choose Google Cloud out of the many cloud storage options. Duplicator will automatically back up your site and send it to Google Cloud.
How do I retrieve my backup from Google Cloud?
To retrieve your backup from Google Cloud, open the correct bucket and find the folder that stores your backups. You’ll see two backup files: the archive and the installer. Download both of these. If you need to restore your site, you can re-upload these to your site’s root directory and launch the Duplicator installer.
Which is better, Google Drive or Google Cloud?
If you need a basic cloud storage service to store WordPress backup files, Google Drive is typically more user-friendly and cost-effective. It’s a good option, especially if you’re already using Google Workspace. Google Cloud, on the other hand, is an object storage service suited for advanced users who require more scalability.
Do I have to pay for Google Cloud storage?
Google Cloud has a free tier that includes 5GB of monthly storage. It will also give you a $300 free credit when you sign up. If you need more space for your backups, premium pricing starts at $.0012 per GB per month.
Get Enterprise-Level Protection with Google Cloud
That’s it! You’ve just created your first Google Cloud backup.
With automatic scheduling enabled, your site is continuously protected without you lifting a finger. Whether a plugin conflict, server crash, or security breach happens down the road, you’re covered.
Do you want to automatically back up your WordPress site to the cloud? Download Duplicator Pro to access 14 different storage options and restore remote backups in one click!
While you’re here, I think you’ll like these extra WordPress guides:
Joella is a writer with years of experience in WordPress. At Duplicator, she specializes in site maintenance — from basic backups to large-scale migrations. Her ultimate goal is to make sure your WordPress website is safe and ready for growth.


