“I just lost three hours of sales because my site crashed during a theme change.”
I hear stories like this from WordPress users almost weekly.
After helping hundreds of customers recover from theme change disasters, I’ve seen the same pattern repeatedly. They try to update their site’s appearance, and suddenly nothing works as expected.
The difference between disaster and success isn’t technical skill. It’s preparation and using the right approach.
I’ve documented the exact method successful site owners use — the same one I recommend to everyone who asks for my advice. It’s remarkably effective yet simple enough that anyone can follow it.
Let me walk you through the process that’s saved countless websites from unnecessary downtime!
Here are the key takeaways:
- Always create a full backup before making any theme changes to avoid losing your website
- Use a staging site to test your new theme without disrupting your live website
- Copy and save all custom code, widgets, and tracking codes before switching themes
- Test the new theme thoroughly for errors, mobile responsiveness, and functionality before going live
- Monitor your site’s loading speed, bounce rate, and user feedback after the theme change
- Choose themes based on design, functionality, performance, SEO-friendliness, and ongoing support
Table of Contents
Why Change Your WordPress Theme?
Your WordPress theme is a significant factor that influences your website’s appearance and performance. Over time, you may find that your existing theme no longer serves your evolving needs.
Here are a few reasons why you might need to change your WordPress theme.
Better Aesthetics
Changing your WordPress theme could enhance the overall look of your website, making it more appealing to your audience. The right theme gives your content a fresh, innovative outlook that could potentially attract and retain more visitors.
Compatibility Issues
Sometimes, your WordPress theme may not be compatible with specific plugins or the latest WordPress updates. This can cause significant errors that affect your entire site. If so, you’ll need to change your theme.
Themes can impact your WordPress website’s loading speed and responsiveness. If you’re experiencing poor site performance, switching themes could improve loading times and provide a better user experience. Plus, this could boost your search rankings.
Additional Features
New themes come with enhanced features that can add more functionalities to your website. A theme change might be necessary if you’re looking to use state-of-the-art features and give your visitors a better browsing experience. For example, you might want a WooCommerce theme to add e-commerce support to your website.
Rebranding
You may be rebranding your business, and your current theme might not reflect the new brand. Changing your WordPress theme can help you align the look and feel of your website with your new brand identity.
How to Choose the Right WordPress Theme
There are thousands available in the WordPress Theme Directory, so it can be difficult to know which one is right for you.
The theme you choose becomes the foundation of your website’s identity and affects how your users interact with your site. So, be sure to look for the following features:
You want a theme that’s appealing and aligns well with your brand. It will be the first thing that catches the eye of your visitors, so it needs to make a good impression.
The theme should offer the exact features you need for your website. For instance, if you’re running an e-commerce site, your theme should offer shopping cart functionality.
With a growing number of users browsing the internet on their mobile devices, your theme has to be mobile-friendly.
A good theme shouldn’t harm your site’s loading speed. Also, remember, themes bloated with unnecessary features tend to slow down your site.
An SEO-friendly theme promotes better visibility on search engines. It should be coded well and comply with the latest SEO best practices.
Ensure the theme developer offers timely updates and adequate support for their product.
Preparing to Change Your WordPress Theme
You can change your WordPress theme at any time. But before you do, I’d recommend taking a few preventative steps to ensure everything goes smoothly.
1. Test Your Current Theme’s Loading Speed
A better theme can improve your loading speed and keep new visitors from bouncing. To see if your new theme ends up loading faster, you’ll need to test your current site’s speed.
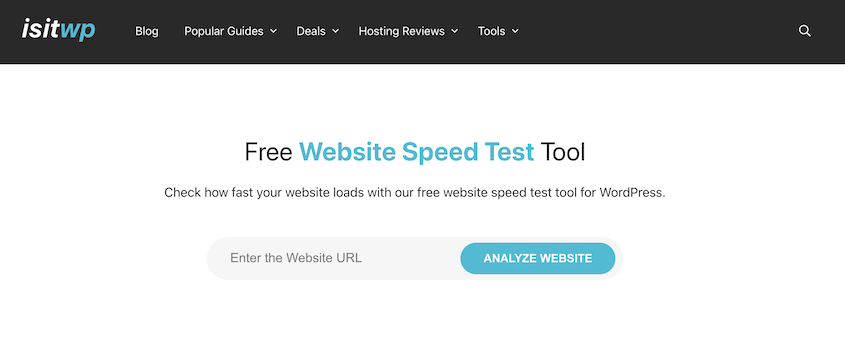
IsItWP’s Speed Test Tool makes it easy and fast to analyze your site speed. Start by entering your website URL.
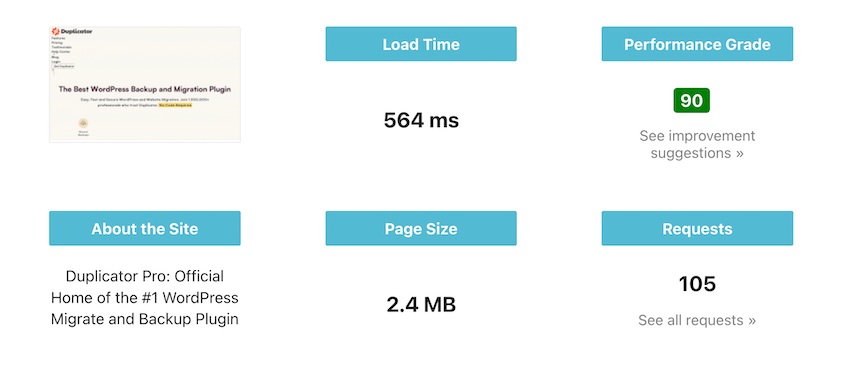
Then, save your load time, number of requests, and performance grade. This will help you know whether the new theme performs better.
Along with your home page, test the loading speed of a few other pages on your site.
2. Copy Code Snippets and Tracking Codes
Some WordPress users add code snippets to the functions.php file to customize a theme. If you want to keep your old theme customizations, you’ll need to copy these code snippets so that you can later paste them into the new theme files.
Along with code snippets, you could have tracking codes in your theme files. These could be for analytics tracking or Adsense. Be sure to save these tracking codes and transfer them to the new theme.
To avoid this hassle in the future, we’d recommend connecting your site to Google Analytics with MonsterInsights. You can also easily manage code snippets with WPCode.
In WordPress, sidebars are a valuable tool for enhancing your site’s functionality and user interaction. They can feature widgets like search bars, recent posts, custom menus, social media links, and more.
If you’ve added any custom code to your widgets, remember to copy it before making the theme switch. This way, you won’t lose any customizations.
How to Change Your WordPress Theme
Ready to learn how to change your WordPress theme? I promise to guide you through step-by-step, aiming for zero downtime.
Here’s a quick overview of the process:
- Step 1: Back Up Your WordPress Site: Create a complete backup using a plugin like Duplicator and download it.
- Step 2: Set Up a Staging Site: Build a safe environment to activate your new theme and test changes.
- Step 3: Migrate a Copy of Your Old Site: Clone your live site into the staging area by installing your backup.
- Step 4: Install and Activate a New Theme: Choose and install your new theme.
- Step 5: Resolve Errors: Test and fix any issues before going live.
- Step 6: Move the Changes to Your Live Site: Push tested changes to production.
Step 1: Back Up Your WordPress Site
First, you’ll need to create a full backup of your existing WordPress site. If anything goes wrong during the transition, you can restore this backup and instantly revert to the previous theme.
There are a few backup plugins you can use, but the best one is Duplicator Pro. Duplicator Pro is a powerful plugin that allows you to easily back up, clone, or migrate your website.
With Duplicator, you can back up your website with just a few clicks. Then, drag and drop this backup into a staging site. Here, test out a different theme without breaking your live site.
While Duplicator does come with a free version, you might want to upgrade for additional features. Duplicator Pro gives you the convenience of automatic backups, drag-and-drop migrations, and much more.
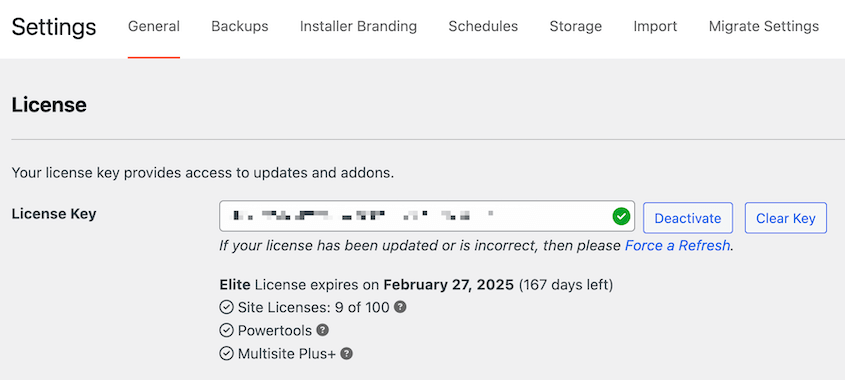
Be sure to copy your license key. Then, install and activate Duplicator in WordPress. As a final step, activate your license key.
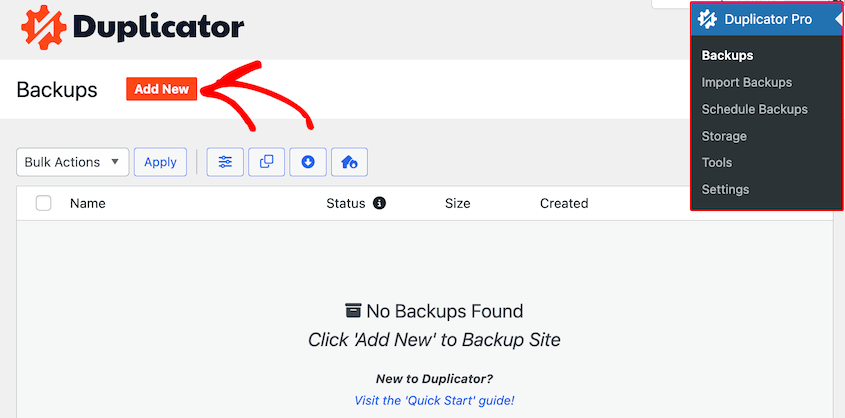
Then, go to Duplicator Pro » Backups » Add New.
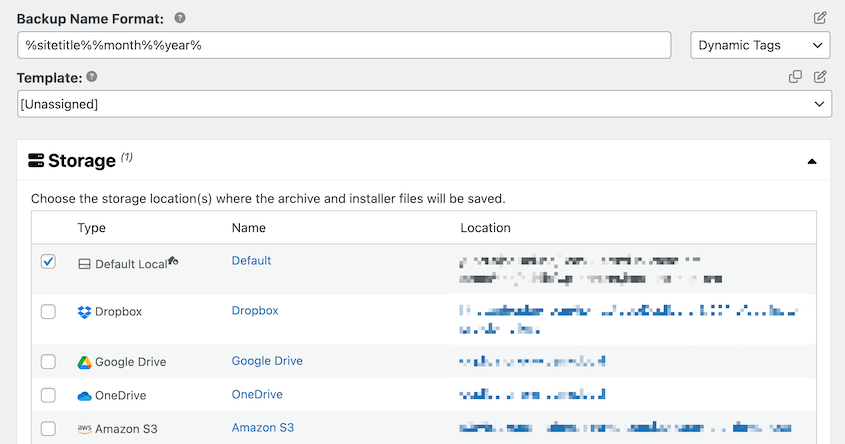
Name the backup with dynamic tags. Duplicator will automatically save it on your local server, but you can also send the backup to cloud storage.
Expand the Backup section and choose the Full Site preset.
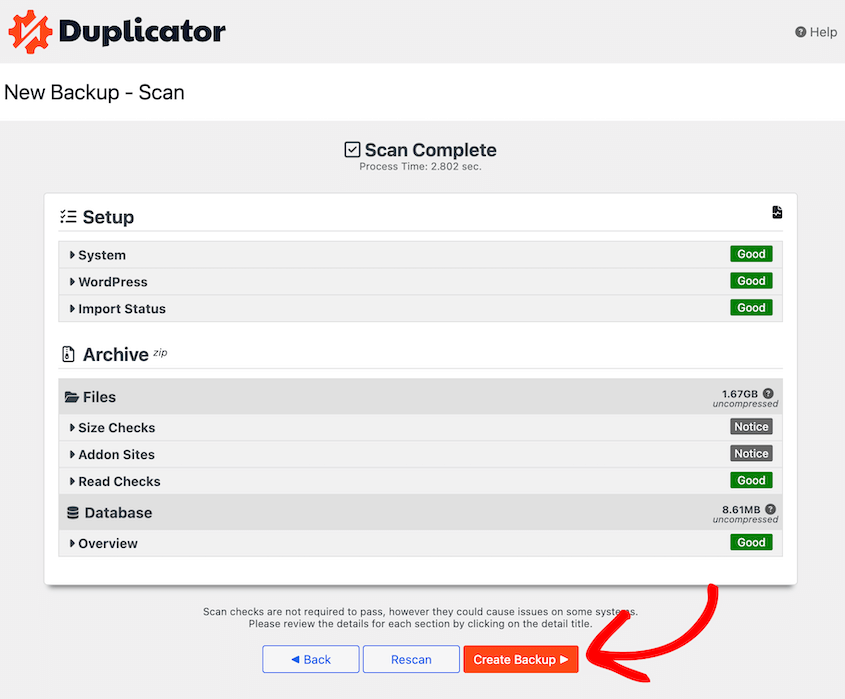
Hit Next. After Duplicator scans your site, click on Create Backup.
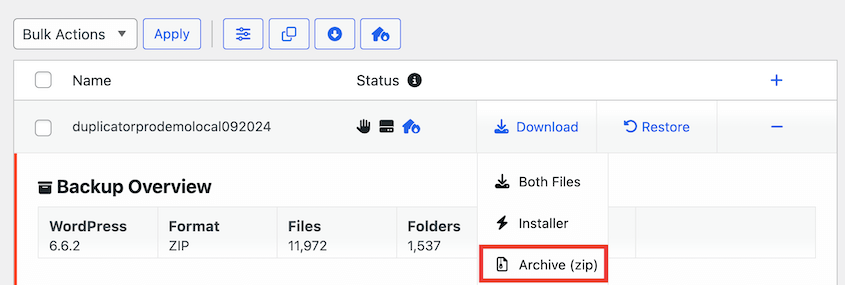
Once your site is backed up, download the backup archive file.
If your backup is in cloud storage, you’ll need to open your cloud account and download the backup.
Step 2: Set Up a Staging Site
Changing your live site’s theme isn’t a great idea. Your visitors could come to a broken website while you’re still busy fine-tuning your new look. This can result in a loss of sales for e-commerce sites or a drop in blog traffic.
Maintaining a professional online presence is key, and this is where a staging site comes into play.
It allows you to work behind the scenes, making all the necessary changes and troubleshooting errors without impacting your live site. Once you’re satisfied with how things look and function, you can then push the changes to your live site.
If you want to set up a staging environment on the same server as your live site, read this tutorial on how to create a WordPress staging site.
You can also easily set up a local staging site. This is a free and easy way to test out new changes.
Step 3: Migrate a Copy of Your Old Site Into the Staging Area
For your staging site to be effective, it needs to be an exact copy of your live site. With Duplicator, you can import a backup and instantly set up a cloned staging environment.
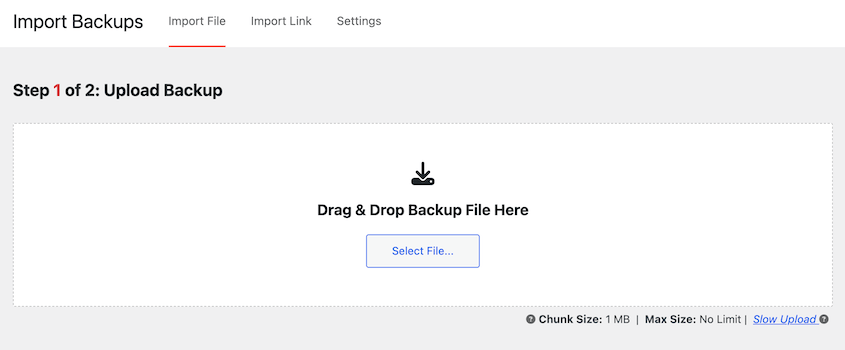
After you create a staging site, be sure to install and activate Duplicator Pro. Then, go to the Import Backups page. Drop your backup archive here.
After it uploads, hit Continue.
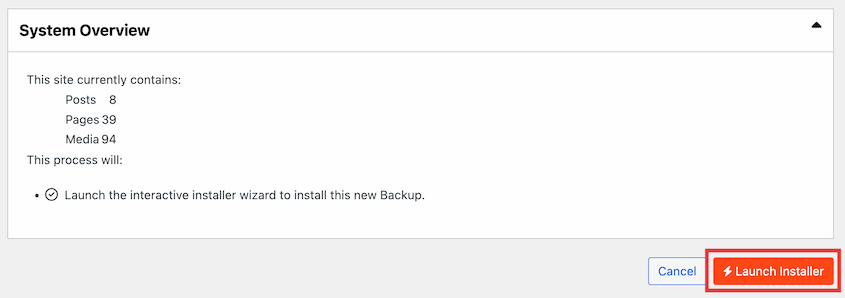
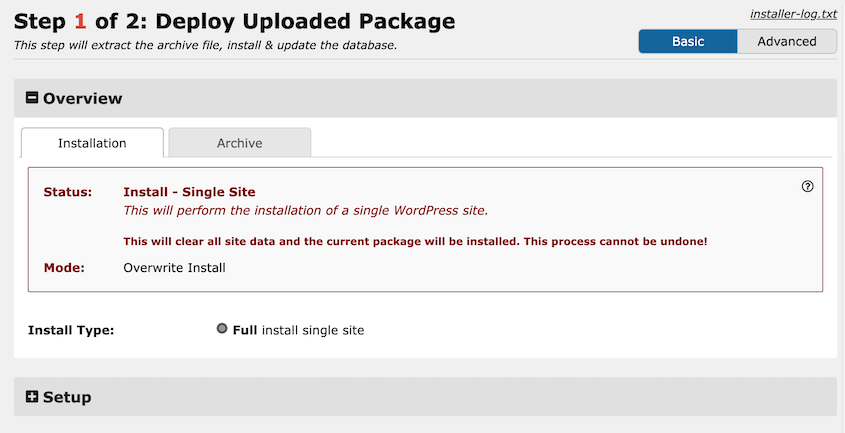
Click on Launch Installer to start replacing the blank staging site with the backup.
Now the Duplicator migration wizard will walk you through the installation. Accept the terms and notices and continue to the next step.
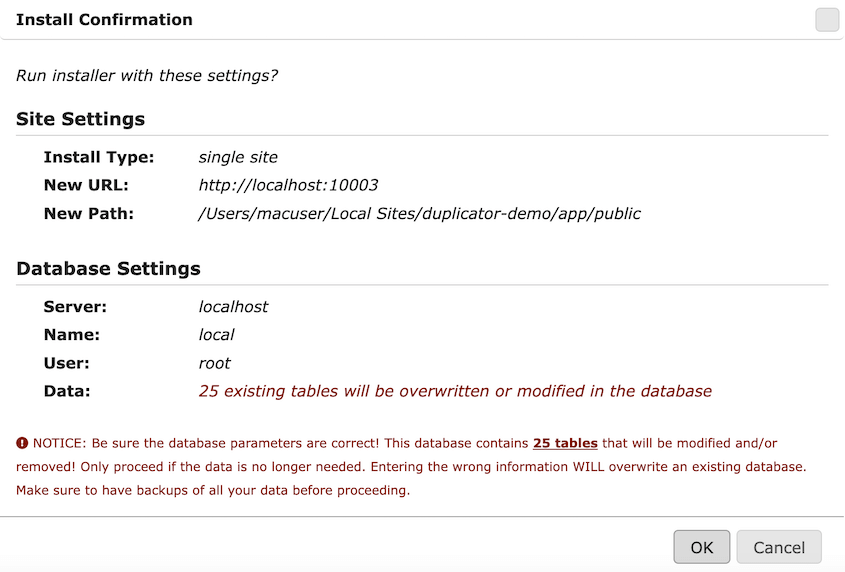
In the pop-up window, confirm that you want to install the backup.
After this, Duplicator will import all of your live site’s files and database tables into the staging site! Click on Admin Login to access your new dashboard.
Step 4: Install and Activate a New Theme
Now that you’ve mastered the staging area, it’s time for the next step: installing your new WordPress theme.
You can either choose a free theme from the WordPress theme directory or purchase a premium theme from third-party providers. Remember, the theme you select should align with the goals and style of your website.
Here are a few of the best WordPress themes:
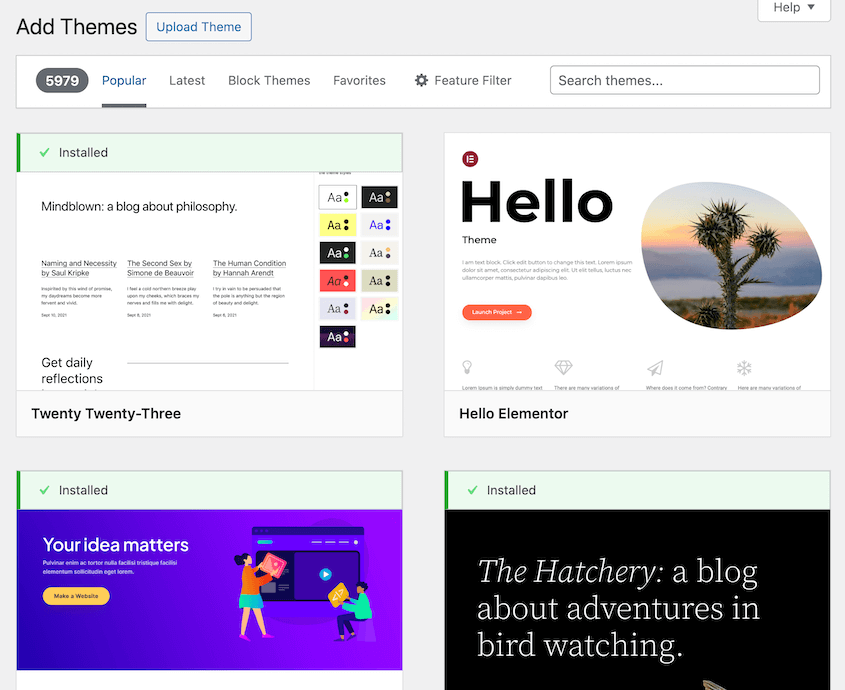
If you want a free theme, go to Appearance » Themes » Add New Theme in your WordPress dashboard. Search for the theme you want.
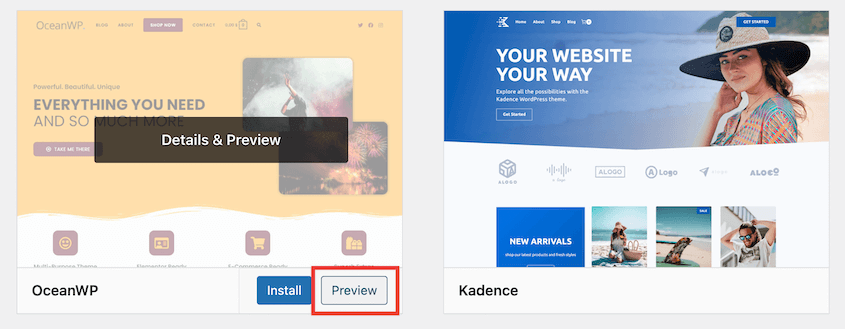
If you want to see how it’ll look on your site, you can live preview it.
Once you find one you like, install it and hit the Activate button.
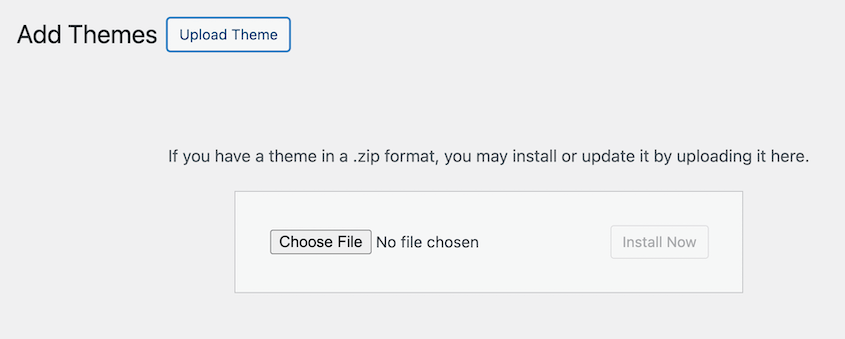
Generally, premium themes come as a .zip file which you need to install on your website. In this case, click on Upload Theme.
After you activate it, you’ll have a completely new WordPress theme!
Step 5: Resolve Errors
Encountering errors after installing your new theme is pretty common. Since it’s a completely different design, elements on the front end could become broken during the switch.
Before you go live, check how every page looks on various devices, such as desktop, tablet, and mobile. Take note of any issues like broken links, missing images, incorrect layouts, or anything that doesn’t seem right.
Ready to fix them? Here’s a simple way to go about it:
Perform a visual inspection of each page. Check if the text, images, and overall layout are appearing as expected.
Links should be clickable, forms should be functional, and the navigation menu should work smoothly.
- Verify mobile responsiveness
With an increasing number of users visiting websites from mobile devices, it’s crucial that your site looks good and functions well on smaller screens.
If you’re an expert at coding, check the theme’s code. If not, use WordPress plugins to do this for you.
If you note any issues during this process, compile them into a list. Then, you can start troubleshooting each of them one by one. If you find any errors that you can’t fix yourself, consider seeking help from the theme’s developer or hiring a professional.
You’ll want to ensure your site remains functional for your visitors after the theme switch. So, make sure you resolve all errors before pushing the new theme to your live site.
Step 6: Move the Changes to Your Live Site
Once you’re happy with the new theme setup on the staging site, it’s time to make those changes live.
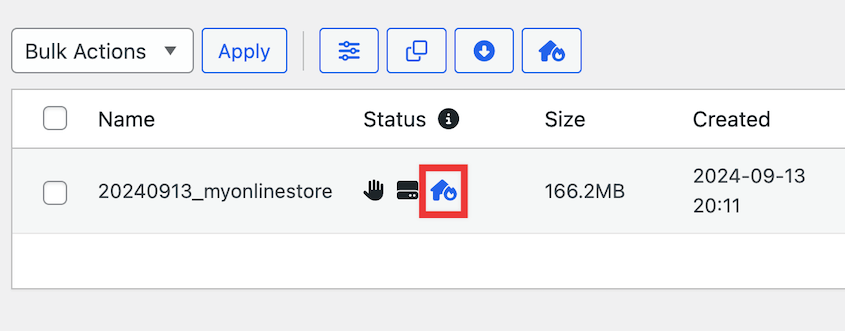
First, be sure to back up your live site again. Just in case the new theme causes errors, set this backup as the disaster recovery point by clicking the house icon.
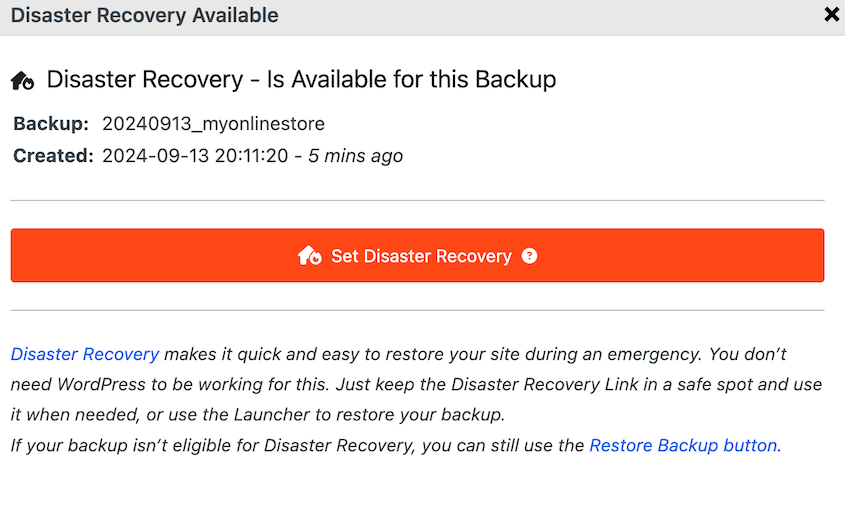
Then, click on Set Disaster Recovery.
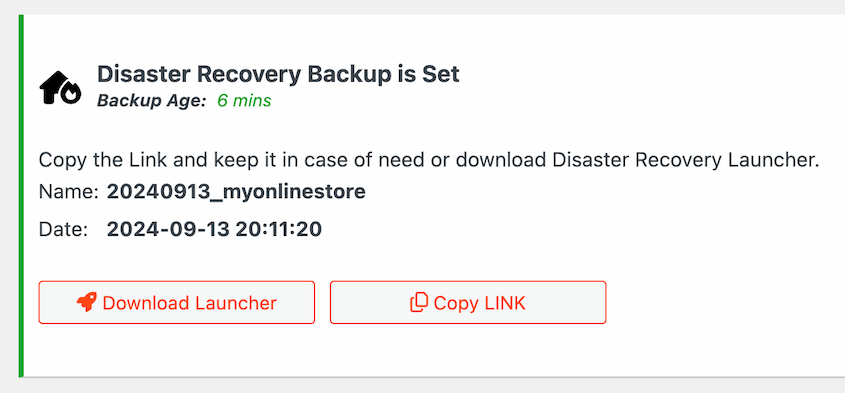
Finally, copy the recovery link or save the recovery launcher. These will help you restore your site even if an error locks you out of WordPress.
Next, use Duplicator to back up the staging site with the new theme. Open your live site’s dashboard and import this new backup.
When the installation process is complete, your live site should look identical to your staging site.
Congratulations! You’ve successfully changed your WordPress theme.
Other Ways to Change Your WordPress Theme
Aside from the steps we’ve listed, there are other ways to change your WordPress theme. Let’s dive into them.
Method 1: Change Your Theme in Maintenance Mode
We’d recommend installing a new theme on a staging site so that your visitors aren’t disrupted by any live errors. However, you could also put your website into maintenance mode.
When in maintenance mode, your audience will see a notice that you’re performing maintenance on your site. You can inform them what’s going on and when you’ll be back. This provides a much better experience than an error page.
Keep in mind that this comes with some downtime. While you’re testing a newly active theme, visitors won’t be able to browse your site. We’d recommend building a staging site instead for maximum visibility and user-friendliness.
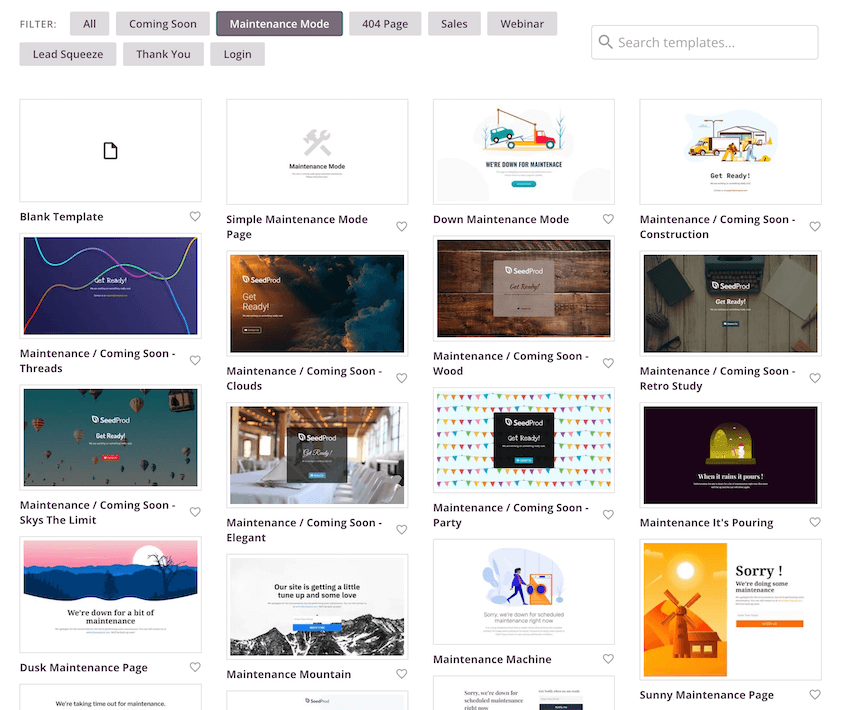
But if you decide to work on your live site, you can use a plugin like SeedProd to design your maintenance mode page. This page builder comes with many pre-designed coming soon and maintenance mode pages.
Before installing a new theme, choose a maintenance mode template.
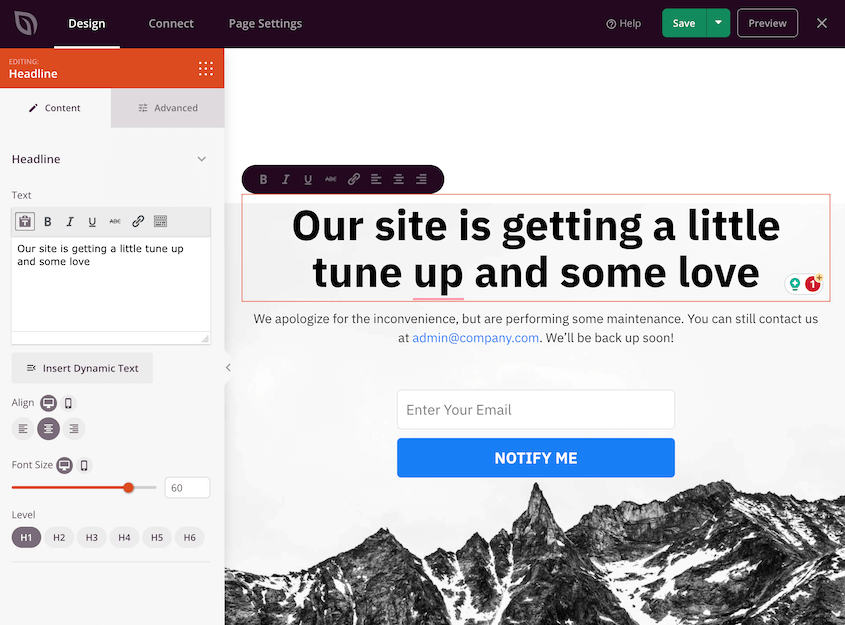
Then, use the drag-and-drop builder to customize the page for your site.
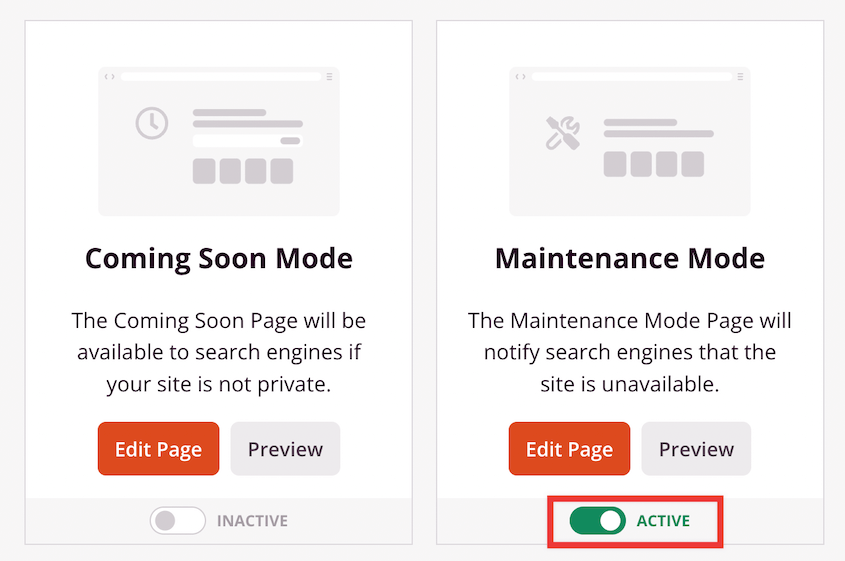
As a last step, activate the maintenance mode page.
SeedProd will automatically put your site into maintenance mode. Instead of experiencing broken elements or errors, they’ll see a beautifully designed maintenance mode page.
Once your new theme is ready, disable maintenance mode.
Method 2: Manually Change Your WordPress Theme
Sometimes, an error could lock you out of your WordPress dashboard. If the problem lies with your theme, you’ll need to change your theme manually. Alternatively, consider restoring a backup.
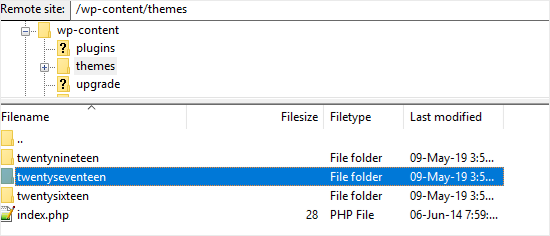
To manually change your theme, use an FTP client to connect to your site’s files. Navigate to wp-content » themes.
In this folder, you’ll see all the themes that you’ve installed. If you don’t see the new theme, you’ll need to manually install it.
Once you find the new theme, write down the name of its theme folder.
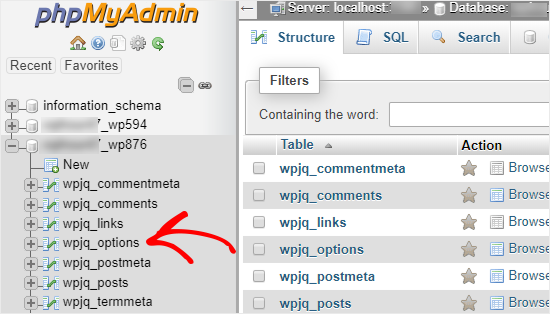
Now you’ll need to sign into phpMyAdmin with your WordPress hosting account’s control panel. Then, click on your database name.
From the list of database tables, select wp_options. It could also have a different database prefix than wp_.
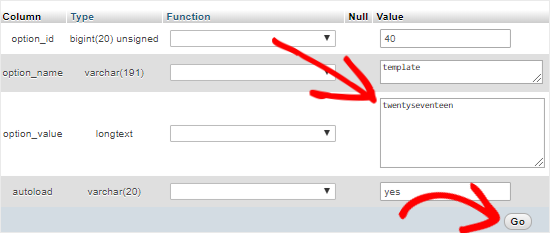
Find the template and stylesheet rows. First, click on Edit for the template option.
For the option_value field, enter the new theme name.
Click Go to save these changes. Repeat these same steps for the stylesheet.
Method 3: Use the Theme Switcha Plugin
Another convenient way to change your WordPress theme is to use a plugin called Theme Switcha. It’s especially useful if you want to preview your new theme without making it live immediately.
After activating the plugin, go to Settings then Theme Switcha. Enable theme switching and save your changes.
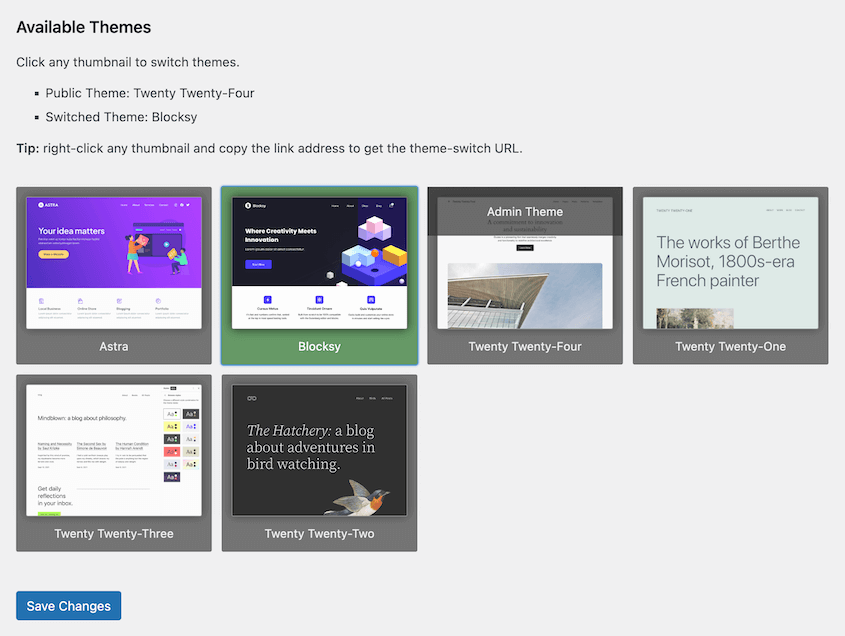
Now, scroll to the bottom of this page. You’ll see a list of all your installed themes.
If you click on one, Theme Switcha will open a preview of the theme in a new tab. This will let you know exactly which theme looks best for your site.
Final Steps After Changing Your WordPress Theme
By now, you’ve successfully learned how to change your WordPress theme. However, make sure to stick around for some key final steps. This section will guide you through essential actions to carry out after a theme change.
1. Test Your Website for Errors
It’s always a good idea to check for any errors on your website. You’ll want all of your links, images, and forms to work flawlessly after you’ve changed your WordPress theme.
Although you could do this manually, there are many helpful plugins available to help you. For example, the Broken Link Checker plugin automatically scans for broken links so you don’t have to click on each one.
Look for missing images or content, and make sure that all of your pages and posts are appearing as they should. It’s easy for elements to get jumbled or misplaced during a theme change, so checking for errors now can prevent any unexpected issues down the line.
Don’t forget to also check your website’s mobile responsiveness. It’s important that your website works correctly on different browsers and screens.
2. Add Tracking Code
You’ll also need to add analytics and Adsense tracking code to your theme. Remember, you copied this code earlier.
To seamlessly add your Google Analytics tracking code, we’d recommend installing the MonsterInsights plugin. Its onboarding wizard will help you connect your site with Google Analytics in no time.
For any other custom code, you can use WPCode (formerly Insert Headers and Footers). This plugin allows you to add code snippets and custom CSS without ever touching your functions.php file.
3. Turn Off Maintenance Mode
Now that you’ve thoroughly tested your new theme and you’re satisfied with its performance, it’s time to turn off maintenance mode.
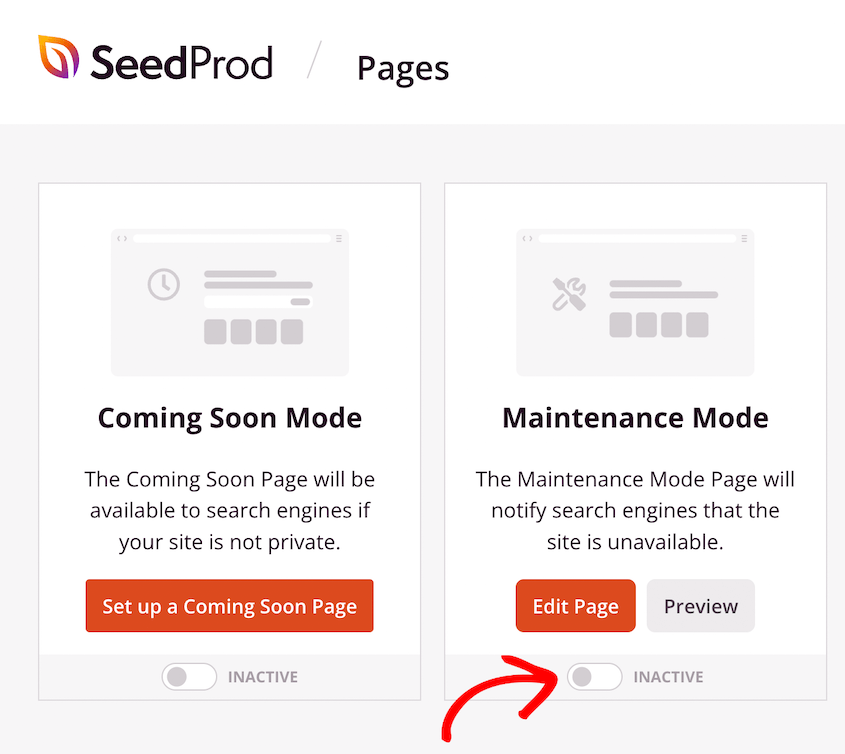
If you set up a maintenance mode page with SeedProd, you can easily disable it. Go to SeedProd » Landing Pages. In the Maintenance Mode box, set the toggle to Inactive.
4. Test Loading Time
Before you changed your WordPress theme, you tested your site’s loading time. Now, it’s time to do it again. You’ll see how the new theme is affecting your performance.
5. Keep Track of Your Bounce Rate
One of the key metrics to monitor is bounce rate – the percentage of visitors who leave your site after viewing just one page.
Bounce rate can highlight user experience issues that might need your attention. With a new theme installed, you want to confirm that it’s enhancing user engagement rather than driving visitors away.
You can use Google Analytics to track your bounce rate. If there’s a notable increase after you’ve changed themes, it might tell you that something isn’t working as expected.
To reduce your bounce rate, you may need to add breadcrumbs, popular posts widgets, related posts, or other user-friendly elements.
6. Get User Feedback
Your opinion matters, but it’s equally important to find out what your audience thinks about the new theme. After all, they’ll be interacting with your website the most.
You can start collecting your audience’s opinions about your site with the UserFeedback plugin. This tool has pre-designed contact form templates that make it easy to collect user feedback.
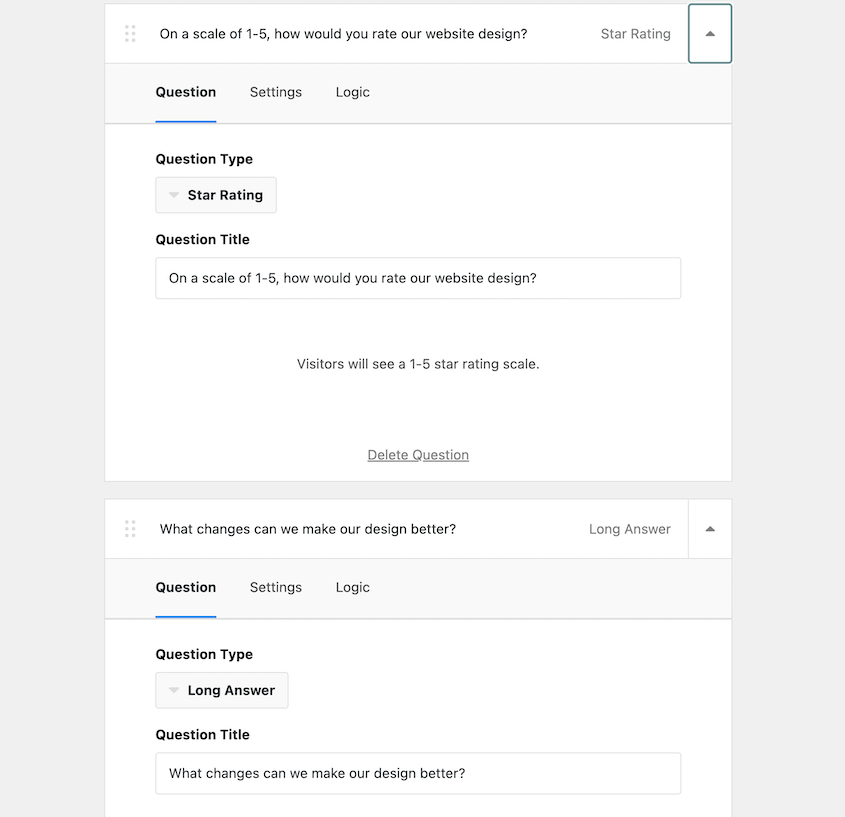
With UserFeedback, you can ask how visitors like the new design. You can include star ratings and text boxes so you know exactly how they feel.
Remember, the main goal is to ensure that your website remains user-friendly and engaging while reflecting your brand’s image. So, listen closely to your audience’s reactions to your new theme and be willing to refine things if needed.
FAQs About Changing WordPress Themes
How do I completely change my WordPress theme?
To change your WordPress theme, create a staging site and migrate a copy of your live website into it. On the staging site, install and activate a new theme. After fully troubleshooting errors, migrate these changes back to your live site.
Can I change WordPress themes without losing content?
Yes, you can change WordPress themes without losing content. The new theme will only change the appearance of your site rather than the posts and pages. But it’s a good idea to back up your website beforehand just in case anything goes wrong.
How do I change the default theme in WordPress?
You can change your WordPress site’s default theme by going to Appearance » Themes » Add New Theme. Choose a new theme and install and activate it.
Will changing my WordPress theme delete everything?
No. When you change your WordPress theme, your pages, posts, images, and other content will still be available. However, you could lose theme-specific shortcodes, homepages, and widgets.
Conclusion
Now you know how to change your WordPress theme!
While you’re here, you may like these extra WordPress tutorials:
Do you want to easily create a staging site for safe theme testing? Download Duplicator Pro to drag and drop a copy of your live site into a local staging area!
Joella is a writer with years of experience in WordPress. At Duplicator, she specializes in site maintenance — from basic backups to large-scale migrations. Her ultimate goal is to make sure your WordPress website is safe and ready for growth.


