Not sure how to update your WordPress theme safely?
Using an outdated theme puts your site at risk of getting hacked, breaking layouts, plugin conflicts, and poor user experience. It leaves your blog or online business vulnerable.
The good news? Updating your WordPress theme is easy and only takes a few minutes.
In this tutorial, we’ll show you how to update your WordPress theme. Let’s keep your WordPress website safe!
Here are the key takeaways:
- Update regularly for security and performance; outdated themes leave your site vulnerable to hacking and malware
- Always back up your site before updating; Use a plugin like Duplicator to create a full backup that you can restore if anything goes wrong
- Test updates in a staging environment first to catch compatibility issues before they affect your live website
- Preserve customizations with child themes or code snippets
- Enable auto-updates for hands-off maintenance
- Restore your site to a previous backup if a new theme version causes issues
Table of Contents
Why Update Your WordPress Themes?
Just like WordPress itself, themes need updates for security, bug fixes, and new features.
Theme updates often have security patches that prevent hackers from accessing your site. They may introduce bug fixes that restore functionality and remove plugin conflicts. Other updates add new customization options.
If you don’t update your theme, you’re using an outdated, insecure version. This leaves your site open to hacking and malware. You could also experience formatting issues, broken features, and plugin conflicts.
Regular theme updates patch vulnerabilities, prevent errors, add new capabilities, and ensure compatibility with WordPress updates. Additionally, an updated theme maintains your site’s professional reputation!
What to Do Before Updating Your WordPress Theme
Before any update, you’ll need to back up your WordPress site.
A backup saves a copy of all your content, settings, and customizations. With a backup, you can easily restore your site if something goes wrong during the update.
Updating a theme without a backup risks losing months or years of hard work if an issue happens. Data loss, theme conflicts, plugin incompatibilities, and other unexpected problems are nightmares without a recent backup to fall back on.
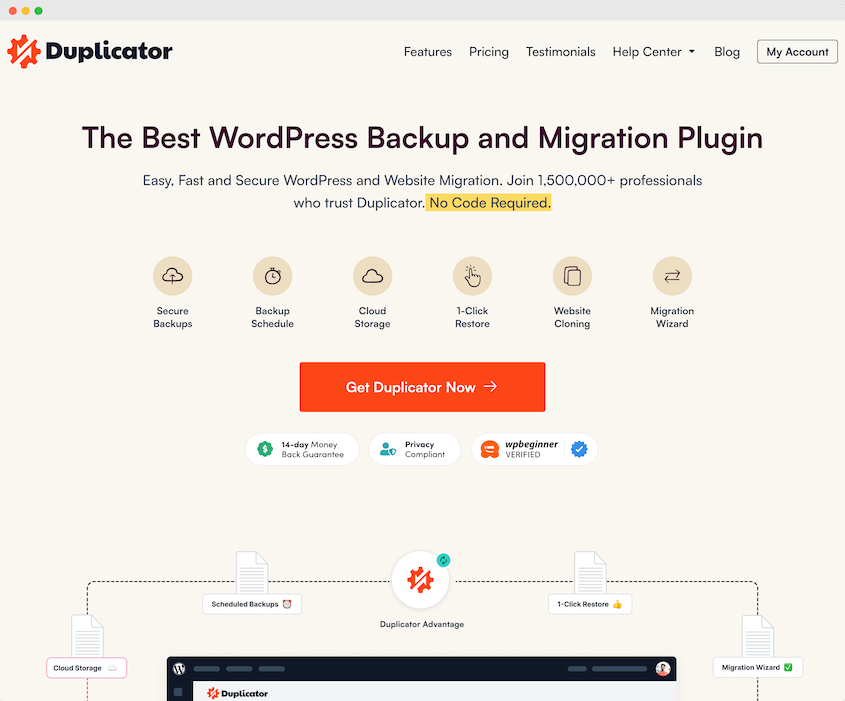
Instead of manually backing up your site, let Duplicator do all the heavy lifting. This backup plugin can create backups in seconds!
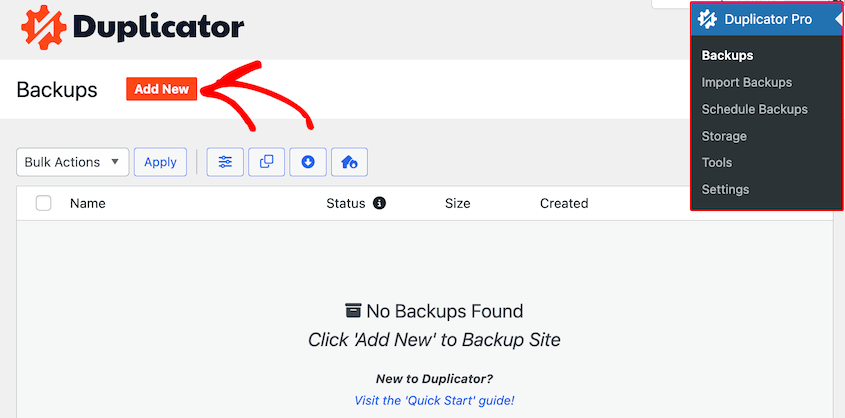
First, create a new backup.
Name the backup and choose a storage location. Along with local backups, Duplicator can send your data to any of these cloud storage providers:
Choose the Full Site preset. This will include all the data on your website.
Click on Next and then Create Backup. Once Duplicator builds your backup zip file, you can download it for safekeeping.
If you chose cloud storage, your backup will automatically be sent to the cloud! If you’d like, you can download the backup from the third-party location. However, Duplicator can restore remote backups straight from the dashboard, so you don’t need to.
Now, you can confidently move forward with updating your WordPress theme.
How to Update Your WordPress Theme
Let me show you how to update your WordPress theme!
- Method 1: WordPress Dashboard: Enable auto-updates or click “Update now” for one-click theme updates right from your admin area
- Method 2: Staging Site: Clone your site to test theme updates in a safe environment before pushing changes live
- Method 3: Code Snippets Plugin: Use WPCode to preserve custom PHP, CSS, and JavaScript edits that would otherwise be lost during updates
- Method 4: Child Theme: Create a child theme to keep all customizations separate from the parent theme’s core files
- Method 5: cPanel: Manually upload updated theme files through your hosting provider’s File Manager
- Method 6: FTP Client: Use FileZilla or similar FTP software to replace old theme folders with updated versions
Method 1: Update Themes in the WordPress Dashboard
Often, the easiest way to update themes is right within the familiar admin dashboard. This method requires zero technical knowledge and just a few clicks.
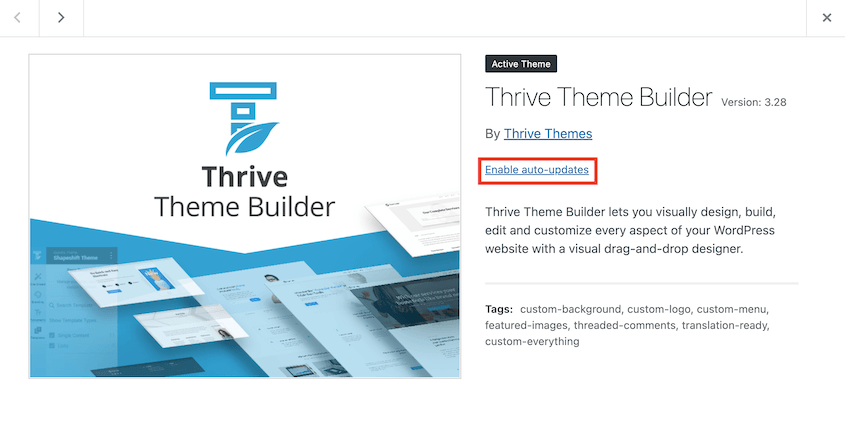
WordPress allows you to enable automatic updates for a truly hands-off experience. Once activated, your currently installed themes will update in the background whenever new versions are released.
To turn on auto theme updates, go to Appearance » Themes and find your active theme. Open it and click on Enable auto-updates.
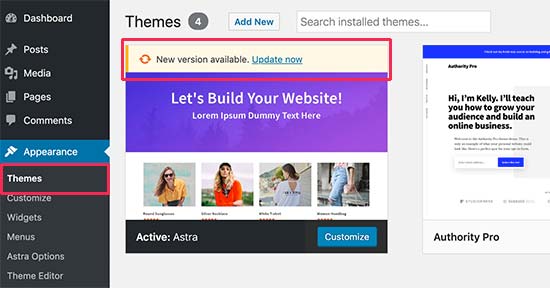
If you prefer more control, you can start theme updates whenever you’re ready. WordPress will alert you when new theme updates are available. All you’ll need to do is hit Update now.
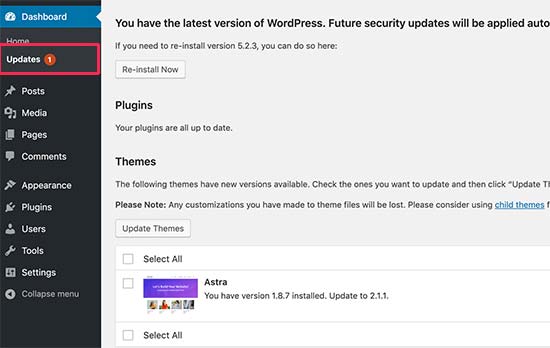
These will also be available on the Updates page. There is a themes section that lists available updates. Update them one at a time or select them all and hit Update Themes.
WordPress will download and update the theme files for you. Be sure to check the theme’s appearance on your live website after the update to verify everything looks correct.
For basic WordPress sites, the dashboard update method is fast, simple, and works great. More advanced sites with custom theme edits may require extra steps to save modifications during updates.
Method 2: Update Themes in a Staging Site
We’d recommend updating your theme on a staging site first. This allows you to catch any compatibility issues or bugs before pushing those changes live.
A staging site is a cloned copy of your live WordPress site used for testing updates, plugins, code, and other changes. It’ll look exactly like your website, except it’s in a safe and invisible location.
If you don’t already have a staging site, you can create one using a local staging environment. Local is one of the simplest and quickest options.
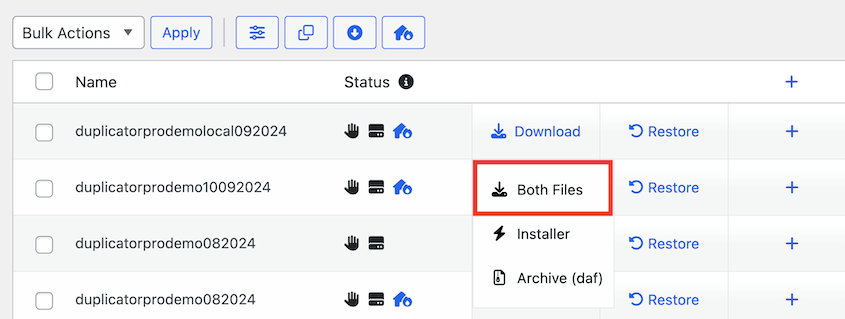
Once you set up a staging site, use Duplicator to back up your original site. Download the archive file.
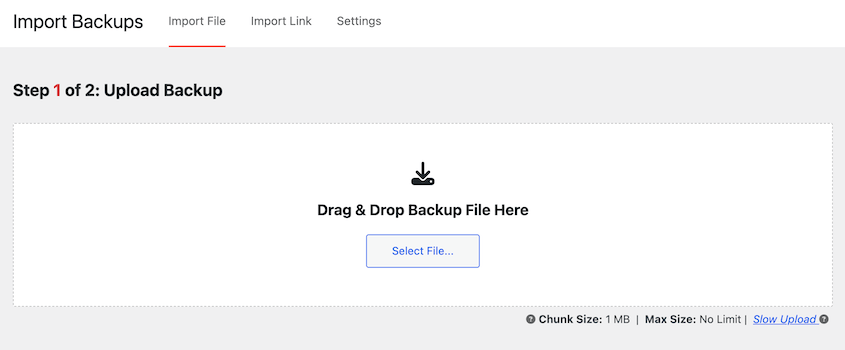
On the staging site, open your dashboard and install Duplicator. Open the Import Backups page and drop the backup into it.
Now that you have an exact copy of your live site, you can see how the theme update will affect it.
Go through the normal update process in the WordPress admin area or manually update the theme files. Thoroughly test every aspect of your site — design, functionality, plugin compatibility, and more.
If everything looks good on staging after the update, you can confidently move those changes over to your live production site. Simply back up the staging site and import the backup into your live site.
Method 3: Use a Code Snippets Plugin to Save Custom Theme Edits
To make a theme your own, you can edit the functions.php file or the stylesheet (style.css file). While this allows for powerful customization, you may lose these edits after you update your theme.
Code snippets plugins like WPCode offer a solution. It lets you insert custom PHP, CSS, and JavaScript snippets that override your theme’s default code.
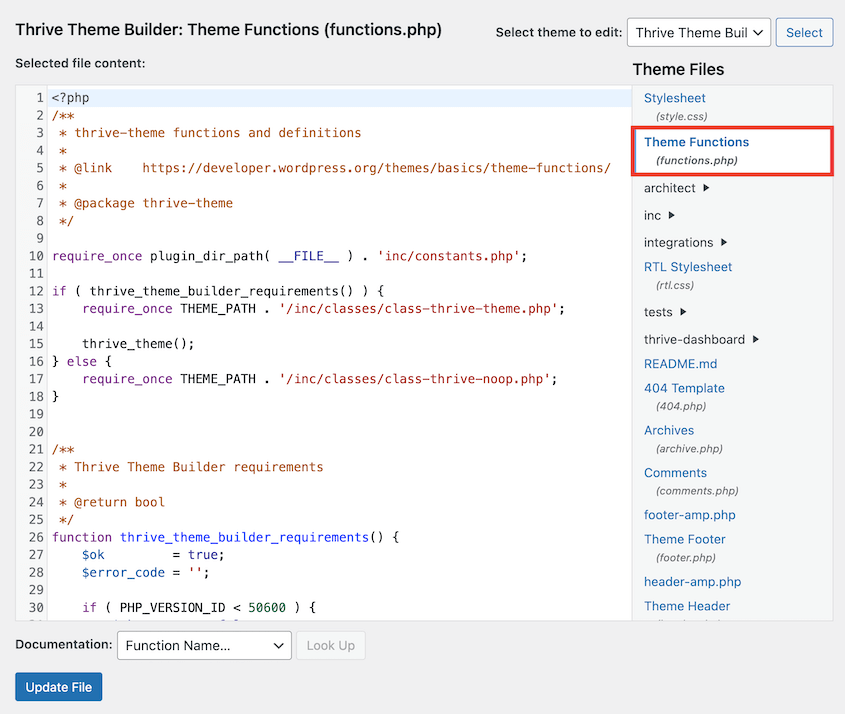
To get started, find Appearance » Theme File Editor. Open the functions.php file on the right-hand side.
Usually, custom theme edits are added to the end of this file. If you have some, copy and paste them into a text editor like Notepad.
From here, you’ll need WPCode’s help. Be sure to install and activate it in your WordPress dashboard.
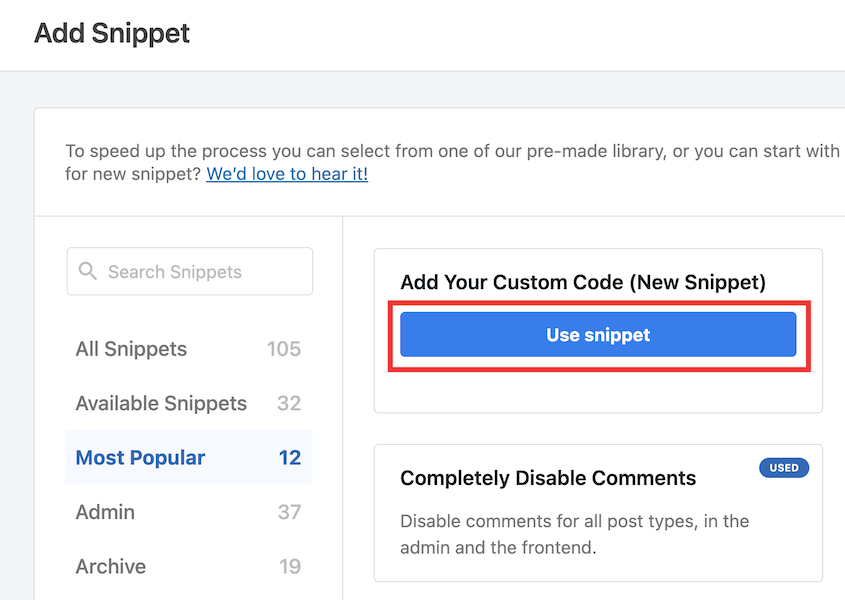
Then, go to Code Snippets » Add New. Use the custom code snippet.
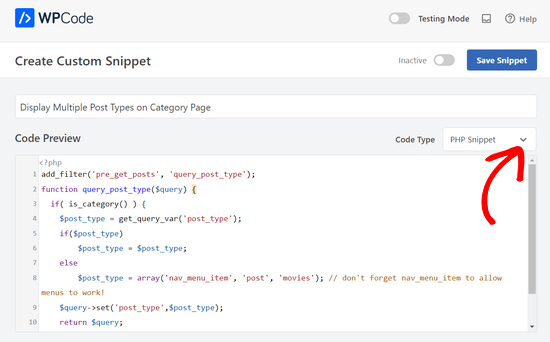
Go back to your text editor and copy one of the custom code snippets. Paste it into the WPCode preview box. For the Code Type, choose PHP Snippet.
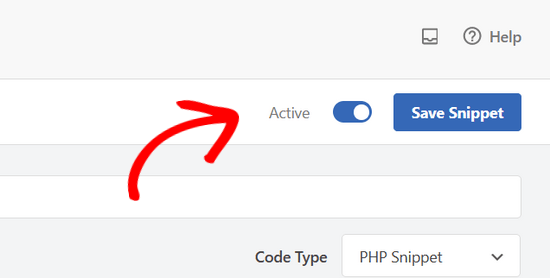
Finally, save the snippet and use the toggle to activate it.
Do the same with each of the custom snippets in your theme files.
With all your custom theme edits safely backed up, you can now update your theme to the latest version like normal. The theme files will be overwritten with the new version, but WPCode’s snippets will keep your custom functionality.
Method 4: Use a Child Theme to Save Custom Theme Edits
Another way to preserve customizations when updating WordPress themes is by using a child theme. A child theme inherits all the functionality and styling of a parent theme while allowing you to safely modify the child theme code.
With a child theme active, you can update the parent theme. The child theme will be completely untouched.
This ensures any custom CSS styles, plugin integration code, or other tweaks you’ve made stay perfectly intact after the update.
If you don’t have a child theme, you can easily create one. Here’s a step-by-step guide on setting up your first child theme.
Then, download your child theme to your computer. You’ll also need to download the parent theme.
Go to the theme’s website or its page on WordPress.org. Download the latest version of the theme.
Now you’ll have three folders downloaded: your original theme, the child theme, and the updated version of the theme.
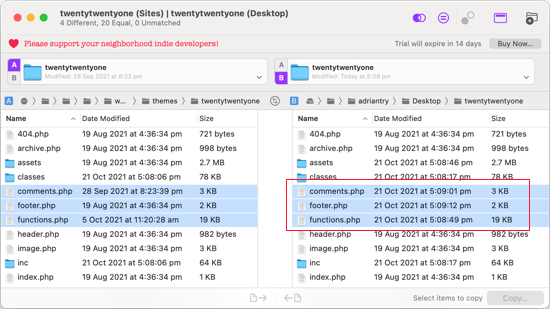
At this point, you’ll need to copy all of your theme changes over to the child theme. You can use comparison software like WinMerge (Windows), Kaleidoscope (macOS), or Meld (Linux).
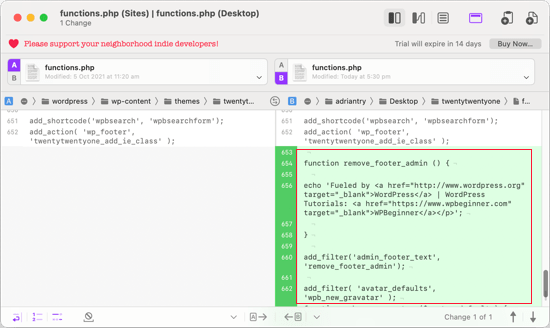
In this software, you can upload old and new theme files. This software will highlight any changes. You can easily identify and copy these files to your child theme.
For the functions.php and style.css files, copy changes at the bottom. Then, paste them at the bottom of the child theme’s files. The comparison software will be helpful for this step.
Next, find your website’s wp-content folder and open themes. Upload both your updated theme and child theme to this folder.
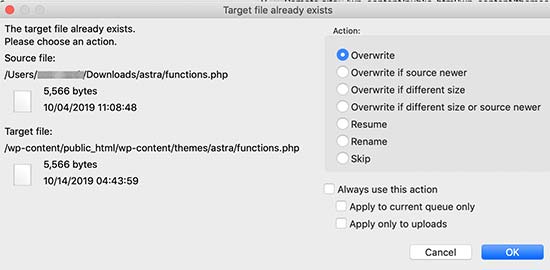
Overwrite the old theme files with the new versions.
If you made changes with the WordPress Customizer, you can move them with the Customizer Export/Import plugin. These changes won’t be stored in your theme files, so you’ll need to do this extra step.
Method 5: Update Your Theme with cPanel
If your WordPress hosting provider has cPanel, you can use it to manually update themes. This can be a good option if you have premium themes, since you can’t update them in the admin dashboard.
Before you begin, download the latest version from the theme developer’s website.
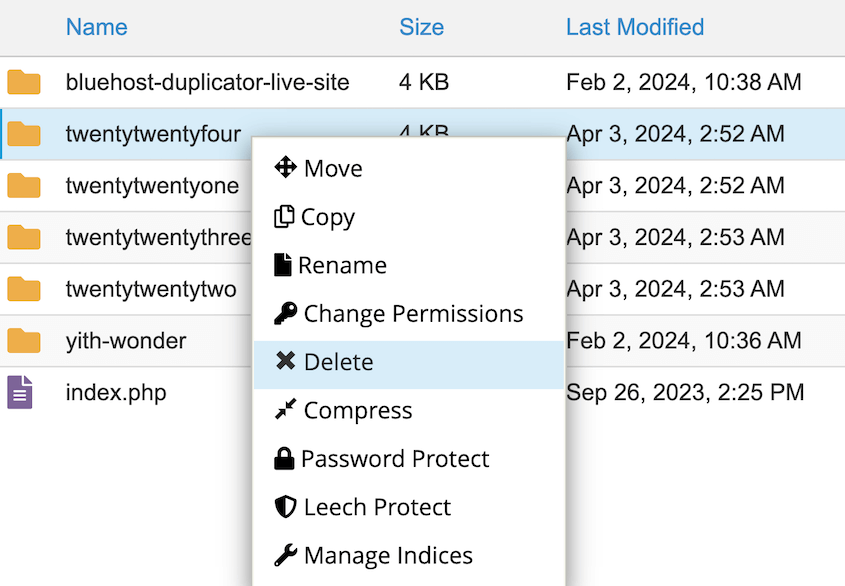
Log into your hosting account’s cPanel dashboard and open the File Manager.
Follow this path: public_html » wp-content » themes. In the themes folder, find your theme name.
Delete this theme folder and upload the updated version. When you log back into WordPress, your theme will be updated.
Method 6: Update Your Theme with an FTP Client
Similar to cPanel, you can download the new version of a theme and upload it via FTP (File Transfer Protocol). This requires an FTP client application like FileZilla.
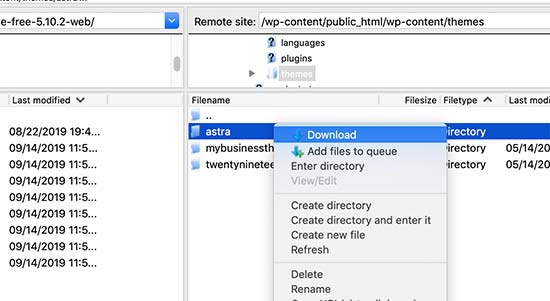
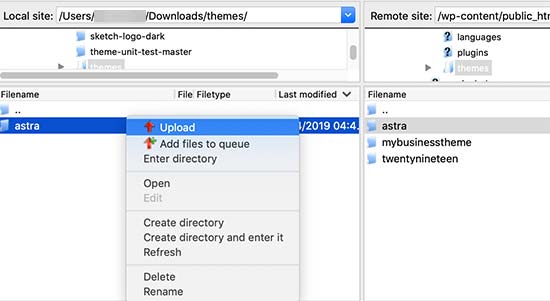
Connect FileZilla to your WordPress site’s server using your FTP credentials. Like the last step, navigate to the /wp-content/themes/ directory.
Select and delete the existing theme folder. Upload the new theme folder containing the updated version files.
For both cPanel and FTP methods, you’ll need a backup in case anything goes wrong. These methods also override any customizations you’ve made directly to the theme files.
How to Roll Back Theme Updates
Sometimes, a new theme update can cause issues like design bugs or broken functionality. It may also be incompatible with other plugins, themes, or the latest version of WordPress core.
If that happens, you’ll want to quickly roll back your site to its previous working state before the update.
With Duplicator, you can easily restore your entire WordPress site. No matter what error your new theme causes, you won’t lose any data.
Before updating your theme, use Duplicator to capture a complete backup of your site — files, database, themes, plugins, content, and more.
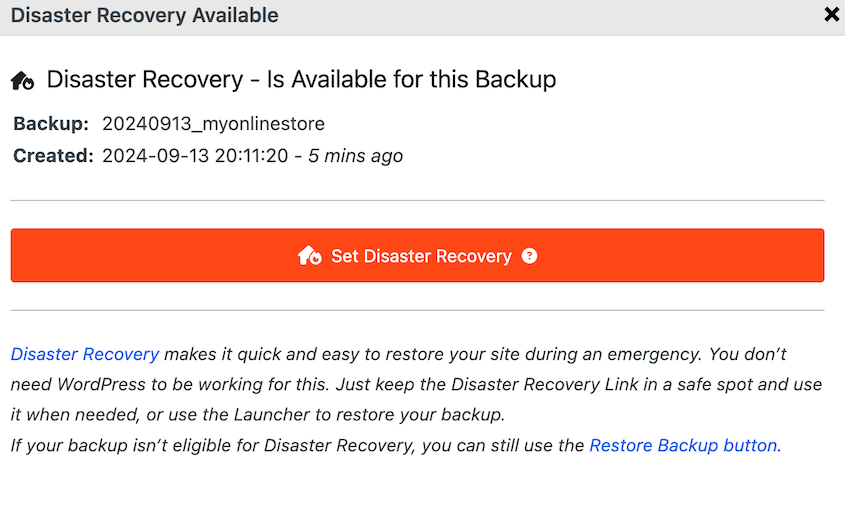
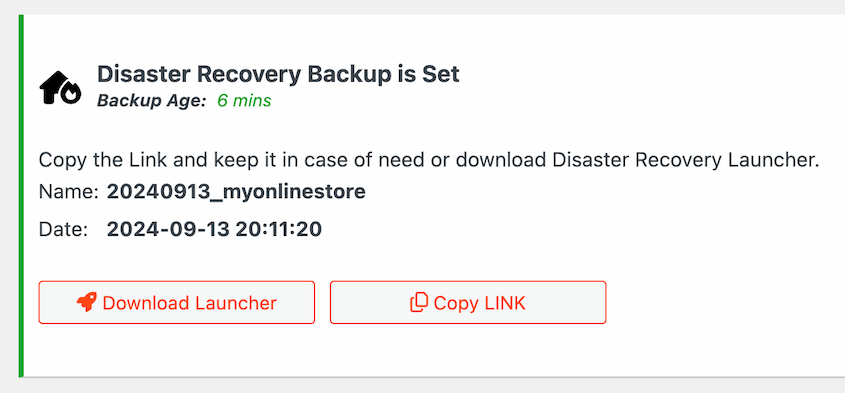
Then, set that backup as the disaster recovery point.
Duplicator will give you two options to restore your site: the recovery URL or the launcher file. You can copy the URL or download the file.
Either way, save these in a safe place, away from your WordPress dashboard.
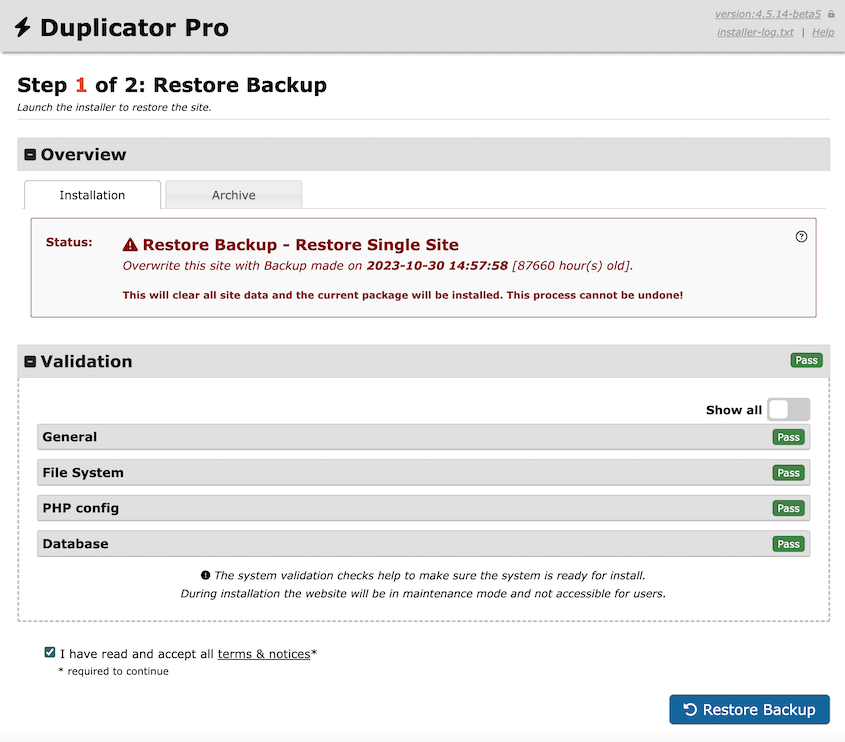
Feel free to update your WordPress theme. If anything goes wrong, paste the recovery URL or open the launcher file. Duplicator will launch the recovery wizard, even if an error locks you out of the dashboard.
In just a few minutes, your entire site will be restored to that previous backup. Your theme will go back to the previous version. It’s like the update never happened!
If you can still access the admin area after a bad update, you can restore your site in one click. Simply find a backup before the update and hit Restore.
No more frantically searching for backups or trying complicated manual restores.
With Duplicator, you have worry-free disaster recovery at your fingertips. You’re free to update themes knowing you can quickly roll back any issues!
You could also find an older version of the theme in the developer’s changelog or theme directory page. Replace the current theme folder with this version to roll it back.
FAQs About Updating WordPress Themes
How do I update my WordPress theme without losing settings?
Before you update your theme, create a full backup of your WordPress site. Then, use a child theme to store your customizations separately from the parent theme’s core files. Alternatively, try a code snippets plugin like WPCode to safely preserve custom code edits.
Do WordPress themes update automatically?
WordPress does allow you to enable automatic updates for installed themes. However, updates can cause compatibility issues or other errors. We’d recommend manually updating your theme so you can test for any problems.
How do I manually update a WordPress theme?
There are a few ways to manually update WordPress themes. One beginner-friendly option is to use the Updates page in your WordPress dashboard. You can also update the theme in a staging area, test for problems, and push the changes live.
Here are some other manual update methods:
- Use WPCode to save theme customizations before updates
- Create a WordPress child theme to save customizations before updating the parent theme
- Use cPanel or an FTP client to replace the current theme files with an updated version
Will changing my WordPress theme delete everything?
No, changing your WordPress theme will not delete any of your posts, pages, media uploads, settings, or other content. But you may lose customized styling or functionality from the old theme.
What is a child theme, and why should I use it?
A child theme inherits elements from a parent theme while allowing you to customize it without losing changes after updates. This is ideal for making design tweaks, adding functionalities, or experimenting with your theme layout safely.
How do I test my site after a theme update?
After updating your theme, thoroughly check your site’s pages to ensure everything displays correctly. Test contact forms, navigation menus, and any plugin functionalities. Address any issues by reviewing the updates or contacting your theme’s support.
Conclusion
We hope this guide helped you update your WordPress theme safely!
While you’re here, I think you’ll like these WordPress guides:
You won’t want to break your theme when you update it. To avoid any errors, use Duplicator Pro to easily move your theme to a staging site (where you can update it safely)!
Joella is a writer with years of experience in WordPress. At Duplicator, she specializes in site maintenance — from basic backups to large-scale migrations. Her ultimate goal is to make sure your WordPress website is safe and ready for growth.


