Occasionally, I need to migrate content from an old blog, import product data for my online store, and bring in user information from another system.
So, I found myself diving into the world of WordPress importing — a world with its own terminology, file formats, and technical problems.
The journey wasn’t always smooth. From corrupted CSV files to unexpected timeout errors, each obstacle taught me something valuable about managing a WordPress site effectively.
In this blog post, I’ll share what I’ve learned about importing files into WordPress — the pitfalls to avoid, the tools that actually work, and the strategies that will save you hours of troubleshooting.
Here are the key takeaways:
- WordPress has built-in import tools for basic content migration (posts, pages, comments), but they’re limited
- Migration plugins like Duplicator Pro offer more comprehensive importing with drag-and-drop functionality
- You can import files for website migration, backup restoration, bulk data entry, and content sharing
- Custom backups allow you to select exactly which site elements to transfer
- Always create recovery points before importing to avoid data loss
Quick Summary: How to Import Files in WordPress
1. Install a WordPress migration plugin.
Although WordPress has a built-in import/export tool, it can’t move data like a custom theme or media library. For more flexibility, install a migration plugin like
Duplicator Pro.
2. Export data from your old website.
It’s time to create a custom exported file that you’ll import into another site. Add a new backup in Duplicator and choose exactly what data you want to include. Duplicator can migrate your WordPress files, plugins, themes, media files, and database.
3. Import the data into the new site.
On the new location, install Duplicator Pro. Drag and drop the exported file into the import page.
Table of Contents
Why Import Files in WordPress?
Here are some reasons you might need to import files in WordPress!
Migrating Your Website
File imports can be useful when you’re migrating your website to a new WordPress installation. By importing files, you can seamlessly transfer all your content, including blog posts, pages, images, plugins, and themes.
This saves you from the hassle of manually recreating everything from scratch. You can continue to improve your SEO without losing your hard-earned rankings.
Restoring a Backup
Accidents happen, and sometimes you might accidentally delete important content or encounter technical issues. By importing your backup files, you can easily get everything up and running again. It’s like hitting the “undo” button for your site.
Bulk Data Entry
If you have a large amount of content that needs to be added to your WordPress site, importing files can save you time and effort.
For example, you may have a CSV or XML file with a list of products, blog posts, or user data. Instead of manually entering each piece of data, you can import this file directly into WordPress.
Integrating External Data
You may want to transfer information from other platforms into your WordPress site. If your product data is in a separate system, you can import that data into WordPress. This will keep everything synchronized and up to date.
Sharing Content Across Sites
Importing files makes it a breeze to share your content across multiple WordPress sites. You can export files from one site and import them into another, maintaining consistent content across your online presence.
How to Import Files in WordPress
Now that you’ve decided to import files into your WordPress site, you might need step-by-step instructions on how to do it. This way, you’ll easily transfer data to your site without any issues.
Here are the two main methods:
- Method 1: WordPress Import Tool: Built-in option for basic content transfer (posts, pages, or comments) with XML/WXR file support
- Method 2: WordPress Migration Plugin: Advanced option using tools like Duplicator Pro for complete site migrations with drag-and-drop functionality
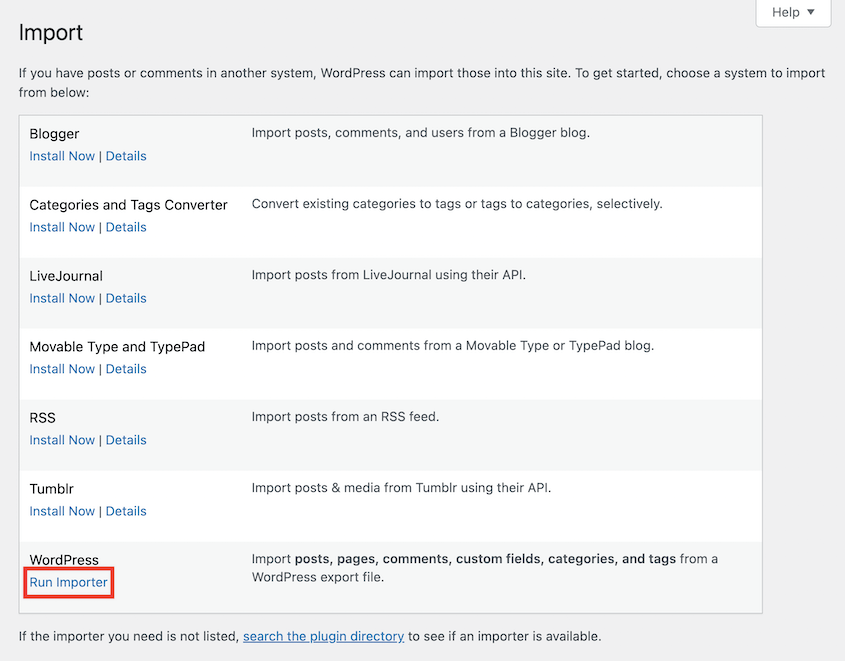
WordPress has built-in import and export tools that allow you to migrate files between different sites. Usually, people use the importer to move content from other publishing systems like Blogger, Joomla, or Tumblr.
Of course, you can also migrate content from another WordPress site. Simply hit Install Now next to the WordPress option. Then, click on Run Importer to start uploading an XML or WXR file.
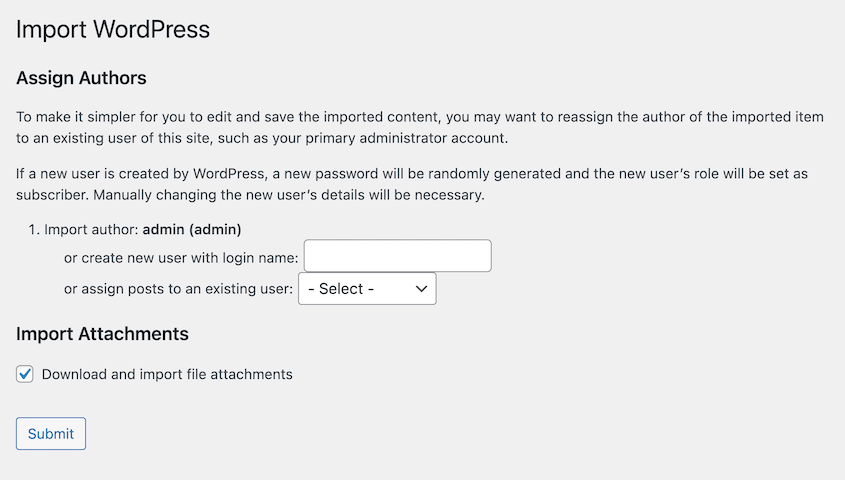
After this, you can map the exported content to an existing user on the site. To make sure attachments are imported, select the Download and import file attachments option.
Although this process doesn’t require any third-party plugins, it has its limitations. The WordPress importer will only import posts, pages, comments, categories, tags, and custom fields. This means that it won’t transfer your custom theme or extensive Media Library.
Method 2: Use a WordPress Migration Plugin
To import and export WordPress files more easily, we’d recommend using a migration plugin. You’ll have more flexible options when it comes to migrating your site content.
Step 1: Install Duplicator Pro
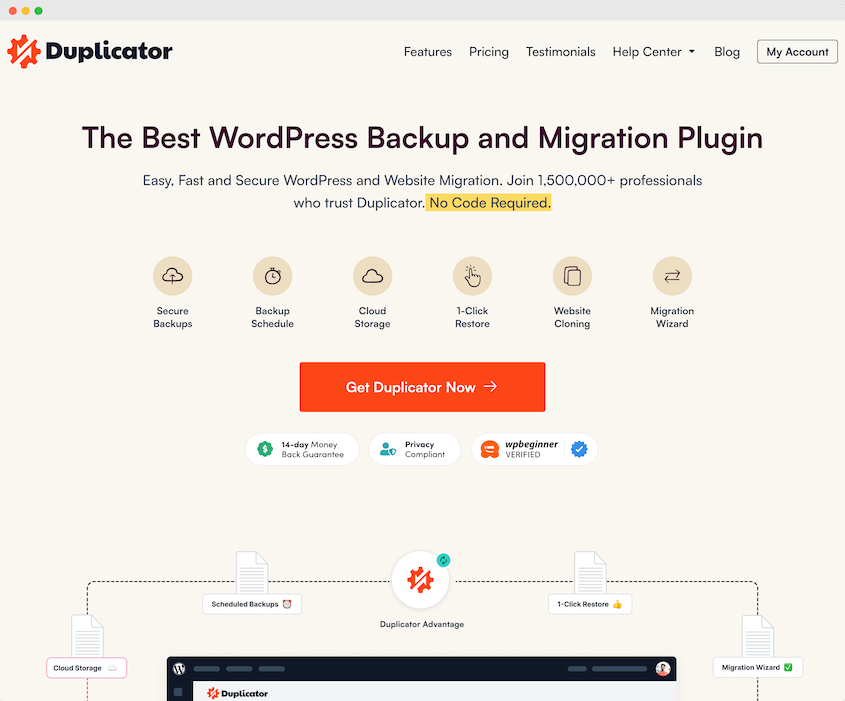
Although there are many WordPress migration plugins out there, Duplicator is by far the best.
It has a drag-and-drop interface, which means it’s a great tool for beginners. Plus, Duplicator can regularly back up your website and even clone it to a staging site for safe testing.
With Duplicator, you can create site backups that include custom WordPress data. Then, you’ll be able to import these backup files by dragging and dropping them into another WordPress installation. This makes it the best WordPress importer plugin.
To get started, choose a subscription for Duplicator Pro. You could use the free version, but then you wouldn’t get to experience the convenience of drag-and-drop imports.
Then, open your WordPress dashboard and install and activate Duplicator.
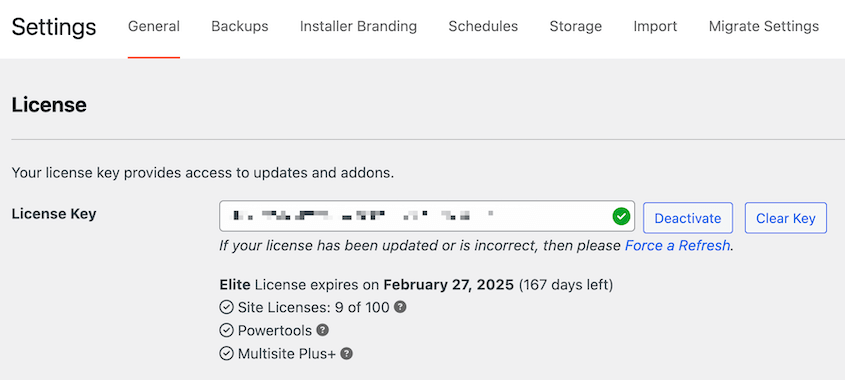
Before you start using Duplicator, you’ll need to activate your license key. Copy the key that you received with your purchase. In WordPress, find Duplicator Pro » Settings » General.
Paste your license key and activate it. This will unlock a wide range of premium features to help you with site migrations, backups, and cloning!
Step 2: Create a Custom Backup
Next, you can create a custom file with all of the data you want to transfer to the new location. Don’t worry, Duplicator Pro makes this process easy.
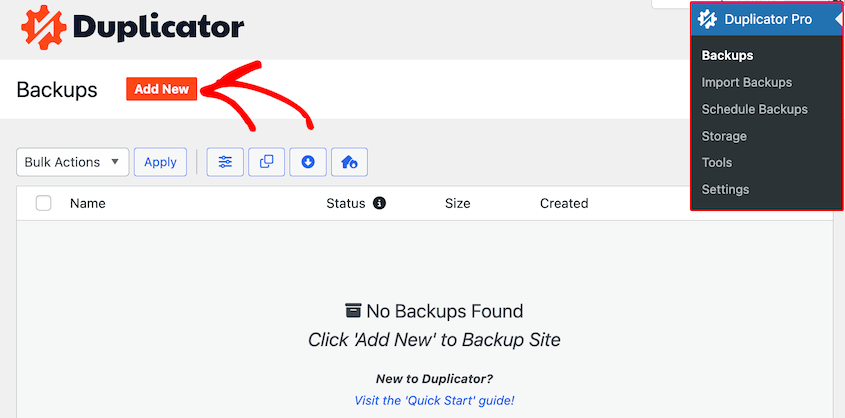
To get started, build a backup by heading over to Duplicator Pro » Backups » Add New.
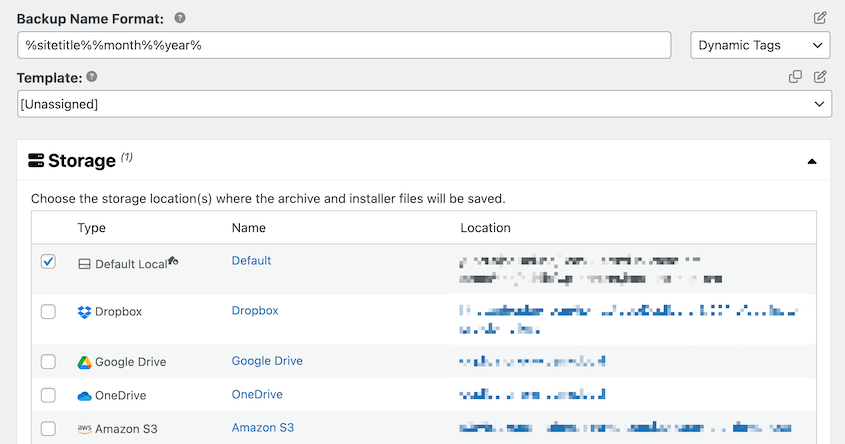
Duplicator will automatically generate a name for the backup, but you can add dynamic tags so it’s easier to find. Although the plugin supports many cloud backup storage services, select Local.
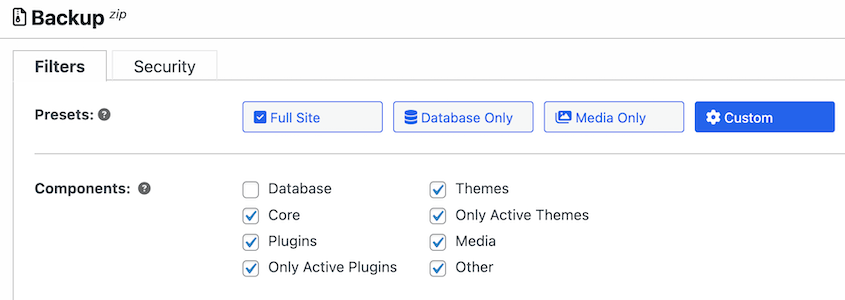
Next, expand the Backup section. Using the Custom preset, you can select exactly which parts of your WordPress site you want to transfer.
You’ll be able to include/exclude the database, along with:
- Core WordPress files
- Plugins
- Themes
- Media files
- Other non-WordPress files in the root directory
To avoid importing a large file, you could also choose to only include active plugin and theme files.
Additionally, consider removing the Other option to exclude non-WordPress files and folders. This will exclude any unnecessary data and optimize your backup.
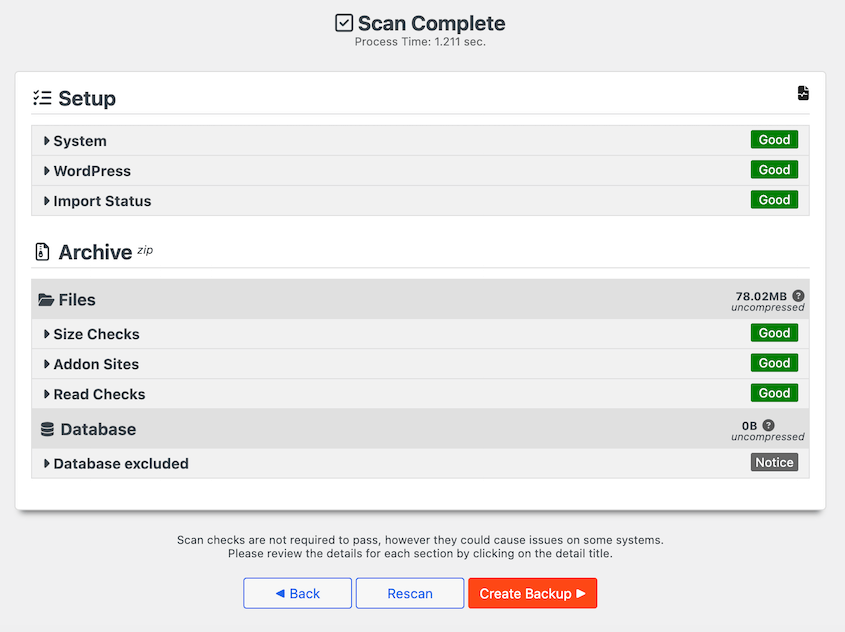
After this, hit Next. Now, Duplicator will scan your website for issues.
Once you review any notices, click on Create Backup.
Step 3: Download Your Files
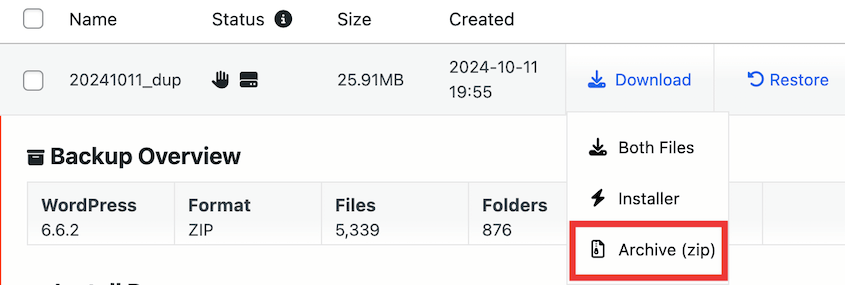
Now that you’ve built a custom file, you’ll want to download it. Your new backup will be at the top of the Backups page.
Click on Download » Archive (zip). This will download a ZIP file with your compiled custom WordPress files. Be sure to save this so you can import it into another location.
If you’re using Duplicator Pro, you’ll only have to download the backup’s archive file and drag and drop it into a new WordPress installation.
However, if you don’t have WordPress installed or you’re using Duplicator Lite, be sure to also download the installer. For more information on this process, check out this guide on how to clone a WordPress site.
Step 4: Import the Files into WordPress
Rather than manually uploading files in cPanel or a File Transfer Protocol (FTP) client, Duplicator allows you to simply drop a backup into the new site.
To start the import process, be sure to install and activate Duplicator Pro on the second installation.
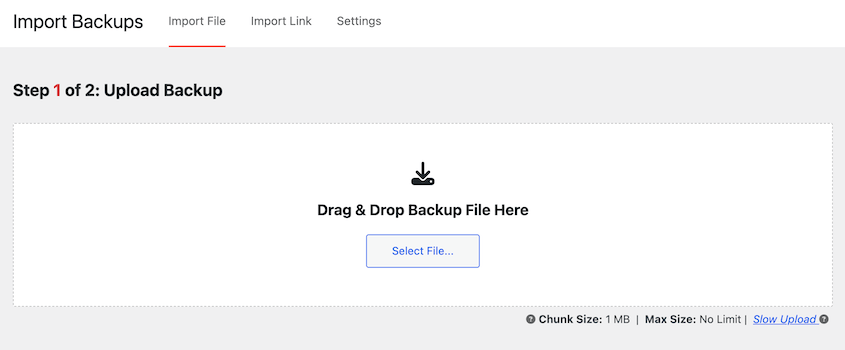
Then, head over to Duplicator Pro » Import Backups. Here, upload the file archive.
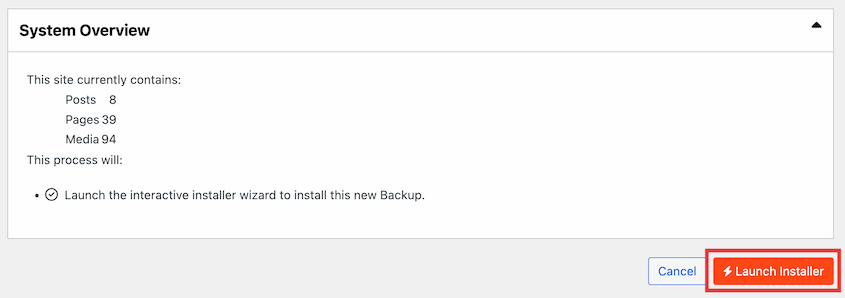
Once it uploads, you’ll see an overview of the backup. Hit Continue.
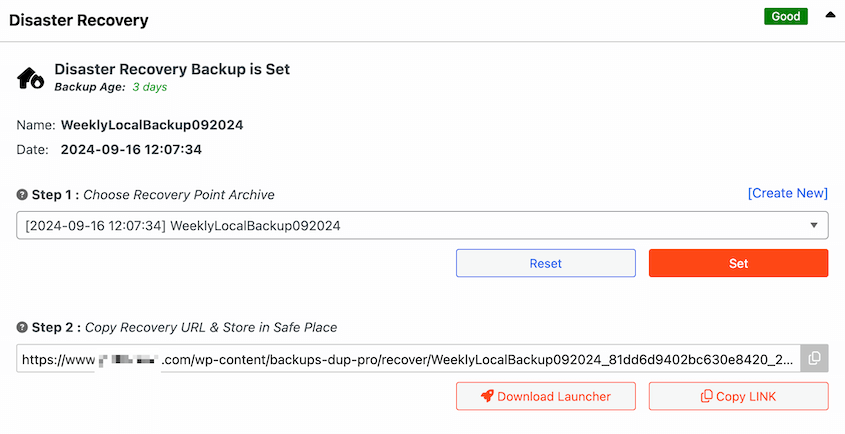
Before you import the file, consider setting a recovery point. Essentially, this involves using the most recent backup to recover your site if anything goes wrong.
After you configure the recovery point, copy the recovery URL and save it. When you’re ready to continue, click on Launch Installer.
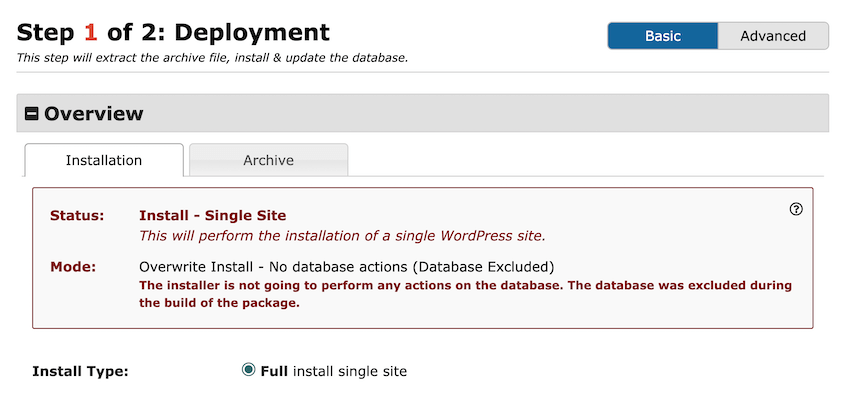
If you decided to exclude your database from your backup, Duplicator will only work as a file extractor. In the migration wizard, you’ll see that it won’t perform any actions on the current site’s database.
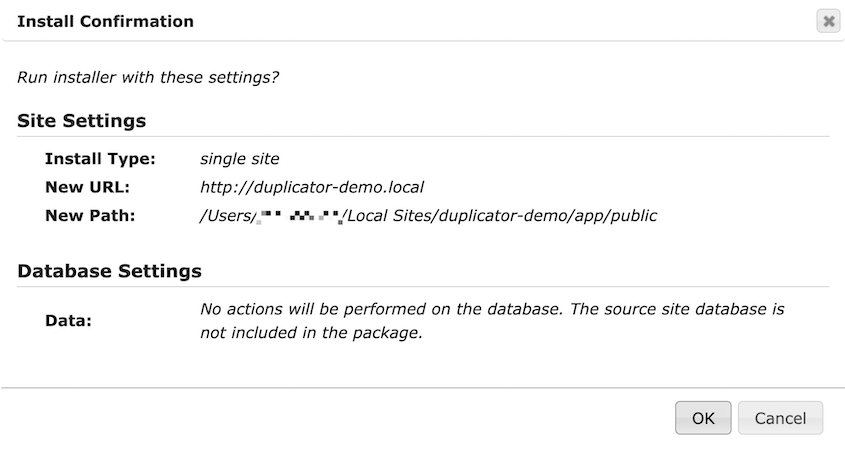
At the bottom of the page, accept the terms and notices and hit Next. A pop-up will appear asking you to confirm the install settings.
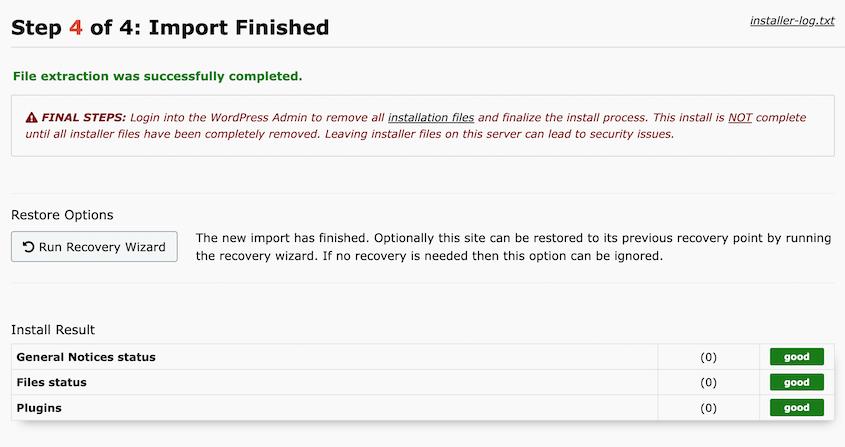
Now, Duplicator will automatically import all of the files in your backup. You’ll see a success message after this is complete.
To access your updated website, you’ll need to log back into the admin area.
Frequently Asked Questions (FAQs)
What is the best WordPress import plugin?
The best WordPress import plugin is Duplicator Pro. With this tool, you’ll be able to customize exactly what data you want to compress into a zip file. Then, you can drag and drop this into a new WordPress installation and use Duplicator to extract the files.
Alternative: WP All Import and CSV Importer are other import plugins. WP All Import is a popular option that can import XML and CSV files. It’s capable of importing data like posts, pages, taxonomies, custom post types, users, and WooCommerce products.
How do I import data into my WordPress site?
You can import data into your WordPress site by creating a custom archive file with Duplicator Pro. Then, drag and drop this file into another WordPress installation. Duplicator’s installer wizard will walk you through the rest of the data import process.
Alternatively, WordPress provides a built-in import tool to upload XML files to your site. This can import posts, pages, comments, categories, tags, and custom fields. However, you’ll need a more flexible tool if you want to migrate images and other files.
Then, log into the new WordPress website via FTP. Drag and drop your downloaded files into the uploads folder. Since your image links will still point to the original site, you’ll also need to update URLs after the migration.
How do I import an XML file into WordPress?
You can import an XML file into WordPress by finding Tools » Import. Run the WordPress importer and upload your XML file. Lastly, hit Upload file and import.
WordPress.org and WordPress.com have different ways of importing content. If you want to migrate to WordPress.com, go to Tools » Import » WordPress and enter your WordPress.org site address. Then, you can choose to import everything, or just posts, pages, comments, and media files.
Conclusion
You’ve just successfully imported files in WordPress!
While you’re here, you may also like these extra WordPress tips and tricks:
Do you want more flexible import options than what’s available in WordPress? Download Duplicator Pro to drag and drop custom file archives into any WordPress site!
Joella is a writer with years of experience in WordPress. At Duplicator, she specializes in site maintenance — from basic backups to large-scale migrations. Her ultimate goal is to make sure your WordPress website is safe and ready for growth.


